Posted on
April 29, 2024
As a developer at PlayStation, I’m usually coding things that involve a gamepad. So as I working in Blender recently, I wondered what it would be like to control it using using a game controller like my DualSense, and how it’d work to code that in Blender.
After a little research and tinkering, I got a proof of concept working where you can control the active camera using a gamepad. I thought I’d go over the process I followed, and what I learned about Blender’s architecture to get this working. And what other cool stuff you can do with this kind of architecture.
Want to try it out? Or look at the final code? You can find the source code on GitHub, it’s pretty tiny with 1 file and 1 dependency.
The Goal
I want to to use a gamepad to control Blender.
Sure I could also re-map my gamepad keys to Blender shortcut keys using an app like joytokey, but I wanted a deeper integration with the app.
What if I could have input based on context in the app - like controlling a camera when it’s selected, then controlling the modeling experience in edit mode?
But why settle for just gamepad input? Once you understand how to sync device input like this, you could extend this architecture to something like a MIDI keyboard (which is my next project…).
Does this exist already?
With any new project I do the obligatory “x and y” search to see if anyone has mixed the concepts together before. Pretty quickly it seems gamepad input was possible in Blender, and there were a couple open source libraries that served as “beta” / “experimental” examples.
I will say though, I tried not to look at most of these at first. I was more interested in approaching the problem myself and discovering the path — rather than using someone else’s stomped out path. The following breakdowns would come after a few rounds of prototyping and getting to at least a decent POC.
blender_gamepad_controls by oktomus was the first that caught my eye. It uses the inputs library to get gamepad input. And does it all using Blender’s app handlers combined with a neat “animation” trick I’ll discuss later (basically using the frame_count variable to get smoother movement). Notably this addon uses Python’s threading library to offset gamepad from the main thread.
Later on I discovered Erindale was working on a series on YouTube for getting a car to drive using gamepad input — all inside geometry nodes (of course lol). They wrote an XInputReader addon for Blender to sync gamepad input and create a geometry node to use the data. This addon uses the XInput library, which requires installation by the user (which triggers a pip install on the backend). It uses a very similar process that I ended up using, based on modal operators with timers. More on that later.
And there are a few paid Blender addons that look pretty cool and gave me inspiration on what I could achieve (despite not being able to see any source code).
The Approach
We’ll break this down into a few different parts.
- Getting gamepad input
- Syncing the gamepad input
- Displaying the input in Blender’s UI
- Using gamepad to control the camera
I’ll assume you have some basic knowledge of Blender’s addon development, but I will try to link to plenty of official docs and examples to help you understand all the intermediate and advanced concepts. I recommend checking out my previous blog articles on Blender addon development for more beginner friendly content to get you started.
Getting gamepad input
The first step is fairly obvious, we need to be able to get gamepad input data. Since Blender uses Python to write it’s addons, we need a Python library that’ll read gamepad data.
With a quick search of “python gamepad library”, you’ll probably stumble onto the inputs library - a cross platform solution (meaning it works on Windows, Mac, and Linux). There’s also an XInput-Python library, but this is limited to Windows only.
Installing external dependencies (the hard way)
So we have 2 external libraries we could use. But how do you use an external dependency in Blender? As someone who does a lot of JavaScript work, I wanted to just npm install the package and import it. This is possible in Python — you basically pip install instead. But how do you do this Blender?
Thanks to StackOverflow, we can see it’s pretty simple. You can use the subprocess module and Blender’s built-in Python executable to run CLI commands - like pip.
import subprocess
import sys
import os

python_exe = os.path.join(sys.prefix, 'bin', 'python.exe')

subprocess.call([python_exe, '-m', 'ensurepip'])
subprocess.call([python_exe, '-m', 'pip', 'install', '--upgrade', 'pip'])
subprocess.call([python_exe, '-m', 'pip', 'install', '--upgrade', 'Xinput-Python'])
But ideally you don’t want this to run every time the addon is loaded — so how do you handle this one-time initialization? Normally Blender addons create a new Panel in the UI with a button to install it, or they hide it in the addon settings. You can see this process with Erindale’s plugin.
The only caveat? You might need to run Blender in administrator mode to be able to do this.
Using bundled dependencies (the easy way)
Blender addons can be a single script, or a whole folder of Python scripts loaded from a single root __init__ script. This allows developers to separate their code into different files and keep things organized, and when they need a certain function or class they can import it.
This also works with 3rd party Python libraries. You can just copy and paste their Python code into your project and import whatever APIs you need access to.
So instead of going through the whole pip process, I opted to use the inputs library, which is a single file of code. I copied that single file over to my project and was able to import it relatively:
# Blender's API
import bpy
# The local inputs library
from .inputs import devices
With this setup I was able to use the library right away, no setup required for the user or weird admin permission problems. And it’s cross-platform, so it’d work on Mac and Linux as well.
Getting gamepad data
Now that I was using the inputs library, I checked out their Quick Start documentation for how to read gamepad input data. With 3 lines of code, I was able to get what I needed.
from inputs import devices
for device in devices:
	print(device)
But where does this code go? I created a UI panel to contain a test button, then I made an “operator” in Blender (basically a function) with the code above in it. Clicking the button runs our gamepad checking function.
from .inputs import devices

import bpy

class GamepadInputPanel(bpy.types.Panel):
    """Creates a Panel in the scene context of the properties editor"""
    bl_label = "Gamepad Input Example"
    bl_idname = "SCENE_PT_gamepad"
    bl_space_type = 'PROPERTIES'
    bl_region_type = 'WINDOW'
    bl_context = "output"

    def draw(self, context):
        layout = self.layout

        scene = context.scene

        # Different sizes in a row
        layout.label(text="Different button sizes:")
        row = layout.row(align=True)
        row.operator("wm.test_gamepad")

class WM_gamepad(bpy.types.Operator):
    bl_idname = "wm.test_gamepad"
    bl_label = "Test Gamepad"
    bl_description = "Test function click me"

    def execute(self, context: bpy.types.Context):

        print("Finding gamepads...")
        for device in devices:
            print("Gamepads found", device)

        return {"FINISHED"}

def register():
    bpy.utils.register_class(GamepadInputPanel)
    bpy.utils.register_class(WM_gamepad)

def unregister():
    bpy.utils.unregister_class(GamepadInputPanel)
    bpy.utils.unregister_class(WM_gamepad)

if __name__ == "__main__":
    register()
If you open the Blender log (Window > Toggle System Console) you should be able to see 3 different devices: your keyboard, mouse, and a gamepad.
💡 If you don’t see your gamepad try turning it on first, then booting up Blender. If that doesn’t work, make sure your device is compatible with XInput. For example, PlayStation devices require a 3rd party app (like DS4Windows) to map them to XInput - otherwise they won’t be detected. You might have encountered this using 3rd party controllers with PC games.
You can find this commit here.
I took this a step further and added a small vibration function just for fun. It’s a good way to check which controller is active:
class GI_gamepad(bpy.types.Operator):
    """Test function for gamepads"""
    bl_idname = "wm.test_gamepad"
    bl_label = "Test Gamepad"
    bl_description = "Vibrates active gamepad and shows data in console"

    def execute(self, context: bpy.types.Context):

        print("Finding gamepads...")
        for gamepad in devices:
            print("Gamepads found", gamepad.get_char_name())
            try:
                gamepad.set_vibration(0.5, 0.5, 420)
            except:
                print("Couldn't vibrate gamepad.")
            # print("Getting gamepad data...")
            # events = gamepad.read()
            # for event in events:
                # print(event.ev_type, event.code, event.state)

        return {"FINISHED"}
And one last tip. I mentioned we’re getting the keyboard and mouse in the device list. We can limit this to gamepads by using devices.gamepads instead — which filters the list for us.
Syncing gamepad input
Now that we have gamepad data inside Blender, how do we sync the input data? When I say sync, I mean when the user is pressing keys, how do we keep track of that?
Right now the function we created only runs when we press a button - and it only runs for 1 frame — meaning the user would have to mash the button constantly to consistently get gamepad data.
So I know what you’re probably thinking — what about running the function on an interval timer (like every 1/60 second it checks for gamepad data). In JavaScript we’d accomplish this using requestAnimationFrame or more crudely, setInterval. But what is the equivalent in Blender?
let interval = setInterval(() => {
  // get gamepad input
}, 0.1);
Application timers (the wrong way)
Initially I looked into Blender’s application timers, which is very similar to setTimeout or setInterval in JavaScript. This lets you define a function and then run it on a timer. In my case, I wanted it to run every 0.1 second or so.
import bpy

def every_2_seconds():
    print("Hello World")
    return 2.0

bpy.app.timers.register(every_2_seconds)
This worked, but you can quickly see we don’t have access to the Blender context here. This means we won’t be able to change anything about our scene based on the input. And even if we saved the input somewhere, and then created another timer function to act as the “renderer” function — it still doesn’t have access to the “context” (meaning no control over scene).
But what if we used the timer to run an operator — which does have access to the Blender context? This actually does work. Then we run into another issue: how do we prevent the function from running the whole time - even when the user might not want gamepad input? I added a global sync_enabled boolean flag that we flip using a button in the UI. This way the sync only runs when the user requests it — and we’re aware of it.
sync_enabled = False

# Timers
def sync_timer():
    global sync_enabled
    if sync_enabled:
        # Call sync function via timer
        bpy.ops.object.modal_operator('INVOKE_DEFAULT')
    return 0.1

bpy.app.timers.register(sync_timer)
This worked, but felt super hacky for a few different reasons.
Modal operators (almost right way)
Blender also has the concept of “modals” with their “operators” which are classes that run when the user interacts with the UI. For example, if you wanted to listen to the user’s mouse or keyboard input, you’d use a modal operator. You can see this example in Blender’s documentation where you can control an object’s position based on mouse position.
I recommend testing it out to see how the interaction actually works. You’ll notice that when you press the menu button to activate the modal it locks the UI — preventing you from interacting from anything. It’s because input like mouse movement and clicks are being sent to your modal code. Until you press the ESC or right click, you lose control somewhat of Blender.
So why don’t we piggyback off this and insert our gamepad reading logic here?
class GI_ModalOperator(bpy.types.Operator):
    bl_idname = "object.modal_operator"
    bl_label = "Gamepad Navigation"

    def __init__(self):
        print("Start")

    def __del__(self):
        print("End")

    def execute(self, context):
        # Sync gamepad input
        for gamepad in devices.gamepads:
            events = gamepad.read()
            for event in events:
                print(gamepad.get_char_name(), event.ev_type, event.code, event.state)

        return {'FINISHED'}

    def modal(self, context, event):
        # End loop if user cancels out
        if event.type == 'ESC':
            return {'FINISHED'}

        # The infinite loop
        self.execute(context)

        return {'RUNNING_MODAL'}

    def invoke(self, context, event):
        print("initial");
        self.execute(context)

        context.window_manager.modal_handler_add(self)
        return {'RUNNING_MODAL'}

# Menu item
def GI_gamepad_menu_item(self, context):
    self.layout.operator(GI_ModalOperator.bl_idname, text="Enable Gamepad Navigation")

# Register and add to the object menu (required to also use F3 search "Modal Operator" for quick access).
bpy.types.VIEW3D_MT_object.append(GI_gamepad_menu_item)
You can find this commit here.
This works… but also doesn’t. You do get gamepad input data streaming to the log — but only when the mouse is moving or keyboard is pressed. This won’t work for our purposes at all. I can’t expect the user to wiggle their mouse while also using the gamepad.
From here I tried combining timers and the modal operator (like I mentioned was possible above). This worked, but had some bugs. The timer kept creating new instances of the class, so there’s be 6 or so instances at any time. Meaning you’d have to mash the ESC key about 6 times in rapid succession to exit the app. Not good UX or performance.
Modal operators with timers (the right way)
What if modal operators could just have their own timer? They can. Yeah, I didn’t find it the first few passes through the API docs - but I finally found discovered it on a random StackOverflow example.
class GI_ModalOperator(bpy.types.Operator):
    """Gamepad syncing and camera movement"""
    bl_idname = "object.modal_operator"
    bl_label = "Gamepad Navigation"
    theta = 0
    analogMovementRate = 0.1

    _timer = None

    def modal(self, context, event):
        if event.type in {'RIGHTMOUSE', 'ESC'}:
            return self.cancel(context)
        if event.type == 'TIMER':

            # Sync gamepad input
            for gamepad in devices.gamepads:
                events = gamepad.read()
                for event in events:
                    print(gamepad.get_char_name(), event.ev_type, event.code, event.state)

        return {'PASS_THROUGH'}

    def execute(self, context):
        wm = context.window_manager
        self._timer = wm.event_timer_add(0.1, window=context.window)
        wm.modal_handler_add(self)
        return {'RUNNING_MODAL'}

    def cancel(self, context):
        wm = context.window_manager
        wm.event_timer_remove(self._timer)
        return {'FINISHED'}

# Add the menu item to use it (like above)
You setup the timer inside the modal’s execute() method (the one that runs when you call the operator usually - if not invoke()). In this method we use Blender’s window manager to create a new timer and store it as a class property _timer (and later to cancel() it). Then when the modal function is running, we return a PASS_THROUGH flag to let it know to block until we receive gamepad input. You could also swap this out to RUNNING_MODAL to fix that.
This works just like the hacky timer + operator combo I showed earlier, without the buggy multiple instances. You can also see this method in action in Erindale’s plugin.
With this in place, we can start having fun. Before we do I want to cover one more technique I discovered in my research that a few other addons use.
Frame based using Animation Timeline (alternative kinda)
One of the issues you’ll discover using the modal timer is the inconsistent frame rate for input. Since our modal is running as part of the UI, it’s lower priority, can often get blocked or block other things — it’s definitely not smooth butter 60fps. This becomes clear when you try to use gamepad input to animate things, it looks choppy to the user.
One workaround for this is to use the scene’s current frame_count and deltaTime to power animations. It’s very similar to how animations work in 3D and game engines like Unity or ThreeJS. This ensures our animations are more constant and accommodates for when 1 frame renders faster or slower than another. Learn more about delta timing here.
You multiply any calculations using the deltaTime to scale it based on the frame’s actual timing. So if it’s a faster frame, the same movement will be reduced to accommodate how fast it moves, so our object doesn’t speed up randomly.
time_then = self.time_now
self.time_now = datetime.now()
self.delta_time = (self.time_now - time_then).total_seconds()

# Use the delta_time to power an animation
new_fov = clamp(current_fov - left_y * self.delta_time, 0.00640536, 3.01675)
You can see this method in action with the blender_gamepad_controls and animation_nodes addons. Basically there’s an app handler for when the frame changes, and this runs a function to sync/animation/do stuff. This requires that in order for us to see gamepad input, the user needs to play the animation timeline so our plugin can have a constantly changing frame_count flowing to it.
Displaying input as UI
So how would you mirror the gamepad input to the UI so the user is able to see it? Ideally we’d want to render a graphic of a gamepad and light up the buttons as they’re pressed. But I’d also settle for just showing a list of buttons and true/false next to it.
💡 Spoilers: This doesn’t work very well for a few reasons. Blender doesn’t like to display custom images in the UI unless it’s loaded as a material texture preview or icon. And text properties don’t update fast enough to give reliable visual feedback. Feel free to keep reading if you’re interested in the process.
Storing input as UI properties
Initially I had stored the gamepad input data in a global dictionary/object called gamepad_input.
gamepad_input = {
    "up": False,
    "down": False,
    "left": False,
    "right": False,
}
This acted as a source of truth in the code to determine the current input (and compare to any new input). You can display this in a Blender UI panel, but the data won’t update regularly. Panel’s seem to be lazy loaded or respond to specific state changes (probably by assigning properties to the PropertyGroup types like BoolProperty()). In order to see changes regularly you need to move or click inside the panel to trigger a manual re-render.
Even if you do use properties to display the gamepad input, they still won’t update 60fps. And it’s a lot more overhead in your code (between scaffolding properties to the memory allocation).
class GI_SceneProperties(PropertyGroup):

    up: BoolProperty(
        name="Up",
        description="Up button on gamepad",
        default = False
        )
    down: BoolProperty(
        name="Down",
        description="Down button on gamepad",
        default = False
        )
    left: BoolProperty(
        name="Left",
        description="Left button on gamepad",
        default = False
        )
    right: BoolProperty(
        name="Right",
        description="Right button on gamepad",
        default = False
        )

class GI_ModalOperator(bpy.types.Operator):
    """Gamepad syncing and camera movement"""
    bl_idname = "object.modal_operator"
    bl_label = "Gamepad Navigation"
    theta = 0
    analogMovementRate = 0.1

    _timer = None

    def modal(self, context, event):
        if event.type in {'RIGHTMOUSE', 'ESC'}:
            return self.cancel(context)
        if event.type == 'TIMER':

		        # Grab the UI properties from scene context
            gamepad_data = context.scene.addon_gamepad

            # Sync gamepad input
            for gamepad in devices.gamepads:
                events = gamepad.read()
                for event in events:
                    # print(gamepad.get_char_name(), event.ev_type, event.code, event.state)
                    match event.code:
                        case "ABS_HAT0Y":
                            if(event.state == -1):
		                            # Update the UI properties
                                gamepad_data.up = True
So how do you display the data? I couldn’t say right now. In my short time experimenting I couldn’t find a reliable way of getting the UI refreshing more frequently.
Looking at Erindale’s addon it seems they insert an Empty object into the scene and store the gamepad input properties directly on the Empty (so like emptyObject['leftTrigger'] = 230.0). Then in the UI they grab the Empty from the scene context, and loop over it’s properties using emptyObject.items() method. This definitely seems hacky, but if it works it works.
💡 I think they do this moreso keep the scene synced with input — as there’s also a line of code somewhere with a comment mentioning they mutate the empty’s
locationto force a scene re-render.
Displaying images in Blender UI (short answer: don’t)
Blender addons are able to render images in a couple different ways. You can create icons that can be used inside buttons, or you can create “thumbnails” using template_preview (like the preview image of your material or texture you see in the Asset Browser). Neither of these options are suitable for large scale images. Both show up blurry and pixelated when scaled past a certain range. And you don’t have amazing control over them (like rendering an SVG and updating colors, or layering transparent multiple images absolutely).
Here’s a working example of using template_preview() to display an image we load as a texture. You can run this in the Scripting tab by pressing New, pasting this in, pressing the Run button (has a play icon), and then checking the Properties window and Scene tab (the cone with 2 spheres).
import bpy
# import os

class LayoutDemoPanel(bpy.types.Panel):
    """Creates a Panel in the scene context of the properties editor"""
    bl_label = "Layout Demo"
    bl_idname = "SCENE_PT_layout"
    bl_space_type = 'PROPERTIES'
    bl_region_type = 'WINDOW'
    bl_context = "scene"

    def __init__(self):
		    # Ideally load relative to plugin
        # assets_dir = os.path.join(os.path.dirname(__file__), "assets")
        # image = bpy.data.images.load(os.path.join(assets_dir, "gamepad.png"))

        # but if running in the scripting window - this works for debug
        image = bpy.data.images.load("J:/Development/Blender/gamepad-input-example/assets/gamepad.png")

        texture = bpy.data.textures.new(name="previewTexture", type="IMAGE")
        texture.image = image
        texture.extension = 'CLIP'

    def draw(self, context):
        layout = self.layout

        scene = context.scene

        # Different sizes in a row
        layout.label(text="Different button sizes:")
        row = layout.row(align=True)
        row.operator("render.render")

        sub = row.row()
        sub.scale_x = 2.0
        sub.operator("render.render")

        row.operator("render.render")


        layout.label(text="Image")

        row = layout.row()
        row.template_preview(bpy.data.textures['previewTexture'])

def register():
    bpy.utils.register_class(LayoutDemoPanel)

def unregister():
    bpy.utils.unregister_class(LayoutDemoPanel)

if __name__ == "__main__":
    register()
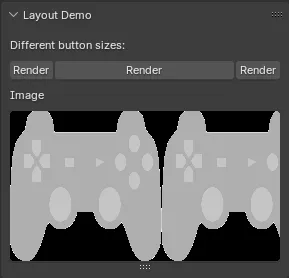
A gamepad png rendered inside the UI panel. This is before CLIP was applied on the texture.
As you can see it works, but it’s be impossible to light up different buttons without having 100 different variation images or something.
Ideally you could use this to create individual icons for buttons or labels (like a little up icon for up on the d-pad).
According to some StackOverflow you’re also able to render images using the GPU and shaders. Though I personally couldn’t get this technique working, and even the post mentioned it’s a difficult one to actually work (like resizing the panel would probably break image or limit image size).
import bpy
import gpu
import bgl
from gpu_extras.batch import batch_for_shader

def draw():
        x1 = 0
        x2 = 200 # width
        y1 = 0
        y2 = 200 # height

        shader = gpu.shader.from_builtin('IMAGE')
        batch = batch_for_shader(
            shader, 'TRI_FAN',
            {
                "pos": ((x1, y1), (x2, y1), (x2, y2), (x1, y2)),
                "texCoord": ((0, 0), (1, 0), (1, 1), (0, 1)),
            },
        )

        # path to the folder where the icon is
        # the path is calculated relative to this py file inside the addon folder
        assets_dir = os.path.join(os.path.dirname(__file__), "assets")
        image = bpy.data.images.load(os.path.join(assets_dir, "gamepad.png"))

        if image.gl_load():
            return # an exception happened

        bgl.glActiveTexture(bgl.GL_TEXTURE0)
        bgl.glBindTexture(bgl.GL_TEXTURE_2D, image.bindcode)
        shader.bind()
        shader.uniform_int("image", 0)
        batch.draw(shader)

        image.gl_free()
I kept getting an error saying the bgl was a NoneType?
As you can see, rendering images outside of the expected ways (like a material or texture previewer) will be difficult and fairly limited.
Using gamepad input
While displaying the input in the UI was a challenge, using the gamepad input to do stuff with the Blender API was much simpler.
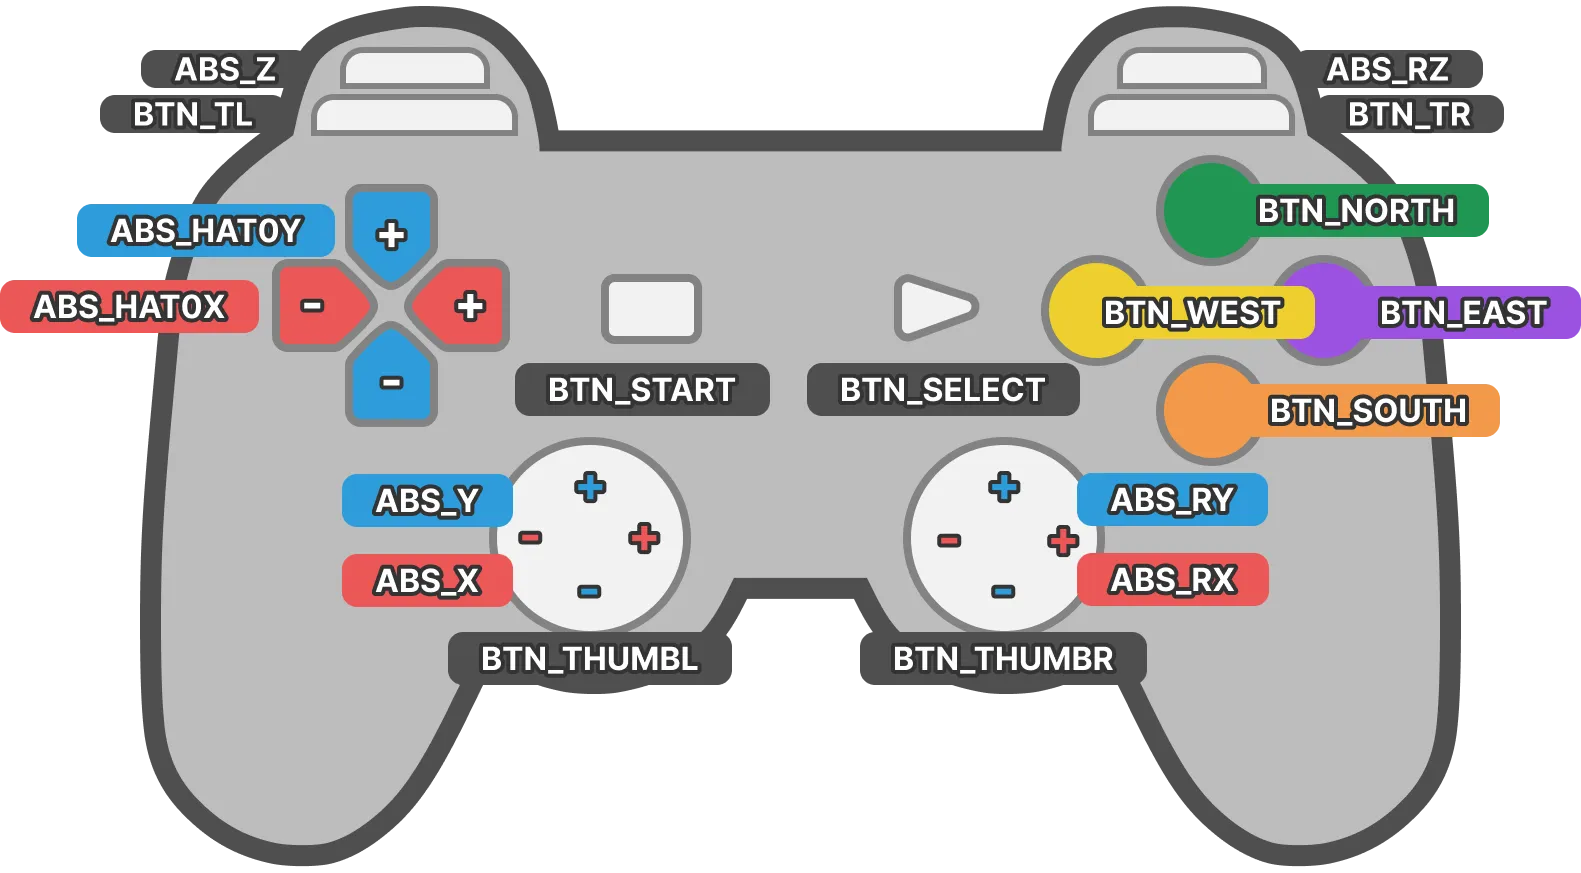
When I say use gamepad input, we’ll be querying for the all gamepads, and then we’ll loop over any buttons that were marked as pressed. We do this using the gamepad.read() method, which returns the input data as event “codes” (button ID’s like BTN_SOUTH for the Cross button on PlayStation) and “state” (true, false, or maybe decimal numbers for pressure sensitive buttons like 203.30).
for gamepad in devices.gamepads:
    events = gamepad.read()
    for event in events:
        print(gamepad.get_char_name(), event.ev_type, event.code, event.state)

        # Check what button was pressed
        match event.code:
		       # D-pad - Vertical movement (up and down)
            case "ABS_Y":
	            print("[GAMEPAD] Up / Down Pressed")
            case "BTN_SOUTH":
	            print("[GAMEPAD] X Pressed")
With this in place you should be able to log out any button presses and map out the rest of the input map with the match statement. Maybe the most fun part, you can just mash every button (systematically ideally 😂) and figure out what each button code is. For reference, I made a diagram:
So what can we do with this kind of input? Let’s move the camera around.
Ideally I want to move whatever the user is looking at. In some cases this is the camera, but in others it’s the “viewport”. In Blender this is the “debug” camera you use to navigate a scene in a 3D viewport. I call it debug because if you render your scene, you won’t see what you see in the viewport — you see what’s happening through the active camera.
I first explored moving and rotating the viewport, then moved onto the active camera once I discovered how difficult the viewport was.
Moving the viewport
My first goal was to take the analog stick movement and translate it to move the viewport. Not the camera, but the actual 3D viewport itself (like when you click around inside to rotate). This proved to be very difficult in Blender.
Targeting the 3D viewport was a little tricky, but not too difficult. Ultimately your goal is to find a 3D viewport to control. In my case, I just wanted the first one — but I found clever ways online to determine which viewport was selected by grabbing the user’s mouse input and comparing it to each viewports size (a bit overkill for my MVP).
Using the Blender context I was able to grab all the current screen “areas” (bpy.context.screen.areas). This was a “list” (aka array), which I I filtered by the type property - checking for VIEW_3D (aka 3D viewports). To get the “camera” data (position, rotation, etc) from the viewport we drill down to the region_3d property of the first area we find.
# Find a viewport
# We check the context for screen areas, and specifically 3D viewports
currentArea = [area for area in bpy.context.screen.areas if area.type == 'VIEW_3D']
if len(currentArea) == 0:
        return
# Then we grab the Region3D view, which has camera-like data
viewport = currentArea[0].spaces.active.region_3d
Now that we had the viewport, we need to move the viewport around. Unlike the camera, the viewport stores all it’s positional data as a matrix. There’s no convenient location.x or rotation.z type properties we can mutate.
So how we deal with matrices? We can use the numpy library, which is a math utility library to parse and work with matrices. Luckily it comes built-in with newer versions of Blender (3.0 and greater?) — so you can just import numpy and use any methods you need.
In our case, we want get the camera position matrix - which is stored in the view_location property. To be able to work with this matrix, let’s use the numpy.array() method. This converts the data into a 3D matrix made up of arrays (aka a type that looks like Array<Array<number>[3]>[3] ) will let us throw the position into other matrix math operations (like dot()).
# How much we want the camera to rotate. Higher number means more rotation
inputForce = 0

# Sync gamepad input
for gamepad in devices.gamepads:
    events = gamepad.read()
    for event in events:
        print(gamepad.get_char_name(), event.ev_type, event.code, event.state)

        # Check what button was pressed
        match event.code:
		       # D-pad - Vertical movement (up and down)
            case "ABS_Y":
		            # Up and down movement share button code
		            # Up = -1, Down = 1, and no input / centered is 0.
                if(event.state < -1):
                    inputForce = math.radians(event.state / 30000 * 180)
                    print("[GAMEPAD] Down Pressed", inputForce)
                elif(event.state > 1):
                    inputForce = math.radians(event.state / 30000 * 180)
                    print("[GAMEPAD] Up Pressed", inputForce)

# Get the angle of rotation based on how much "force" we applied
newTheta = self.theta * inputForce

# Create a new 3D rotation matrix
rotationMatrix = numpy.array(
    [
       [math.cos(newTheta), -math.sin(newTheta), 0],
       [math.sin(newTheta), math.cos(newTheta), 0],
       [0,0,1]
    ]
)

# Update the viewport position with the new rotation
# We take the "origin" (aka original position) and do a `dot()` against the rotation
viewport.view_location = numpy.dot(cameraOrigin, rotationMatrix)
print("new location", numpy.dot(cameraOrigin, rotationMatrix))
This didn’t work too well for me, even when I hardcoded some matrices. Not sure what I might have targeted incorrectly — but I couldn’t seem to mutate the view_location — it kept returning the original position (as you can see with that print() at the bottom).
At this point I was losing steam so I moved onto the camera to get an “easy win”.
You can find this commit here.
Moving the camera
After approaching the most difficult problem first, I switched to the easier task: moving the active camera with the gamepad. This was a cake walk in comparison.
Get the active camera:
camera = context.scene.cameraStore the input data to use later.
rotationX = 0.0
rotationY = 0.0
rotationZ = 0.0
navHorizontal = 0.0
navVertical = 0.0
navDepth = 0.0

# Sync gamepad input
for gamepad in devices.gamepads:
    events = gamepad.read()
    for event in events:
        # print(gamepad.get_char_name(), event.ev_type, event.code, event.state)
        match event.code:
		        # D-pad - Up and down
            case "ABS_HAT0Y":
                if(event.state == -1):
                    navVertical = self.analogMovementRate
                    gamepad_data["up"] = True
                elif(event.state == 1):
                    navVertical = -self.analogMovementRate
                    gamepad_data["down"] = True
                elif(event.state == 0):
                    gamepad_data["up"] = False
                    gamepad_data["down"] = False
	          # Left analog stick
            case "ABS_Y":
                if(event.state != 0):
                    rotationY = math.radians(event.state / 30000)
                    # print("[GAMEPAD] Analog vertical Pressed", rotationY)
	          # Right analog stick
            case "ABS_X":
                if(event.state != 0):
                    rotationX = math.radians(event.state / 30000)
                    # print("[GAMEPAD] Analog horizontal Pressed", rotationX)
	          # Left trigger
            case "ABS_Z":
                if(event.state != 0):
                    rotationZ = math.radians(event.state / 255)
                    # print("[GAMEPAD] Left Trigger Pressed", rotationZ)
	          # Right trigger
            case "ABS_RZ":
                if(event.state != 0):
                    rotationZ = -math.radians(event.state / 255)
                    # print("[GAMEPAD] Left Trigger Pressed", rotationZ)
We’ll use a analogMovementRate property to move our camera by a certain number of increments (like 10 units at a time). Then since we’re moving a camera in a 2D axis, we can get away with only 2 variables for movement math — navHorizontal and navVertical. When we want to move one direction it’ll be a negative value, and the opposite direction will be positive (e.g. down = negative, up = positive). So when we do the math on the camera, we can just add our value to the x and y values and it’ll shift in the right direction.
💡 I didn’t mention it earlier, but when you log out the analog sticks, they return values that range from about
-30,000and30,000. We normalize the value, which means we’ll divide the button state by this “max” range to get a number between-1and1instead. That way the math is more manageable and we’re not moving things huge distances accidentally. Similarly we do this with the triggers, which range from0to255.
Mutate the camera position and rotation properties directly as needed:
# Set camera rotation in euler angles
camera.rotation_mode = 'XYZ'
camera.rotation_euler[0] += rotationX
camera.rotation_euler[1] += rotationY
camera.rotation_euler[2] += rotationZ

# Set camera translation
camera.location.x += navHorizontal
camera.location.y += navVertical
camera.location.z += navDepth
Done. Camera movement synced to gamepad. Way easier than the previous way right? Albeit choppy like I mentioned before.
Optimizations
Multi-threading
I mentioned earlier that the blender_gamepad_controls addon uses Pythons built-in multi-threading library threading to offset the gamepad syncing to another thread. This alleviates the main thread, which can easily become blocked by a timer running functions constantly.
Why would we do this? Well, if you try the plugin before this point, you’ll notice it’s choppy and blocks Blender’s own operations on the main thread. After we implement this, everything will run super smooth.
How do you create a thread? And can you still access Blender context inside of it? (TLDR: nope)
import threading

def init():
	self._thread_flag= threading.Event()
	self._thread= threading.Thread(target=self._sync_gamepad, args=(self._thread_flag,))
	self._thread.daemon = True # used to kill thread if Blender closes
	self._thread.start()
Let’s break down this code inspired by the addon to understand what’s going on.
Ultimately we need to create a new thread to do stuff on. We do this using threading.Thread(). This function takes a target which is the function we want to run on another thread. We use a function that’s a private method on our class (let’s us do cool stuff later).
And an args which represents properties we can send over to the function we’re firing in the thread (so in this case _sync_gamepad(_thread_flag)).
We store the thread as a property on the class itself self._thread (aka our modal operator, or maybe a wrapper class around your game controller) to use for later.
For the args you can see we pass a _thread_flag - which we also store on as a class property. This flag is created using a threading event object (threading.Event() function), that’s basically a convenience wrapper around an event flag (basically 0, 1 or 2 to represent different states). It has functions like set() or wait() to change it’s state and let the thread know it’s processing or not.
Then we can start() our thread to let it run.
Syncing inside the thread
So we have a new thread, and a function running inside it — how do we sync gamepad input from there?
Since it’s a separate thread, we don’t have to worry about blocking, so we can do things like a while loop that runs until we say so. In this case, we can use the thread’s Event flag (_thread_flag) and check if the thread is supposed to be running or not. And since the function we’re running inside the thread is technically part of our class, we can use the self property to access private methods, a sync() we could use to sync data.
def _sync_gamepad(self, thread_flag):
    while not thread_flag.is_set():
		  print("Syncing gamepad")
		  self._sync()
You’ll quickly notice though, we don’t have access to the scene context in a thread. This means that we need to store our gamepad input data somewhere the modal operator with timer (or app handler) can access so they can handle modifying the scene.
Previously I was using a global variable to store the gamepad input data, but I’m pretty sure threads can’t access those (or it wouldn’t be a good idea). So the gamepad input data needs to be wrapped in it’s own class now, where it can also contain this thread logic.
class GamepadInput():
	def __init__(self):
		# Initialize input properties
		self.up = False;
		self.down = False;
		self.left_joystick = 0.0;
		self.right_joystick = 0.0;

		# Thread stuff from above

	def _sync_gamepad():
		# `while` loop code from above
And this class would be stored as a property inside the modal operator (like self.gamepad). That way we can keep track of it’s input, and control it’s lifecycle along with our modal (ideally stopping the thread when we ESC out).
# Inside our modal operator
def execute(self, context):
    # Create the timer
    wm = context.window_manager
    self._timer = wm.event_timer_add(0.1, window=context.window)
    wm.modal_handler_add(self)

    # Create the gamepad only when running modal
    # (only do this if you disable the global one below)
    self.gamepad = GamepadInput()

    return {'RUNNING_MODAL'}

def cancel(self, context):
    # Remove timer
    wm = context.window_manager
    wm.event_timer_remove(self._timer)

    # Release gamepad class and threads
    self.gamepad.stop()
    del self.gamepad

    return {'FINISHED'}
Or, we can now enable gamepad input globally, so that any modal operator or UI panel could use it by attaching the class to our scene object when we register our addon’s classes initially. Keep in mind this does make Blender a little slower (especially on startup) since you’re constantly running your sync code.
def register():
    from bpy.utils import register_class
    for cls in classes:
        register_class(cls)

    # If you wanted global gamepad input, you can enable it here
    # to be active all the time instead of only when modal is running
    bpy.types.Scene.gamepad_input = GamepadInput()

def unregister():
    from bpy.utils import unregister_class
    for cls in reversed(classes):
        unregister_class(cls)

    # Delete the class from scene
    # Ideally you'd want to run the `stop()` before this
    del bpy.types.Scene.gamepad_input
This improves performance immensely. Instead of having choppy movement, we now have much smoother navigation with our camera.
And for reference, here’s what it looks like using our new GamepadInput class instead querying the gamepads directly in the modal:
    def modal(self, context, event):
        if event.type in {'RIGHTMOUSE', 'ESC'}:
            return self.cancel(context)
        if event.type == 'TIMER':
		        # Global version
            # gamepad_input = context.scene.gamepad_input
            # Local version
            gamepad_input = self.gamepad

            if gamepad_input.up:
                navVertical = self.analogMovementRate
                print("[GAMEPAD] Pressed up")
            if gamepad_input.down:
                navVertical = -self.analogMovementRate
                print("[GAMEPAD] Pressed down")
            if gamepad_input.left:
                navHorizontal = self.analogMovementRate
                print("[GAMEPAD] Pressed left")
            if gamepad_input.right:
                navHorizontal = -self.analogMovementRate
                print("[GAMEPAD] Pressed right")
Much cleaner and reusable, we don’t have to do any weird conditional math to figure out directions (at least not on this level lol).
I tried wiring this up to the UI panel to see the input update live - but it didn’t update the UI at all. Storing the gamepad input in the scene context wasn’t enough to trigger UI updates. Doesn’t seem possible without using PropertyGroup or Erindale’s Empty object hack. Here was my code for reference:
class GI_GamepadInputPanel(bpy.types.Panel):
    """Creates a Panel in the scene context of the properties editor"""
    bl_label = "Gamepad Input Example"
    bl_idname = "SCENE_PT_gamepad"
    bl_space_type = 'PROPERTIES'
    bl_region_type = 'WINDOW'
    bl_context = "output"

    def draw(self, context):
        layout = self.layout

        scene = context.scene
        gamepad = scene.gamepad_input

        row = layout.row()
        # Since we don't have Blender's special mutable properties
        # we just display text conditionally
        up_text = "True" if gamepad.up else "False"
        row.label(text="Up:" + up_text)
        down_text = "True" if gamepad.down else "False"
        row.label(text="Down:" + down_text)
You can find this commit here.
Tips and tricks
How to store a list of gamepads
What if the user has multiple gamepads connected to their computer for whatever reason, and they need to switch between devices?
We can create a Blender PropertyGroup with an EnumProperty to store a dropdown list of options. And we need to hydrate the list dynamically using the gamepads, and keep it synced up to date. Luckily the EnumProperty method accepts a callback for the items argument, meaning you can create a function that returns the dropdown data (massaged into an array of tuples).
But how do we keep track of them? I grab the array of gamepads from devices and use Python’s enumerate() to create a number to represent the array index (0, 1, 2, etc). With the index and the name, that’s all you need to create a dropdown item. I do it all inside a fancy inline for loop so it can make debugging like 50% harder but reading 50% easier (”tradeoffs”).
# Creates dropdown items formatted as an array of tuples
def gamepad_items(self, context):
    items = [(str(index), gamepad.get_char_name(), "") for index, gamepad in enumerate(devices.gamepads)]
    return items

# UI properties
class GI_SceneProperties(PropertyGroup):
    active_gamepad: EnumProperty(
        name="Active Gamepad",
        description="Gamepad used for control",
        items=gamepad_items
        )

def register():
		# Add properties to scene context
    bpy.types.Scene.gamepad_props = PointerProperty(type=GI_SceneProperties)
Now when we’re using the gamepad, we just check the scene context for the active_gamepad property we created to determine the current gamepad index to grab:
class GI_gamepad(bpy.types.Operator):
    """Test function for gamepads"""
    bl_idname = "wm.test_gamepad"
    bl_label = "Test Gamepad"
    bl_description = "Vibrates active gamepad and shows data in console"

    def execute(self, context: bpy.types.Context):

        print("Finding gamepads...")
        current_gamepad = context.scene.gamepad_props.active_gamepad
        print("active gamepad", current_gamepad)
        try:
            devices.gamepads[int(current_gamepad)].set_vibration(0.5, 0.5, 420)
        except:
            print("Couldn't vibrate gamepad.")

        return {"FINISHED"}
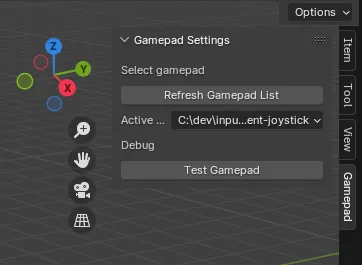
Screenshot of the UI panel with a dropdown for active gamepad
And of course, when we create our modal and initialize our GamepadInput class now, we’d want to pass an active gamepad index. That way it can know which gamepad input data to store (instead of just grabbing the first one).
class GamepadInput():
    def __init__(self, index) -> None:
        self.gamepad_index = index

    def _sync_gamepad_data(self):
        # Sync gamepad input
        gamepad = devices.gamepads[int(self.gamepad_index)]
        events = gamepad.read()
You can find this commit here.
What’s next?
Now that the core functionality has been ironed out, I’m interested in adapting the tool to some specific situations. Like I mentioned in the intro, context specific controls would be fantastic for controlling the camera in Layout mode — but then adapting to Edit mode and enhancing modeling workflows. I see this as an accessibility tool that can provide users with a different way to approach their Blender workflow.
I’m also looking into adapting this architecture to other device based addons like a MIDI plugin for instruments (like music keyboards and drum pads). I’ve been looking for ways to sync up MIDI playback with Blender animations and this is a great way to read MIDI data and translate to keyframes.
Let me know what you build after reading this. I’m always curious to see what people are working on. And of course, if you have any comments or questions feel free to reach out on Threads, Mastodon, or Twitter.
Stay curious,
Ryo