Posted on
July 15, 2025
As I’ve been working with the Web Audio API, I’ve become most interested in the Web Worklet API that lets you process audio on a separate thread. This makes audio apps run meaner and leaner by moving heavier operations off the main thread, allowing you to do more (like rendering UI or handling other interactions).
One way to step this up to the next level is combining the Web Audio worklet with WASM (or WebAssembly), a way to run native languages on the web. Rather than crunching numbers with JavaScript, we can pass the data to a “native” layer and have a language like C++ or Rust handle it. If I told you this improves performance you’d say I was mad, but WASM actually improves performance by circumventing many of the pitfalls JavaScript comes packed in with (like garbage collection).
That’s why I made clawdio - a JavaScript library that lets you use Web Audio worklets that process audio using Rust (through WASM). It provides easy to use modules, like a Bitcrusher node, that adds a “crunchy” or “pixelated” effect to audio. You can chain these nodes into a Web Audio context, and they’ll handle the dirty work of initializing the WASM-based web worklets for you.
In this blog I’ll go over the process of putting together the library, and all the challenges I tackled in the creation. From bundling Rust code to WASM, to setting up Vite properly to distribute WASM and audio workers — we’ll go over lots of great tips for creating an NPM library with web workers.
You can browse the full source code for reference. And you can see the library and the Bitcrusher effect in action in the example app.
⚠️ This article is the second in a series about using Rust and WASM for Web Audio. If you’re interested in learning the basics of audio worklets and how to bundle Rust code into WASM, check out the first blog post.
High level architecture
Ultimately we need to ship Web Audio worklets written in JavaScript and WASM bundles to NPM. Based on the last tutorial, we can basically combine the two repos we created (the Rust and JS) and combine them into one. We know that we’ll need a folder dedicated to our Rust project. And then the frontend JavaScript code will be a separate folder, that relies on WASM generated by the Rust project.
Here’s the top level structure of the code:
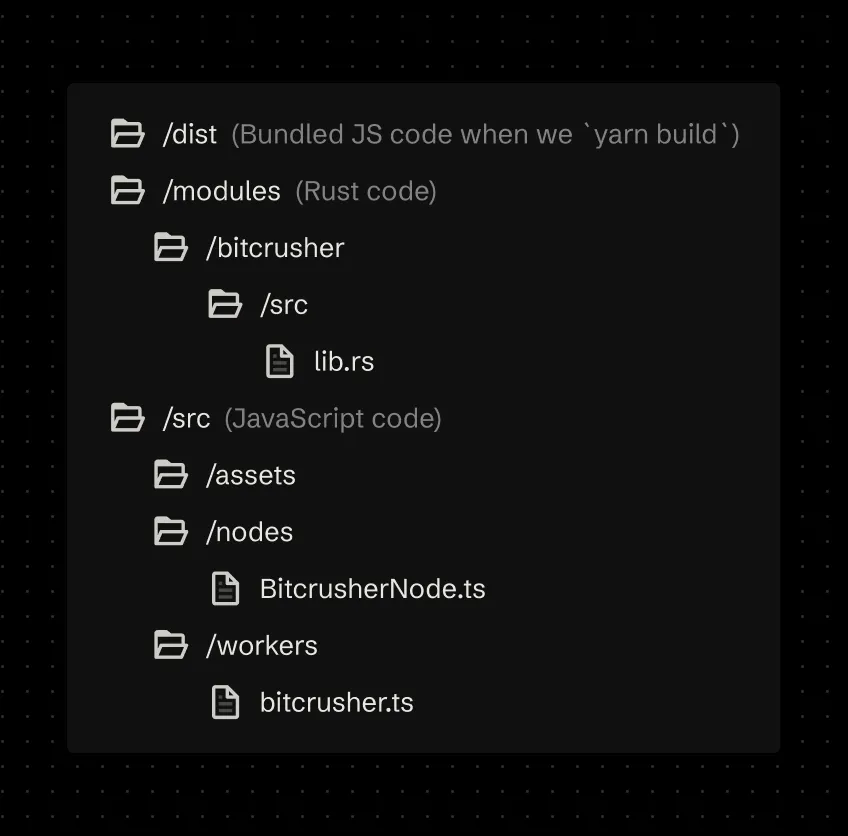
When we want to write Rust code, we’ll do it inside /modules/ folder. We’ll also create a separate folder for each WASM module so we can separate each module into it’s own WASM bundle, instead of having one big one to load all the effects.
The JavaScript code that gets released to NPM will be kept inside a /src/ directory (basically the default folder for a Vite project - or most JS projects). We’ll have a folder dedicated to our “worklets” or /workers/ and another folder called /nodes/ to contain a convenient custom Audio Node that initializes the worklet properly for the user.
When we finally build our JS library, it’ll get placed inside a /dist folder that will be released to NPM.
📁 I end up using a monorepo setup later, but this fundamental architecture doesn’t change, just moves folders if anything.
Creating a WASM-powered library
Project Setup
Like I mentioned before, this article is a continuation of my previous blog post, so I’ll be using most of that work as the basis for this one. That means I’ll be using my rust-wasm-library-template to handle bundling Rust code to WASM.
Why WASM? I’ve covered this topic in my previous article, check it out for an in-depth breakdown of the benefits.
And for releasing my library to NPM, so I’ll use my react-vite-library-boilerplate to simplify bundling JS code and automating the release to NPM using GitHub Actions. You can see a breakdown of this template here.
I created a new folder for the project, then created a /modules/ folder inside that, and git clone’d the Rust WASM library into there (without a .git repo inside - no need for submodules). Then I copied over the JS Vite template into the root folder.
With this setup, we have Rust code that can bundle to WASM, and a separate JS library that can release to NPM. Let’s put those together.
You can see the commit here for this initial phase.
Building Rust modules
We have Rust modules that need to bundle into WASM and JS, and each module is it’s own dedicated Rust project. To bundle these projects, we run the wasm-pack CLI.
And ideally, all these modules are necessary for the JS code, so they should bundle before the JS code bundles, because the JS code will import it.
We can make a little Node script that walks through the /modules/ folder and builds each project inside using the wasm-pack CLI.
import { execFileSync } from "child_process";
import { copyFileSync, readdirSync } from "fs";
import path from "path";

/**
 * This file handles building the Rust code into WASM and JS,
 * and copies the WASM to the root asset folder (`/public`)
 * so we can distribute them with library.
 */

const log = (...props) => console.log("[CLAWDIO/BUILD]", ...props);

log("Starting build");

// 1️⃣ Build all WASM modules

// Get all modules
const modules = readdirSync("./modules");
log("Processing Rust modules: ", modules);

modules.forEach((moduleName) => {
  // wasm-pack build --target web
  execFileSync("wasm-pack", [
    "build",
    `./modules/${moduleName}/`,
    "--target",
    "web",
  ]);
});

log("Build completed successfully 👏🎉");
Then we can add this to the root package.json to build Rust code using yarn build:modules
"scripts": {
  "build:modules": "node scripts/build.js",
}
Now whenever we want to build our library, we’ll run yarn build:modules then yarn build.
Linking modules
So how does the JS code get access to the Rust code?
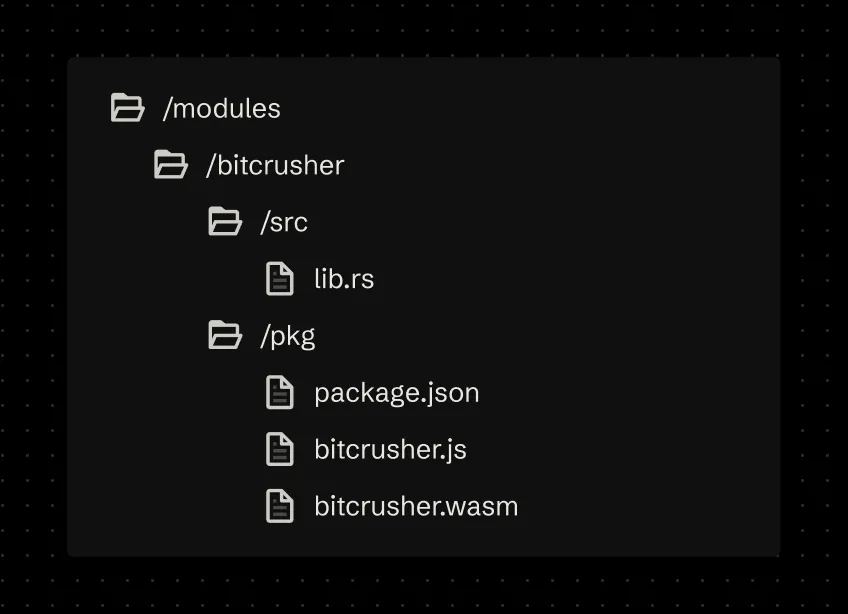
In the previous blog post, I cover how the wasm-pack library bundles the Rust code as a binary .wasm file, and it also outputs a nice .js file that initializes the WASM and exposes the module on the JS layer. This gets generated inside a /pkg folder inside the Rust project alongside a package.json so we can release it independently to NPM if we needed.
To use the Rust code, we’ll want to import the .js code via the auto-generated WASM package.json from that /pkg folder.
Normally I’d setup a monorepo, but NPM has recently started to support local dependencies using the file: syntax. Inside the root folder’s package.json, I added a new dependency for the Rust module and instead of using a version, I passed the path to the compiled Rust module file:./modules/module-name/pkg/.
{
  "name": "clawdio",
  "dependencies": {
    "clawdio-bitcrusher": "file:./modules/bitcrusher/pkg",
This worked great, and let me import the WASM initialization code in my frontend JS project.
// The Rust module (technically the `package.json` inside `/pkg` folder)
import init, { BitcrusherModule } from "clawdio-bitcrusher";

// Later in the web worklet
init();
Monorepo for release though
Despite this working great for local development, this setup quickly fell apart during the release workflow. When publishing the library to NPM, I received an error that it couldn’t find the WASM dependency, and it was looking in the root of my new project folder (because of the relative file: path).
The solution was exactly what I was trying to avoid, a classic monorepo setup. I went with my tried and true architecture using Yarn v1’s Workspaces feature. This hoists a few folders I specify (like /packages/ or /modules/*/pkg to include the WASM libraries), and lets the build system use them instead of downloading the dependency from NPM.
You can see the major shift to monorepo in this commit.
Importing workers
We’re using AudioWorkletNode, which is a kind of “web worker” that takes code and runs it in a separate thread. When we initialize the worklet node, we need to pass a file path to this worklet/worker.
In the previous blog, I used Vite as my build system, and I was able to leverage their ?url parameter to get a file path to the web worker. This is required for initializing Web Worklets (and Web Workers in general) - they usually take a whole JS file and then run that in their own isolated JS context. You can learn more about this process in the Vite docs here.
Missing Typescript types
I was having issues initially using the ?url parameter, I kept getting TS errors. It seems that you need to explicitly include the Vite types into your tsconfig.json to inform Typescript that import paths might include Vite-specific parameters.
{
  "compilerOptions": {
    "types": ["vite/client"],
Exporting workers as assets
Though I was still having issues with this setup. Ideally, when the library builds, the audio worklet should become a separate JS file. This is because we need to have a path to it for our audio worklet node. It shouldn’t be embedded alongside our library code (aka one big clawdio.es.js file), or the audio worklet won’t be able to start correctly.
Vite supports this setup by adding the ?worker parameter to an import path. This ensures the file gets bundles separately. And when we combine it with the ?url (making it ?worker&url - like URL params on the web) — we’re able to get a file path to the worklet JS file in our bundle. Learn more about using web workers in Vite here.
import BitcrusherWorklet from "@/workers/bitcrusher.ts?worker&url";

// Create the worklet
console.log("creating worklet...");
try {
  // Resolve the URL relative to the current module
  await audioCtx.audioWorklet.addModule(BitcrusherWorklet);
Cool, now the bitcrusher.ts file is compiled to JavaScript by Vite, and it handles all the import to the Rust module adding that too. If you run a build you should see a new assets/bitcrusher.js appear in the /dist folder.
IIFE vs Module Workers
But wait, if we look at the bundled code for the worker, we can see that it’s wrapped in an IIFE function (a function that immediately runs when imported). This is because Vite expects you to initialize your worker using a new Worker() syntax.
() => {
	// our worker code
	class T extends AudioWorkletProcessor {}
}();
We don’t want this. We just need the worker compiled separately, and as raw JS that the Audio Worklet can load as a module.
We can fix this by adding one line to our Vite config:
export default defineConfig({
  worker: {
    format: "es",
Now if we check the final worker bundle the code should look normal, with our AudioWorkletProcessor class available at the root level of the document.
Preventing base64 WASM
If inspect the main library’s bundle, we’ll notice one key issue. Since we import our WASM initialization script in our worker, it appends it to the bundle. This is to be expected (and kinda what we want) - but there’s a big issue with the bundle - a literal big issue: our WASM file has been inlined as a base64 file.
// Inside the final JS bundle in `/dist/`
// This goes on for 100+ lines, shortened for sanity
W = "data:video/mp2t;base64,
It basically means the entire WASM file is inside the worker file, bloating it’s file size to 25kb:
[vite:dts] Start generate declaration files...
dist/assets/bitcrusher-4GRzcwnf.js  25.29 kB
dist/clawdio.es.js                   8.49 kB │ gzip: 2.98 kB
[vite:dts] Declaration files built in 425ms.
Why does this happen? This is a pretty simple problem that took me a while to pin down.
To understand why this is happening, let’s take a look back at the WASM initialization code generated by wasm-pack. When we init() our module, the first function parameter is the WASM module. But this could be many things — in our case it might by the buffer that makes up the WASM code, or maybe a path to the WASM that needs to be fetched.
The init() function checks if you passed a module, and if it doesn’t detect a module or path, it provides a default module. It fetches the module using a new URL() to define the path to it, then fetches that URL. Our problem lies here, with the new URL() statement:
if (typeof module_or_path === "undefined") {
  module_or_path = new URL("clawdio_bitcrusher_bg.wasm", import.meta.url);
}
Vite has a built-in feature that takes any instance of new URL() in your code and attempts to inline it inside your bundle. You can see the docs for that here.
So we have a problem here. wasm-pack automatically generates this init() script for each module. In order to fix the problem for Vite, we’d need to alter the URL to use non-static path. But we can’t easily modify the WASM library code after generated (we could append our build script to do some find/replace logic…but there should be more efficient ways to handle it).
What if we initialized the WASM module ourselves? We could try, but there’s a special step for WASM initialization that handles reserving the memory for the module, and this function is conveniently provided by wasm-pack for us. So we’re kind of forced to use this setup.
What if we changed the way Vite interpreted the file?
Custom Vite plugin
How do we prevent Vite from inlining a URL? Apparently there’s no easy configuration for it, so we’ll have to create a custom plugin that checks if the code contains a URL and then removes the URL replaces it with a false boolean statement.
// When we import WASM in worker, wasm-pack creates an initialization wrapper using `new URL`.
// Vite transforms any `new URL()` and generates base64 - @see: https://vite.dev/guide/assets.html#new-url-url-import-meta-url
// That increases bundle by doubling up WASM (once as `.wasm` and another as base64)
// This prevents that by finding any instances and removing them.
const preserveUrlPlugin = {
  name: "worker-preserve-url",
  transform(code) {
    if (code.includes("new URL(")) {
      const searchTerm = /new URL\([^)]*\)/g;
      const newCode = code.replace(searchTerm, "false");
      return {
        code: newCode,
        map: null,
      };
    }
  },
};

export default preserveUrlPlugin;
We use this plugin by placing it inside the workers.plugins section of the Vite config. This was another area that I got blocked on for a bit. If you add this to the regular plugins array, it won’t run on any file you add ?worker to. This is a great way to ensure workers don’t have unnecessary plugins run (like React, since our workers are written in vanilla JS).
// https://vitejs.dev/config/
export default defineConfig({
  base: "./",
  plugins: [
    react(),
    dts({
      rollupTypes: true, // Bundles all types into a single file
    }),
    tsconfigPaths(),
  ],

  // Plugins that only run on workers
  worker: {
    plugins: () => [preserveUrlPlugin],
  },
If you ever need to debug this sort of situation, I found it was useful to just log out the id that Vite provides. That returns the filename, so you can see if it’s running the plugin on the right file. In my case, the worker didn’t pop up until I threw the plugin in the worker plugins property.
export default {
  plugins: [
    {
      name: "debug-transform",
      transform(code, id) {
        console.log("Transform ID:", id);
        // Look for your third-party module in the logs
        if (code.includes("new URL(")) {
          console.log("Found new URL() in:", id);
        }
        return null;
      },
    },
  ],
};
Cool, now if we inspect our bundle, we shouldn’t see our WASM embedded inside our worklet. It should be 4kb instead of 25kb.
[vite:dts] Start generate declaration files...
dist/assets/bitcrusher-CIHdRKFA.js  4.05 kB
dist/clawdio.es.js                  8.49 kB │ gzip: 2.98 kB
Bundling WASM
One last thing that I didn’t notice until I tried to import this library in a new project — the WASM isn’t included in the bundle. If we build the library now, there’s no WASM inside the /dist/ folder.
And currently, we have a custom audio node that fetches that WASM bundle. But without it inside the final bundle, it has nothing to fetch.
So how do we handle this? It’s actually rather simple with Vite. We already import the WASM as a path, we just need to actually import the WASM module itself.
import "clawdio-bitcrusher/clawdio_bitcrusher_bg.wasm?no-inline";
import BitcrusherWasmPath from "clawdio-bitcrusher/clawdio_bitcrusher_bg.wasm?url&no-inline";
This should look similar to when you import other static assets in Vite, like CSS or images. Though note how we use ?no-inline for the WASM. This ensures it doesn’t get encoded into base64 and embedded in the current JS file.
But we have one last problem. By default, Vite doesn’t include .wasm files in the final bundle (aka /dist/ folder). We can enable that with a quick flag in the Vite config though:
export default defineConfig({
  // Make sure to include `.wasm` files
  assetsInclude: ["**/*.wasm"],
You can learn more about the assetsInclude property in the Vite docs, and here’s a list of supported modules (which doesn’t include WASM).
Audio node wrapper
In order to release this in a library, we need to have a way to create the AudioWorkletNode - as well as do the dirty business of fetching and initializing the WASM.
And since we’re using a worklet/worker, we can’t directly mutate properties on the node like we would with say a GainNode (e.g. gainNode.gain.value = 0.5). Instead we need to send messages to the worker with the data we want to update. But we can’t expect the user to handle this, because sending a message requires providing the right type of message - which they shouldn’t be required to know. Learn more about this process in my previous blog.
Instead, we’ll make a function called createBitcrusherNode that creates the node and returns it, but also provides the helper functions we need (like setBits to set the “bits” of the calculation).
/**
 * Creates a Bitcrusher audio worklet node and initializes it's WASM module.
 * Returns the AudioWorkletNode and helpful setter functions for parameters
 * @returns BitcrusherNode
 */
const createBitcrusherNode = async (
  audioCtx: AudioContext,
  bits = 4,
  normfreq = 0.1
) => {
  // This will be the "final" node that we create
  let nodeRef: AudioWorkletNode | null = null;

  // Handle any messages from the worker. We'll init here.
  const handleNodeMessage = (e: MessageEvent) => {
    // I cut this out - but this is same process as previous WASM blog
  };

  // Here we actually create the node and fetch the WASM
  const createNode = async () => {
    // Fetch the WASM module
    const response = await fetch(BitcrusherWasmPath);
    const wasmData = await response.arrayBuffer();

    // Create the worklet
    console.log("creating worklet...");
    try {
      // Resolve the URL relative to the current module
      await audioCtx.audioWorklet.addModule(BitcrusherWorklet);
      nodeRef = new AudioWorkletNode(audioCtx, "bitcrusher");

      // Send the WASM payload to Audio processor
      nodeRef.port.postMessage({ type: "init-wasm", data: wasmData });
      // Get messages from the worklet/processor
      nodeRef.port.onmessage = handleNodeMessage;

      // Set initial values
      setNormfreq(normfreq);

      console.log("created worklet node", nodeRef);

      nodeRef.addEventListener("processorerror", (e) =>
        console.error("Audio Worklet processing error", e)
      );
    } catch (e) {
      console.log("failed to create worklet", e);
    }
  };

  // Setter functions to communicate with worklet params
  const setBits = (newBits: number) => {
    if (!nodeRef) return;
    nodeRef.port.postMessage({ type: "set-bits", data: newBits });
  };

  // Create the node and return it
  await createNode();

  if (!nodeRef) {
    throw "Couldn't create node, try again";
  }

  return {
    node: nodeRef,
    setBits,
    setNormfreq,
  } as BitcrusherNode;
};
The function essentially runs the createNode() function, which creates the node. Then we just return that to the user in an object, along with our helper functions.
Using it looks like this:
const bitcrusher = await createBitcrusherNode();
console.log("The node", bitcrusher.node);
It’s a little tricky at first for the user, since most audio nodes are created and self contained. But this isn’t a completely foreign pattern.
This pattern is somewhat inspired by the custom audio node architecture Google used for their JAM with Chrome project. They wrap a few audio nodes together in a “custom node” and expose necessary APIs to the user through parameters.
To make things easier for the user, I also made a custom type to package thing up. It also extends a base type, allowing us to create more types for other nodes:
export type CustomAudioWorkletNode = {
  node: AudioWorkletNode;
};

export type BitcrusherNode = CustomAudioWorkletNode & {
  setBits: (newBits: number) => void;
  setNormfreq: (newFreq: number) => void;
};
This way we return the BitcrusherNode type to the user, and their IDE will be able to autocomplete and whatnot and let them know it’s not an AudioWorkletNode itself — but it contains one.
And with that, we have:
- Rust code compiled to WASM (with JS “glue” code) —
/modules/bitcrusher/ - An audio worklet that initializes the WASM and uses it —
/src/worklet/bitcrusher.ts - A handy function that handles fetching the WASM and creating an audio worklet node using our custom processor —
/src/nodes/BitcrusherNode.ts
And we ultimately export the BitcrusherNode to NPM, allowing others to use it (and the underlying pre-packaged worklet + WASM).
Let’s test that out by making an example website and install the package there.
Creating an example site
In order to quickly test the library, and provide some audible and visual output for the modules, I created an example app inside the project under the /examples/ folder.
It’s another Vite project with React installed, and it uses the local file: linking to pickup the package.json of the NPM library. This lets me test the library as a library — instead of using the Vite application embedded inside the library (via src/App.tsx).
One more worker bug
But when I imported my BitcrusherNode from the library, I got an error that the worklet isn’t found. If we check the library bundle, we can see the worker there in the /dist/assets/ folder. So why isn’t it getting picked up?
My example website is trying to load the worklet from a relative URL, so it tries loading the worker from the /example/public/ folder (which Vite serves it’s assets from). But the worker isn’t there, it’s in my node_modules folder (and technically symlinked to another spot).
So how do ensure that the worker is loaded from the correct place by apps that consume our library?
We need to add the base property to the library’s Vite config. This has Vite load assets using new URL with the import.meta setting — meaning the consuming app will know to check relatively for it (inside node_modules).
export default defineConfig({
  base: "./",
Once we add this and re-run the library’s build, we can see that the worker is fetched correctly in our example app. And if you inspect the library code, you should see a new URL in there now pointing to the worker.
const u = "" + new URL("assets/bitcrusher-CIHdRKFA.js", import.meta.url).href;Filesystem security bug
Except it’s not fetching correctly. If you’re using the same file: setup as me for linking to the module, this is going to cause issues with Vite’s security. Vite doesn’t load files outside of it’s context (aka the “workspace root” or same folder it’s inside of). And for our example app (that bundles with Vite), it’s trying to access our library code from the folder above it.
You can see this in the error, we try and load from the localhost using the @fs path, which then targets a specific folder - in our case the parent library code.
GET
http://localhost:5173/@fs/E:/Development/React/clawdio/dist/assets/bitcrusher-CIHdRKFA.js
[HTTP/1.1 403 Forbidden 4ms]
We can fix this by enabling the parent folder explicitly in the Vite config under the server.fs property. You can see the docs on that here.
export default defineConfig({
  plugins: [react(), tsconfigPaths()],
  server: {
    fs: {
      // Allow serving files from one level up from the project root
      allow: ["..", "./node_modules"],
    },
  },
📁 Only users who work with the library in development should have to deal with this workaround. If you’re consuming from
npmoryarn— it should pick up the library fine.
Using the module in React
And with that the module was working in the example Vite app. Here’s how it’d look:
import { useCallback, useEffect, useRef } from "react";
import useAudioStore from "@/store/audio";
import { createBitcrusherNode } from "clawdio";
import type { BitcrusherNode } from "clawdio";

type Props = {
  bits?: number;
  normfreq?: number;
};

const Bitcrusher = ({ bits = 4, normfreq = 0.1 }: Props) => {
  const nodeRef = useRef<BitcrusherNode | null>(null);
  const { audioCtx, addAudioNode, removeAudioNode } = useAudioStore();

  const createNode = useCallback(async () => {
    nodeRef.current = await createBitcrusherNode(audioCtx, 4, 0.1);

    addAudioNode("bitcrusher", nodeRef.current.node);
  }, [addAudioNode, audioCtx]);

  useEffect(() => {
    if (!audioCtx || nodeRef.current) return;
    createNode();

    return () => {
      if (nodeRef.current) removeAudioNode("bitcrusher");
      nodeRef.current?.node.disconnect();
    };
  }, [audioCtx, createNode, removeAudioNode]);

  useEffect(() => {
    nodeRef.current?.setBits(bits);
  }, [bits]);

  useEffect(() => {
    nodeRef.current?.setNormfreq(normfreq);
  }, [normfreq]);

  return <></>;
};

export default Bitcrusher;
We import our createBitcrusherNode function and pass it the audio context, as well as a couple of parameters, to create a new BitcrusherNode. We await for it because it has to fetch the WASM bundle and initialize it. Then we add the node to our store, which handles the process of “chaining” it to the output (aka your speakers).
To be able to experience the node in action, we need to have audio playing. Normally for testing, we’d use a simple sine wave oscillator to get consistent results. But for fun, let’s use a sampler with that will play an .mp3 file.
The sampler has buttons for each piano key, and plays the audio sample when button is pressed. It re-pitches the sample depending on the note played as well (so higher pitch notes sound actually higher).
When we play the sample, we loop through all the audio nodes in the store and chain them after the sample. This chains in our BitcrusherNode, as well as other useful nodes like an AnalyserNode we use to draw a waveform in our <Waveform /> component.
There’s a bit going on in the example app I won’t cover here, but I might cover it in a future blog post dedicated to the topic of web audio.
When we load up the app is should look like this:
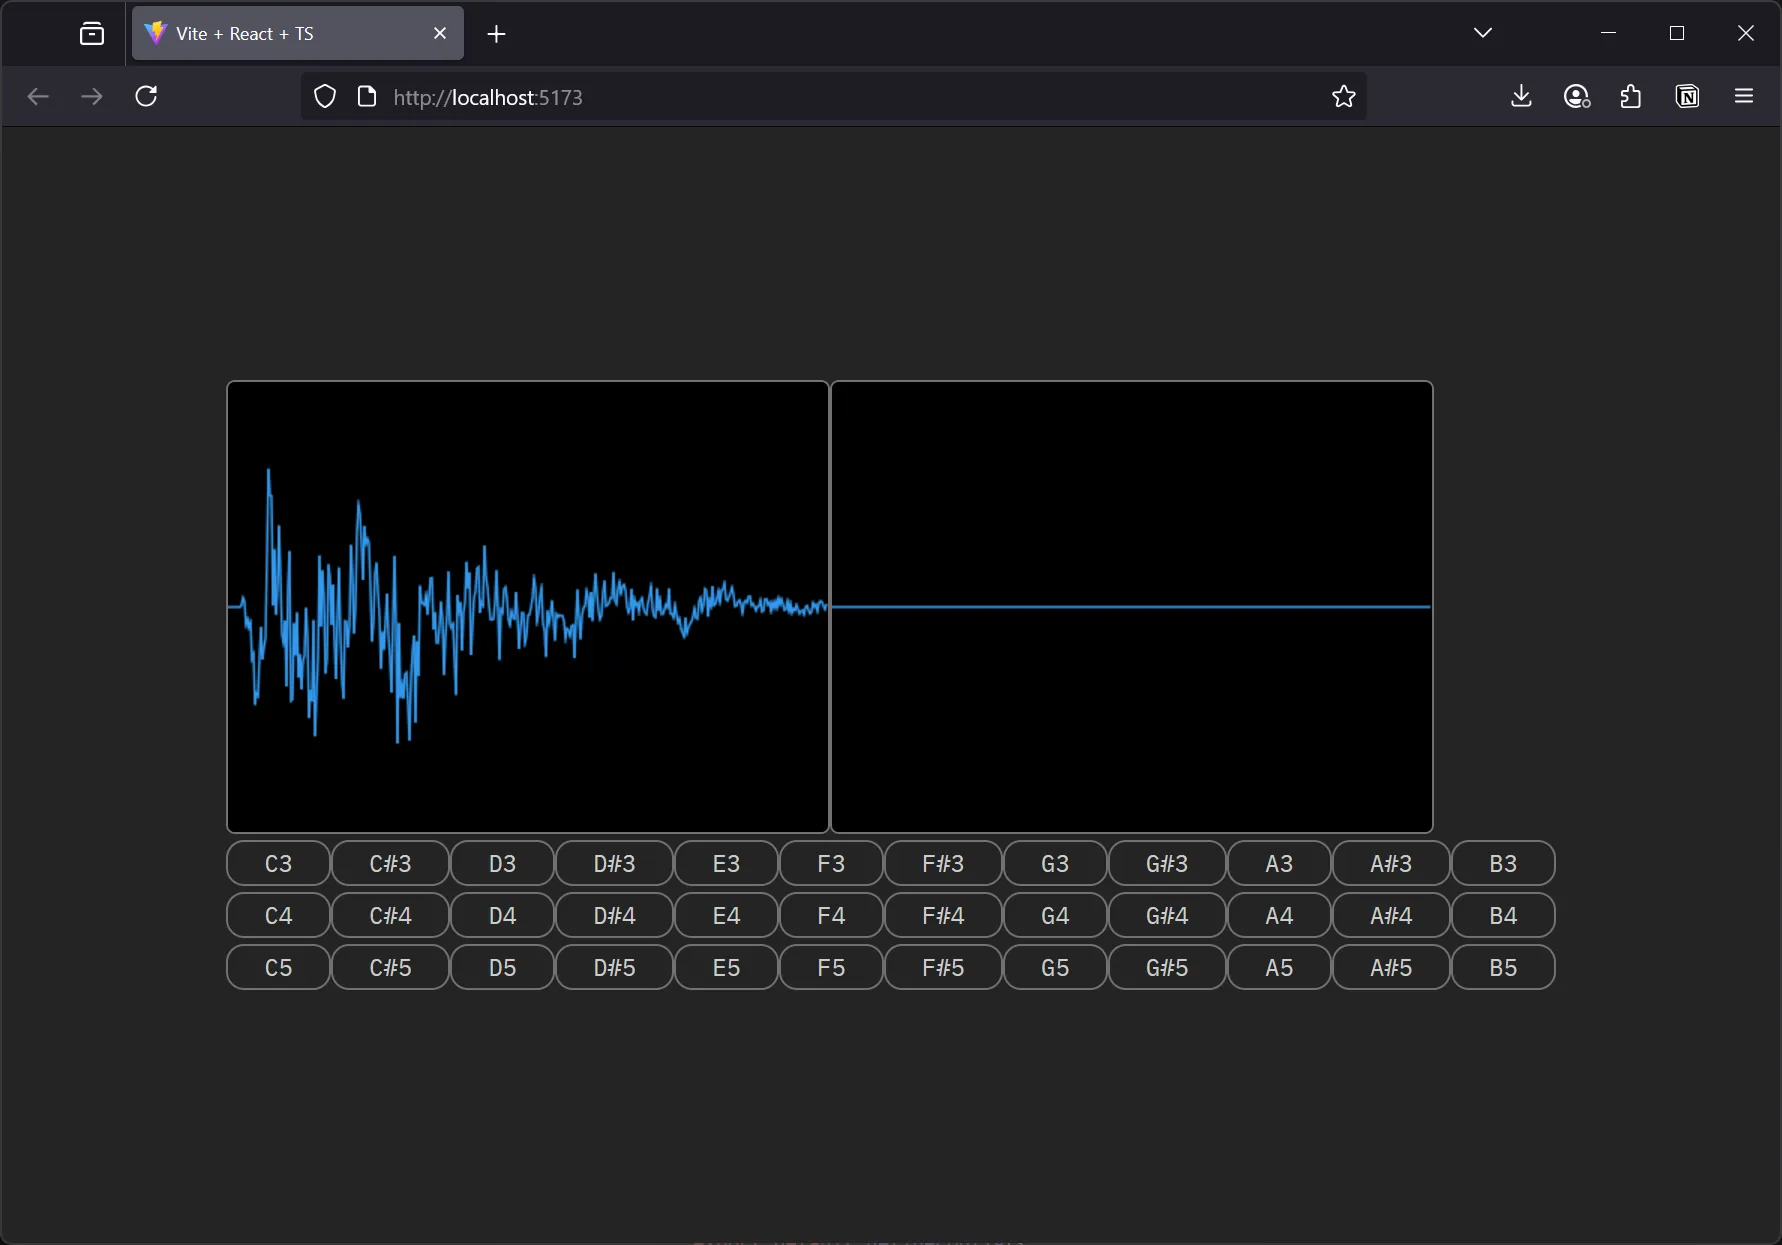
And specifically, if we play the audio, it should sound “crunchy” or lower quality from the BitcrusherNode. You can test if it works by removing the <Bitcrusher /> component from the React render tree and playing the sound again. It should sound “cleaner”, or unfiltered.
This was spread across a few commit, but the latest one is here for testing.
Releasing to NPM
We’ve got a library, it probably works because we tested it in an example app, so let’s release it to NPM finally. We could just run the build process and then npm publish - but that’s too manual. We’d also have to handle bumping our version each time, and also hope that it build properly on our machine (and something like Windows doesn’t mess it up).
Instead, let’s use a continuous integration and deployment (or CI/CD) workflow by leveraging GitHub Actions. Most of this setup comes from my Vite library template, but it required slight modification to get the Rust WASM code compiled.
name: Publish package on NPM

on:
  release:
    types: [created]

jobs:
  build:
    runs-on: ubuntu-latest

    steps:
      - uses: actions/checkout@v2
      - uses: actions/setup-node@v2
        with:
          node-version: 22.12.0
          registry-url: https://registry.npmjs.org/
      - uses: jetli/wasm-pack-action@v0.4.0
      - run: yarn build:modules
      - run: yarn
      - run: yarn build
      - run: npm publish
        env:
          NODE_AUTH_TOKEN: ${{ secrets.NPM_TOKEN }}
This workflow does a few things:
- Checks out the Git repo to access the files
- Sets up NodeJS on the exact version we need (some dependencies require v22+)
- Installs the
wasm-packCLI so we can use it for building Rust code (shoutout to jetli for their convenient package). - Then we do exactly that and build Rust code with it using the custom script we wrote earlier
yarn build:modules - Then we build the library code
- And finally we release the code to NPM
The release process itself is pretty easy. We write code, hopefully make sure it works (no testing libraries…yet…), and then push the code to GitHub on the main branch when it’s ready.
Then we can trigger a build by activating the “generate version tag” workflow, which bumps the version in the library’s package.json for us and creates a tag on GitHub for it. Then we can create a new release in the GitHub UI (or CLI if you want), which triggers the NPM release workflow.
And with that, we have a library on NPM: clawdio.
But what about the Rust WASM?
Since our library code uses it as a dependency, and it’s in a monorepo, the build system doesn’t need the code released to NPM.
But what if someone wants to use one of these modules separately for whatever reason?
Let’s release each Rust WASM module to NPM, since they’re all setup for it anyway.
Here’s what the release script looks like:
import { execFileSync } from "child_process";
import { readdirSync } from "fs";
import path from "path";
import { fileURLToPath } from "url";

const log = (...props) => console.log("[CLAWDIO/RELEASE]", ...props);

// Get all modules
const modules = readdirSync("./modules");
log("Processing Rust modules: ", modules);

function releaseModules() {
  log("Starting release process 🚀");

  modules.forEach((moduleName) => {
    // Get current directory equivalent for ES modules
    const __filename = fileURLToPath(import.meta.url);
    const __dirname = path.dirname(__filename);

    // Build the path from scripts/ to modules/
    const modulePath = path.resolve(
      __dirname,
      "..",
      "modules",
      moduleName,
      "pkg"
    );
    // const modulePath = `./modules/${moduleName}/pkg`;
    log("Trying to release module", moduleName, modulePath);

    try {
      execFileSync(
        "npm",
        ["publish", "--registry", "https://registry.npmjs.org/"],
        {
          cwd: modulePath,
          stdio: "inherit", // show output in console
          env: {
            ...process.env,
            NODE_AUTH_TOKEN: process.env.NODE_AUTH_TOKEN,
          },
        }
      );
      log("Successfully released module", moduleName);
    } catch (e) {
      log("Failed to release module", moduleName);
    }
  });
}

releaseModules();
We basically do the same as our build modules script, where we go into /modules/ folder and find all the folders inside (like our bitcrusher one).
Then we run npm publish in the /pkg directory that gets generated by wasm-pack. And the key here — we pass an environment variable to our script with our NPM token. We set this in the GitHub repo settings.
I added this script to the package.json as release:modules.
Then I had to modify the GitHub action for the release workflow.
name: Publish package on NPM

on:
  release:
    types: [created]

jobs:
  build:
    runs-on: ubuntu-latest

    steps:
      - uses: actions/checkout@v2
      - uses: actions/setup-node@v2
        with:
          node-version: 22.12.0
          registry-url: https://registry.npmjs.org/
      - uses: jetli/wasm-pack-action@v0.4.0
      - run: yarn build:modules
      - run: yarn
      - run: yarn publish:modules
        env:
          NODE_AUTH_TOKEN: ${{ secrets.NPM_TOKEN }}
      - run: yarn build:library
      - run: npm publish
        working-directory: ./packages/clawdio
        env:
          NODE_AUTH_TOKEN: ${{ secrets.NPM_TOKEN }}
The key changes here:
- I added
registry-urlto the Node setup that points to the NPM registry specifically. If you don’t do this,yarnwill try to add the module to it’s own registry (which requires it’s own auth token). - At first I had the release logic happening in
build:modules— but it kept failing. It seems that in order to release, you need to run the initialyarn, which generates a.npmrcand sets up configs like registry. So the release got separated into it’s own script, and run afteryarn. - We also pass the NPM token to our release script, same as our final
npm publishstep.
And now when we release our library, we’ll also release each Rust WASM module as a NPM module.
You can see this live with the clawdio-bitcrusher module.
How do I use it?
This should work in any JavaScript project that supports ES modules. I used React in my example app, but I designed this library to be framework agnostic, so feel free to use it directly with vanilla JS - or maybe a framework like Vue.
You should be able to install it via NPM:
# With NPM
npm install clawdio

# With Yarn
yarn add clawdio
Then you can import the createBitcrusherNode function into your app, create the node, and chain it like you would any other node (kinda):
import { createBitcrusherNode } from "clawdio";

async function startAudio() {
  const context = new AudioContext();
  const oscillatorNode = context.createOscillator();
  const bitcrusher = await createBitcrusherNode(audioCtx, 4, 0.1);
  oscillatorNode.connect(bitcrusher.node);
  bitcrusher.node.connect(context.destination);

  oscillatorNode.start();
}

startAudio();
You should be able to hear the difference once you connect the node.
Branding
Since I’m looking to develop on this library a bit, I designed branding for it, complete with it’s own custom logo.
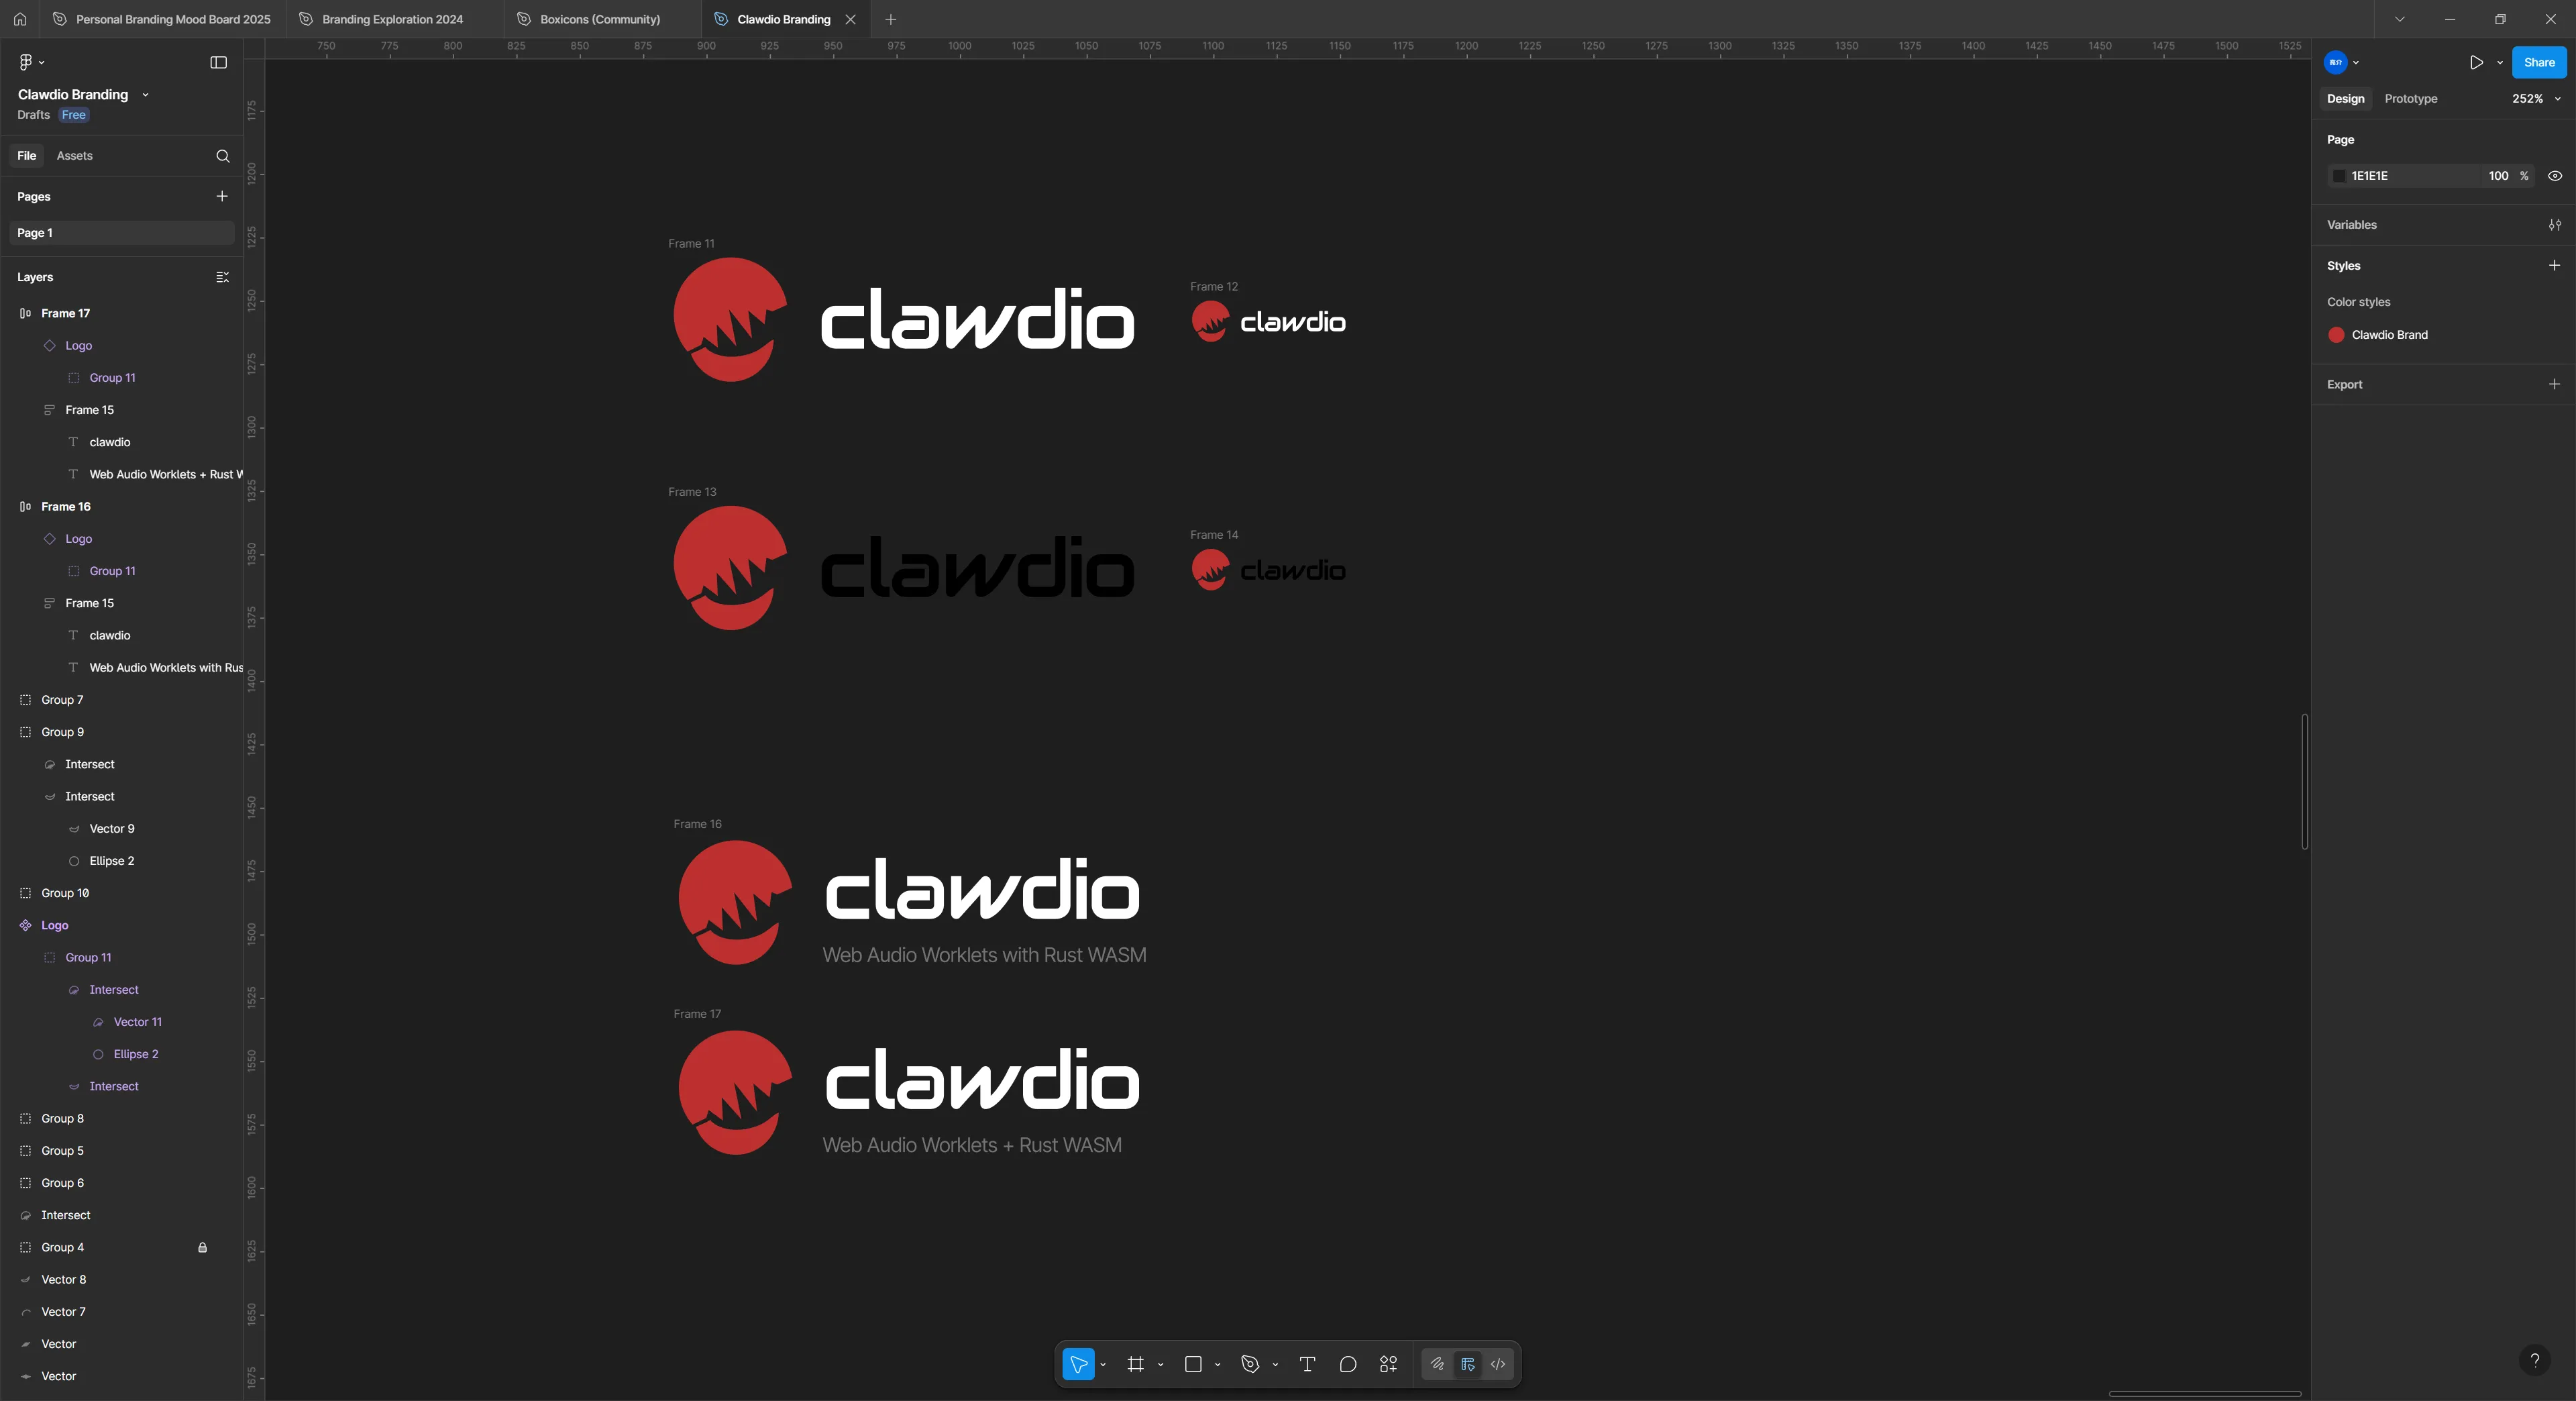
The logo came together pretty quickly. I knew I wanted to pay homage to the Rust side of the library by featuring the library’s official mascot - the crab. And the audio portion of the library needed to be clearly conveyed.
I settled on the visual of a cartoonish crab claw, as it was easily recognizable as a crab, and scaled well to an icon. After sketching a bit with the claw, I used a classic sine waveform to shape the top claw, creating the distinctive symbol of audio.
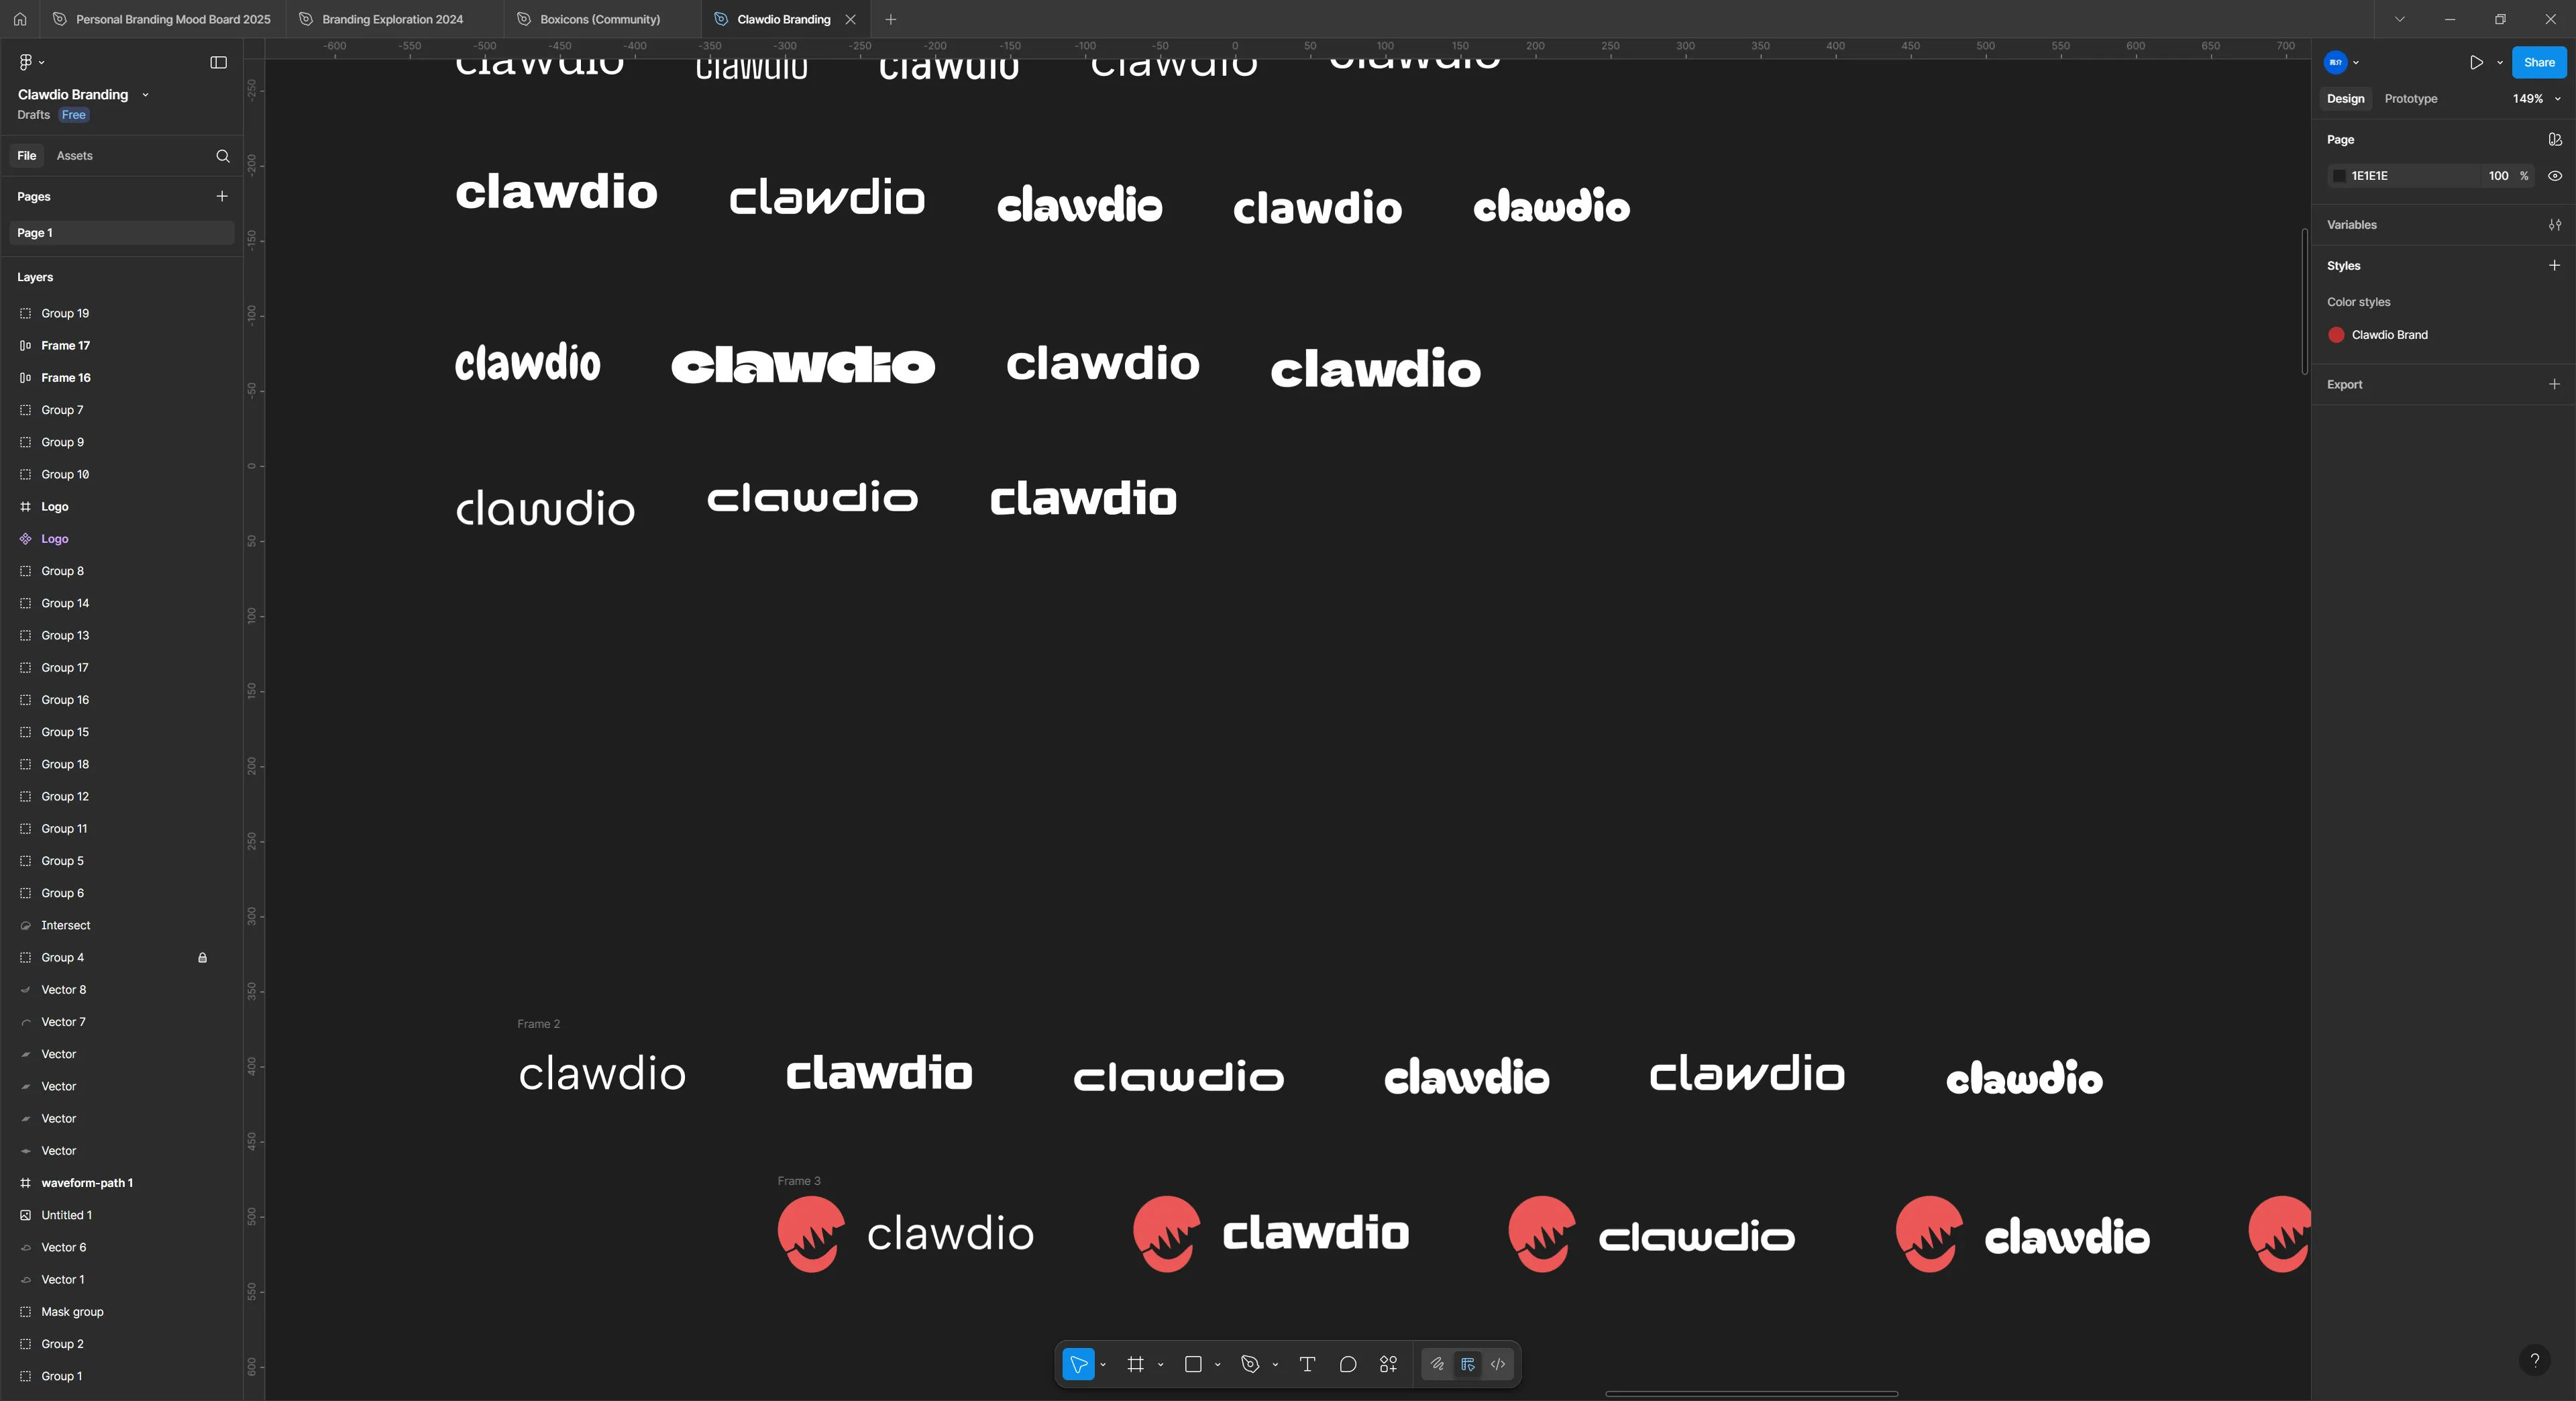
For font family I went through several options. I initially leaned serif and rounded shapes — but I eventually moved towards a futuristic look. It seemed more fitting since it was a cutting edge library using WASM, not something that needed to feel old.
I placed the logotype alongside the logo and tested each out, seeing which worked best to match the style of the logo. At first I leaned a little cartoony with bolder, thicker fonts, but I came back to that futuristic look after finding an aptly named “Audiowide” font.

I’m actually really pleased with this branding for being put together in an afternoon.
What’s next?
The goal of this library is to optimize the processing of audio on the web using WASM. The Audio Worklet API is new, and it serves to replace the older and deprecated createScriptProcessor API. That API was used to process audio data on the CPU side, which blocks the main thread and can make things like UI less responsive.
Instead, we can leverage the audio worklets to process the audio in a separate thread (and ideally using WASM).
I’ll be starting by converting a few basic audio effects to worklets and use Rust where possible. The Bitcrusher was the first effect, but expect to see things like LFO, Envelope Follower, or Moog filter. You could even replicate native nodes like the DelayNode to create echoes, or play audio in reverse. Any effect that could be created using the createScriptProcessor API can be replicated as a worklet, so I’m on the hunt (and getting creative) to discover more.
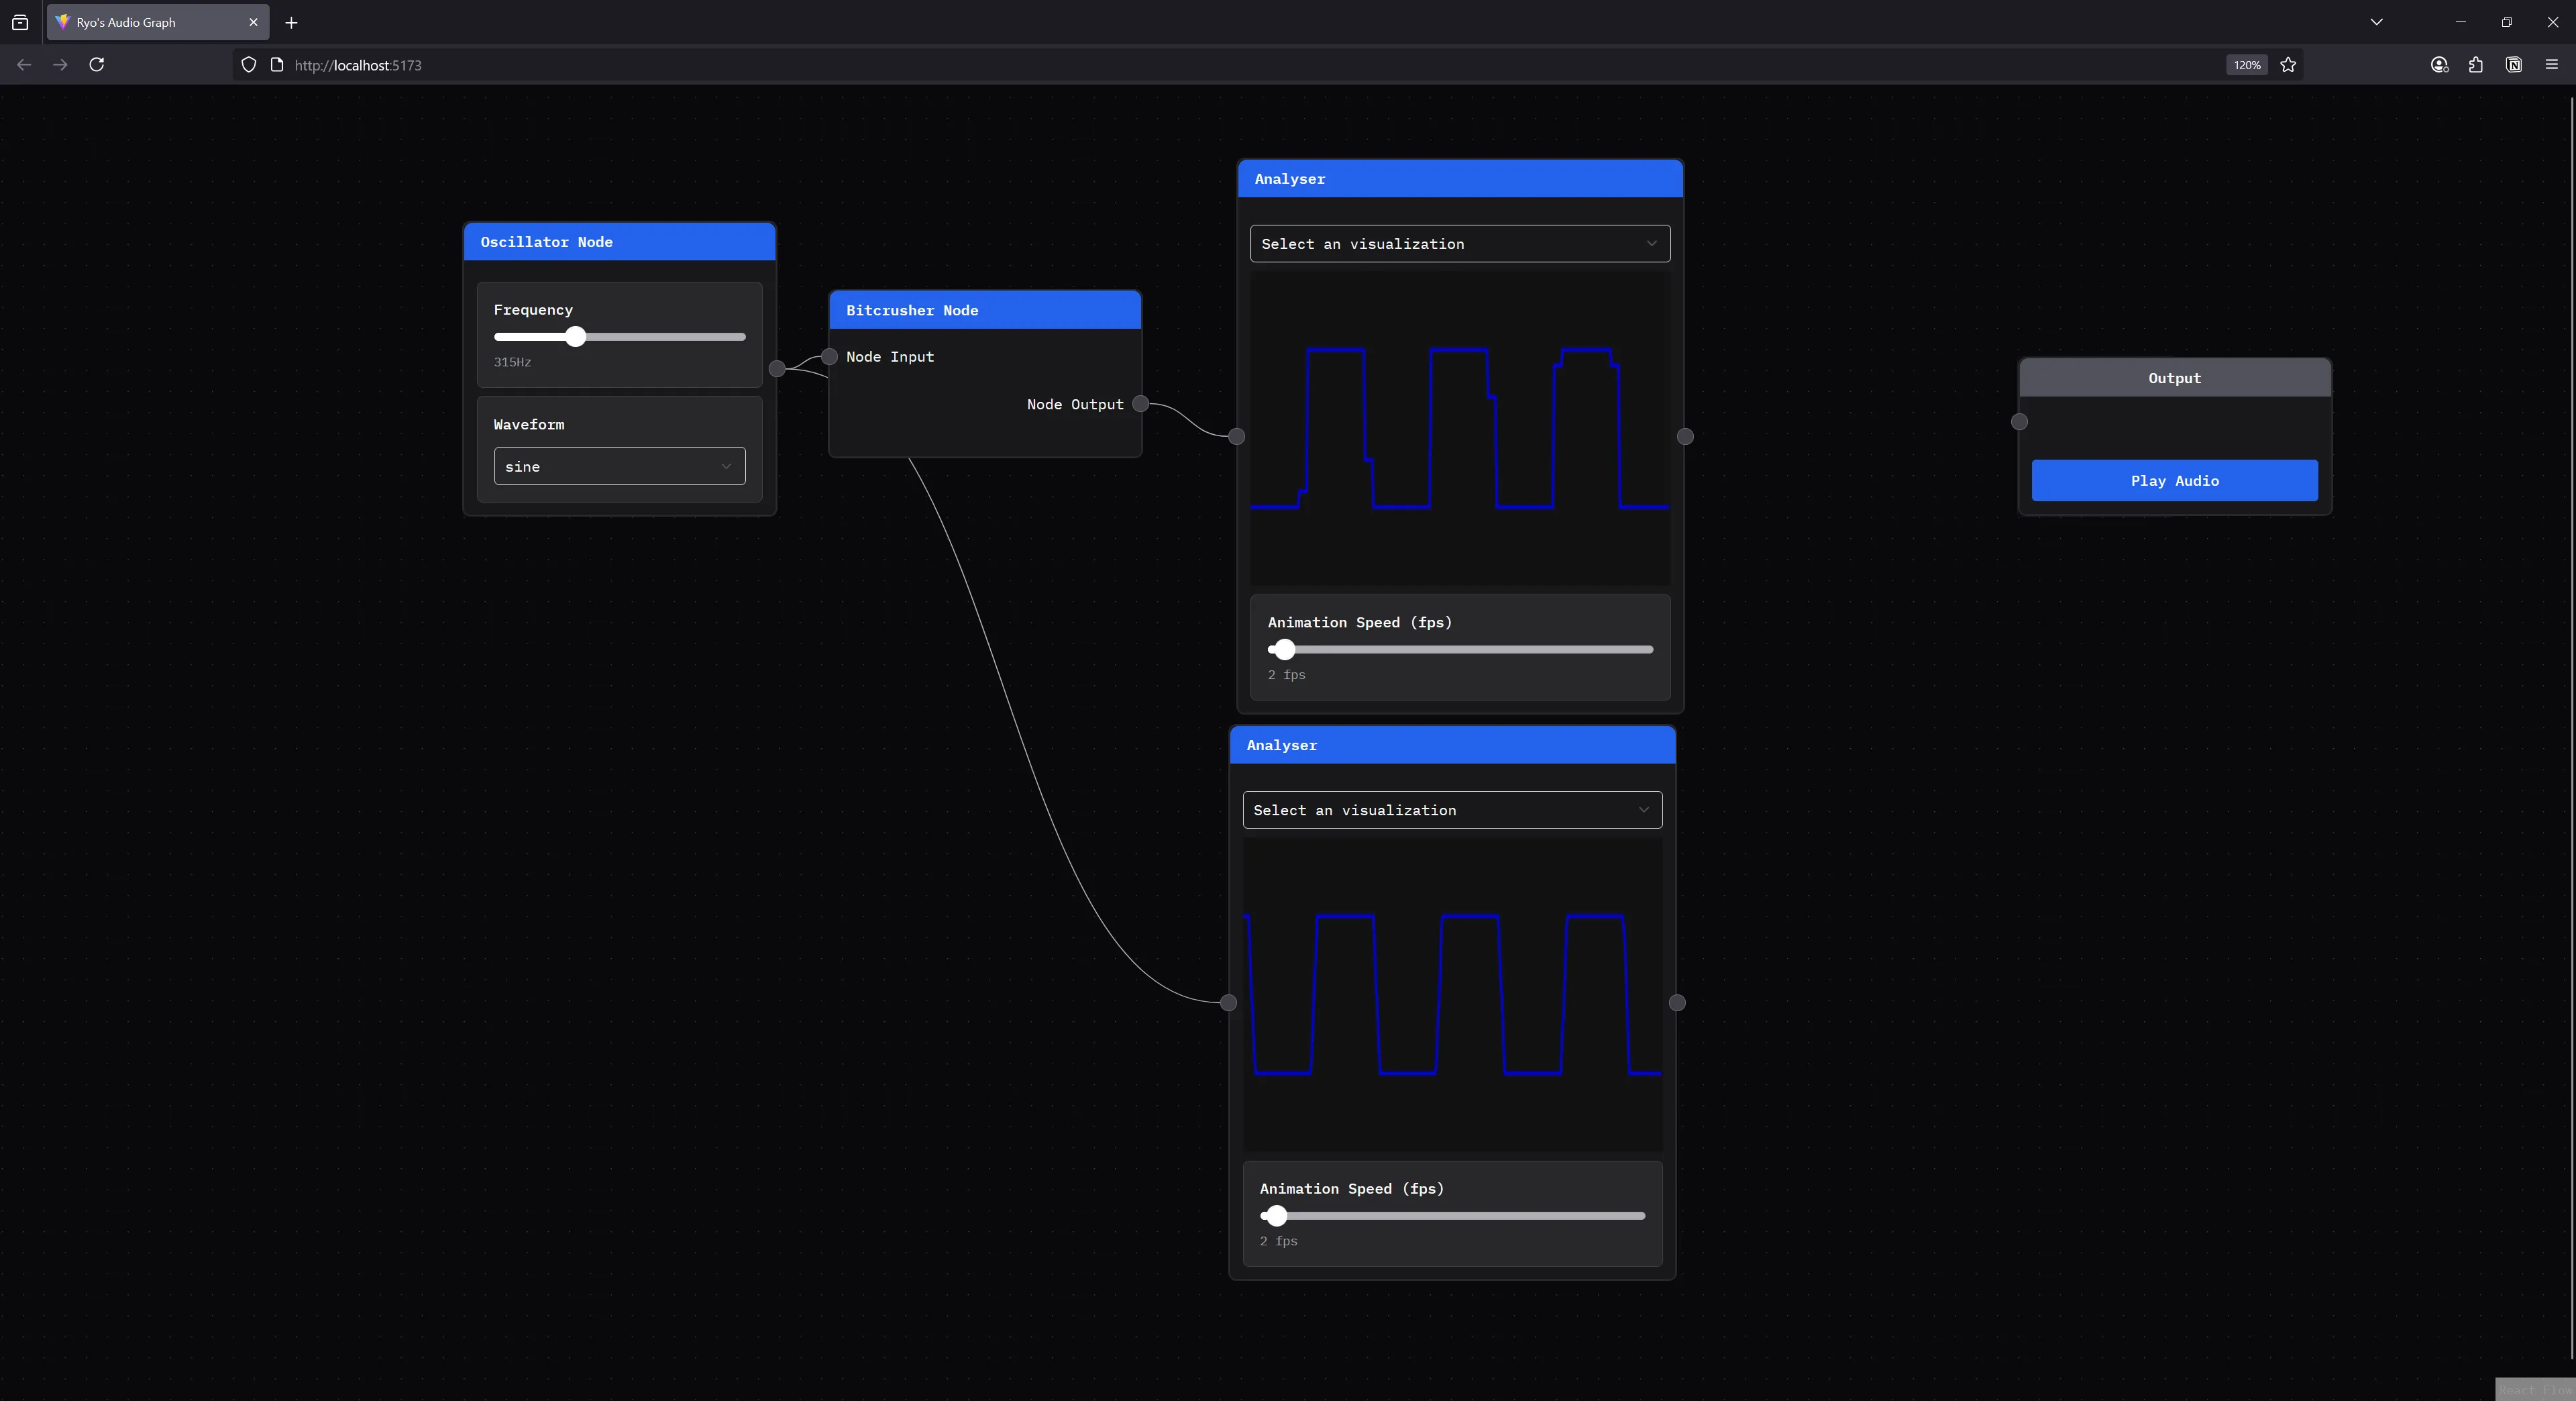
You can see this library in action in my web audio node graph project where you can create a Bitcrusher node to chain into other nodes. It’s great for testing the library, but also a fantastic learning and teaching tool for visualizing the effects on the audio signal. For example, in the image above, you can more clearly see how the bitcrusher node is altering the oscillator signal by seeing the original and altered signals side by side.
Make audio with claws
I hope you consider using clawdio for your next Web Audio project when you’re reaching for some cool effects. We currently only have the Bitcrusher node, but now that I have the build system ironed out — I have a few more I’m nearly ready to release.
Or you could use the library as a basis for another Rust WASM based project so you can avoid most (if not all) of the build setup.
And even if you don’t use it, I hope this article was enlightening on the process of using workers and Vite, and releasing a library with them. There was a lot to unpack with this process, so I appreciate you if you stuck along for the wild ride.
As always, if you found this interesting or have any questions, feel free to reach out on socials and let me know.
Stay curious,
Ryo