
Posted on
June 5, 2025
I’ve been falling down the rabbit hole of audio synthesis, or by the scientific term: digital signal processing. It’s the art of translating sound into 1’s and 0’s and processing it with more math. When you see a the classic audio waveform, that’s the 1’s and 0’s of the audio being represented in a line graph.
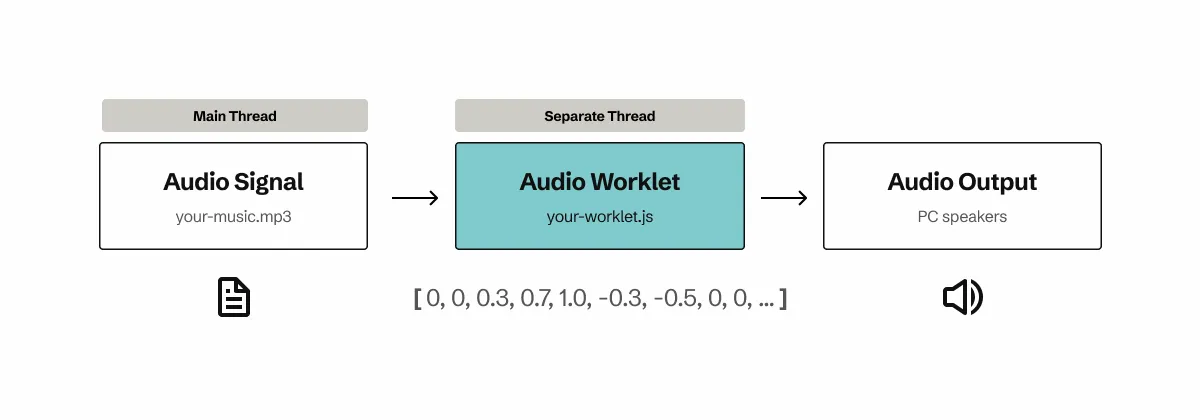
As I’ve been exploring audio on the web, I discovered a newer API called AudioWorkletNode, a way to run audio processing code on a separate thread dedicated to audio. The concept is simple, you provide some JavaScript code to the worklet, and when the audio plays it passes the data through the worklet (like “middleware”).
That’s awesome enough, because you alleviate the main thread, but what if you could take it a step further? What if you could use Rust or C++ code inside the audio worklet?
That’s what we’ll be exploring today - writing Rust code, compiling it into WASM, and running it inside the audio worklet to generate or modify existing sounds.
Today we’ll make a white noise generator and a pitch detection module in Rust and use them in our ReactJS app with the Web Audio API. I’ll also share tips for using the Web Audio API in React. And as always, you can find the source code here.
🆕 This code uses modern web features, like Audio Worklets or WASM, so it may not be supported in older browsers (like IE6). But as of writing, most browsers support all of these out of the box. You can check the Can I Use for Audio Worklets and WASM for exact browser versions.
What is audio synthesis?
Audio synthesis is the act of electronically creating audio by manufacturing and/or combining “signals” into a single “sound”. You might be familiar with DJ’s or song remixes and how musicians take “samples” of someone’s voice and then play it in their song - sometimes warping the sound of it. That’s is a kind of audio synthesis, using a pre-existing sound as the basis and modifying it’s output.
On the web, we can tap into audio using the Web Audio API. This lets us not only play music from binary files (like .mp3 or .wav) — but it also lets us create (or synthesize) sound from nothing using a concept called “oscillators”. If you’ve ever heard of a “electronic synth” in music, this is the basis of that instrument.
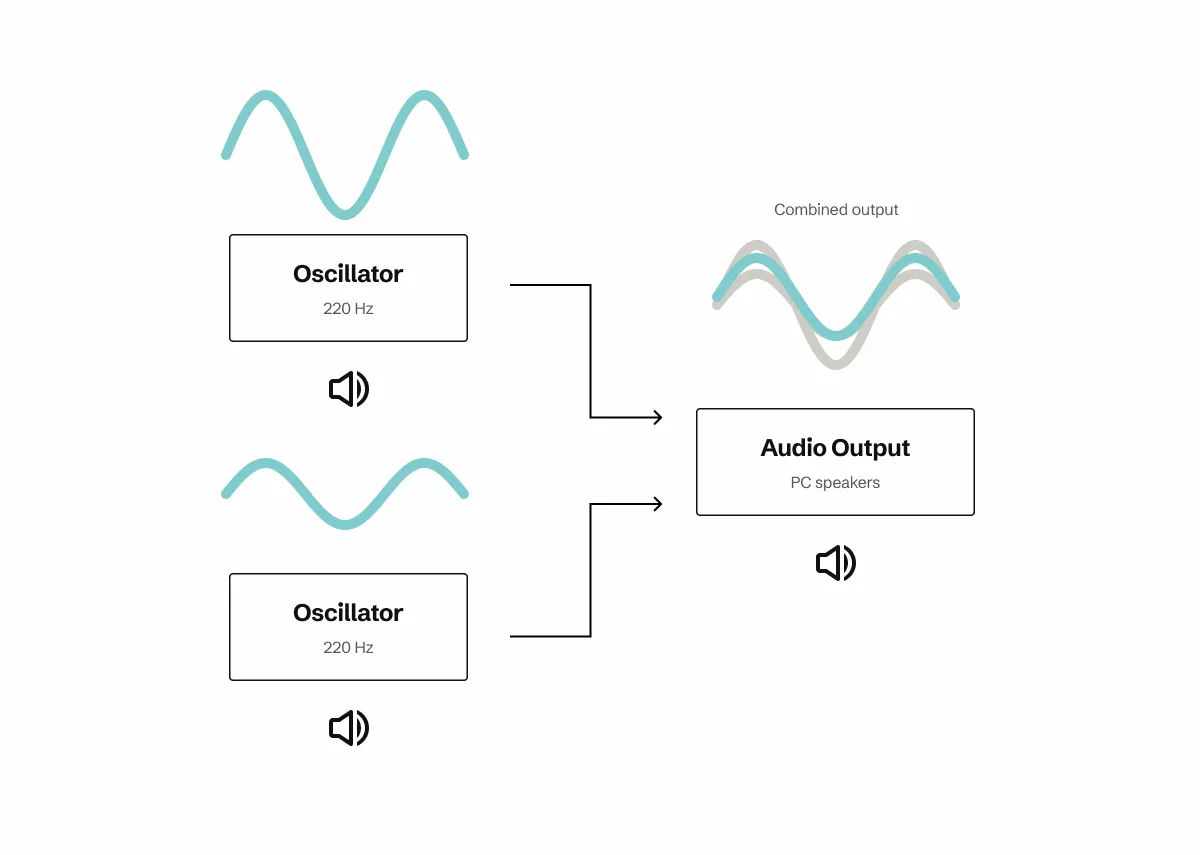
With audio, it often goes through lots of different processes. You might want to change the volume, or crossfade one sound with another. And all these effects stack, so I may have one “sound” playing (like microphone audio playback) and several effects (like reverb) stacked on top.
const context = new AudioContext();
let oscillatorNode = context.createOscillator();
let volumeNode = context.createGain();
oscillatorNode.connect(volumeNode);
volumeNode.connect(context.destination);

oscillatorNode.start();
This generates a piercing sound, and we can use the GainNode (aka volumeNode) to increase or decrease the “gain” or volume of the audio.
With this noise we’ve generated, you can start to change the way it sounds by altering settings like it’s frequency (or “hz” or “pitch” aka is it a C, D, E, etc. key). We can make it sound more like a bass if we lower the frequency to get a “deeper” sound.
const bass = context.createOscillator();
bass.type = "sine";
bass.frequency.value = 220;
bass.frequency.linearRampToValueAtTime(880, context.currentTime + 2);
It’s in this process that we’re able to create and synthesize sound - and ultimately create digital instruments. This is how most audio plugins work in apps like Garage Band, Fruity Loops, or Ableton on a fundamental level.
All these processes add up, and take up time on the main CPU thread dedicated to running our website. And if we have any other code running that’s also intensive, like our UI, everything suffers. Audio might stutter, UI might freeze. Which is why we’re exploring offloading this work onto another thread.
Why WASM?
You might ask yourself: is it really more efficient to take a whole other language, compile it down to bits, and run that inside of JavaScript? And I’d say: in some cases actually yeah.
Garbage free since 2023
The problem with JavaScript is that it’s not the most memory efficient language. It’s designed to be dynamic and easy to use, so you don’t have to think about finer details like allocating memory.
To handle this, JavaScript has something called a “garbage collector”, where any unused data gets released regularly, allowing us to allocate more as needed (and prevent us from overloading or leaking too much memory).
But when we run WASM code, it doesn’t have a garbage collector, since we write it in a language that allocates the exact amount of memory needed at all times (only recently was it added for supporting GC based languages like PHP). That allows us to run the same simple functions (like taking integers and adding or multiplying them together) and it makes it much faster.
This makes a bigger difference when you consider how we process audio. When we analyze audio, we’re often observing a constant stream of data. And we’re talking a lot of data — often arrays of 1000s of items at a time and looping over each of them. Any performance we can save with those “low level” processes, it’d be nice.
Reusability
You might not be aware, but most audio code isn’t written in JavaScript. It’s usually written in a low level language like C++, maybe Python at the most. This is because C++ (and other languages like Rust) are much better at processing large amounts of data more efficiently.
And to be honest, C and C++ have been around the longest, so their ecosystem is the most mature. You’ll find that most Rust modules are wrappers around existing C libraries.
So to be able to leverage that ecosystem and other libraries is incredibly valuable, instead of having to convert their code to JavaScript (and hope it’s nearly as efficient).
The setup
Before we get started using Audio Worklets, let’s create an environment where we can experiment with them. We’ll need an audio context setup and some sort of sound playing to give us data to use. Then we can insert our audio worklet into the pipeline and see how it works.
I’ll go over briefly how to do this in vanilla JS, but I’ll be working in React for this article.
📁 If you want a project template to follow along and you’re familiar with React, I recommend cloning my web-audio-playground project. It has examples of how to create audio with oscillators and playing from sound files. I’d also recommend this example on GitHub for using vanilla JS and Vite.
Let’s get a basic web audio setup going. We’ll need to create a context, add a sound to it (in our case a .mp3 file we fetch), and then pipe it to our output.
// Setup audio context and attach our music file
const audioCtx = new window.AudioContext();
const audioSource = audioCtx.createMediaElementSource(
  document.getElementById("music-file");
);
audioSource.connect(audioCtx.current.destination);

const handlePlay = () => {
    // Check if context is in suspended state (autoplay policy)
    if (audioCtx.current?.state === "suspended") {
      audioCtx.current.resume();
    }

    if (!audioCtx.paused) {
      // Play audio
      const audioElement = document.getElementById("music-file");
      audioElement.play();
    }
}

<audio file="your-song.mp3" id="music-file" />
<button onClick={handlePlay}>Play/Pause</button>
But I usually work in React, often in a composable architecture. This is how that same functionality would look in React-land:
import { Button, Stack } from "@whoisryosuke/oat-milk-design";
import React, { useEffect, useRef, useState } from "react";
import useAudioStore from "../../store/audio";

type Props = {
  file: string;
};

const AudioPlayer = ({ file, ...props }: Props) => {
  const [isPlaying, setIsPlaying] = useState(false);
  const [bufferLength, setBufferLength] = useState(0);
  const audioElement = useRef<HTMLAudioElement>(null);
  const audioCtx = useRef<AudioContext>(null);
  const { setAudioCtx, audioNodes } = useAudioStore();

  const handleDone = () => {
    setIsPlaying(false);
  };

  useEffect(() => {
    if (!audioElement.current) return;
    if (!audioCtx.current) {
      audioCtx.current = new window.AudioContext();
      setAudioCtx(audioCtx.current);
    }
    const audioSource = audioCtx.current.createMediaElementSource(
      audioElement.current,
    );
    // Loop through any dynamic audio nodes and attach them
    let prevNode: AudioNode = audioSource;
    audioNodes.forEach((node, index) => {
      console.log("connecting node", node);
      prevNode.connect(node);
      prevNode = node;
    });
    prevNode.connect(audioCtx.current.destination);

    // Add any event listeners to audio (like when it's done)
    audioElement.current.addEventListener("ended", handleDone);

    console.log("audio created", audioElement.current, audioCtx.current);

    // return () => {
    //   audioElement.current?.remove();
    //   audioCtx.current?.close();
    // };
  }, [audioNodes]);

  const handlePlay = () => {
    if (!audioElement.current) return;

    // Check if context is in suspended state (autoplay policy)
    if (audioCtx.current?.state === "suspended") {
      audioCtx.current.resume();
    }

    if (!isPlaying) {
      console.log("playing");
      // Play audio
      audioElement.current.play();
      setIsPlaying(true);
    } else {
      console.log("pausing");
      // Play audio
      audioElement.current.pause();
      setIsPlaying(false);
    }
  };

  return (
    <div>
      <audio ref={audioElement} preload="auto" src={file} />
      <Stack vertical gap="0.25rem">
        <Button
          px={5}
          py={2}
          borderRadius={1}
          onClick={handlePlay}
          display="flex"
          justifyContent="center"
        >
          {isPlaying ? "Pause" : "Play"}
        </Button>
      </Stack>
    </div>
  );
};

export default AudioPlayer;
This is a <AudioPlayer /> component. I won’t go too into detail how this works, that’s the topic of another article. But we essentially setup a web audio, grab our audio from the DOM, and then play it when the user presses the button. Very similar to the process above.
You can pass a file to it’s props to load it and play it using the <button> inside. This file is located in the /public folder, which Vite serves alongside our app.
<AudioPlayer file="music/ff8-magic.mp3" />There’s a couple things to take away from this setup. The first is how we store the audio context in a global Zustand store (useAudioStore). This allows us to access the audio context from other components, anywhere in the app.
const { audioCtx } = useAudioStore();We also have a concept of “audio nodes”. Like I mentioned earlier, audio is often a sound that has a bunch of processes on top of it. These processes are referred to as “audio nodes” in the Web Audio API. We “chain” these nodes along with our sound, and each node takes our “signal” (or sound) and progressively transforms it.
So if we want to create an audio node somewhere else (like say, another React component), we need to make sure it’s part of the chain. That’s where the global store comes into play - we store each audio node there in an array that our main audio player can loop through and chain as needed.
  // Loop through any dynamic audio nodes and attach them
  let prevNode: AudioNode = audioSource;
  audioNodes.forEach((node, index) => {
    console.log("connecting node", node);
    prevNode.connect(node);
    prevNode = node;
  });
  prevNode.connect(audioCtx.current.destination);
This setup lets us create separate components for “audio nodes” that we can add anywhere in our app (ideally as children or nearby the <AudioPlayer />.
Here’s an example of a “gain” node - aka a way to control the volume of the sound. This hooks into the existing audio context to create the node, then adds the audio node to a global store to use later. Keep this structure in mind as we’ll be using this as the basis for our worklet.
import React, { useEffect, useRef, useState } from "react";
import useAudioStore from "../../store/audio";
import { Input, Slider } from "@whoisryosuke/oat-milk-design";

type Props = {};

const Gain = (props: Props) => {
  const [loaded, setLoaded] = useState(false);
  const [value, setValue] = useState(0);
  const gainRef = useRef<GainNode | null>(null);
  const { audioCtx, addAudioNode, removeAudioNode } = useAudioStore();

  useEffect(() => {
    if (!audioCtx || loaded) return;
    console.log("creating gain");
    gainRef.current = audioCtx.createGain();
    addAudioNode(gainRef.current);
    setLoaded(true);

    return () => {
      if (gainRef.current) removeAudioNode(gainRef.current);
    };
  }, [audioCtx]);

  const handleChange = (sliderValue: number) => {
    console.log(sliderValue);
    setValue(sliderValue);

    const newGain = sliderValue;

    if (gainRef.current) gainRef.current.gain.value = newGain;
  };

  return (
    <div>
      {value}
      <Slider
        label="Volume"
        value={value}
        minValue={-3}
        maxValue={2}
        step={0.01}
        onChange={handleChange}
      />
    </div>
  );
};

export default Gain;
Now with this setup, we can start experimenting with an audio worklet.
📁 Interested in this setup? Let me know on socials and I can write a tutorial breaking it down in greater detail.
How do they Audio Work-let?
Audio Worklets are a new part of the Web Audio API introduced to browsers. It first became widely available in Chrome 64 in 2017. They allow for you to run code in a background thread to process the audio signal - whether it’s to transform it (like changing the sound), or analyzing it (like checking the pitch).
They work similar to other existing audio nodes, like the GainNode. It chains into the audio pipeline to receive input, transforms the input into a new signal (or sound), and then outputs it back into the pipeline (ideally to the “destination” or the user’s speakers).
Chrome has a great intro to Audio Worklet’s here, and they go deeper into design patterns as well.
Audio Worklets are a two part process. We need to chain another node through our audio output that handles the processing (just like the gain node above). Then we need to create a “module” that contains the code we want to run on the separate thread.
The Processor
In order to run code on the separate audio thread, we need a container for that code. The Web Audio API provides a AudioWorkletProcessor class we can extend and override the process() method to actually “process” some audio.
We also use a registerProcessor() function that registers our new process with the audio worklet backend. This is important, because later we’ll need to use this unique identifier (”white-noise-processor”) to create our node.
In the most simple case, this is what it’d look like:
class WhiteNoiseProcessor extends AudioWorkletProcessor {
  process(inputs: Float32Array[][], outputs: Float32Array[][], parameters) {
    const output = outputs[0];
    output.forEach((channel) => {
      for (let i = 0; i < channel.length; i++) {
        const randomNoise = Math.random() * 2 - 1;
        channel[i] = randomNoise;
        console.log("white noise", randomNoise);
      }
    });
    return true;
  }
}

registerProcessor("white-noise-processor", WhiteNoiseProcessor);
The process() method runs once the audio starts and updates constantly with 128 new audio samples in the inputs parameter for each channel.
The channels represent different “lanes” of audio playing. Most commonly, you’ll find 2 channels playing at once for the left and right of stereo speakers.
Each channel returns a Float32Array of the audio signal or “samples”. Each sample is an number ranging from -1 to 1.
We also have access to an outputs variable that you can mutate to send data to the next audio node in the chain. By default it returns 0 for everything, so you won’t hear anything unless you update it. If you’re using the worklet for crunching audio data, you should make outputs = inputs so the user can still hear the audio (unless they don’t need to).
And finally, we return true from our process() method so the processor stays alive. If we return false it will stop processing (useful if you’re done analyzing something).
There’s a bit more to the processor, and we’ll get into it once we start to add the WASM. But this is basically it, just a class with a single function that runs constantly on a separate thread when the audio context is playing.
📁 We’ll get into it later, but this is a standard JavaScript class, so feel free to use it like that. If you need to store data, add properties to the class and access them using
this.variableName. This blog post goes over more features I won’t touch on, like parameters.
Typescript types
You might notice that Typescript won’t recognize some of these classes. As of writing this article (June 2025) the official DOM types don’t include these by default. You’ll need to create a Typescript definition file in your project with placeholder types:
// @via: github.com/kgullion/vite-typescript-audio-worklet-example/blob/main/src/worklet.d.ts
// @see: github.com/microsoft/TypeScript/issues/28308#issuecomment-650802278
interface AudioWorkletProcessor {
  readonly port: MessagePort;
  process(
    inputs: Float32Array[][],
    outputs: Float32Array[][],
    parameters: Record<string, Float32Array>,
  ): boolean;
}

declare var AudioWorkletProcessor: {
  prototype: AudioWorkletProcessor;
  new (options?: AudioWorkletNodeOptions): AudioWorkletProcessor;
};

declare function registerProcessor(
  name: string,
  processorCtor: (new (
    options?: AudioWorkletNodeOptions,
  ) => AudioWorkletProcessor) & {
    parameterDescriptors?: AudioParamDescriptor[];
  },
): void;
The Node
The AudioWorkletNode works similar to other audio nodes, like the GainNode I mentioned earlier.
You use the audio context to access the audioWorklet property, and then use the addModule() method on that to import the code we want to on the separate thread. This loads the JS on the browser’s backend so it can run on the audio thread.
import PitchDetectorWorklet from "../../workers/pitch-detector.ts?url";

await audioCtx.audioWorklet.addModule(PitchDetectorWorklet);
📁 The
addModule()method accepts a URL to our JS file. Since we’re using Vite as a bundler, and writing in Typescript, we can use theimportthe module and append the path with?urlto get a URL version of the path. And it also magically converts it from Typescript to JavaScript (more on that later).
Then we can create a “node” that contains an instance of our audio worklet. We use the AudioWorkletNode class and pass it the audio context and a unique key that identifies our module we imported earlier.
const audioWorklet = new AudioWorkletNode(audioCtx, "pitch-detector");Chain the node into your output and you’re good to go. In our case, let’s just add it to the Zustand store so our <AudioPlayer /> can pick it up.
const { addAudioNode } = useAudioStore();
addAudioNode(audioWorklet);
And that’s it! You have a worklet setup, wired into the audio context, and it should be receiving and sending audio data.
In this specific case, if we play the music, we’ll hear a lot of white noise instead of hearing any of the song. This is because we generated pure white noise, and didn’t factor in any of the inputs containing our song’s audio signal.
Rust → WASM
Now that we have a worklet setup and processing in a separate thread, let’s try to create a Rust function that also generates white noise and use that instead of our JavaScript code.
In order to run Rust code on the web, we’ll need to compile it into a language called Web Assembly (or WASM). This converts Rust to a special type of code that’s more language agnostic. This “WASM” code gets loaded and parsed on the web, and lets us tap into the functionality of our Rust code.
We’ll be using wasm-pack to compile and bundle our WASM code, as well as automatically generate lots of handy JS and TS glue code. Make sure to install that globally, or in the container/environment running your project.
📁 If you’re not familiar with this process, I recommend following this tutorial for creating a game of life using Rust and WASM. Or if you’re in a hurry, check out their project template or my project template (simlar and simpler with less debug support).
Setting up from scratch
- Installed
wasm-packglobally to build project. - Created a new project:
cargo new wasm-test - Added WASM package:
cargo add wasm-bindgen - Updated
Cargo.tomlto include a[lib]category withcdylibandrlibconveying we’ll be exporting shared C and Rust library code.
[package]
name = "wasm-test"
version = "0.1.0"
authors = ["Ryosuke Hana"]
edition = "2021"

[lib]
crate-type = ["cdylib", "rlib"]

[dependencies]
wasm-bindgen = "0.2.100"
- Added library code to export inside of a
lib.rsfile:
use wasm_bindgen::prelude::*;

#[wasm_bindgen]
extern "C" {
    fn alert(s: &str);
}

#[wasm_bindgen]
pub fn greet() {
    alert("Hello World!");
}- Build code
wasm-pack build(see more info here) - Check the
/pkgfor the WASM build and nice JS and type definition glue files.
That simple! It’s really cool how far the Rust WASM ecosystem has grown since I first used it, shoutout to all the contributors.
Now to test it:
yarn linkin the/pkgfolder since they make a nicepackage.jsonfor ya.- Made a new Vite project a separate project folder:
yarn create vite - Installed the WASM package
yarn add wasm-test - Imported the
greetfunction and used it.
But….this is where I got my first hiccup.
I got an error from Vite that ESM (the format we bundle our JS into) doesn’t support WASM yet. Luckily the error had great context and told me exactly what to do.
ESM integration proposal for Wasm" is not supported currently. Use vite-plugin-wasm or other community plugins to handle this. Alternatively, you can use `.wasm?init` or `.wasm?url`. See https://vite.dev/guide/features.html#webassembly for more details.Installed vite-plugin-wasm and changed build target to esnext to target modern browsers (so I don’t have to polyfill async await).
Now it works! We can run Rust code inside of our browser.
If you want to make any changes, just update the Rust code, run the wasm-pack build process again, and your web project should automatically refresh (since one of the NPM modules updated).
Why do we need a Vite plugin?
You actually don’t need a Vite plugin if you don’t want to use it - or you have a different kind of build system for your project.
The reason we use a Vite plugin is because it automatically loads and initializes our WASM for us when we import any functions from it. The JS module that wraps our Rust WASM code also might need compiling for a specific browser target - which our Vite build system handles.
But we can do all that manually if we need to. If you export your Rust code with wasm-pack --build web, it pre-compiles the WASM’s JS code, so you can just use the module directly. So instead of just using import for the WASM code, we’d need to something like this:
import init, { greet } from "wasm-test";

// Fetch the WASM. Ideally it'd be served to server (like `/public` folder)
const response = await fetch("/path/to/wasm-test.wasm");
const data = await response.arrayBuffer();

// Initialize the WASM module with our preloaded data
init(data);
If you look inside the /pkg folder that wasm-pack generates, you’ll see that it exports a init() function that essentially uses the WebAssembly.instantiate() method to load and boot up the WASM code.
Keep this in mind, because we’ll be using this process later…
White Noise module
Now that we can use our Rust code in the browser, we need to make something we can use in our audio pipeline. Let’s make a quick white noise module that partially replicates the functionality we were getting from the JavaScript Math.random() code.
use std::f32::consts::PI;
use wasm_bindgen::prelude::*;

#[wasm_bindgen]
pub fn greet(greeting: f32) -> f32 {
    let sample = (greeting * 440.0 * 2.0 * PI).sin();

    sample
}
We take an input number and just do a bunch of random math on it, then sin() it to get it back to a 0 to 1 range.
📁 Rust doesn’t have a built-in function for random-ness like JS or even C++. It’s in a separate
randcrate. When I tried to import and use that, I got some build errors fromwasm-pack. So this was a simpler compromise to true randomness for sake of execution speed. And ideally we’d go from-1to1- but yeah, you get the idea.
If you build this code with wasm-pack and try running it in a random app (like a fresh Vite app), you’ll see it returns numbers like 0.001 and increments upwards depending on the input number. This will work great for our audio worklet.
Using WASM in Audio Worklets
So we have an Audio Worklet that processes our audio in a separate thread, and now we have a WASM module that runs Rust code for us on the web. How do we combine the two? This is where things get a bit tricky and I had to do a bit of digging to figure it out.
Let’s just dive in and see the problems, then I can explain why they happen.
Shaking the bug tree
If you try using the WASM module inside the AudioWorkletProcessor class, you’ll find that you get some errors. Maybe it’s for TextEncoder or TextDecoder missing.
Why do we get these errors? Why does the WASM code work outside the worklet fine — but crashes inside?
The first thing we need to understand is how the AudioWorkletProcessor works a bit more. When we created our worklet, we “registered” it and passed in a URL to the module. The browser takes that JavaScript code and stores it in a cache somewhere to run later on a separate thread. When it runs the code, it’s not within the scope of the browser, it’s in it’s own scope (likely somewhere in C++ land to run faster without the burden of the full browser context).
This is similar to a NodeJS module if you’ve ever worked with one. You don’t have access to global browser variables like window or document - or many API’s and functions only available inside the browser context. That includes TextEncoder.
Now the first instinct might be to create a polyfill, but let’s take a step back for a second and look at the wasm-pack docs more closely. If we look at the Deployment section under “without a bundler”, we can see more information about compiling our WASM library.
Because the Audio Node needs to load a .js file, it needs to be pre-compiled (using a process like Webpack or Vite) so that the browser can run the code. For example, we couldn’t pass in a Typescript file directly because the browser couldn’t read it (unless it magically contained no TS code or something but that’s besides the point).
📁 But wait you say - didn’t we use a Typescript file earlier? That’s the benefit of the Vite build system we’re using. It pre-compiles the module for us. It’s pretty nice.
For our WASM library to be able to load in this context, we’ll need to compile it to a web target. If we look at the docs for the build command, we can see that if we use a web target, we need to manually load and instantiate our WASM.
So let’s do that. We’ll initialize the WASM in the constructor and then use the function in our process() method like we need.
// 🐛 Code is purposefully buggy, don't use as working reference
import init, { greet } from 'wasm-test';

class WhiteNoiseProcessor extends AudioWorkletProcessor {
	constructor() {
		super()
		// Initialize the WASM when we create this class
	  init();
  }

  process(inputs: Float32Array[][], outputs: Float32Array[][], parameters) {
	  // Run the WASM!
	  greet()

    return true;
  }
}

registerProcessor("white-noise-processor", WhiteNoiseProcessor);
But…this doesn’t work.
We get a new error, that URL isn’t defined. And in this case, it isn’t as simple as a polyfill.
Why are we getting this error? The same reason I mentioned above. The AudioWorkletProcessor runs in a “NodeJS”-type context where there’s no browser APIs — like URL in this case. And our init() method uses that API under the hood to load our WASM from a file path or URL.
So how do we circumvent this? We just load the WASM outside, then send the data to the AudioWorkletProcessor using it’s built-in messaging system.
The Correct Way
Now that we have an understanding of what not to do, let’s finally see how to put all the puzzle pieces together.
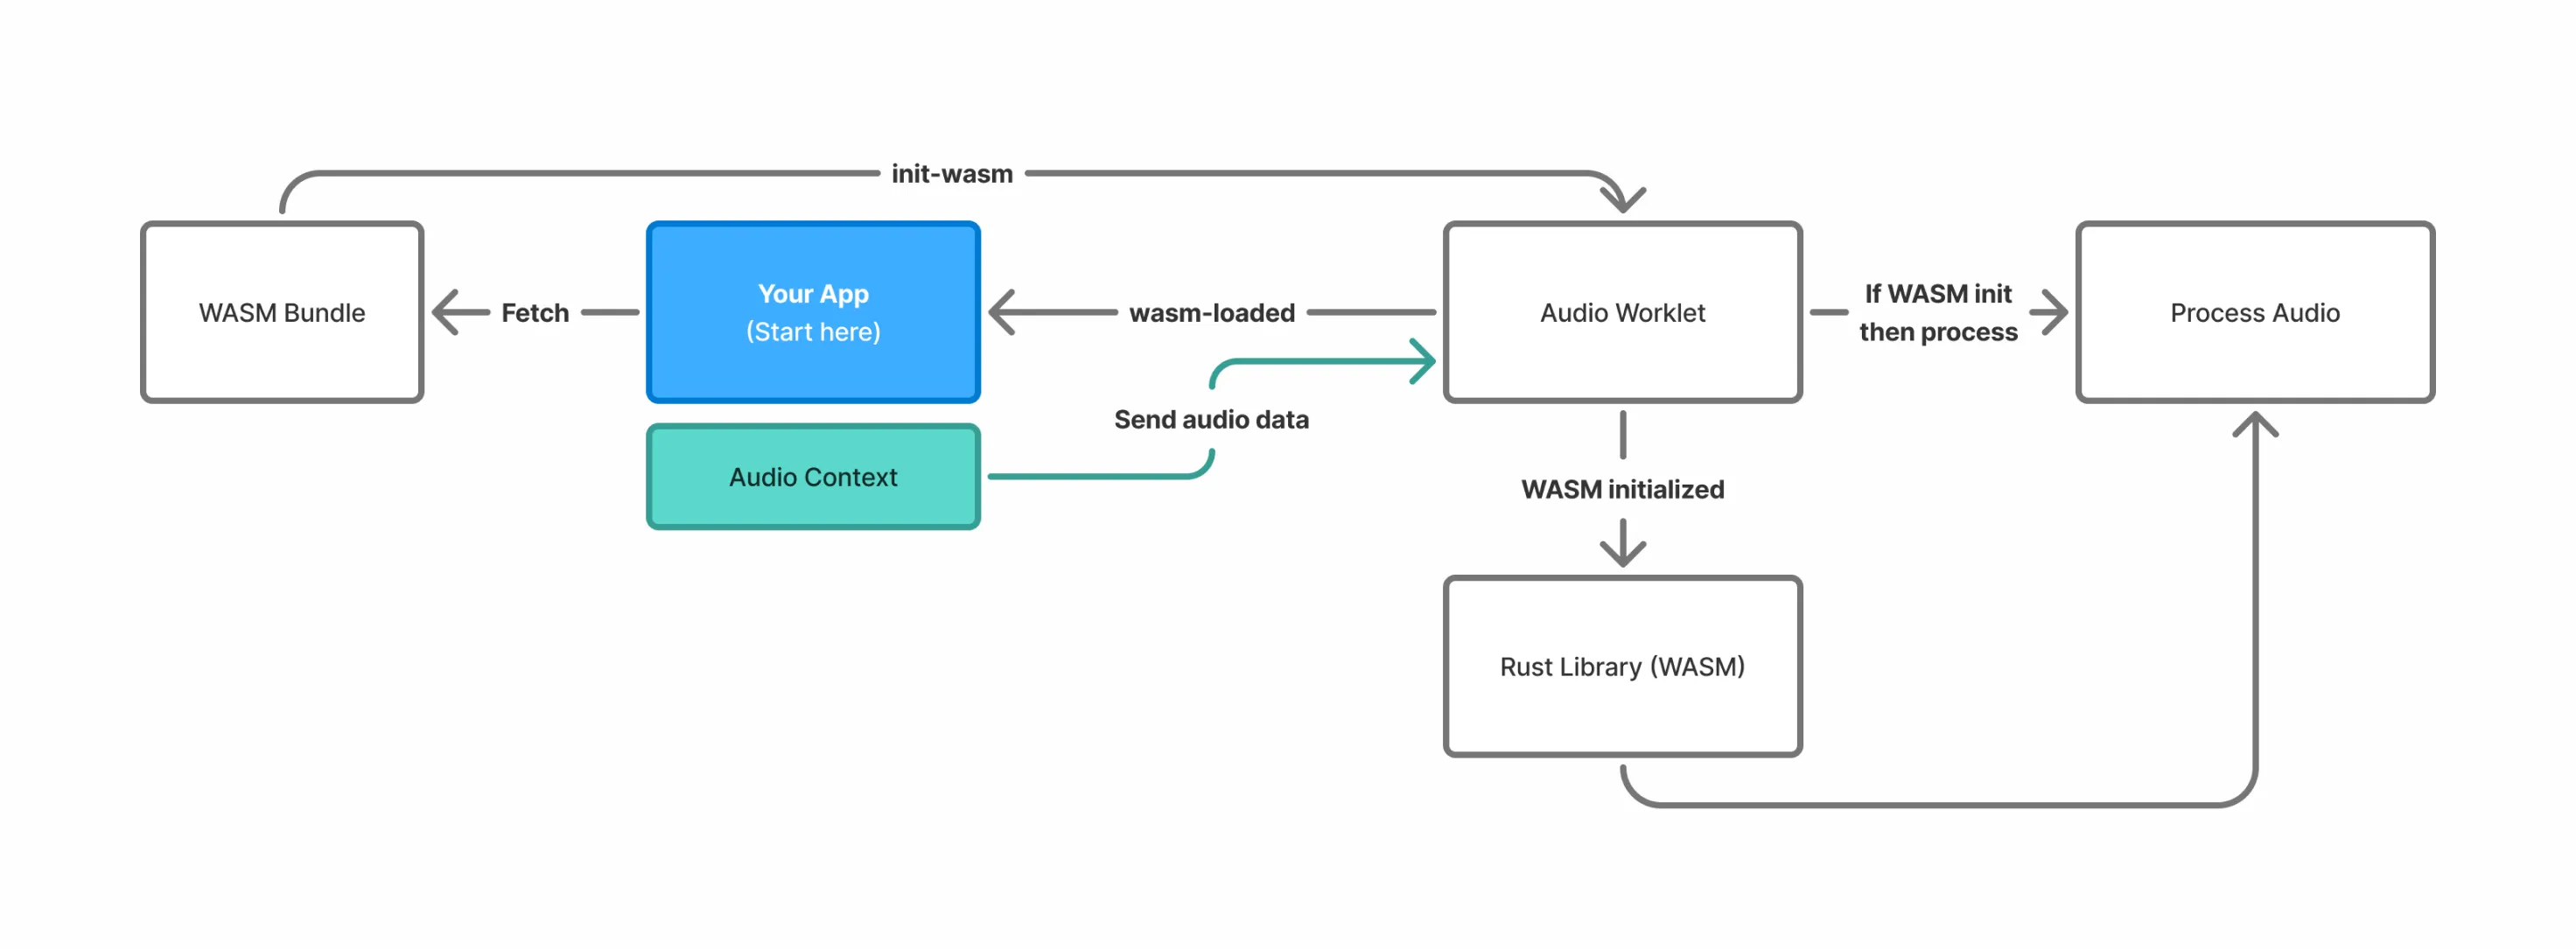
Here’s what the process is going to look like on a high level. Since we’re going to leverage the messaging system to send and receive data inside and outside the worklet — we’ll be doing a lot of back and forth.
- Fetch the WASM and convert it to an array buffer
- Create an
AudioWorkletNodewith ourAudioWorkletProcessorinside. - Send a message to the worklet using the
postMessage()method on theportproperty that contains our WASM data. We’ll name the messageinit-wasm. - We also subscribe to the
onmessageproperty, so whenever a message is sent, we can also see it outside the worklet. - Receive the
init-wasmmessage inside the worklet and initialize the WASM using theinit()method (but using our array buffer data instead of a URL). - Once we’ve
await-ed the initialization (since it’s a Promise-based system), we send anotherpostMessage- this time from inside the worklet to the outside. The message will be a simplewasm-loaded. - Outside the worklet, we detect the
wasm-loadedmessage and we can either run it immediately (if it’s a simple function) — or we can initialize another class we export from our Rust code. This is useful if you have a class on the Rust side that you need to use (like a 3rd party library - likepitch-detectionin this case). - (Optional) The worklet receives the
init-detectormessage with the necessary config data and sends the data to WASM to initialize the Rust class. - (Optional) Then we can use the pitch detection class (from Rust - via WASM) to process our audio.
That’s a lot, but we can skip the last 2 steps if you aren’t doing complex work.
Let’s tackle steps 1-4 first:
import PitchDetectorWorklet from "../../workers/pitch-detector.ts?url";
import wasm from "rust-wasm-audio/rust_wasm_audio_bg.wasm?url";

const nodeRef = (useRef < AudioWorkletNode) | (null > null);
const { audioCtx, addAudioNode, removeAudioNode } = useAudioStore();

const createNode = async () => {
  // Fetch the WASM module
  const response = await fetch(wasm);
  const wasmData = await response.arrayBuffer();

  // Create the worklet
  console.log("creating worklet...");
  try {
    await audioCtx.audioWorklet.addModule(PitchDetectorWorklet);
    nodeRef.current = new AudioWorkletNode(audioCtx, "pitch-detector");

    // Send the WASM payload to Audio processor
    nodeRef.current.port.postMessage({ type: "init-wasm", data: wasmData });
    // Get messages from the worklet/processor
    nodeRef.current.port.onmessage = handleNodeMessage;

    console.log("created worklet node", nodeRef.current);
    addAudioNode(nodeRef.current);
    setLoaded(true);

    nodeRef.current.addEventListener("processorerror", (e) =>
      console.error("Audio Worklet processing error", e),
    );
  } catch (e) {
    console.log("failed to create worklet", e);
  }
};
Now that we created our worklet and sent our WASM bundle, let’s take a look at how to use it to initialize the WASM.
import init, { greet } from "rust-wasm-audio";

class WhiteNoiseProcessor extends AudioWorkletProcessor {
  constructor() {
    super();

    this.port.onmessage = (event) => this.onmessage(event.data);
  }

  onmessage = (event: { type: string; data: ArrayBuffer }) => {
    if (event.type === "init-wasm") {
      init(WebAssembly.compile(event.data)).then(() => {
        this.port.postMessage({ type: "wasm-loaded" });
      });
    }
  };

  process(inputs: Float32Array[][], outputs: Float32Array[][], parameters) {
    const output = outputs[0];
    output.forEach((channel) => {
      for (let i = 0; i < channel.length; i++) {
        const randomNoise = greet(i);
        // const randomNoise = Math.random() * 2 - 1;
        channel[i] = randomNoise * 10;
        console.log("white noise", randomNoise);
      }
    });
    return true;
  }
}

registerProcessor("white-noise-processor", WhiteNoiseProcessor);
📁 Keep note you can
console.log()inside theprocess()function as much as you need to see what’s going on. It can be difficult to debug audio data in general (with such large arrays of just numbers), so this is helpful to just tap in.
The major difference here from before is the constructor() method. There we subscribe to messages using the onmessage property, and passing it a class method this.onmessage() to handle it. In that method, we check for the messages by checking the event parameter passed to the function. It’s useful to just console.log() with the event data inside this method just to see what’s going on.
When we receive the init-wasm message we run the same init() method we imported from WASM module, but this time we pass it our WASM data after compiling it using WebAssembly.compile(). Once it’s done loading, we send the wasm-loaded message back outside.
And with that, you should be able to use any WASM exported functions or classes inside the AudioWorkletProcessor with no problem.
You can see a full example on GitHub here.
🆕 If you’d like to see a few different ways to handle this, Google Chrome Labs has an example up in their repo - and a section of their design patterns breaking down the architecture. There was also a nice example in this ruffbox project that’s similar to what we’re doing here.
Pitch Detection example
But what if needed to send audio data to Rust? And what if we wanted to use a 3rd party library to process that data? Let’s make a quick pitch detection module to see how that works.
📁 The pitch detection code is mostly inspired by this great tutorial that covers this topic as well if you’re interested in how it works. You can also check my git branch for the full example code.
Sending audio data to Rust
When we run the process() method in our AudioWorkletProcessor, we get 128 “samples” of our music. It’s basically an array of numbers from -1 to 1 that represents the current sound playing.
Ultimately all we’re sending to Rust is an array of numbers. But if we try to do that, we’ll get some errors from the wasm-bindgen library. It expects more exacting data types - since it’s working with low level code that cares about those details.
So we need to use a Float32Array to represent our Array<number> instead. It’s basically the same thing, but we don’t get convenient methods from the Array class like push().
So the most simplest case of sending audio samples would be:
import { sendData } from "wasm-test"';

class PitchDetector extends AudioWorkletProcessor {
  process(inputs: Float32Array[][], outputs: Float32Array[][], parameters) {
    sendData(new Float32Array([...inputSamples]);
  }
}
And on the Rust side, you’d want to check for that array:
pub fn get_pitch(samples: &[f32]) -> f32 {
	// Loop over the samples like any other array in Rust
}
And with that, you can process and crunch the audio data as needed.
Sample buffer
But 128 samples isn’t often enough data to get a good idea of what’s going in the audio signal. We may need a larger data set like 512, or 1024 instead. How would we handle that process?
Our process() method gives us 128 samples each time. We can take those samples and store them locally in the AudioWorkletProcessor as a property. Then when we’ve stored enough samples, we can send it over to the Rust code for evaluating.
import init, { PitchDetectorModule } from "rust-wasm-audio";
import type {
  AudioWorkletEventMessage,
  PitchDetectEventInit,
  PitchDetectEventInitDetector,
  PitchDetectorOptions,
} from "./types";

class PitchDetector extends AudioWorkletProcessor {
  detector: PitchDetectorModule | null = null;
  samples: Float32Array = new Float32Array([]);
  numSamplesPerAnalysis: number = 1024; // our fftSize input from earlier

  // 🗑️ Omitted the constructor and onmessage methods

  process(inputs: Float32Array[][], outputs: Float32Array[][], parameters) {
    // We only grab from the first channel for testing
    // This is equivalent to "mono" sound (1 channel)
    const currentChannel = inputs[0];
    if (!currentChannel) return true;
    const inputSamples = currentChannel[0];
    if (!inputSamples) return true;

    // Fill buffer as needed
    if (this.samples.length < this.numSamplesPerAnalysis) {
      // console.log("collecting samples");
      // Add the input samples to our internal sample state
      this.samples = new Float32Array([...this.samples, ...inputSamples]);
    } else {
      // console.log("buffer full, shifting");
      // Buffer is full, so we shift it to accommodate new samples
      const numNewSamples = inputSamples.length;
      const numRemainingSamples = this.samples.length - numNewSamples;
      const remainingSamples = this.samples.slice(0, numRemainingSamples);
      this.samples = new Float32Array([...remainingSamples, ...inputSamples]);
    }

    // Get the pitch data here

    return true;
  }
}

registerProcessor("pitch-detector", PitchDetector);
Here we pick the first “channel” we find, which is usually the left side of a stereo audio output. We check if we have enough samples (based on a config we pass when initializing), and if we don’t we just put the samples into the back of our array. If we have enough samples, we want to keep a full buffer, so we use .slice() to take the back chunk of the array and merge it with the new samples.
Then finally when we have enough samples, we can run the pitch detection module and pass it the array of samples.
📁 Not sure what’s better in terms of performance, taking the array and looping over each item and shifting, then looping over new items and adding them — or just ES6 spread merge like I did. But this version is much cleaner and simpler to work with.
Using a 3rd party library
Like I mentioned earlier, once our WASM is loaded, we might want to initialize a 3rd party Rust module. We can use the pitch-detection crate for Rust to detect pitch from audio samples.
If we look at the pitch-detection crate docs we can see an example of how it works on the most rudimentary level:
use pitch_detection::detector::mcleod::McLeodDetector;
use pitch_detection::detector::PitchDetector;

fn main() {
    const SAMPLE_RATE: usize = 44100;
    const SIZE: usize = 1024;
    const PADDING: usize = SIZE / 2;
    const POWER_THRESHOLD: f64 = 5.0;
    const CLARITY_THRESHOLD: f64 = 0.7;

    // Signal coming from some source (microphone, generated, etc...)
    let dt = 1.0 / SAMPLE_RATE as f64;
    let freq = 300.0;
    let signal: Vec<f64> = (0..SIZE)
        .map(|x| (2.0 * std::f64::consts::PI * x as f64 * dt * freq).sin())
        .collect();

    let mut detector = McLeodDetector::new(SIZE, PADDING);

    let pitch = detector
        .get_pitch(&signal, SAMPLE_RATE, POWER_THRESHOLD, CLARITY_THRESHOLD)
        .unwrap();

    println!("Frequency: {}, Clarity: {}", pitch.frequency, pitch.clarity);
}
It looks like they define a few key variables, like a sample rate, and the signal itself which they mock as a sine wave. Then they instantiate the pitch detection class (or struct with impl in Rust), and use that “class” to get the pitch data (like it’s frequency - aka does it sound like a C, D#, or G piano key?).
If we translate this to to a WASM library, it’d look like this:
use pitch_detection::detector::{mcleod::McLeodDetector, PitchDetector};
use wasm_bindgen::prelude::*;

#[wasm_bindgen]
pub struct PitchDetectorModule {
    sample_rate: usize,
    fft_size: usize,
    detector: McLeodDetector<f32>
}

#[wasm_bindgen]
impl PitchDetectorModule {
    pub fn new(sample_rate: usize, fft_size: usize) -> PitchDetectorModule {
        let padding = fft_size / 2;
        PitchDetectorModule { sample_rate, fft_size, detector: McLeodDetector::<f32>::new(fft_size, padding), }
    }

    pub fn get_pitch(&mut self, samples: &[f32]) -> f32 {
        if samples.len() < self.fft_size {
            panic!("Not enough samples!")
        }

        // Settings from pitch-detection example
        // Only include notes within a threshold of the amplitude of the frequency.
        const POWER_THRESHOLD: f32 = 5.0;
        // Another threshold for the "clarity" of sound or how "sharp" a noise is
        const CLARITY_THRESHOLD: f32 = 0.7;


        let pitch_result = self.detector
            .get_pitch(&samples, self.sample_rate, POWER_THRESHOLD, CLARITY_THRESHOLD);

        match pitch_result {
            Some(pitch) => pitch.frequency,
            None => 0.0,
        }

    }
}
We have a PitchDetectorModule as a struct (which will become a JavaScript class). It has properties with the pitch detection libraries configuration variables we saw earlier, like the sample rate. Then we define a new() method to instantiate the underlying pitch detection “class”. And a get_pitch() method to use the pitch detection, which accepts our samples as it’s first parameter (aka an array of floats).
Now we can compile this using wasm-pack and start working on the audio worklet side.
To initialize the pitch detection module, we’ll have to wait until the WASM has loaded. We could do it directly in the promise after compiling our WASM, but we’ll send a postMessage outside so a user could change settings afterwards (but honestly, we could just send the config when we initially send our fetched WASM data).
import init, { PitchDetectorModule } from "rust-wasm-audio";
import type {
  AudioWorkletEventMessage,
  PitchDetectEventInit,
  PitchDetectEventInitDetector,
  PitchDetectorOptions,
} from "./types";

class PitchDetector extends AudioWorkletProcessor {
  detector: PitchDetectorModule | null = null;
  samples: Float32Array = new Float32Array([]);
  numSamplesPerAnalysis: number = 1024; // our fftSize input from earlier

  constructor() {
    super();
    this.port.onmessage = (event) => this.onmessage(event.data);
  }

  onmessage = (event: PitchDetectEventInit | PitchDetectEventInitDetector) => {
    console.log("event in module", event, event.type, event.data);
    // Handle loading WASM module
    if (event.type === "init-wasm") {
      init(WebAssembly.compile(event.data)).then(() => {
        this.port.postMessage({ type: "wasm-loaded" });
      });
    }
    if (event.type === "init-detector") {
      const { sampleRate, fftSize } = event.data;
      this.numSamplesPerAnalysis = fftSize;
      this.samples = new Float32Array(fftSize);
      this.detector = PitchDetectorModule.new(sampleRate, fftSize);
    }
  };

  process(inputs: Float32Array[][], outputs: Float32Array[][], parameters) {
    return true;
  }
}

registerProcessor("pitch-detector", PitchDetector);
Similarly, when we receive the init-detector message, we grab the pitch detector class we exported from Rust (PitchDetectorModule) and initialize that using the config data we sent in the message. It’s not a standard JavaScript class, so you don’t use new PitchDetectorModule() with it — you’ll actually just use it statically like PitchDetectorModule.new().
With that, we can start processing the samples that we built up in our buffer:
if (this.samples.length >= this.numSamplesPerAnalysis && this.detector) {
  // Send samples to Rust code and get result back
  const pitch = this.detector.get_pitch(this.samples);
  console.log("got pitch", pitch, this.samples);

  // Send pitch outside to save + show user
  if (pitch > 0) {
    this.port.postMessage({
      type: "send-pitch",
      data: pitch,
    });
  }
}
Then once we have the pitch from Rust, we can send it back to our frontend (aka outside the worklet) using postMessage().
The potential
Using WASM on the web, you really unlock a whole new area of potential libraries to use. And with audio programming, the best code is in C++, and soon - Rust. Getting to leverage that is incredibly valuable in itself, but the performance gains you receive from using low-level code is invaluable.
I’d browse through the audio section of Rust’s crates and see what kind of libraries you can start to tap into. I’ve used crates like midir in the past to handle MIDI input and output with great success, or audio-processor-analysis to check for peaking levels or analyze the signal using FFT.
I’d also recommend checking out some of the examples from Google Chrome Labs and the ruffbox project. And if you’re interested in a more extreme example, this web-synth by Ameobea runs an entire Rust server on the backend in WASM that the frontend uses through audio worklets. The Rust server manages it’s own web audio context.
Stay curious,
Ryo
comments?
what's up?