
Posted on
June 30, 2025
Recently had a wild idea - what if I could take a Rive animation and run it inside a 3D scene? This was surprisingly easy to setup using ThreeJS and their CanvasTexture API.
This blog will be a quick one that goes over my process for creating a 3D MIDI sequencer that uses a Rive animation as it’s screen. And to take it to the next level, we’ll use Rive’s new data binding API to send audio data and animate a waveform with it.
Check out the source code for this project here if you want to spin it up or follow along.
📁 I’ll be coding mostly using ReactJS, so I’ll be using
react-three-fiber- a wrapper around ThreeJS. You could do this all in pure ThreeJS if you needed.
Texturing in general
Let’s say you have a 3D model, in the simplest case - a plane - a flat rectangle in 3D space.
If you wanted to show a picture in 3D (like a photograph) you could create a “material” with the picture as a “texture”, and assign that to the plane. This would show the picture as the plane.
This is how that process would look:
import CanvasDebug from "@/components/CanvasDebug/CanvasDebug";
import { Canvas, useLoader } from "@react-three/fiber";
import React from "react";
import { Color, TextureLoader } from "three";

type Props = {};

const COLOR_PRIMARY = new Color("#0B49AF");

const TextureExample = (props: Props) => {
  const colorMap = useLoader(TextureLoader, "../images/avatar.jpg");
  return (
    <Canvas>
      {/* FPS, OrbitControls, etc */}
      <CanvasDebug />

      <ambientLight intensity={0.1} />
      <directionalLight position={[0, 0, 5]} />

      {/* Textured plane */}
      <mesh rotation={[0, Math.PI / 4, Math.PI / 4]}>
        <planeGeometry />
        <meshStandardMaterial map={colorMap} />
      </mesh>

      {/* Wireframe plane */}
      <mesh position={[0, 0, 0.1]} rotation={[0, Math.PI / 4, Math.PI / 4]}>
        <planeGeometry />
        <meshStandardMaterial wireframe color={COLOR_PRIMARY} />
      </mesh>
    </Canvas>
  );
};

export default TextureExample;
And here’s what it looks like on the web:

📁 If you want to try running this example, you can find it inside my 3D Web Sketchbook.
So we take an image, then load it and convert it using ThreeJS TextureLoader into a data format that’s appropriate for texture.
Then we pass that texture data to our meshStandardMaterial, which displays it using it’s underlying vertex and fragment shaders.
So that’s cool, we can use this to display a static image. But what if we wanted to use a dynamic image - something that would could “draw” to?
That’s where <canvas> and CanvasTexture comes into play. It allows us to convert the canvas data into texture data, and maps it to our material.
Using CanvasTexture with <canvas>
Before I go too deep into the process of making a whole Rive animation for this, I figured I’d make a POC (proof of concept). Instead of using Rive, I’ll use a regular canvas that I draw to. This’ll be a nice baseline test of the CanvasTexture API.
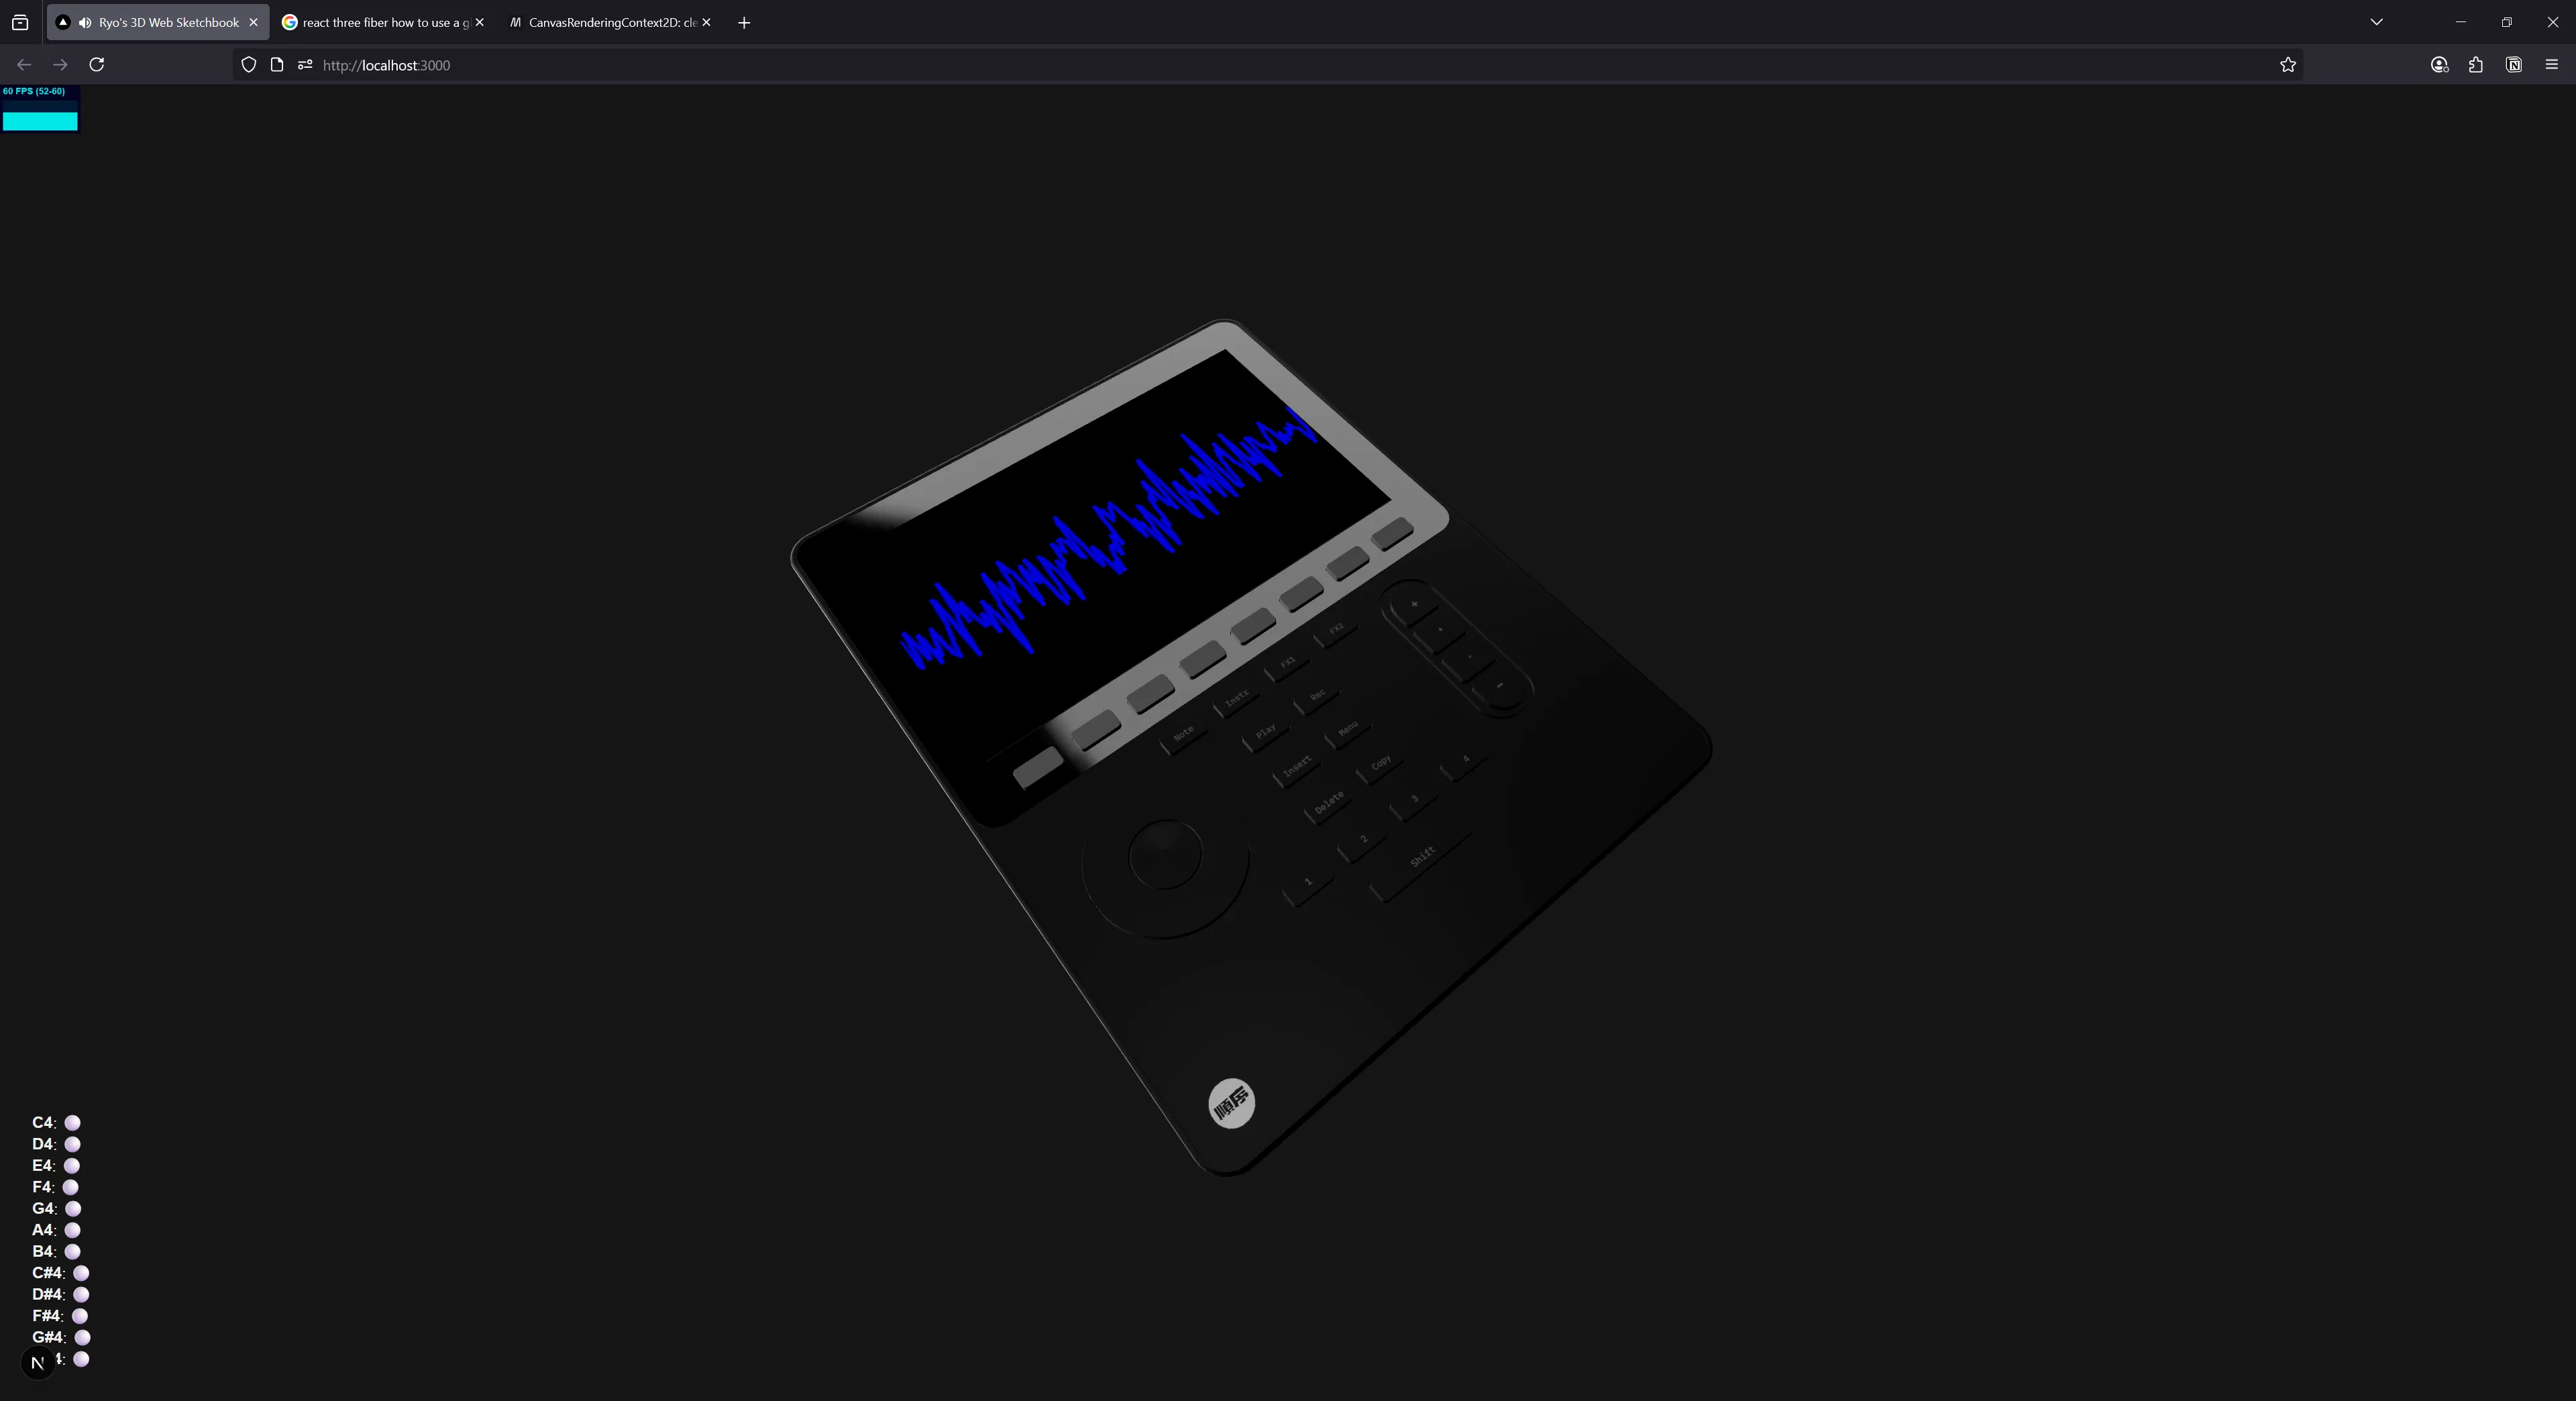
One of the most common ways to work with the <canvas> element is making an audio visualizer. With the Web Audio API we can analyze the current audio output to generate waveform data, and use a canvas to draw it.
That’s what we’ll do - we’ll play an audio file and show the user what the sound looks like. And we’ll use that canvas inside of our 3D scene as the screen for a MIDI device.
The 3D setup
I modeled and textured a Polyend Tracker Mini in Blender to use for this project. I optimized it for web, so it’s fairly low poly (translating to lower file size), and I separated each device component as an object (for example, each button is a separate object labeled named like “Button.Rec”). They’re all parented to a single MIDI.Sequencer empty object (a nice trick in Blender for “grouping” objects like folders in Photoshop).
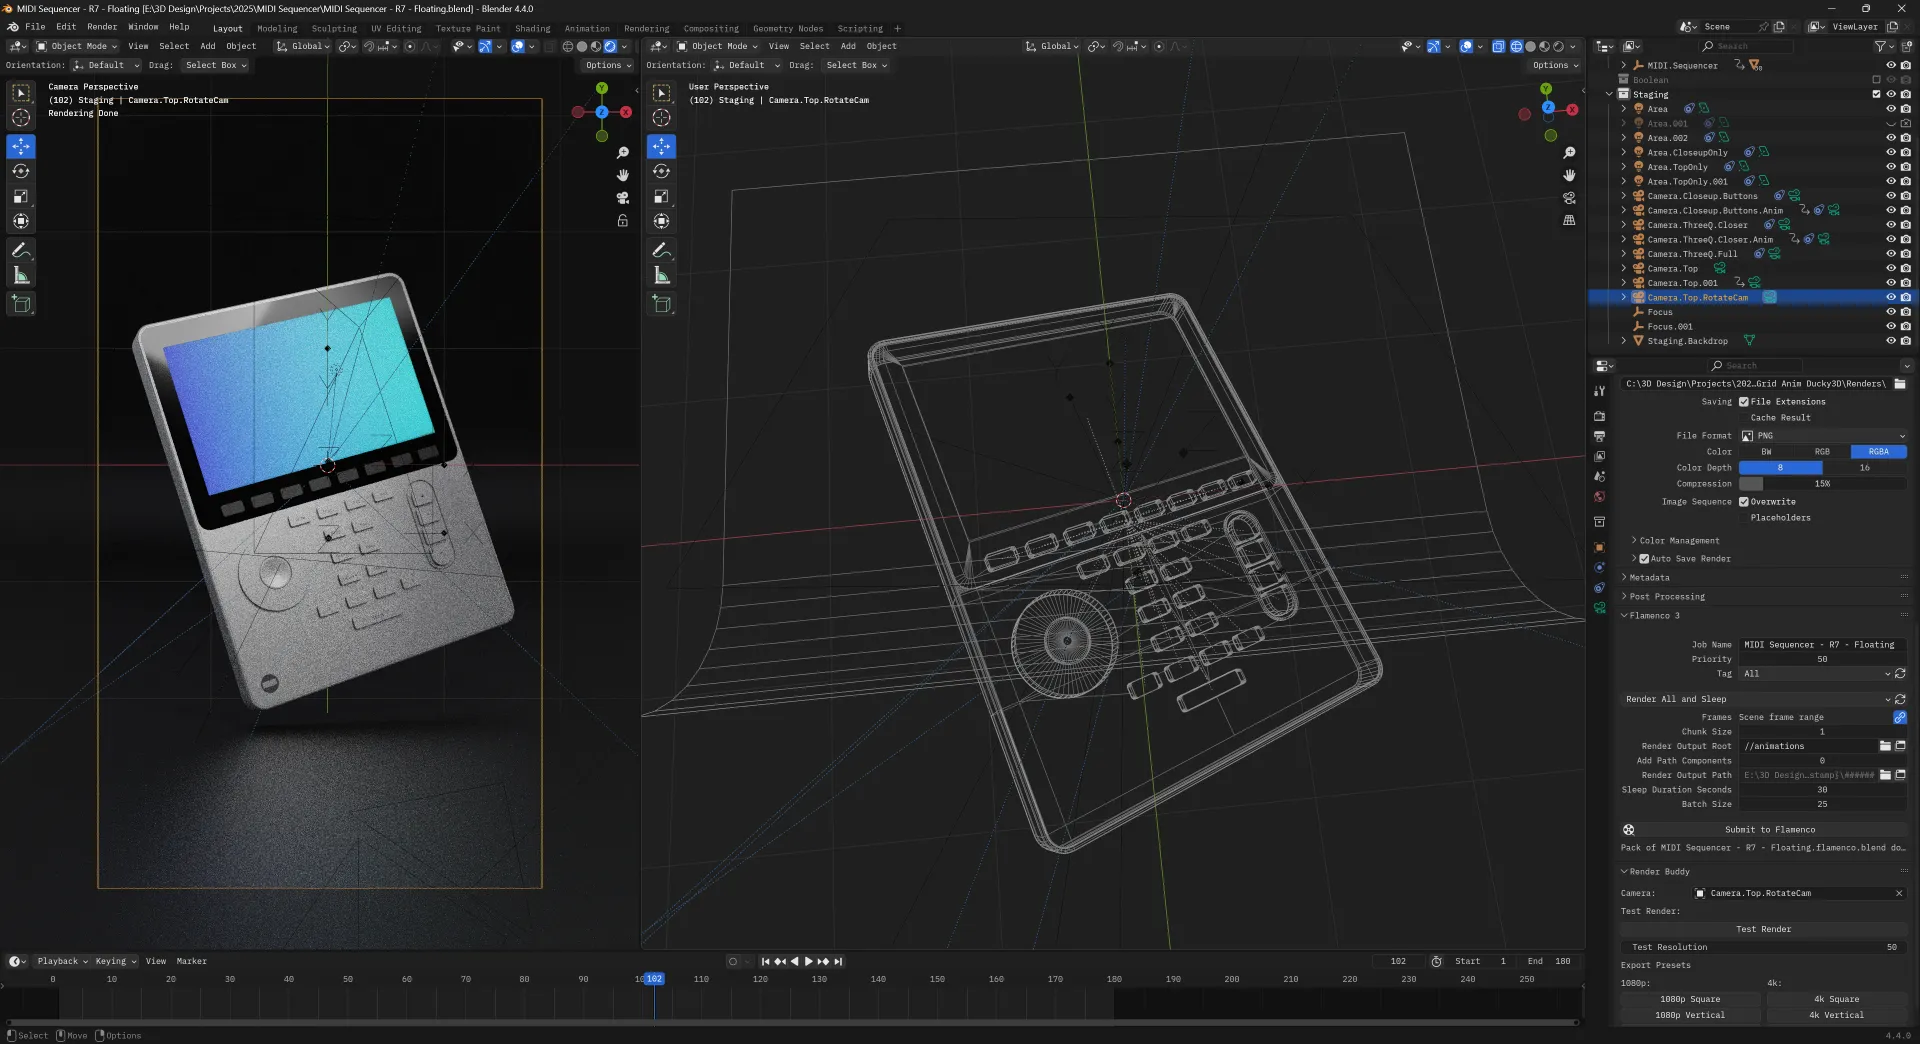
I exported the 3D model as a GLTF and imported it into ThreeJS (technically react-three-fiber). The 3D model has a separate screen mesh exported, and that has it’s own material attached. I generate a React component from the GLTF file using the gltf2jsx CLI that contains <group> with all our nested objects inside.
📁 Interested in hearing more about this kind of process - like say - making this 3D object interactable and animated? Check out my previous blog on making a 3D piano in ThreeJS.
Instead of nesting a meshStandardMaterial under the screen’s <mesh>, we pass an <AnimatedScreenMaterial> component, which will contain the ThreeJS canvas texture material.
export function MIDISequencer(props: JSX.IntrinsicElements["group"]) {
  const { nodes, materials } = useGLTF(
    "/models/MIDI Sequencer - R5 - Web.glb",
  ) as unknown as GLTFResult;
  return (
    <group {...props} dispose={null}>
      <mesh geometry={nodes.Screen.geometry} position={[0, 0.114, -0.76]}>
        <AnimatedScreenMaterial />
      </mesh>
    </group>
  );
}

useGLTF.preload("/models/MIDI Sequencer - R5 - Web.glb");
Now that we have our 3D object that needs our texture, let’s create our canvas that we want to source from. We’ll get to the material eventually.
Setting up the canvas
We need a <canvas> element on the page somewhere that we can draw to, and have ThreeJS reference for the material texture.
The way canvas texture works is by using a “reference” to the original element.
In vanilla JS, this means you’d do a document.getElementById("#canvas") to grab the canvas, then pass it to the canvas texture API.
material = new THREE.MeshBasicMaterial();
const drawingCanvas = document.getElementById("drawing-canvas");

// set canvas as material.map (this could be done to any map, bump, displacement etc.)
material.map = new THREE.CanvasTexture(drawingCanvas);
With React, we could use that method, but it’s technically better practice to store the canvas element as a “ref” using the useRef hook. This basically gives us access to the element (exactly like getElementById() would) - but it works within the React framework.
Knowing this now, we’ll make a component called <GlobalCanvas> that will contain our canvas.
import useCanvasStore from "@/store/canvas";
import React, { useEffect, useRef } from "react";

type Props = {};

const GlobalCanvas = (props: Props) => {
  const localRef = useRef<HTMLCanvasElement | null>(null);

  return <canvas ref={localRef} width={1024 / 4} height={1024 / 4} />;
};

export default GlobalCanvas;
📁 Most 3D engines use square textures for materials. A standard texture size is often 1024 x 1024, or higher/lower depending on the resolution required. I used 256 x 256 on the canvas here since it renders out to a smaller screen.
But how do we access the canvas outside this component? We could use the React Context API to make a “CanvasContext” — but in my case I’ll keep it simple and just use a global data store like Zustand or Jotai.
import { Router } from "next/router";
import { RefObject } from "react";
import { create } from "zustand";
import { devtools, persist } from "zustand/middleware";

export interface CanvasState {
  canvasRef: RefObject<HTMLCanvasElement | null>;
  setCanvas: (canvasRef: RefObject<HTMLCanvasElement | null>) => void;
}

export const useCanvasStore = create<CanvasState>()(
  devtools((set) => ({
    canvasRef: null,
    setCanvas: (canvasRef) =>
      set((state) => ({
        ...state,
        canvasRef,
      })),
  })),
);

export default useCanvasStore;
Now back in <GlobalCanvas> we can save the ref to the useCanvasStore we just made.
const { setCanvas } = useCanvasStore();

useEffect(() => {
  setCanvas(localRef);
}, []);
Cool, now let’s actually use the texture with CanvasTexture.
📁 Why did we go through all that effort to make a store for the canvas element? Well we need to use it in the
CanvasTexture, but we also need to draw on it with waveform data. With this setup, this let’s us have separate components (like<Waveform>) that can operate independently. And it prevents us from duplicating the reference to the canvas across our app by using the same source of truth.
Using CanvasTexture
We have our 3D object, and we have a <canvas>, now let’s combine the two using CanvasTexture.
📁 You can find an official example of CanvasTexture here in the ThreeJS repo.
Let’s make the <AnimatedScreenMaterial> from earlier. This component returns a meshBasicMaterial with the canvasTexture nested inside with the ref to our <canvas> attached to it.
import useCanvasStore from "@/store/canvas";
import { createPortal, useFrame } from "@react-three/fiber";
import { RefObject, useEffect, useRef } from "react";
import { CanvasTexture } from "three";

export type CanvasMaterialProps = {};

function AnimatedScreenMaterial({}: CanvasMaterialProps) {
  const { canvasRef } = useCanvasStore();
  const [localCanvasRef, setLocalCanvasRef] =
    useState<HTMLCanvasElement | null>(null);

  // Sync the canvas to local state (to force re-render when canvas is synced)
  useEffect(() => {
    setLocalCanvasRef(canvasRef.current);
  }, [canvasRef]);

  useFrame(() => {
    if (canvasRef.current) {
      // 🔴 Required for animated canvas
      if (textureRef.current) {
        textureRef.current.needsUpdate = true;
      }
    }
  });

  return (
    <meshBasicMaterial>
      <canvasTexture ref={textureRef} attach="map" image={localCanvasRef} />
    </meshBasicMaterial>
  );
}

export default AnimatedScreenMaterial;
The image property of the <canvasTexture> should be our canvas element. If you console.log() the canvas variable, it should look like the canvas DOM element itself in the debugger.
In order to support animation, you’ll also need to access the <canvasTexture> element and change the needsUpdate property to true. This let’s ThreeJS know that the material will have new data to render every frame. By default it’ll “cache” the initial texture data and just keep using that.
Ref has it’s own “bugs”
There was one major issue with using ref to track the canvas. It worked fine if another component wanted to say - draw to the canvas. But the <canvasTexture> wouldn’t render the canvas on initial load - only when I hot reloaded the component during development.
I discovered that since the canvas element is stored as a ref - React doesn’t know when it’s initially null or when we actually store our <canvas> in it.
In order to to circumvent this, we need to store the ref as React state, so when the ref updates (basically just 1 time, when the canvas loads) - it’ll refresh the <canvasTexture> with the canvas data.
Here’s that snippet again from the code above:
const [localCanvasRef, setLocalCanvasRef] = useState<HTMLCanvasElement | null>(
  null,
);

// Sync the canvas
useEffect(() => {
  setLocalCanvasRef(canvasRef);
}, [canvasRef]);
After this - we should have our canvas connected to our 3D scene.
📁 If you still have issues here, instead of storing the
refin the Zustand store, save the actual element. Or consider using getting the canvas directly usingdocument.getElementById()and save that to local state (see below for example).
Draw directly
If you wanted, you could just draw to the canvas inside the <AnimatedScreenMaterial> component.
useFrame(() => {
  if (!canvasRef.current) return;
  const canvas = canvasRef.current;
  canvas.width = 256;
  canvas.height = 256;
  const ctx = canvas.getContext("2d");
  if (!ctx) return;
  console.log("canvas init - clearing with color", canvas, ctx);
  ctx.fillStyle = "black";
  ctx.fillRect(0, 0, canvas.width, canvas.height);

  // Draw stuff here
});
But let’s make another component that’ll handle our Waveform animation.
Audio Waveform
I won’t go too deep into detail on the audio side of this (that’s the topic of it’s own blog) - but here’s our <Waveform> component.
This creates an AnalyzerNode that gets chained into the audio pipeline and receives the waveform data. Then we use a requestAnimationFrame to take that waveform data and render it as a 2D line graph. The Y-axis represents the amplitude of the audio wave, which ranges from around -128 to 256 (which we map to the height of the canvas).
import useAudioStore from "@/store/audio";
import useCanvasStore from "@/store/canvas";
import React, { useEffect, useRef, useState } from "react";
import { mapLinear } from "three/src/math/MathUtils.js";

const DEFAULT_AUDIO_HEIGHT = 128;

type Props = {};

const Waveform = (props: Props) => {
  const [loaded, setLoaded] = useState(false);
  const analyser = useRef<AnalyserNode>(null);
  const dataArray = useRef<Uint8Array>(new Uint8Array(0));
  const animationRef = useRef<ReturnType<typeof requestAnimationFrame>>(null);
  const { audioCtx, addAudioNode, removeAudioNode } = useAudioStore();

  useEffect(() => {
    if (!audioCtx || loaded) return;
    analyser.current = audioCtx.createAnalyser();

    // Configure analyser
    analyser.current.fftSize = 1024;
    const newBufferLength = analyser.current.frequencyBinCount;
    dataArray.current = new Uint8Array(newBufferLength);

    // Connect this audio node to the output
    addAudioNode(analyser.current);
    setLoaded(true);
  }, [audioCtx]);

  const animate = (delta: number) => {
    // No analyzer? Loop again
    // @TODO: ideally activate animation when analyzer is loaded
    if (!analyser.current || !dataArray.current) {
      return requestAnimationFrame(animate);
    }

    // Get audio data
    analyser.current.getByteTimeDomainData(dataArray.current);

    // Draw on canvas
    const { canvasRef } = useCanvasStore.getState();
    if (!canvasRef?.current) {
      return requestAnimationFrame(animate);
    }
    const canvas = canvasRef.current;

    const ctx = canvas.getContext("2d");
    if (!ctx) {
      return requestAnimationFrame(animate);
    }

    const canvasWidth = canvas.width;
    const canvasHeight = canvas.height;

    // Clear drawing
    ctx.clearRect(0, 0, canvasWidth, canvasHeight);
    ctx.fillStyle = "black";
    ctx.fillRect(0, 0, canvasWidth, canvasHeight);

    ctx.beginPath();
    ctx.lineWidth = 0.25;
    ctx.strokeStyle = "blue";
    for (let i = 0; i < canvasWidth; i++) {
      const index = Math.floor(
        mapLinear(i, 0, canvasWidth, 0, dataArray.current.length),
      );
      const currentItem = dataArray.current[index];
      const baseY = mapLinear(
        currentItem,
        DEFAULT_AUDIO_HEIGHT - 20,
        DEFAULT_AUDIO_HEIGHT + 20,
        0,
        1,
      );
      const x = i;
      const y = (baseY * canvasHeight) / 2 + canvasHeight / 4;
      if (i === 0) {
        ctx.moveTo(x, y);
      } else {
        ctx.lineTo(x, y);
      }
    }

    ctx.stroke();

    // Repeat
    animationRef.current = requestAnimationFrame(animate);
  };

  useEffect(() => {
    animationRef.current = requestAnimationFrame(animate);

    return () => {
      if (animationRef.current) cancelAnimationFrame(animationRef.current);
    };
  }, []);

  return <div id="waveform" />;
};

export default Waveform;
See this example here on GitHub.
And with this - we have a live audio waveform rendering inside our 3D scene as the screen of our MIDI sequencer.
📁 In order to have an audio waveform - we need audio! Needless to say I had a React component that handles that, and I mapped keyboard keys as piano keys. If you’re interested in more examples of using audio APIs inside ReactJS, check out my web-audio-playground or the Ryoturia project.
What about Rive?
If you don’t know what Rive is, it’s an animation software that lets you export them to the web (or mobile, and even game engines). If you’re old enough to remember, it’s essentially like Flash. It’s a powerful piece of software that exports a proprietary .riv format and uses their own custom renderer to display the animation on each platform.
For the web, this means that they ultimately render to a <canvas> element using WebGL. Because of this, we can leverage that same <canvas> for our ThreeJS canvasTexture.
Initial test
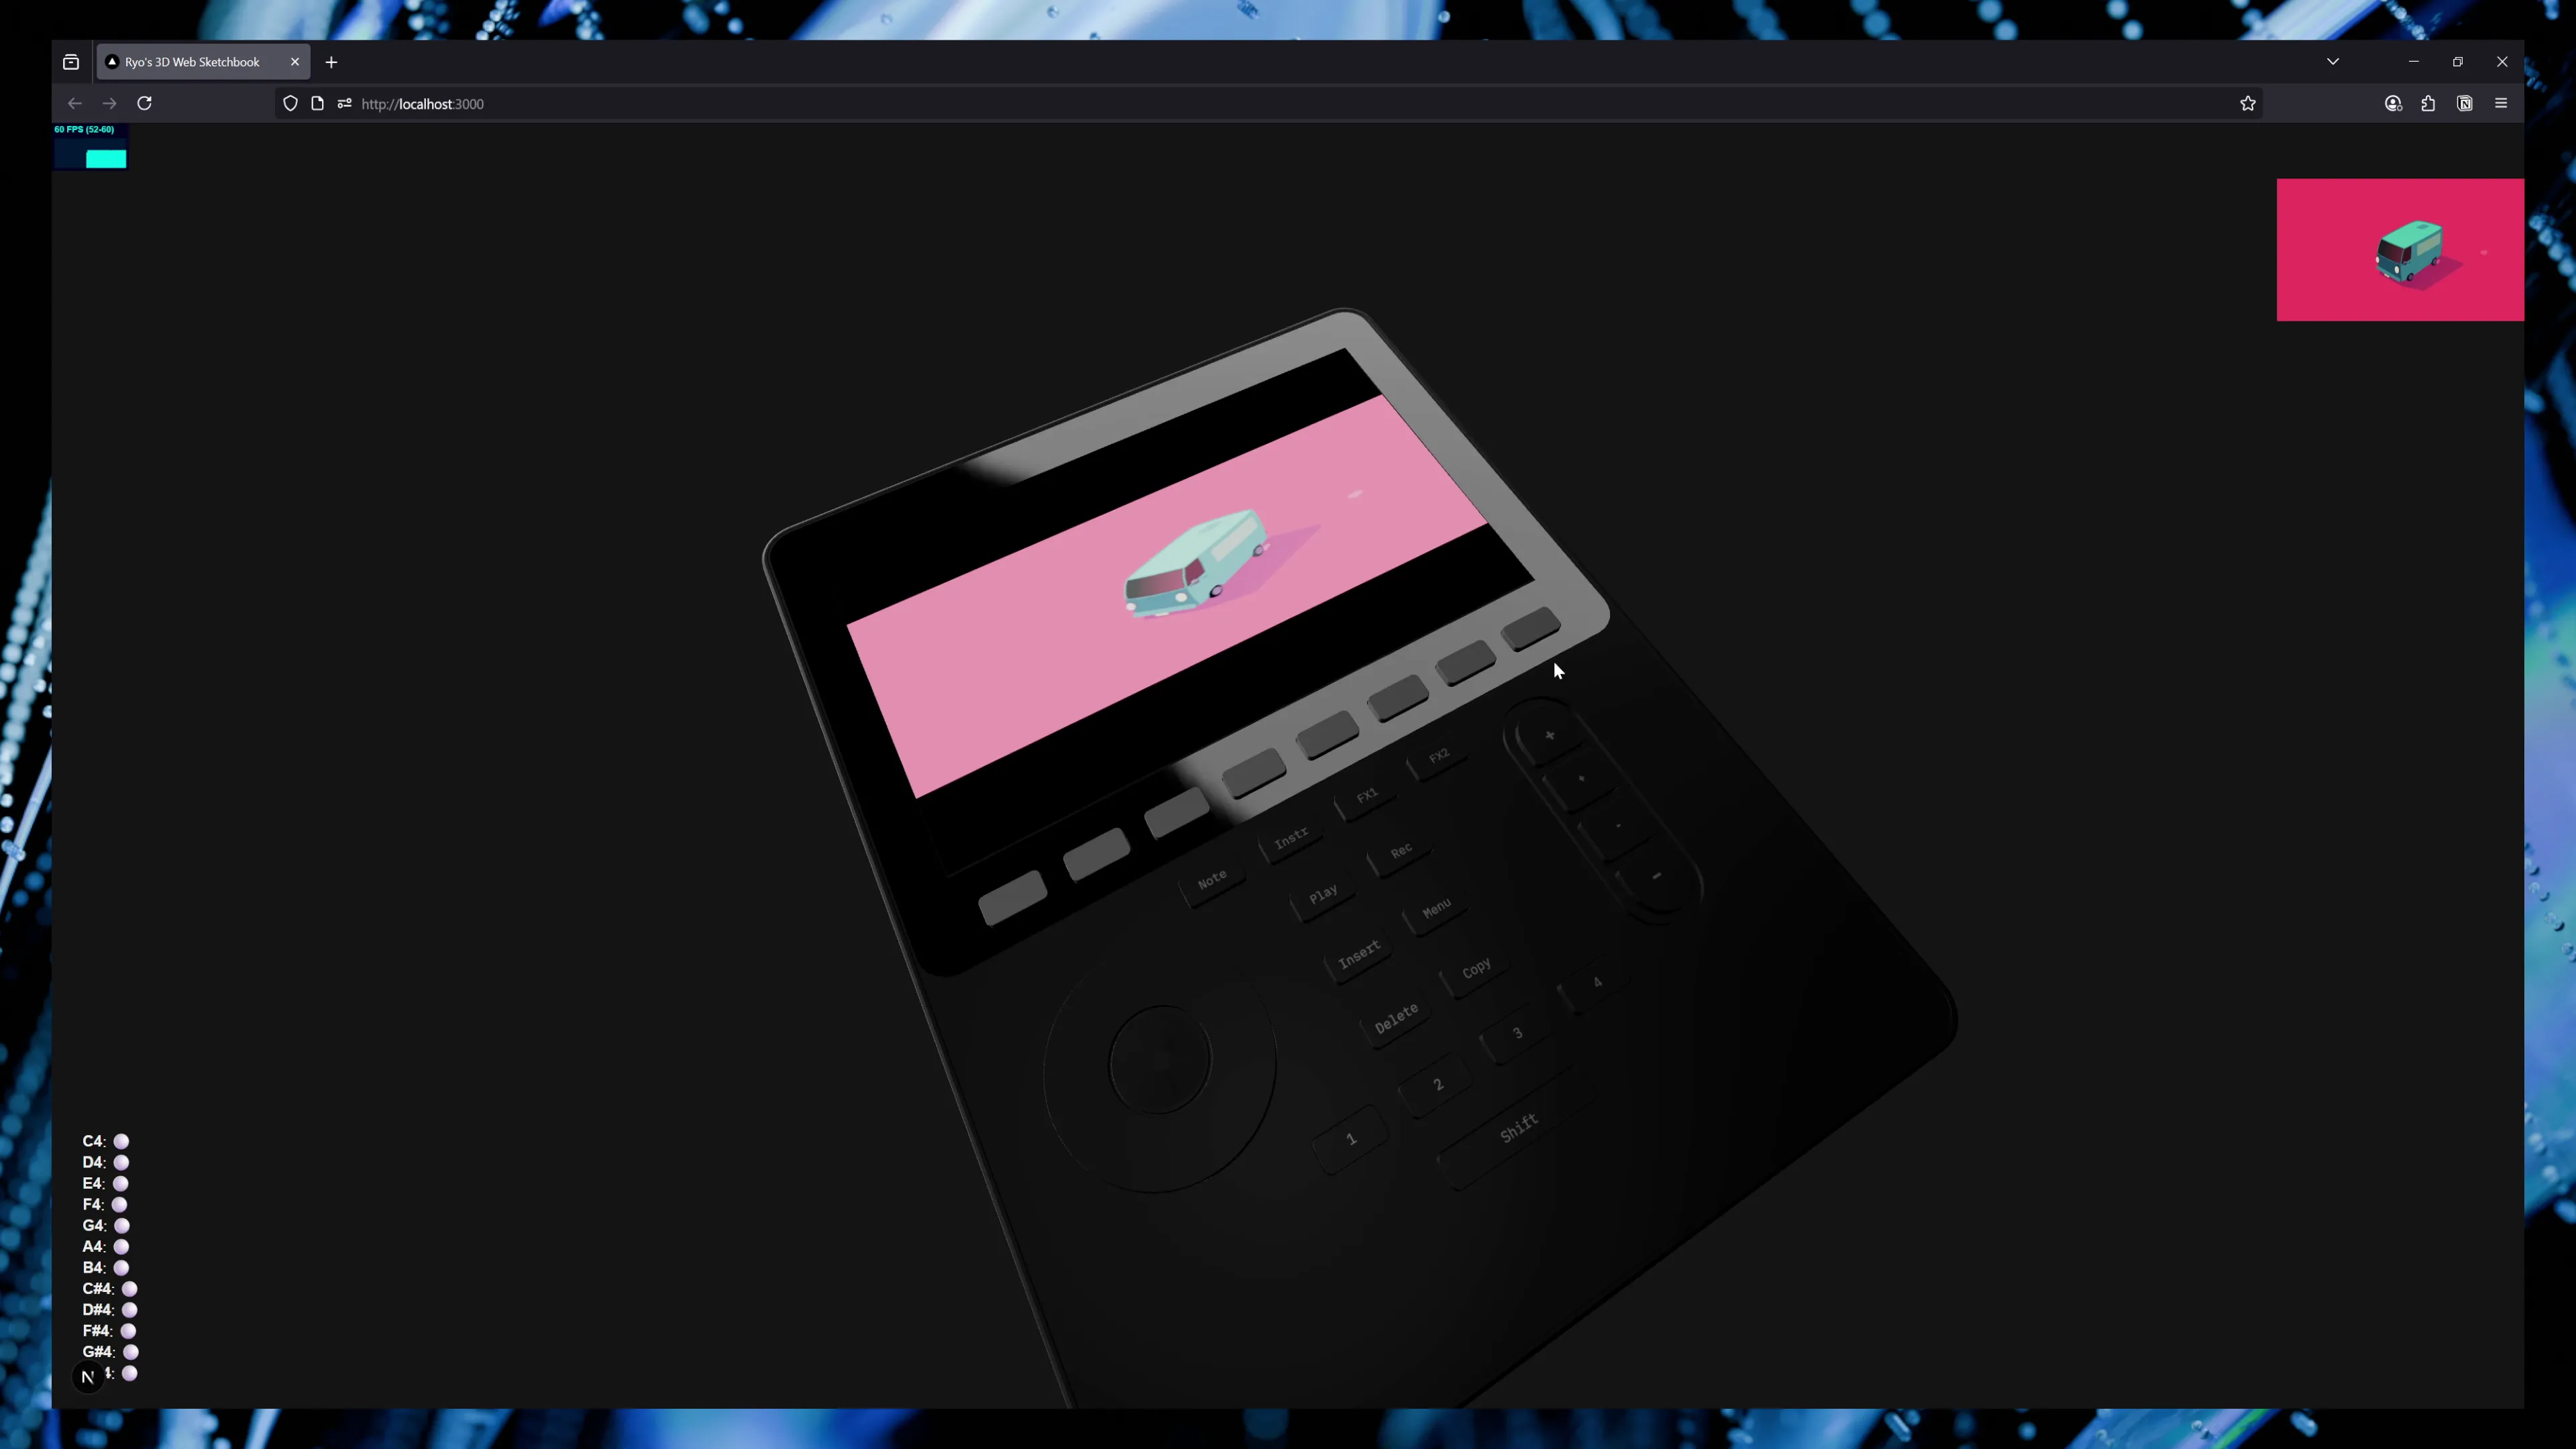
Before I dive in an make my own Rive animation, I used one of their sample animations as a test.
From the official Rive React documentation, they have an example of using their <Rive> component to render an animation. The animation in this case is a teal truck driving on a pink background.
import Rive from "@rive-app/react-canvas";

export const RiveTest = () => (
  <Rive
    id="rive-canvas"
    src="https://cdn.rive.app/animations/vehicles.riv"
    stateMachines="bumpy"
  />
);
📁 To make things simple, I added an
idto the Rive component, which passes it to the<canvas id="">- letting us query for it later. You could also pass aref- but for MVP purposes I skipped it. (I know, I know, seems silly, especially after all that store setup earlier - but can’t beat quick and dirty sometimes)
If we use this inside our <GlobalCanvas> now (and change a little logic to use getElementById()), it should work as a swap for our <canvas>.
import useCanvasStore from "@/store/canvas";
import React, { useEffect, useRef } from "react";
// RiveTest is from above

type Props = {};

const GlobalCanvas = (props: Props) => {
  const localRef = useRef<HTMLCanvasElement | null>(null);
  const { setCanvas } = useCanvasStore();

  useEffect(() => {
    if (!window) return;
    const canvasEl = document.getElementById(
      "rive-canvas",
    ) as HTMLCanvasElement;
    setCanvas(canvasEl);
  }, []);

  return (
    <RiveTest
      // ref={localRef}
      id="rive-canvas"
      width={`${1024 / 4}px`}
      height={`${1024 / 4}px`}
      // height={1024 / 4}
      style={{
        width: 256,
        height: 256,
        top: 0,
        right: 0,
        zIndex: 420,
        position: "absolute",
      }}
    />
  );
};

export default GlobalCanvas;
And with that - we have Rive rendering in 3D!
Rive Waveform using Data Binding
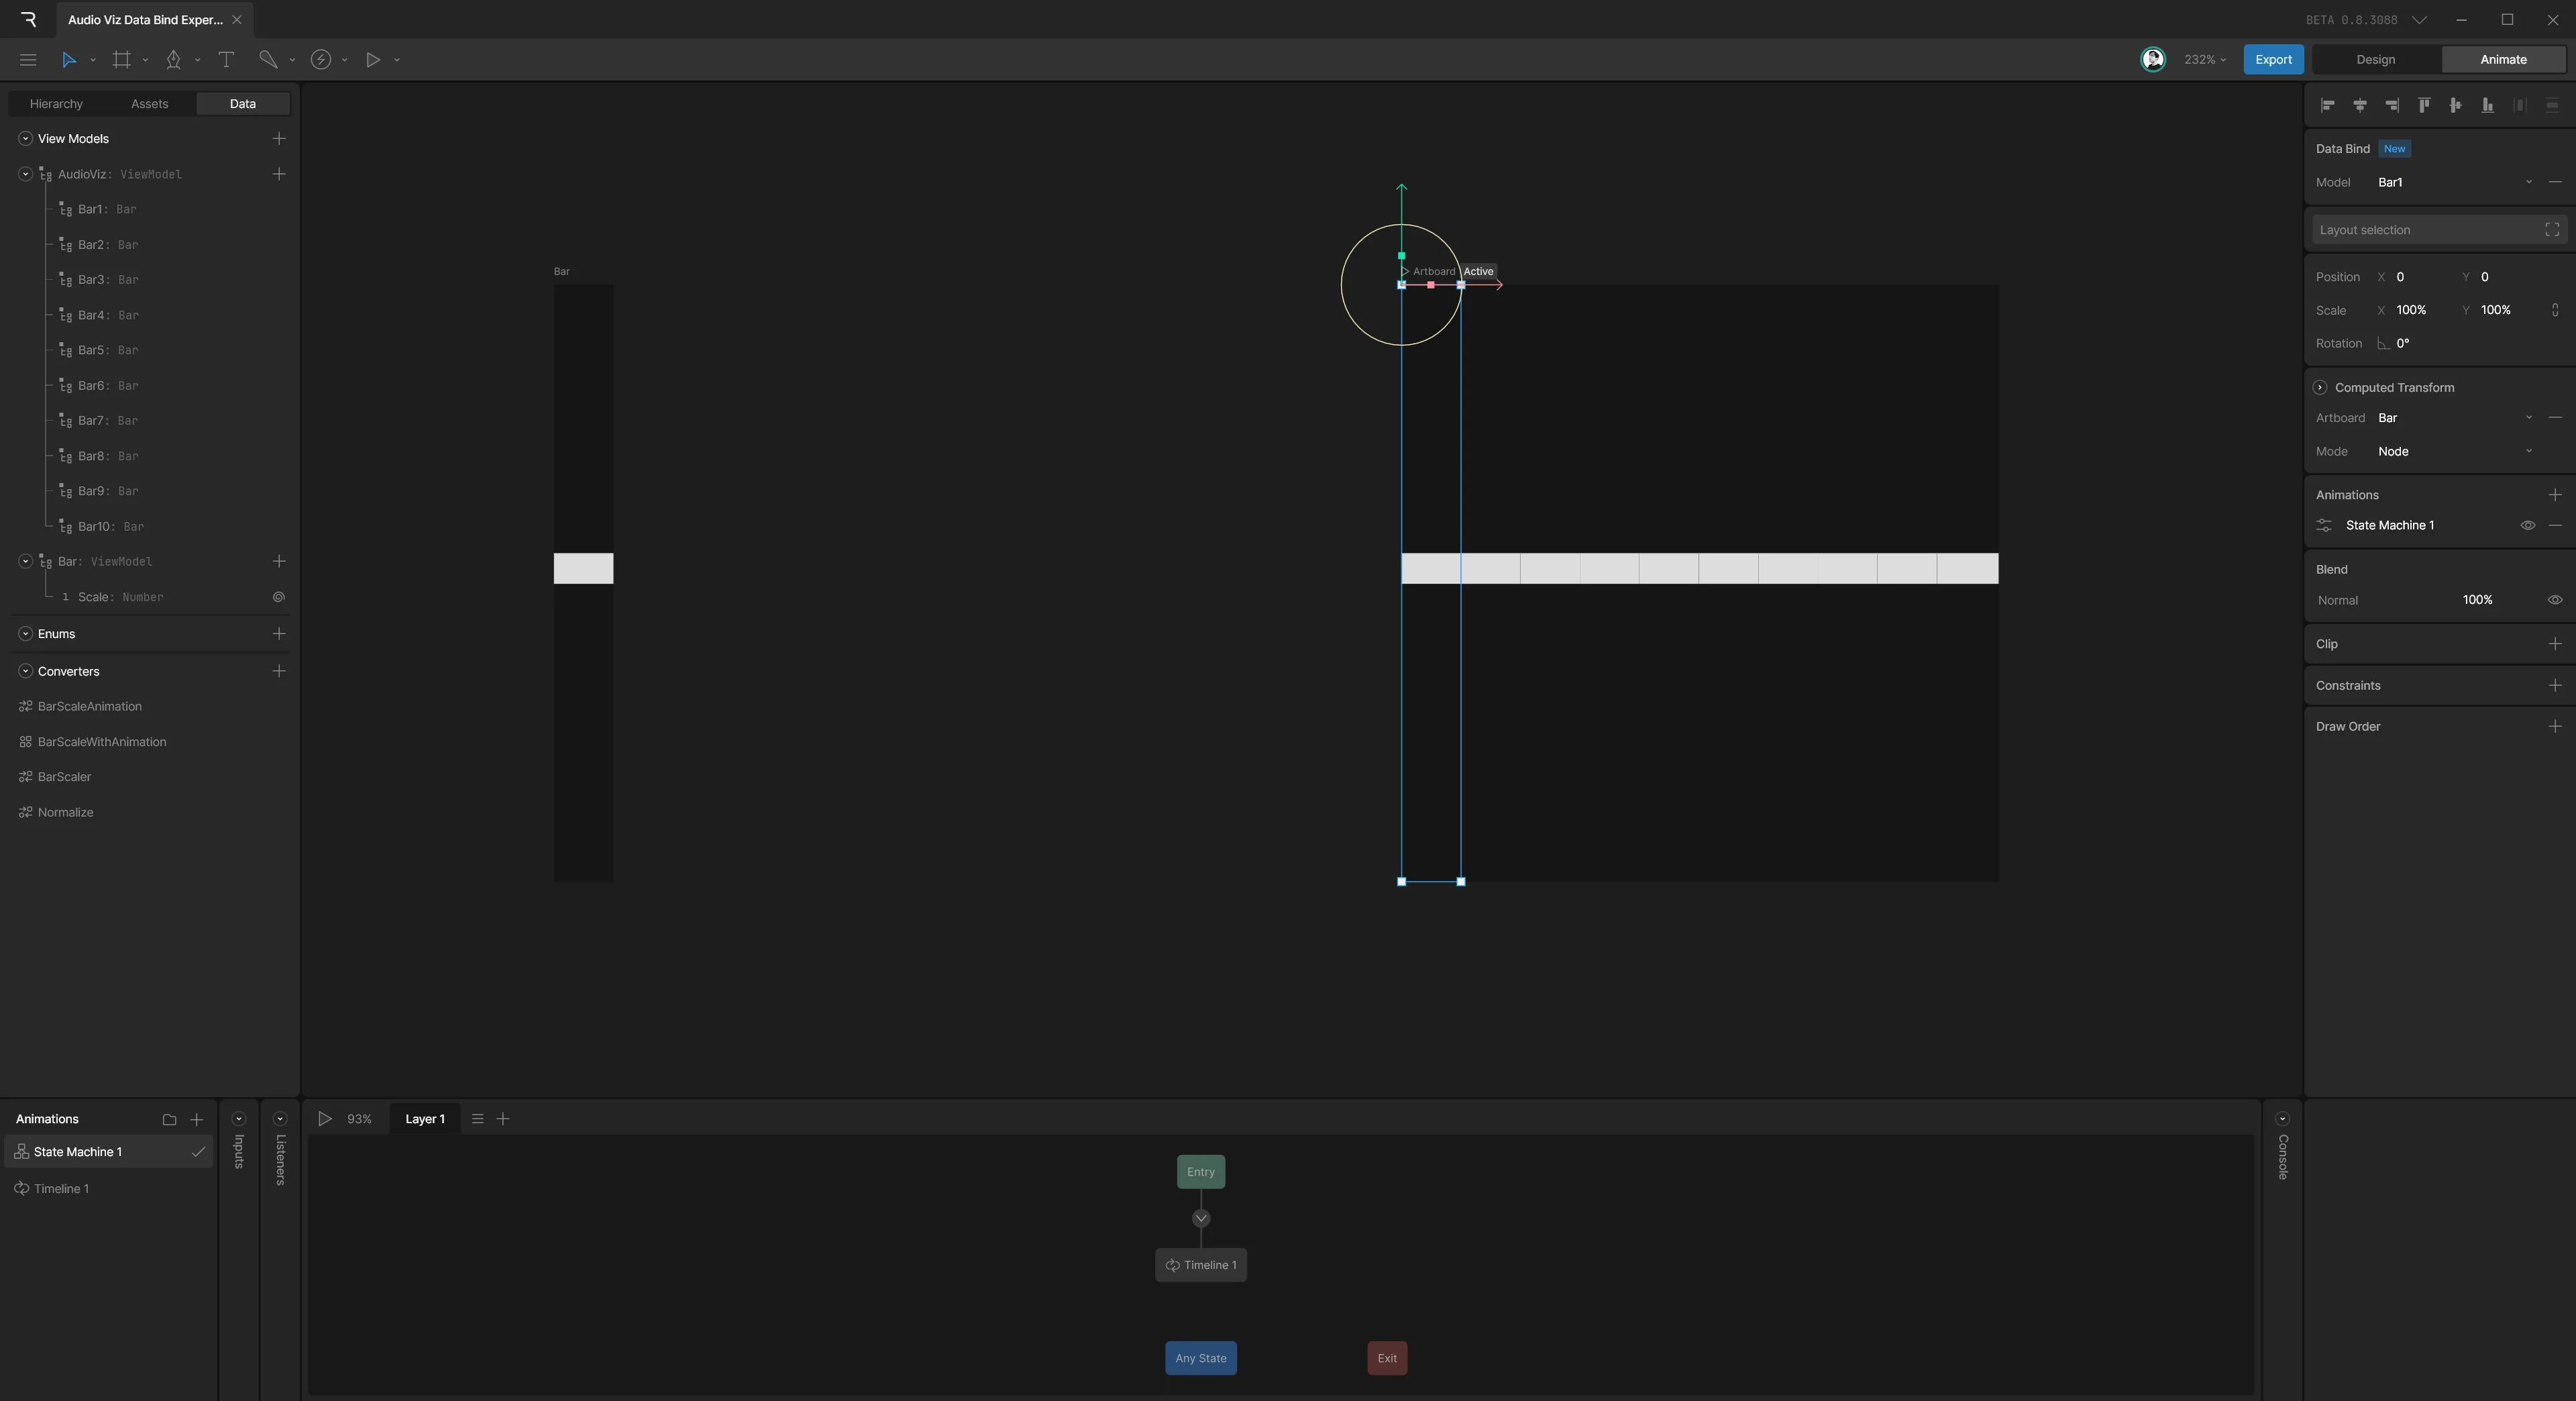
Let’s make an audio waveform in Rive, and animate it using the data binding API. The goal is to make 10 “bars” that scale up or down based on the audio waveform data. Same concept as our line graph, but we use boxes instead of points on a line.
This is another area I won’t go too deep into, but I’ll cover a bit of the flow because it’s an interesting process.
📁
I recommend checking out Rive’s official video tutorial for data binding. It should cover a lot of the concepts I’ll be touching on in greater detail. I also recommend browsing through the official data binding docs.
Data binding intro
The first step is making a bar “component”. This is just a rectangle in the center of the canvas. Since I know 3D tends to use square textures, I made a canvas that was 256 x 256, and I divided that by 10 to get my bar width.
Then I duplicated the bar component 10 times on the canvas.
Cool, we have the basis of our waveform animation. Let’s setup the data binding to animate the bars using data.
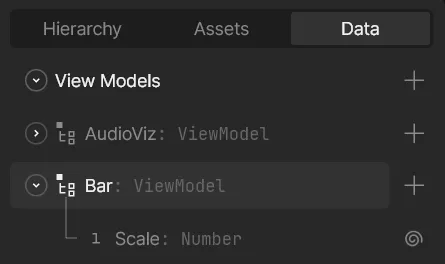
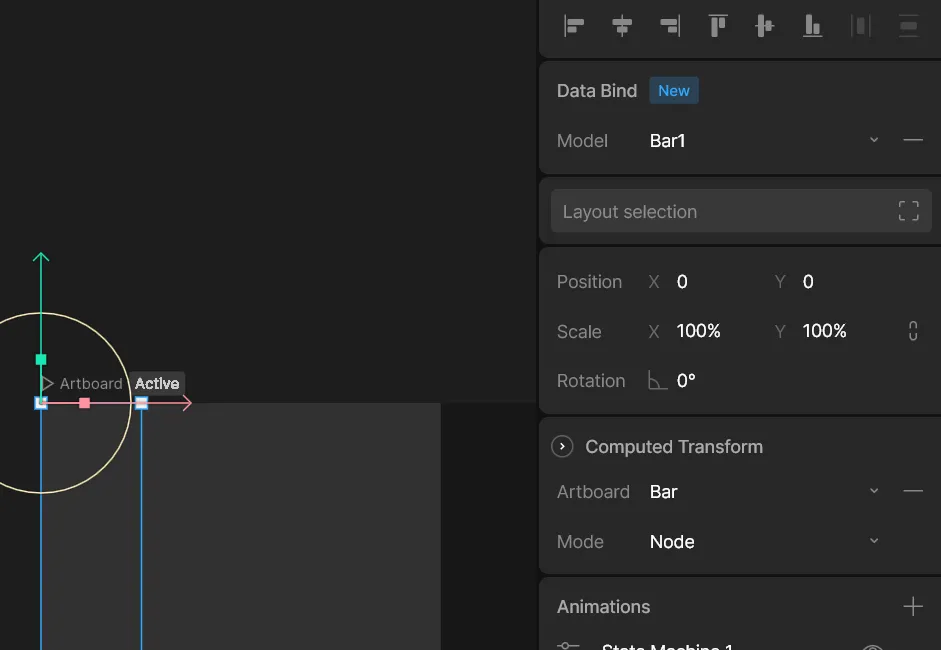
Under the Data tab on the left sidebar, I setup a new ViewModel called “Bar”. This contains a “Scale” property that will handle scaling our bar.
Now we can assign this ViewModel to our component. Click the component’s artboard, then on the right sidebar in the Data Bind section, assign the “Bar” view model we just created.

Now we can bind the view model’s properties to components, in our case, we want to map the “Scale” property to the Y scale.
- Select the rectangle
- Right click the Y-scale property and choose Data Bind
- Select the “Bar” View Model “Scale” property.

Now to preview the data binding, we need to play the animation. Make sure the component artboard is the active artboard, then press the big Play button in top toolbar. Once the animation is playing, select to the “Bar” View Model in the left sidebar and change the Scale property on the right side. You should see it animate changes.
Now that we have 1 bar setup, how do we animate 10 separate bars? We’ll need a new view model that contains them.
Data binding instances
-
Make new artboard (”container” artboard hereafter)
-
Select Nested Artboard tool
-
Click inside new artboard and select your component
-
Copy/paste as needed (in our case, 10 times)
-
Make a new View Model for the “container” - we’ll call it
AudioViz -
Add properties for each component, and make it a View Model (using the one from the component)
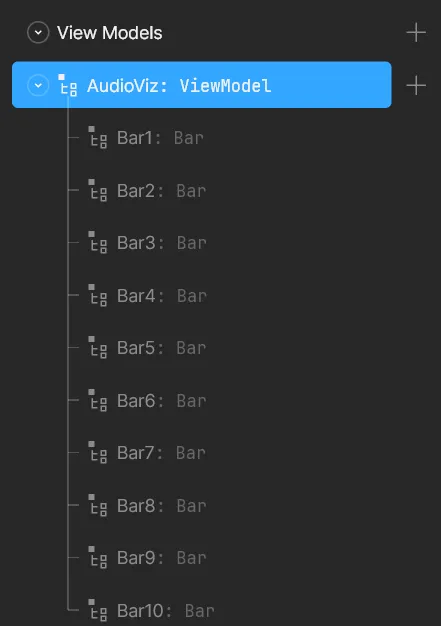
-
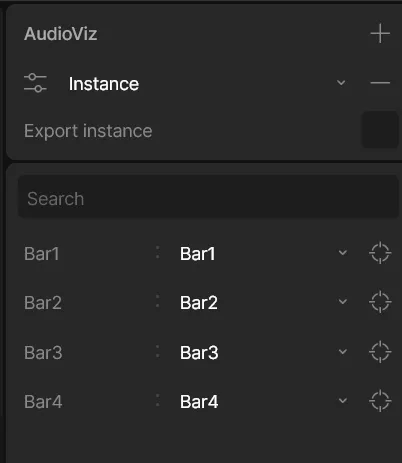
Go back to the original component View Model and create enough instances for each component copy (e.g. 3 copies = 3 total instances). Click the toggle bar icon to popup the menu and then click + sign to add instances.

-
Go back to “container” view model and assign each instance to each view model property. This is on the right sidebar once you select the view model.
-
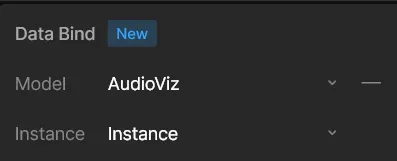
Select the “container” artboard and assign it the “container” view model.
-
Select each component instance and assign it a View Model instance
And that’s it, you should have 10 separate bars that you can animate.
📁 This is definitely a lot of setup. You can see why I limited this to only 10 bars instead of more - like audio waveform visualizers tend to have. I hope in the future this process gets streamlined a bit more so it’s not as manual.
But how do you test it out?
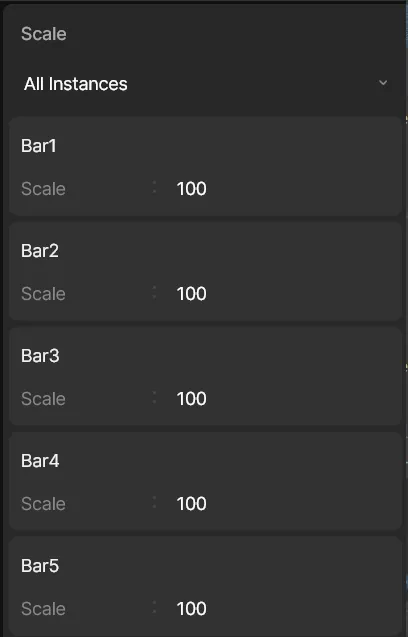
Same as before, preview your animation to make sure data binding is active. Then go to the Data tab in left sidebar, expand your “Bar” view model, and select the “Scale” property. In the right sidebar, you should see a list of all the instances and their associated Scale value. If you don’t see all instances, click the dropdown under the word “Scale” and pick “All Instances”.
Change the scale there to see your bars animate.
But they don’t exactly animate…they just kinda instantly update. So how do we “animate” the bars so they transition from one scale to the next? That’s where data binding converters come into play.
Converters
Data binding works by passing data from our view models to element properties (like the scale). But what if we need to change the data?
Like say, we have a number between -10 to 10, but we want to it to scale the bar from top or bottom based on that number? If we just use a number like -10 our scale will only go a little bit (-10% basically).
With converters, we can take our number and do math operations on it - like multiplying or dividing. So in our case, we could multiply our number by 10 or 100 and increase the amount it scales our element. When we assigned our data binding to our element property, we could have picked a converter to assign.
In my case, I didn’t mess with this much, because I just mapped the audio values on the JavaScript side to the appropriate scale.
But I did utilize the time-based interpolation converter. This basically takes your value and runs it through an easing function, based on the curve that you can draw and duration you set.
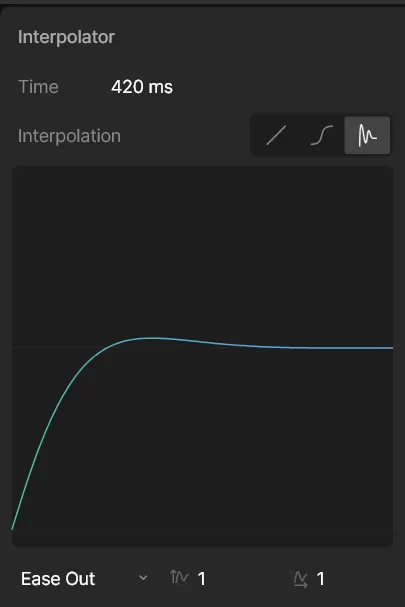
For my “BarScaleAnimation” converter I stuck with a standard “Ease Out” curve and a duration of 420ms (’natch).
📁 You can see more examples of easing functions on this Easing website.
Applying this to the Y-scale property’s data binding now makes the bar animate smoothly into place.
Data binding in ReactJS
So this is where things get a bit messy. Rive has a great hook-based API for React for accessing the View Model properties, but this requires using their low level useRive hook as well. You can find a basic example in the Rive React repo.
Here’s a simplified version of it with a single property (”title”) exposed from the animation through a view model:
import React, { useEffect } from "react";
import {
  useRive,
  useViewModel,
  useViewModelInstance,
  useViewModelInstanceColor,
  useViewModelInstanceNumber,
  useViewModelInstanceString,
  useViewModelInstanceEnum,
  useViewModelInstanceTrigger,
} from "@rive-app/react-webgl2";

const DataBinding = () => {
  const { rive, RiveComponent } = useRive({
    src: "stocks.riv",
    artboard: "Main",
    stateMachines: "State Machine 1",
    autoplay: true,
    autoBind: false,
  });

  // Get the default instance of the view model
  const viewModel = useViewModel(rive, { name: "Dashboard" });
  const viewModelInstance = useViewModelInstance(viewModel, { rive });

  // Get the view model instance properties

  const { setValue: setTitle } = useViewModelInstanceString(
    "title",
    viewModelInstance,
  );

  useEffect(() => {
    // Set initial values for the view model
    if (setTitle) {
      setTitle("Rive Stocks Dashboard");
    }
  }, [setTitle]);

  return <RiveComponent />;
};

export default DataBinding;
The Rive animation, artboard, and state machine are loaded using the useRive hook. We specifically set autoBind to false so we can control the data binding ourselves (if you set to true - updates won’t work).
⚠️ To ensure the animation actually played, I needed to do a few things. Turn on
autoplayin the initial config. And then in your Rive file, make sure the Timeline is set to Loop - and not One Shot. If you don’t do this, the animation won’t play until you explicitly activate playback via the state machine.
We get the view model with useViewModel using the Rive instance and the name of our view model. Then we can grab the actual “instance” of the view model we need.
Then finally, we can use that instance to query for properties, using data-type specific hooks like useViewModelInstanceString. This returns an object with a setValue property that we can use to update the view model inside the animation (and subsequently, have the animation update with new data).
📁 This is a bit verbose and dependent on the success of previous hooks. I hope there can be an easier way to handle this in future for simpler use cases.
Now that we’ve got an idea of how to access view models, let’s try updating our 10 bars.
import useAudioStore from "@/store/audio";
import useCanvasStore from "@/store/canvas";
import React, { useEffect, useRef, useState } from "react";
import Rive, {
  useRive,
  useViewModel,
  useViewModelInstance,
  useViewModelInstanceNumber,
  useViewModelInstanceString,
} from "@rive-app/react-canvas";
import { mapLinear } from "three/src/math/MathUtils.js";

const DEFAULT_AUDIO_HEIGHT = 128;

type Props = typeof Rive & {};

const RiveWaveform = (props: Props) => {
  const [loaded, setLoaded] = useState(false);
  const analyser = useRef<AnalyserNode>(null);
  const dataArray = useRef<Uint8Array>(new Uint8Array(0));
  const animationRef = useRef<ReturnType<typeof requestAnimationFrame>>(null);
  const { audioCtx, addAudioNode, removeAudioNode } = useAudioStore();

  // Create instance of Rive + React component
  const { rive, RiveComponent } = useRive({
    src: "/animations/audio_viz_data_bind_experiment-v3.riv",
    autoBind: false,
    autoplay: true,
  });

  // Get the view model you need
  const viewModel = useViewModel(rive, { name: "AudioViz" });
  // Get the instance of the view model
  const viewModelInstance = useViewModelInstance(viewModel, { rive });

  // Access your view model property to get/set it
  // Here we use a path with `/` to signify a nested View Model + it's property
  const { value: bar1Scale, setValue: setBar1Scale } =
    useViewModelInstanceNumber("Bar1/Scale", viewModelInstance);
  const { value: bar2Scale, setValue: setBar2Scale } =
    useViewModelInstanceNumber("Bar2/Scale", viewModelInstance);
  const { value: bar3Scale, setValue: setBar3Scale } =
    useViewModelInstanceNumber("Bar3/Scale", viewModelInstance);
  const { value: bar4Scale, setValue: setBar4Scale } =
    useViewModelInstanceNumber("Bar4/Scale", viewModelInstance);
  const { value: bar5Scale, setValue: setBar5Scale } =
    useViewModelInstanceNumber("Bar5/Scale", viewModelInstance);
  const { value: bar6Scale, setValue: setBar6Scale } =
    useViewModelInstanceNumber("Bar6/Scale", viewModelInstance);
  const { value: bar7Scale, setValue: setBar7Scale } =
    useViewModelInstanceNumber("Bar7/Scale", viewModelInstance);
  const { value: bar8Scale, setValue: setBar8Scale } =
    useViewModelInstanceNumber("Bar8/Scale", viewModelInstance);
  const { value: bar9Scale, setValue: setBar9Scale } =
    useViewModelInstanceNumber("Bar9/Scale", viewModelInstance);
  const { value: bar10Scale, setValue: setBar10Scale } =
    useViewModelInstanceNumber("Bar10/Scale", viewModelInstance);

  const scalers = [
    setBar1Scale,
    setBar2Scale,
    setBar3Scale,
    setBar4Scale,
    setBar5Scale,
    setBar6Scale,
    setBar7Scale,
    setBar8Scale,
    setBar9Scale,
    setBar10Scale,
  ];

  useEffect(() => {
    if (!audioCtx || loaded) return;
    analyser.current = audioCtx.createAnalyser();

    // Configure analyser
    analyser.current.fftSize = 1024;
    const newBufferLength = analyser.current.frequencyBinCount;
    dataArray.current = new Uint8Array(newBufferLength);

    // Connect this audio node to the output
    addAudioNode(analyser.current);
    setLoaded(true);
  }, [audioCtx]);

  const animate = (delta: number) => {
    // No analyzer? Loop again
    // @TODO: ideally activate animation when analyzer is loaded
    if (!analyser.current || !dataArray.current) {
      return requestAnimationFrame(animate);
    }

    // Get audio data
    analyser.current.getByteTimeDomainData(dataArray.current);

    const BAR_COUNT = 10;
    for (let i = 0; i < BAR_COUNT; i++) {
      const index = Math.floor(
        mapLinear(i, 0, BAR_COUNT, 0, dataArray.current.length),
      );
      const currentItem = dataArray.current[index];
      const barScale = mapLinear(
        currentItem,
        DEFAULT_AUDIO_HEIGHT - 20,
        DEFAULT_AUDIO_HEIGHT + 20,
        -256,
        256,
      );

      // Get the correct "setter" function for the Rive view model
      // for the bar we want to animate
      scalers[i](barScale);
    }

    // Repeat
    animationRef.current = requestAnimationFrame(animate);
  };

  useEffect(() => {
    if (!rive && !setBar1Scale) return;
    animationRef.current = requestAnimationFrame(animate);

    return () => {
      if (animationRef.current) cancelAnimationFrame(animationRef.current);
    };
  }, [rive, setBar1Scale]);

  return <RiveComponent {...props} />;
};

export default RiveWaveform;
We need to animate the “scale” property on each instance of our “Bar” view model. In the previous example, when we updated the title property, we assumed it was a top level property in the view model. But our “AudioViz” view model is made up of 10 instances of other view models — which have their own property.
Now we could access them using the useViewModel and useViewModelInstance — but that’s a lot of hooks fired just to access our nested property.
Instead, Rive allows for using / separated names when querying for properties. This lets you target a specific view model, and the property inside. So in our case, we want to use Bar 1/Scale.
Other than that, there’s not that much different. We use a requestAnimationFrame() to animate, which updates the Rive data binding with new waveform data.
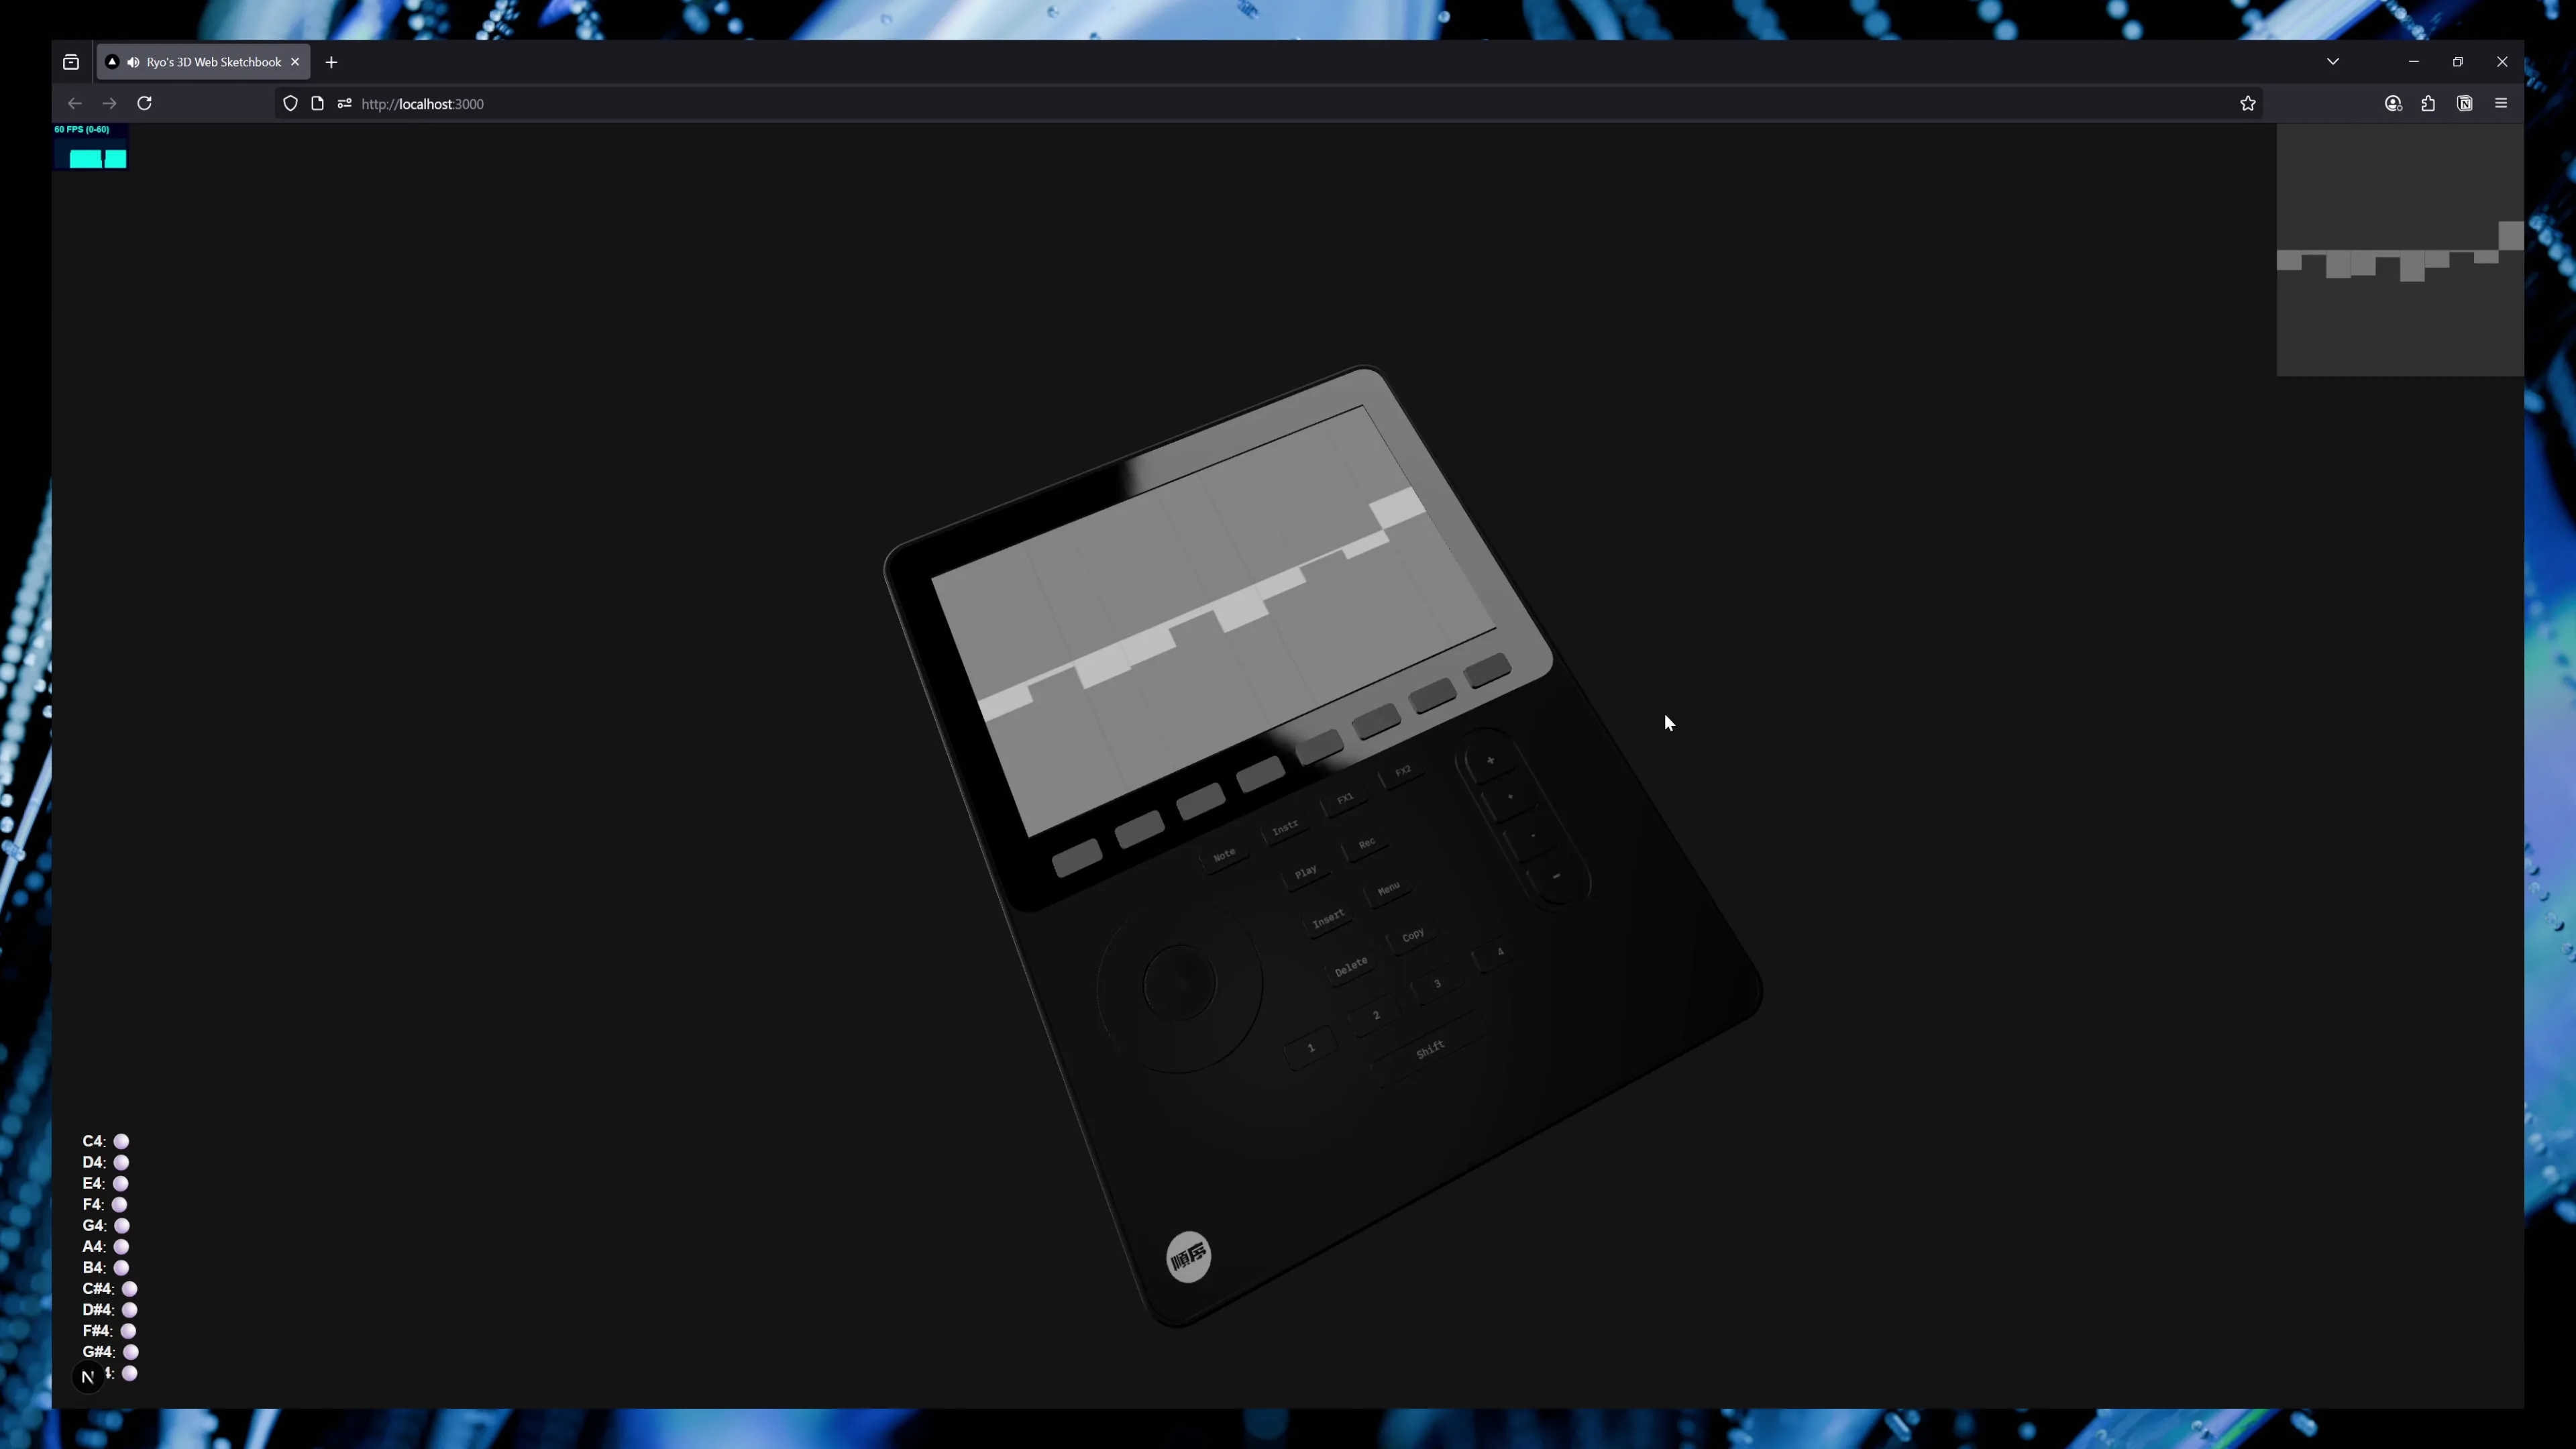
And with that, we have a Rive animation that updates with live audio waveform data - and renders inside of our 3D scene as a device screen.
You can find the full source code for this project on the rive-test branch.
Time to get creative
Hope this helps inspire you to create something interesting with modern web tech. You can have a lot of fun and create unique experiences with a handful of code and libraries.
If you’re interested in seeing more of my art and 3D, check out my Instagram or socials. Or want to support more informative blog articles like this? Feel free to contribute on Patreon.
Stay creative,
Ryo