Posted on
November 12, 2024
I’ve been hooked on incorporating MIDI and music into my process recently. If you follow me on social feeds you’ve probably seen me post 3D animations that are synchronized to music. This has led to me creating a few 3D models of pianos and related hardware. And while I enjoy using my Blender plugin for creating animations from MIDI files, whenever I preview the animation in Blender (or wait for it to render) I sit and wonder what it’d look like if I could everything running real-time. And more importantly: interactive by the user (instead of baked animation data).
That’s why I created Ryoturia, a web-based 3D synth piano sampler. It uses a model I created a while ago in Blender and brings it to life in the browser. It combines a lot of techniques I’ve been experimenting with on the side using web MIDI and audio APIs . Open up the site and press any key on your keyboard - or connect a MIDI keyboard or even gamepad and watch the piano react to your button presses.
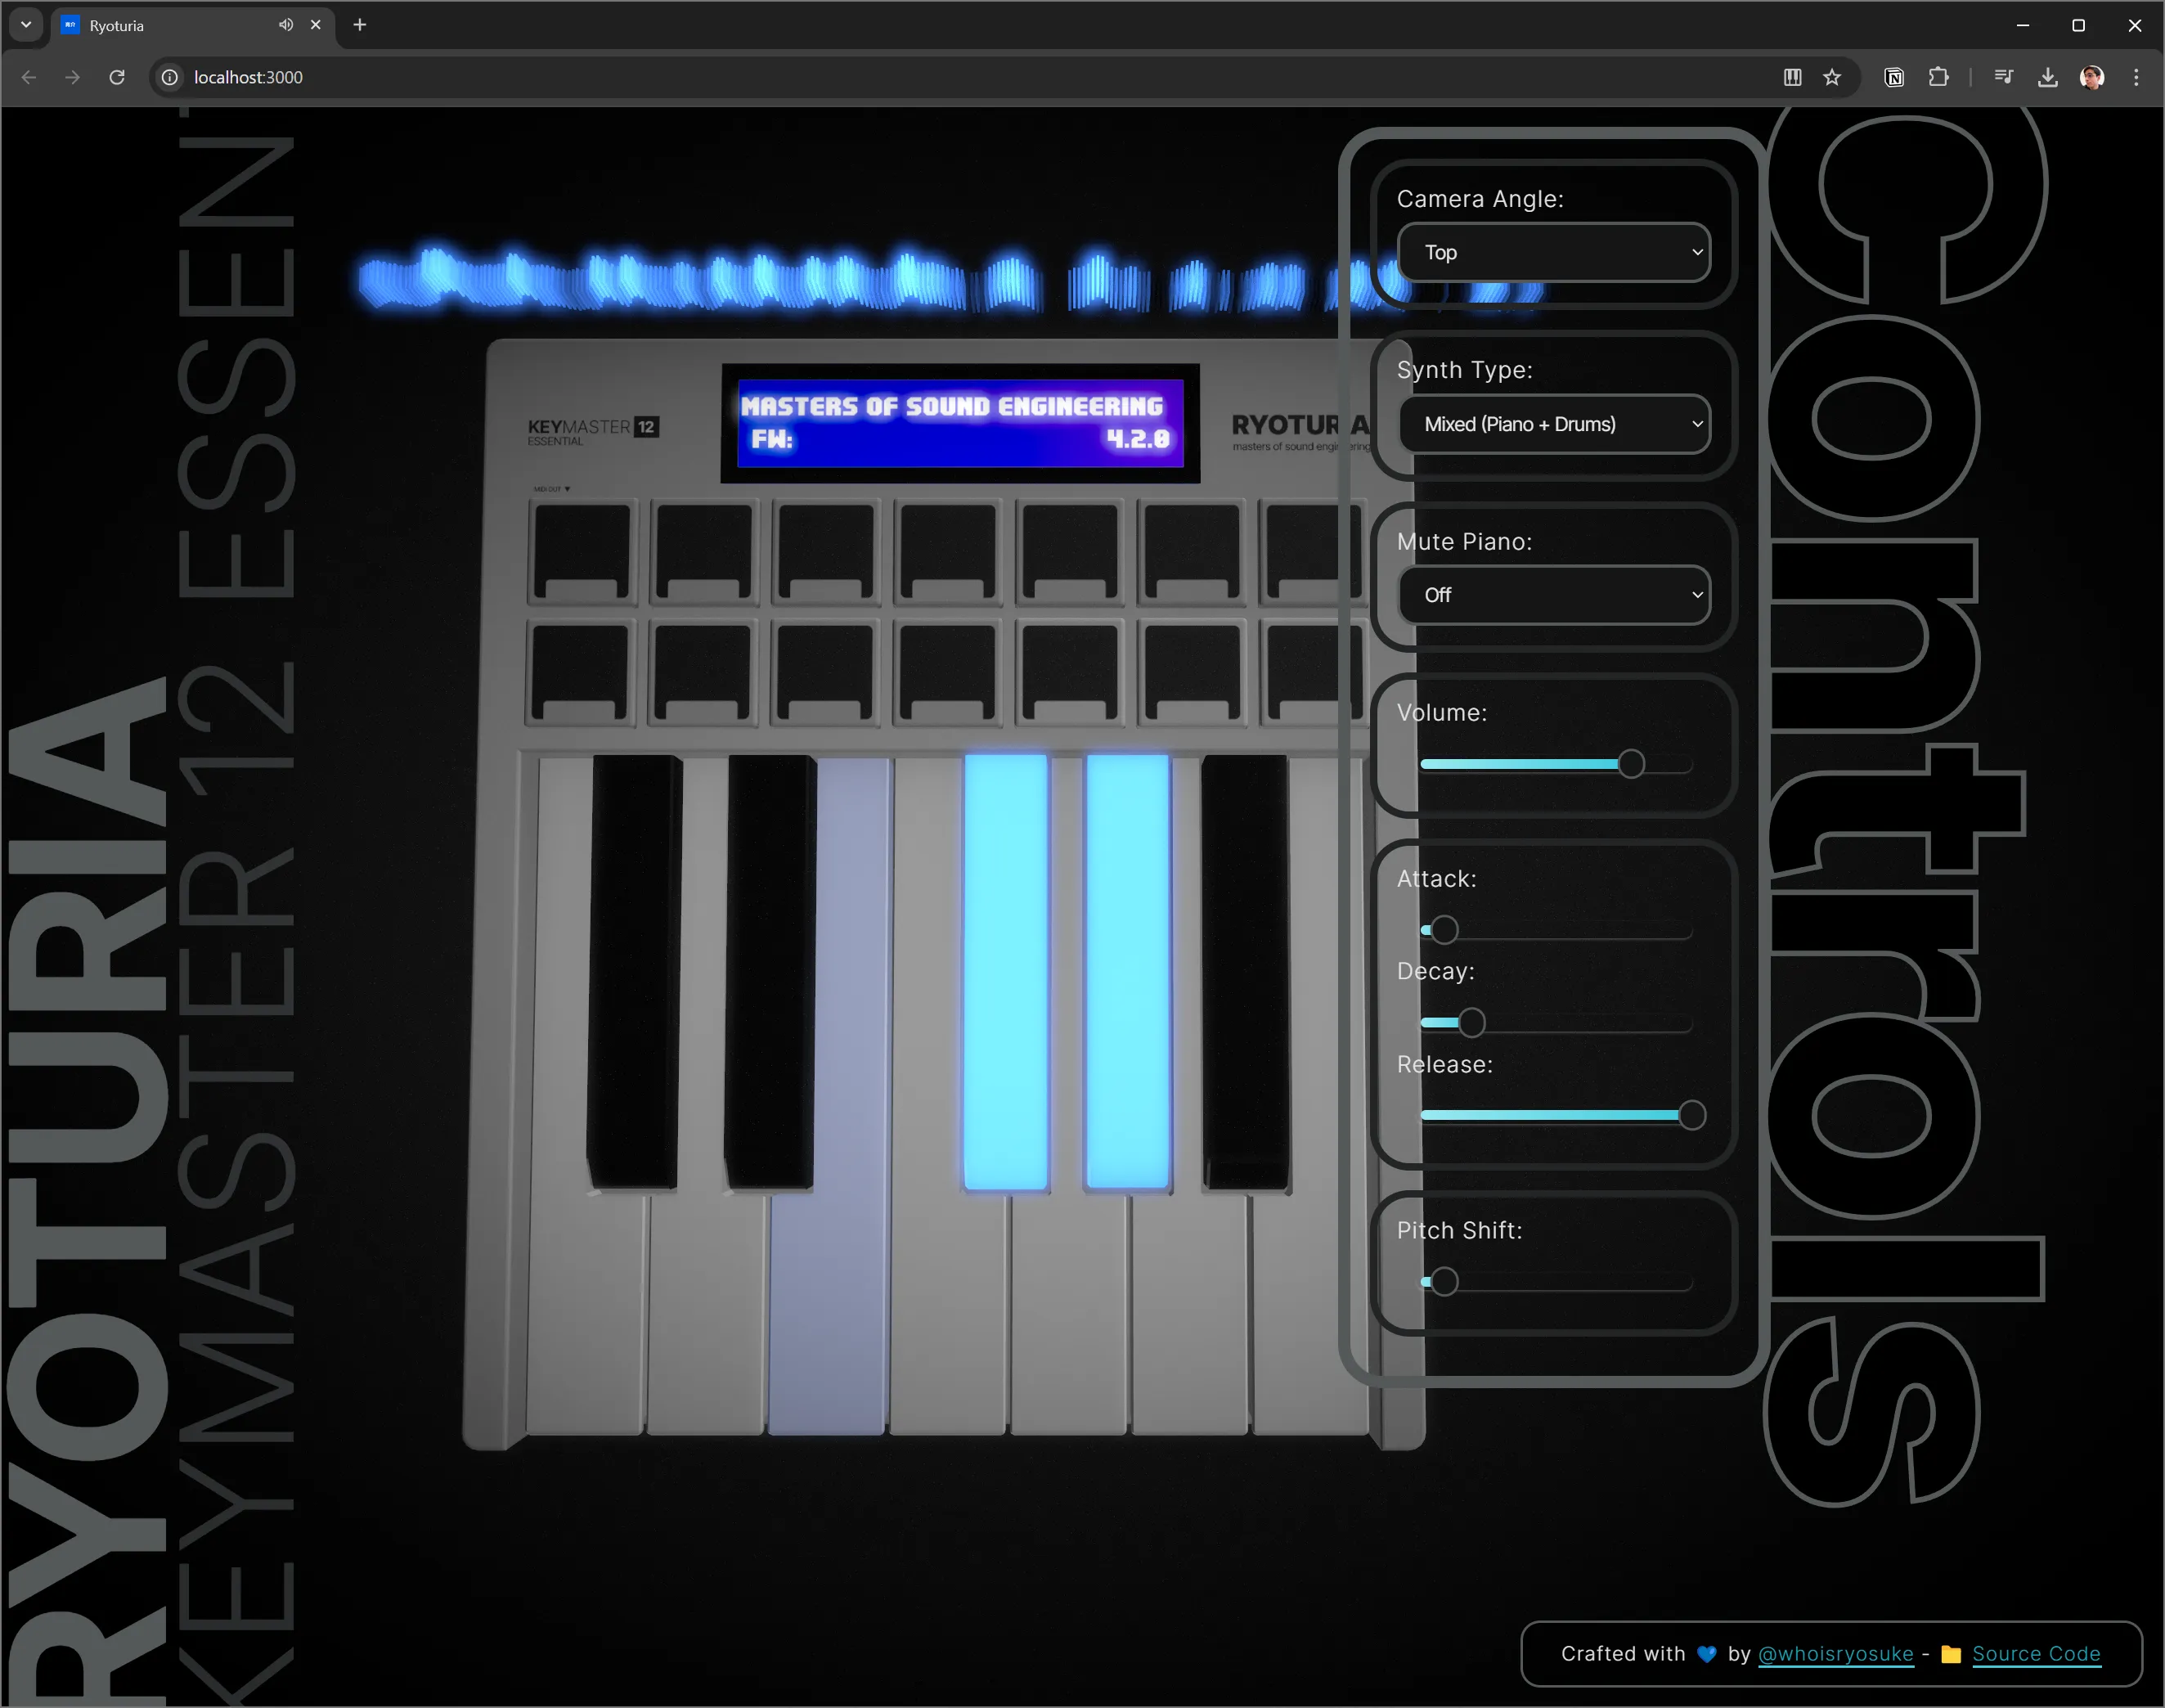
In this blog I wanted to break down the process of making the app. All the code is available open source on Github if you’re interested, but I find it always helps to have more context in the creation process to fully grok a project. And as 3D becomes more standard on the web, I hope this is a nice reference for those exploring ThreeJS and React Three Fiber.
The piano
The first part of this process starts with the hero of the app — the 3D model.
Like I mentioned in the intro, the piano was modeled a while ago. I made it to test the MIDI to keyframes plugin and I wanted a piano and a secondary part to animate — so a mini synth was a perfect subject. I picked the smallest Arturia MIDI controller as inspiration since I personally use a large version, but I made sure to add mock branding to everything.
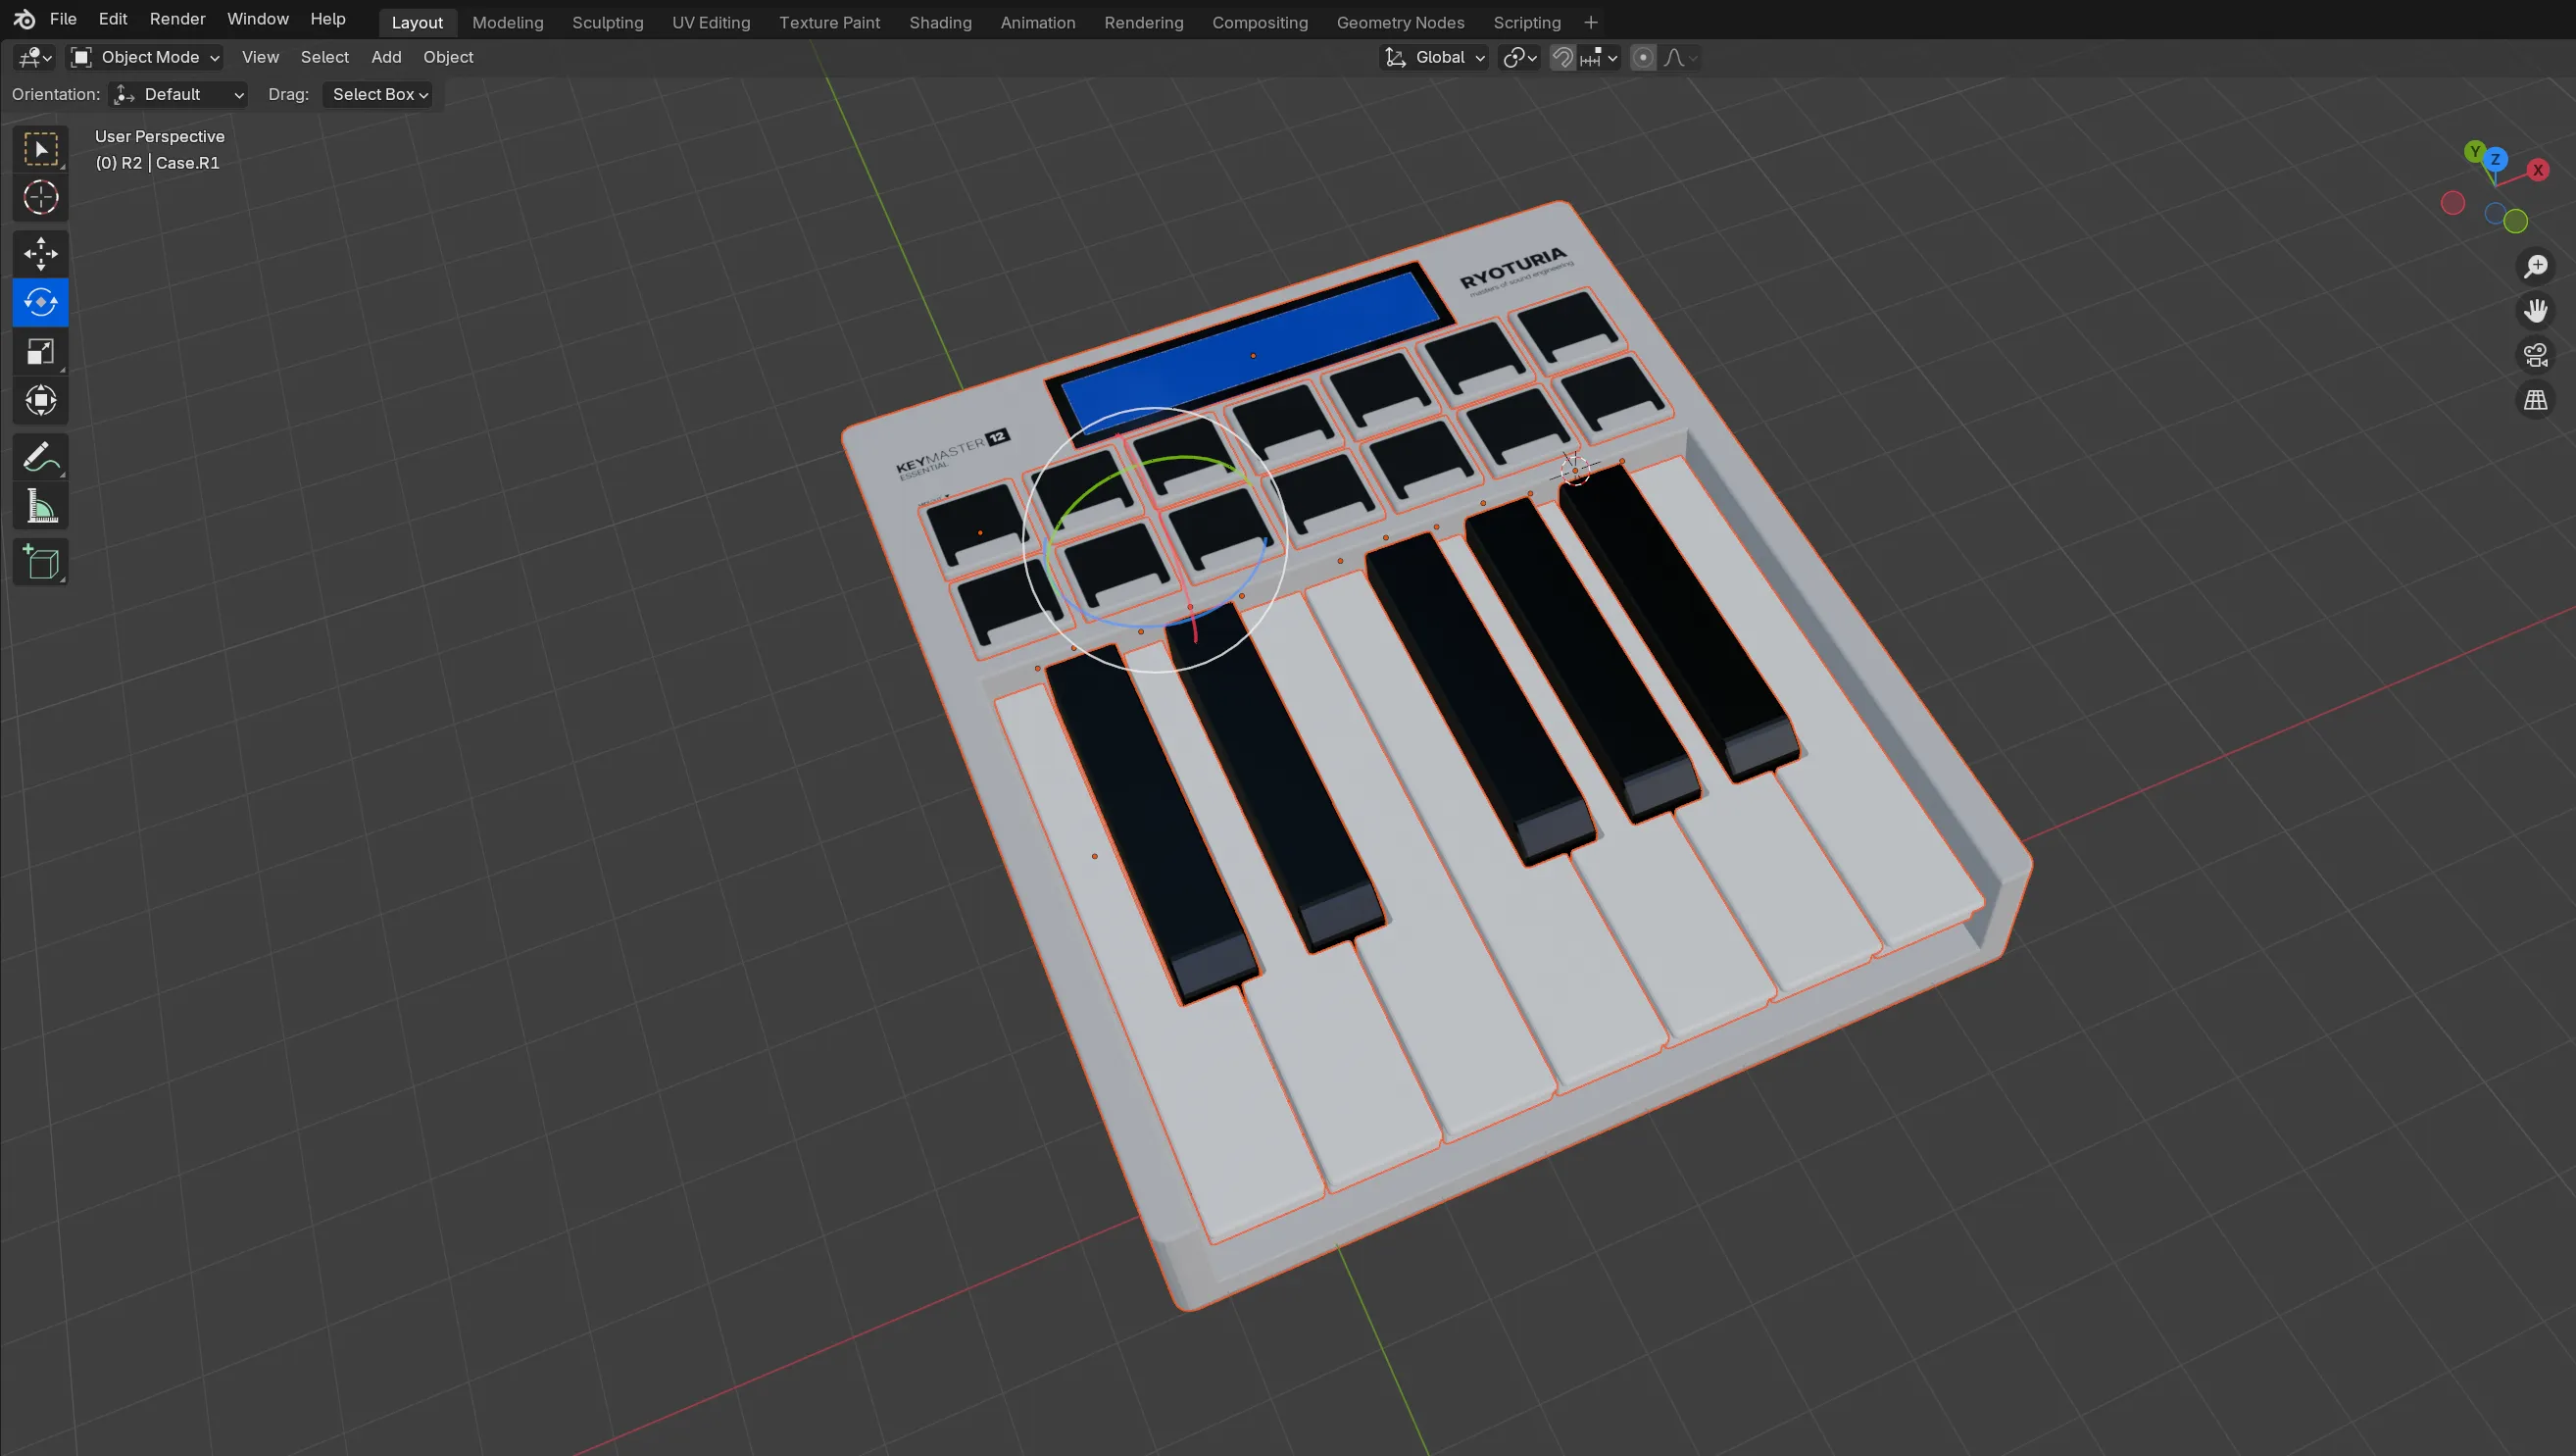
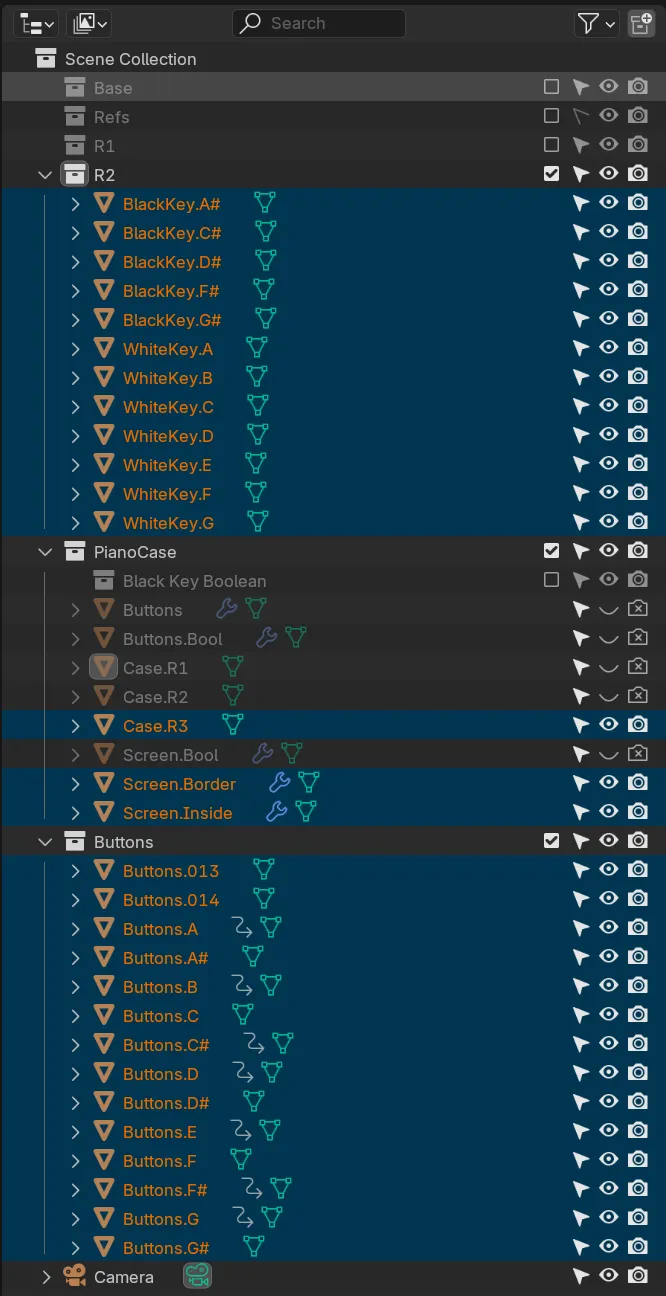
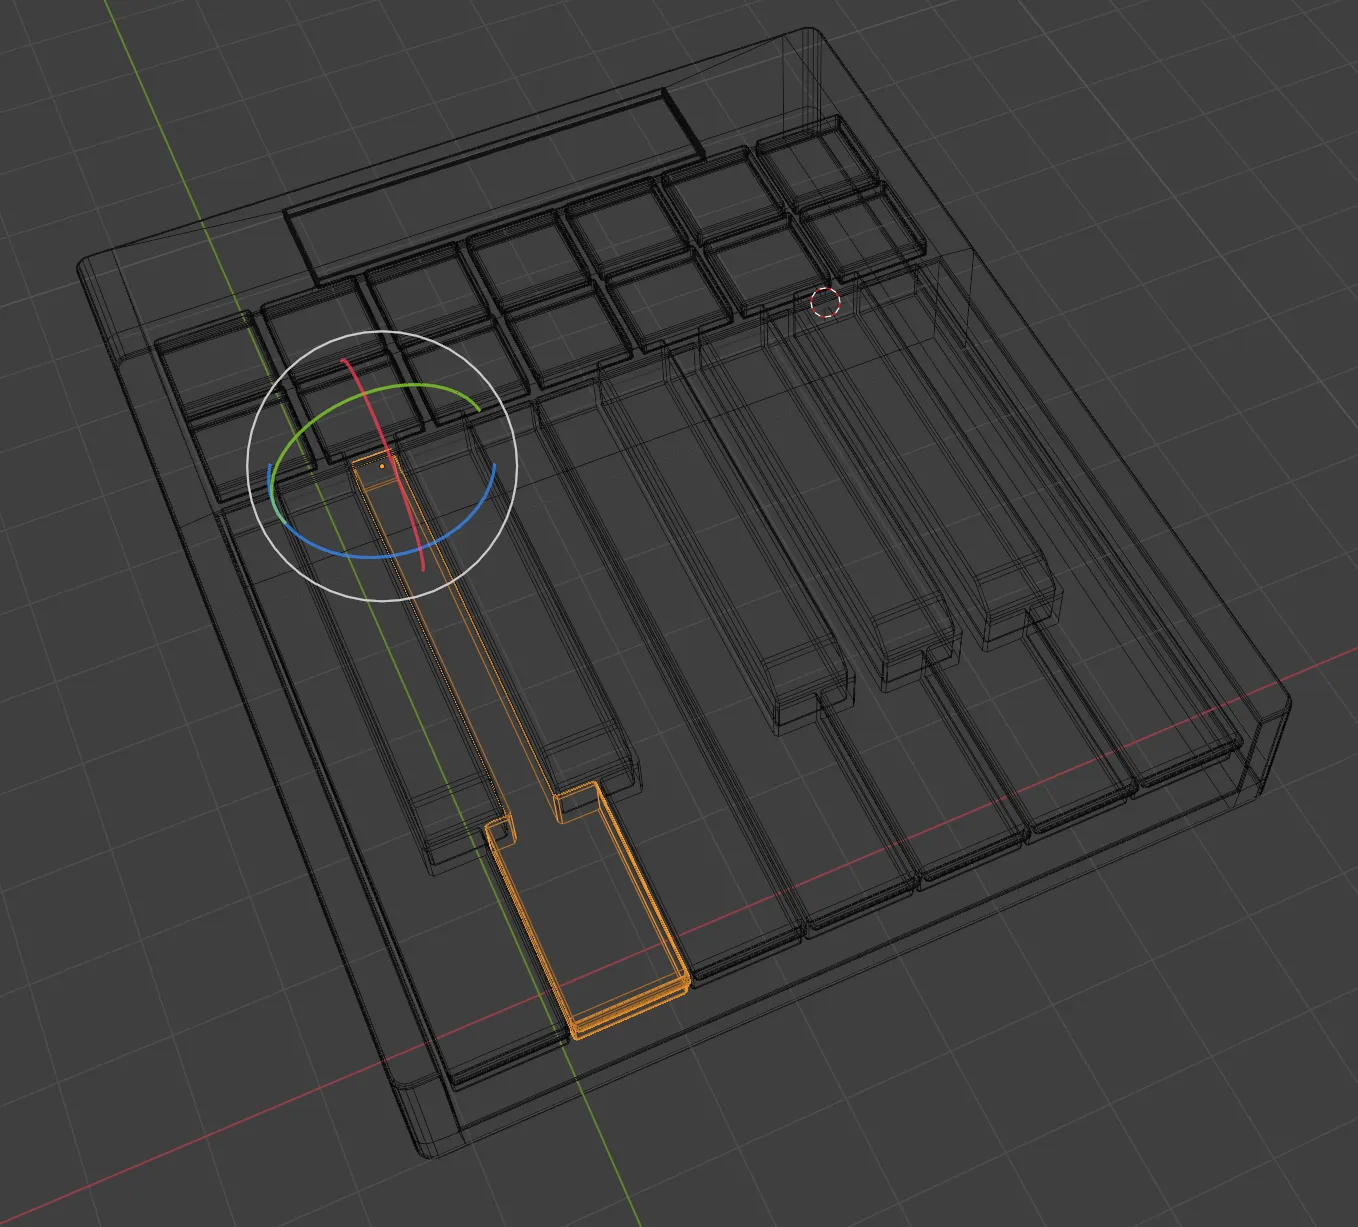
The model itself isn’t too complicated. It’s essentially a “case” (the white body / board), the piano keys, the drum pads, and a screen. I have a few hidden objects that act as booleans in the scene, but for the web they got baked in (more on that later). Notice as well that all the piano keys are labeled. This makes work much easier later.
One of the most important aspects for animation was setting the correct transformation origin for the piano keys. Since a piano key rotates from the rear where they’re mounted, that’s where the origin needs to be. If we don’t do this, animating the keys will look like a “see-saw”.
Now let’s get this out of Blender and onto the web.
Exporting to web
Getting a 3D model from Blender to the web is fairly easy… depending on how complex your object and material setup are.
The basic process is: select what you want to export (one or multiple objects), go to File > Export > gltf, and save that file. But what you’ll quickly find is, the model (and even animation) will look and play correctly - but the materials might be missing or incorrect. This is because Blender uses a node-based material system that most engines don’t support, particularly anything on the web like ThreeJS.
In my case, I had quite a few complex materials going on. All the piano keys and buttons light up when rotated or pulled down during animation. I also had an animated screen with text that scrolls from side to side created using 2 transparent text layers and a dynamic gradient. And as simple as it sounds, the case itself was textured using transparent text mixed into a solid color - which wouldn’t work when exported.

If you have a complex or procedural material, you can use Blender and the Cycles render engine to “bake” these into flat textures. It basically process the material down to what gets seen and saves it into an image.
But in my case, these materials needed to react to different conditions - or do things that can’t be baked easily (like animation). The piano keys could be a simple material that we change the color and emission using uniforms. And I’d flatten the case texture myself from transparent PNG to white BG JPG. But the screen would have to be a custom GLSL shader to achieve the scrolling animated text. I’ll touch on that later.
After resolving the materials, I exported the model as a GLTF file, along with a GLB containing any textures. This would be enough to display it on the web.
Showing it on the web
This was easy thanks to gltf2jsx. I ran the file through that CLI and it output a Typescript file with all the different objects from the GLTF file setup with materials. You could do this manually by opening the GLTF file in a text editor and mapping the meshes and materials out to ThreeJS elements, but the CLI does most of this for you. And since I used a GLB file technically, it’d take a few extra steps for me to export a GLTF file and map that one out.
You can see that it picks up all the object names from Blender and makes it easier to work understand what is what (especially with so many <mesh> components grouped together).
/*
Auto-generated by: https://github.com/pmndrs/gltfjsx
Command: npx gltfjsx@6.5.2 MIDI to Keyframe - Piano Template - Web V3.glb -t
*/

import * as THREE from "three";
import React from "react";
import { useGLTF } from "@react-three/drei";
import { GLTF } from "three-stdlib";

type GLTFResult = GLTF & {
  nodes: {
    WhiteKeyC: THREE.Mesh;
    ["BlackKeyC#"]: THREE.Mesh;
    ["BlackKeyG#"]: THREE.Mesh;
    WhiteKeyD: THREE.Mesh;
    WhiteKeyE: THREE.Mesh;
    WhiteKeyF: THREE.Mesh;
    WhiteKeyG: THREE.Mesh;
    WhiteKeyA: THREE.Mesh;
    WhiteKeyB: THREE.Mesh;
    ["BlackKeyD#"]: THREE.Mesh;
    ["BlackKeyF#"]: THREE.Mesh;
    ["BlackKeyA#"]: THREE.Mesh;
    ScreenBorder: THREE.Mesh;
    CaseR3: THREE.Mesh;
    ScreenInside: THREE.Mesh;
    ButtonsC: THREE.Mesh;
    ["ButtonsC#"]: THREE.Mesh;
    ButtonsD: THREE.Mesh;
    ["ButtonsD#"]: THREE.Mesh;
    ButtonsE: THREE.Mesh;
    ButtonsF: THREE.Mesh;
    ["ButtonsF#"]: THREE.Mesh;
    ButtonsG: THREE.Mesh;
    ["ButtonsG#"]: THREE.Mesh;
    ButtonsA: THREE.Mesh;
    ["ButtonsA#"]: THREE.Mesh;
    ButtonsB: THREE.Mesh;
    Buttons013: THREE.Mesh;
    Buttons014: THREE.Mesh;
  };
  materials: {
    ["PianoKey.White"]: THREE.MeshStandardMaterial;
    ["PianoKey.Black"]: THREE.MeshStandardMaterial;
    ["Piano.Screen.Border"]: THREE.MeshStandardMaterial;
    PianoCase: THREE.MeshStandardMaterial;
    ["Piano.Screen.Inside"]: THREE.MeshStandardMaterial;
    ["Button.DynamicText.001"]: THREE.MeshStandardMaterial;
  };
  animations: GLTFAction[];
};

export function Model(props: JSX.IntrinsicElements["group"]) {
  const { nodes, materials } = useGLTF(
    "/MIDI to Keyframe - Piano Template - Web V3.glb"
  ) as GLTFResult;
  return (
    <group {...props} dispose={null}>
      <mesh
        geometry={nodes.WhiteKeyC.geometry}
        material={materials["PianoKey.White"]}
        position={[-0.488, 0.901, -5.421]}
      />
      <mesh
        geometry={nodes["BlackKeyC#"].geometry}
        material={materials["PianoKey.Black"]}
        position={[-0.096, 1.014, -5.417]}
      />
      <mesh
        geometry={nodes["BlackKeyG#"].geometry}
        material={materials["PianoKey.Black"]}
        position={[4.304, 1.014, -5.417]}
      />
      <mesh
        geometry={nodes.WhiteKeyD.geometry}
        material={materials["PianoKey.White"]}
        position={[0.578, 0.901, -5.421]}
      />
      <mesh
        geometry={nodes.WhiteKeyE.geometry}
        material={materials["PianoKey.White"]}
        position={[1.644, 0.901, -5.421]}
      />
      <mesh
        geometry={nodes.WhiteKeyF.geometry}
        material={materials["PianoKey.White"]}
        position={[2.71, 0.901, -5.421]}
      />
      <mesh
        geometry={nodes.WhiteKeyG.geometry}
        material={materials["PianoKey.White"]}
        position={[3.775, 0.901, -5.421]}
      />
      <mesh
        geometry={nodes.WhiteKeyA.geometry}
        material={materials["PianoKey.White"]}
        position={[4.841, 0.901, -5.421]}
      />
      <mesh
        geometry={nodes.WhiteKeyB.geometry}
        material={materials["PianoKey.White"]}
        position={[5.907, 0.901, -5.421]}
      />
      <mesh
        geometry={nodes["BlackKeyD#"].geometry}
        material={materials["PianoKey.Black"]}
        position={[1.111, 1.014, -5.417]}
      />
      <mesh
        geometry={nodes["BlackKeyF#"].geometry}
        material={materials["PianoKey.Black"]}
        position={[3.217, 1.014, -5.417]}
      />
      <mesh
        geometry={nodes["BlackKeyA#"].geometry}
        material={materials["PianoKey.Black"]}
        position={[5.357, 1.014, -5.417]}
      />
      <mesh
        geometry={nodes.ScreenBorder.geometry}
        material={materials["Piano.Screen.Border"]}
        position={[2.815, 1.423, -8.023]}
      />
      <mesh
        geometry={nodes.CaseR3.geometry}
        material={materials.PianoCase}
        position={[-0.682, 1.109, -2.962]}
      />
      <mesh
        geometry={nodes.ScreenInside.geometry}
        material={materials["Piano.Screen.Inside"]}
        position={[2.815, 1.414, -8.023]}
        scale={0.991}
      />
      <mesh
        geometry={nodes.ButtonsC.geometry}
        material={materials["Button.DynamicText.001"]}
        position={[-0.518, 1.453, -6.839]}
      />
      <mesh
        geometry={nodes["ButtonsC#"].geometry}
        material={materials["Button.DynamicText.001"]}
        position={[-0.518, 1.453, -6.839]}
      />
      <mesh
        geometry={nodes.ButtonsD.geometry}
        material={materials["Button.DynamicText.001"]}
        position={[-0.518, 1.453, -6.839]}
      />
      <mesh
        geometry={nodes["ButtonsD#"].geometry}
        material={materials["Button.DynamicText.001"]}
        position={[-0.518, 1.453, -6.839]}
      />
      <mesh
        geometry={nodes.ButtonsE.geometry}
        material={materials["Button.DynamicText.001"]}
        position={[-0.518, 1.453, -6.839]}
      />
      <mesh
        geometry={nodes.ButtonsF.geometry}
        material={materials["Button.DynamicText.001"]}
        position={[-0.518, 1.453, -6.839]}
      />
      <mesh
        geometry={nodes["ButtonsF#"].geometry}
        material={materials["Button.DynamicText.001"]}
        position={[-0.518, 1.453, -6.839]}
      />
      <mesh
        geometry={nodes.ButtonsG.geometry}
        material={materials["Button.DynamicText.001"]}
        position={[-0.518, 1.453, -6.839]}
      />
      <mesh
        geometry={nodes["ButtonsG#"].geometry}
        material={materials["Button.DynamicText.001"]}
        position={[-0.518, 1.453, -6.839]}
      />
      <mesh
        geometry={nodes.ButtonsA.geometry}
        material={materials["Button.DynamicText.001"]}
        position={[-0.518, 1.453, -6.839]}
      />
      <mesh
        geometry={nodes["ButtonsA#"].geometry}
        material={materials["Button.DynamicText.001"]}
        position={[-0.518, 1.453, -6.839]}
      />
      <mesh
        geometry={nodes.ButtonsB.geometry}
        material={materials["Button.DynamicText.001"]}
        position={[-0.518, 1.453, -6.839]}
      />
      <mesh
        geometry={nodes.Buttons013.geometry}
        material={materials["Button.DynamicText.001"]}
        position={[-0.518, 1.453, -6.839]}
      />
      <mesh
        geometry={nodes.Buttons014.geometry}
        material={materials["Button.DynamicText.001"]}
        position={[-0.518, 1.453, -6.839]}
      />
    </group>
  );
}

useGLTF.preload("/MIDI to Keyframe - Piano Template - Web V3.glb");
The project base
I used NextJS as the framework for the web app. I basically needed something that runs React and serves pages statically. I used a starter template I created a while ago for 3D projects called r3f-next-starter. It sets up ThreeJS and React Three Fiber and the various aspects of the ecosystem (like post processing).
I also used the midi-synthesizer-app I’ve been experimenting with recently. It has a lot of React specific logic setup for handling input (like MIDI or even gamepad) and music playback using ToneJS.
Input management
This is something I’ve done in a lot of other projects, so I just copied the structure over from the midi-synthesizer-app and changed it slightly.
I created a Zustand store that acted as a kind of global state for the input (useInputStore). It keeps track of any note that is currently pressed. Whether it’s a keyboard or actual MIDI keyboard, or the music playing component, they tap into this store to get the latest input data.
import { create } from "zustand";

export type WhiteNotes = "C" | "D" | "E" | "F" | "G" | "A" | "B";
export type BlackNotes = "C#" | "D#" | "F#" | "G#" | "A#";
export type BaseNote = WhiteNotes | BlackNotes;
export type Octaves = "1" | "2" | "3" | "4" | "5" | "6" | "7";
export type Note = `${BaseNote}${Octaves}`;

export type UserInputMap = Record<Note, boolean>;
// Object.entries() version that's commonly used to iterate over it easily
export type UserInputMapEntries = [Note, boolean][];

const DEFAULT_USER_MAP: UserInputMap = {
  C1: false, // All "white" keys
  C2: false,
  C3: false,
  C4: false,
  C5: false,
  C6: false,
  C7: false,
  D1: false, // Next octave
  "C#1": false, // Sharp (or "black") keys
  // ...etc...
};

export type UserInputKeys = keyof UserInputMap;

interface InputState {
  input: UserInputMap;
  setInput: (key: UserInputKeys, input: boolean) => void;
  setMultiInput: (keys: Partial<UserInputMap>) => void;

  currentDevice: string;
  setCurrentDevice: (currentDevice: string) => void;
  deviceName: string;
  setDeviceName: (deviceName: string) => void;
}

export const useInputStore = create<InputState>()((set) => ({
  input: DEFAULT_USER_MAP,
  setInput: (key, input) =>
    set((state) => ({ input: { ...state.input, [key]: input } })),
  setMultiInput: (keys) =>
    set((state) => ({ input: { ...state.input, ...keys } })),
}));
💡 For the Typescript fans out there, you’ll notice a really neat compound type I create to define all the possible notes across all piano octaves (octaves 1 through 8 in C-major).
Then I made components for each input device and connected them to this store. For the keyboard I used event listeners, for the gamepad I used the Gamepad API, and for MIDI devices I use the webmidi library (which uses the Web MIDI API).
import { NoteMessageEvent, WebMidi } from "webmidi";
import React, { useEffect, useState } from "react";
import { Note, useInputStore } from "@/store/input";
import { isApplePlatform } from "@/helpers/platform";

type Props = {};

const MidiKeyboard = (props: Props) => {
  const [instruments, setInstrument] = useState<string[]>([]);
  const [playedNotes, setPlayedNotes] = useState<string[]>([]);
  const [currentNotes, setCurrentNotes] = useState<string[]>([]);
  const { input, setInput } = useInputStore();

  function onEnabled() {
    // Inputs
    WebMidi.inputs.forEach((input) => {
      console.log("manu", input.manufacturer, "name", input.name);

      const checkInstrument = instruments.findIndex(
        (instrument) => instrument === input.name
      );
      if (checkInstrument >= 0) return;
      setInstrument((prevInstruments) => [...prevInstruments, input.name]);
    });

    // Outputs
    WebMidi.outputs.forEach((output) => {
      console.log(output.manufacturer, output.name);
    });
  }

  // console.log("instruments", instruments);
  // console.log("currentNotes", currentNotes);
  // console.log("input", input);
  useEffect(() => {
    if (isApplePlatform()) return;
    WebMidi.enable()
      .then(onEnabled)
      .catch((err) => alert(err));

    return () => {
      WebMidi.disable();
    };
  }, []);

  const keyLog = (e: NoteMessageEvent) => {
    // C2 - C7 (and more if user changes oct +/-)
    console.log(e.note.identifier);
    setPlayedNotes((prevNotes) => [...prevNotes, e.note.identifier]);
    setInput(e.note.identifier as Note, true);
    setCurrentNotes((prevNotes) =>
      Array.from(new Set([...prevNotes, e.note.identifier]))
    );
  };

  const clearKey = (e: NoteMessageEvent) => {
    const clearNote = `${e.note.identifier}`;
    console.log("key off", e.note.identifier, clearNote, currentNotes);
    setInput(e.note.identifier as Note, false);

    setCurrentNotes((prevNotes) =>
      prevNotes.filter((note) => note !== clearNote)
    );
    console.log("clearing key");
  };

  useEffect(() => {
    if (instruments[0]) {
      const myInput = WebMidi.getInputByName(instruments[0]);
      myInput?.addListener("noteon", keyLog);
      myInput?.addListener("noteoff", clearKey);
    }
    return () => {
      if (instruments[0]) {
        const myInput = WebMidi.getInputByName(instruments[0]);
        myInput?.removeListener("noteon", keyLog);
        myInput?.removeListener("noteoff", clearKey);
      }
    };
  }, [instruments]);
  return <></>;
};

export default MidiKeyboard;
💡 You’ll also note that we have to check if the user is on an Apple mobile device, because Webkit disables the Web MIDI API for security reasons.
And with that we have 3 different devices that can theoretically play music and change the way the piano looks (once we set all that up next!). I put these inside an <AppWrapper> component and wrapped each page in it.
import Keyboard from "@/features/input/Keyboard";
import MidiKeyboard from "@/features/input/MidiKeyboard";
import Gamepad from "@/features/input/Gamepad";
import React, { PropsWithChildren } from "react";
import ThemeProvider from "./ThemeProvider/ThemeProvider";

type Props = {};

const AppWrapper = ({ children }: PropsWithChildren<Props>) => {
  return (
    <ThemeProvider>
      <Keyboard />
      <MidiKeyboard />
      <Gamepad />
      {children}
    </ThemeProvider>
  );
};

export default AppWrapper;
Playing music
This is also something I won’t go into too deeply in this article (I’ll save it for a later one I promise), but I used ToneJS and made several React components that wrap it’s various functions (like the Sampler). Then I connected those components to the input store to play notes.
There’s not too much to the store itself. I store the state of the music (like the volume or if it’s muted or not), as well as references to different ToneJS objects we need to access across the app (like the audio waveform data).
import * as Tone from "tone";
import { create } from "zustand";
import { devtools } from "zustand/middleware";
import { SynthTypes } from "../features/Music/Music";
// import type {} from "@redux-devtools/extension"; // required for devtools typing

interface AppState {
  // Sound state
  mute: boolean;
  setMute: (mute: boolean) => void;
  volume: number;
  setVolume: (volume: number) => void;
  attack: number;
  decay: number;
  sustain: number;
  release: number;
  setAttack: (attack: number) => void;
  setDecay: (decay: number) => void;
  setSustain: (sustain: number) => void;
  setRelease: (release: number) => void;
  pitchShift: number;
  setPitchShift: (pitchShift: number) => void;
  synthType: SynthTypes;
  setSynthType: (synthType: SynthTypes) => void;
  waveform: React.RefObject<Tone.Waveform> | null;
  setWaveform: (fft: React.RefObject<Tone.Waveform>) => void;
  fft: React.RefObject<Tone.FFT> | null;
  setFft: (fft: React.RefObject<Tone.FFT>) => void;
}
Here’s what the music component looks like at the lowest level. It basically lets us create different types of instruments using ToneJS, whether it’s a Sampler (like a sound board) or a PolySynth (like a classic MIDI synthesizer).
import React, { useEffect, useRef } from "react";
import { UserInputKeys, UserInputMap, useInputStore } from "../../store/input";
import * as Tone from "tone";
import { useAppStore } from "@/store/app";

const SYNTH_TYPES = ["PolySynth", "Sampler"] as const;

type Props = {
  type: (typeof SYNTH_TYPES)[number];
  config?: any;
};

const BaseSynth = ({ type, config = {} }: Props) => {
  const notesPlaying = useRef<Partial<UserInputMap>>({});
  const { input } = useInputStore();
  const {
    mute,
    setMute,
    setWaveform,
    setFft,
    volume,
    attack,
    release,
    pitchShift,
  } = useAppStore();
  const loaded = useRef(false);

  // Create a synth and connect it to the main output (your speakers)
  const synth = useRef<Tone.PolySynth | Tone.Sampler | null>(null);
  const pitchShiftComponent = useRef<Tone.PitchShift | null>(null);
  const waveform = useRef<Tone.Waveform | null>(null);
  const fft = useRef<Tone.FFT | null>(null);
  const inputKeys = Object.keys(input) as UserInputKeys[];

  useEffect(() => {
    // If we're muted, don't play anything
    if (mute) return;
    // Make sure Synth is loaded before playing notes (or it crashes app)
    // if (!loaded.current) return;
    const now = Tone.now();
    if (!synth.current) return;

    // Find out what input changed
    const pressedKeys = inputKeys.filter(
      (key) => input[key] && !notesPlaying.current[key]
    );
    const releasedKeys = inputKeys.filter(
      (key) => !input[key] && notesPlaying.current[key]
    );

    pressedKeys.forEach((key) => {
      Tone.start();
      //   console.log("playing note!");
      synth.current?.triggerAttack(key, now);
      notesPlaying.current[key] = true;
    });

    releasedKeys.forEach((key) => {
      Tone.start();
      //   console.log("releasing note!");
      synth.current?.triggerRelease(key, now);
      notesPlaying.current[key] = false;
    });

    if (pressedKeys.length == 0) synth.current.releaseAll(now + 3);
  }, [input]);

  useEffect(() => {
    if (!synth.current) {
      console.log("creating synth");
      // Initialize plugins
      fft.current = new Tone.FFT();
      waveform.current = new Tone.Waveform();
      pitchShiftComponent.current = new Tone.PitchShift(4);

      // Initialize synth with user's config
      // and "chain" in the plugins
      // @ts-ignore
      synth.current = new Tone[type]({
        ...config,
        onload: () => {
          // loaded.current = true;
          console.log("loaded now!");
        },
      })
        .chain(waveform.current, Tone.getDestination())
        .chain(fft.current, Tone.getDestination())
        .chain(pitchShiftComponent.current, Tone.getDestination())
        .toDestination();

      // synth.current.connect(pitchShift.current);

      setWaveform(waveform);
      setFft(fft);
    }

    return () => {
      if (synth.current) {
        synth.current.releaseAll();
        synth.current.dispose();
        waveform.current.dispose();
        fft.current.dispose();
      }
    };
  }, []);

  // Mute audio when requested
  useEffect(() => {
    if (mute) {
      const now = Tone.now();
      synth.current?.releaseAll(now);
      // setMute(false);
    }
  }, [mute]);

  // Sync volume with store
  useEffect(() => {
    if (synth.current && synth.current.volume.value != volume) {
      synth.current.volume.set({
        value: volume,
      });
    }
  }, [volume]);

  // Sync envelope with store
  useEffect(() => {
    const sampler = synth.current as Tone.Sampler;
    if (!sampler) return;

    if (sampler.attack != attack) {
      sampler.set({
        attack: attack,
      });
    }
    if (sampler.release != release) {
      sampler.set({
        attack: release,
      });
    }
  }, [attack, release]);

  // Sync pitch shift with store
  useEffect(() => {
    if (pitchShiftComponent.current.pitch != pitchShift) {
      pitchShiftComponent.current.set({
        pitch: pitchShift,
      });
    }
  }, [pitchShift]);

  return <></>;
};

export default BaseSynth;
This is a cool component to check out if you’re ever interested in using vanilla JavaScript libraries inside of React. It essentially keeps ToneJS, and any other objects we need to initialize, stored as React ref. This lets us use the library as needed, and control it within the React lifecycle (without re-initializing the synth every re-render).
The component ultimately looks like this in practice. No props since it connects to the store to sync with any state there (like what type of piano is selected).
<MusicSwitcher />💡 I may be releasing these components as a standalone library soon to simplify coding music, if you’re interested in using them let me know!
Animating the piano keys
Once I had the input store in place, I could animate the keys based on the changes.
I created a wrapper component around the model that checked the input store and sent the input data to the model using component props.
import React from "react";
import RyoturiaModel from "./RyoturiaModel";
import { useInputStore } from "@/store/input";
import { useFrame } from "@react-three/fiber";

type Props = {};

const Ryoturia = (props: Props) => {
  const { input, setInput } = useInputStore();

  const inputProps = {
    piano: {
      c: input.C4,
      d: input.D4,
      e: input.E4,
      f: input.F4,
      g: input.G4,
      a: input.A4,
      b: input.B4,
      csharp: input["C#4"],
      dsharp: input["D#4"],
      fsharp: input["F#4"],
      gsharp: input["G#4"],
      asharp: input["A#4"],
    },
    drumpad: {
      c: input.C5,
      d: input.D5,
      e: input.E5,
      f: input.F5,
      g: input.G5,
      a: input.A5,
      b: input.B5,
      csharp: input["C#5"],
      dsharp: input["D#5"],
      fsharp: input["F#5"],
      gsharp: input["G#5"],
      asharp: input["A#5"],
    },
  };
  return <RyoturiaModel {...inputProps} setInput={setInput} />;
};

export default Ryoturia;
Then inside the model component, I animate using the input props I send over.
The keys need to be rotated. and the drumpad need to go down in position. And the key color needs to change to show it’s pressed - we’ll change the albedo / base color and the emissive color (basically the color of the outside and the color it will glow).
I do all this inside a <AnimatedPianoKey> component:
import { useFrame } from "@react-three/fiber";
import { easing } from "maath";
import { useEffect, useRef } from "react";
import { Color, Mesh, MeshPhysicalMaterial } from "three";
import { lerp } from "three/src/math/MathUtils";

const ANIMATION_TIME_ROTATION = 0.1; // seconds
const ANIMATION_SPEED_COLOR = 4; // seconds
// Rotation in Blender is 3 euler which = 3 out of 360
// ThreeJS uses PI-based units, so it'd be `x / Math.PI * 2`
// The full proportional calculation: `(3 * (Math.PI * 2)) / 360 = x`
const WHITE_KEY_ROTATION = 0.05235987755;
const DRUM_PAD_PRESS_DISTANCE = 0.08;
const PRESSED_EMISSIVE_COLOR = new Color("#4287f5");
const AnimatedPianoKey = ({
  pressed,
  black = false,
  drumpad = false,
  note = "C4",
  setInput,
  whiteKeyRotation = WHITE_KEY_ROTATION,
  ...props
}) => {
  let keyColor = black ? [0, 0, 0] : [0.8, 0.8, 0.8];
  if (drumpad) keyColor = [0.8, 0.8, 0.8];
  const colorDelta = useRef(0);
  const meshRef = useRef<Mesh>();
  const originalPositionY = useRef<number>(null);
  const inputRef = useRef(null);
  useFrame(({}, delta) => {
    if (meshRef.current) {
      if (drumpad && originalPositionY.current == null) {
        originalPositionY.current = meshRef.current.position.y;
      }
      // Animate the keys up or down when pressed
      // We use a `easing()` method to "tween" between 2 rotational values
      if (drumpad) {
        easing.damp(
          meshRef.current.position,
          "y",
          pressed
            ? originalPositionY.current - DRUM_PAD_PRESS_DISTANCE
            : originalPositionY.current,
          ANIMATION_TIME_ROTATION,
          delta
        );
      } else {
        easing.damp(
          meshRef.current.rotation,
          "x",
          pressed ? whiteKeyRotation : 0,
          ANIMATION_TIME_ROTATION,
          delta
        );
      }

      // Change color (we go from OG key color to blue - it helps glow pop more)
      // We "tween" between 2 colors, the original color (stored above) and a "pressed" color (blue)
      if (pressed) {
        colorDelta.current += delta;
      } else {
        colorDelta.current = Math.max(colorDelta.current - delta, 0);
      }
      const material = meshRef.current.material as MeshPhysicalMaterial;
      material.color.r = lerp(
        keyColor[0],
        0,
        Math.min(colorDelta.current * ANIMATION_SPEED_COLOR, 1)
      );
      material.color.g = lerp(
        keyColor[1],
        0,
        Math.min(colorDelta.current * ANIMATION_SPEED_COLOR, 1)
      );
      material.color.b = lerp(
        keyColor[2],
        1,
        Math.min(colorDelta.current * ANIMATION_SPEED_COLOR, 1)
      );

      // Change Emission (glow)
      material.emissive = PRESSED_EMISSIVE_COLOR;
      material.emissiveIntensity = lerp(
        0,
        3,
        Math.min(colorDelta.current * ANIMATION_SPEED_COLOR, 1)
      );
    }
  });

  // Sync clicks with input store to play music
  const handleKeyPress = () => {
    setInput(note, true);

    // Since we don't know when user stops clicking
    inputRef.current = window.setTimeout(() => setInput(note, false), 420);
  };
  // Clear any timers when exiting component
  useEffect(() => {
    return () => {
      if (inputRef.current) clearTimeout(inputRef.current);
    };
  }, []);

  return <mesh ref={meshRef} onClick={handleKeyPress} {...props} />;
};

export default AnimatedPianoKey;
I use this component in place of every piano key and drum pad. It leverages the useFrame hook to animate the keys based off the input state passed through. If the button is pressed, it animates to a “pressed” state (rotated or pushed down depending). And the color changes from the initial state (black or white) to a “pressed” color (basically blue).
Here’s what that setup looks like in action:
One issue I had here was that gltf2jsx created materials for all my objects - but they also shared materials. so when I changed the color of one key, it changed the color of all the keys. to get around this quick and dirty, I added a clone() to each of the materials. ideally I’d store them in a ref or something so I don’t recreate them every render.
<AnimatedPianoKey
  geometry={nodes.WhiteKeyD.geometry}
  // The material gets cloned here
  material={materials["PianoKey.White"].clone()}
  position={[0.578, 0.901, -5.421]}
  pressed={piano.d}
  setInput={setInput}
  note="D4"
/>
💡 I’ll touch on it later, but I went through probably 3 different animation techniques until I finally found one that wasn’t broken and actually worked. Was pretty frustrating trying to do something super simple and having such a hard time (and having all the docs and examples look so “simple”).
Animating the Screen
The screen was a bit more complex. it has text that is longer than the width of the screen and scrolls left and right to show the full text.
This is accomplished by using a custom ThreeJS shader made using drei’s shaderMaterial function with custom vertex and fragment shader I wrote. The vertex shader doesn’t do anything except send the object UVs down to the fragment shader. But inside the fragment shader is where the magic happens: we stack multiple textures containing typography and the colored BG…and animate it all.
The way we do this in the fragment shader is fairly simple - we want to use the UV data and add/subtract from it to “move” the texture (which is displayed based off this UV data that we’re altering).
To set this up with the images, base texture for the screen isn’t too complicated, it’s the same basically. But the scrolling text - since it overflows, we need to handle it differently.
Basically we have to think about the UV map as a frame in Figma or Illustrator. it represents the width and height of the image - and the ratio is key. if you provide a texture that is a different ratio than the UV expects, your image will look stretched.
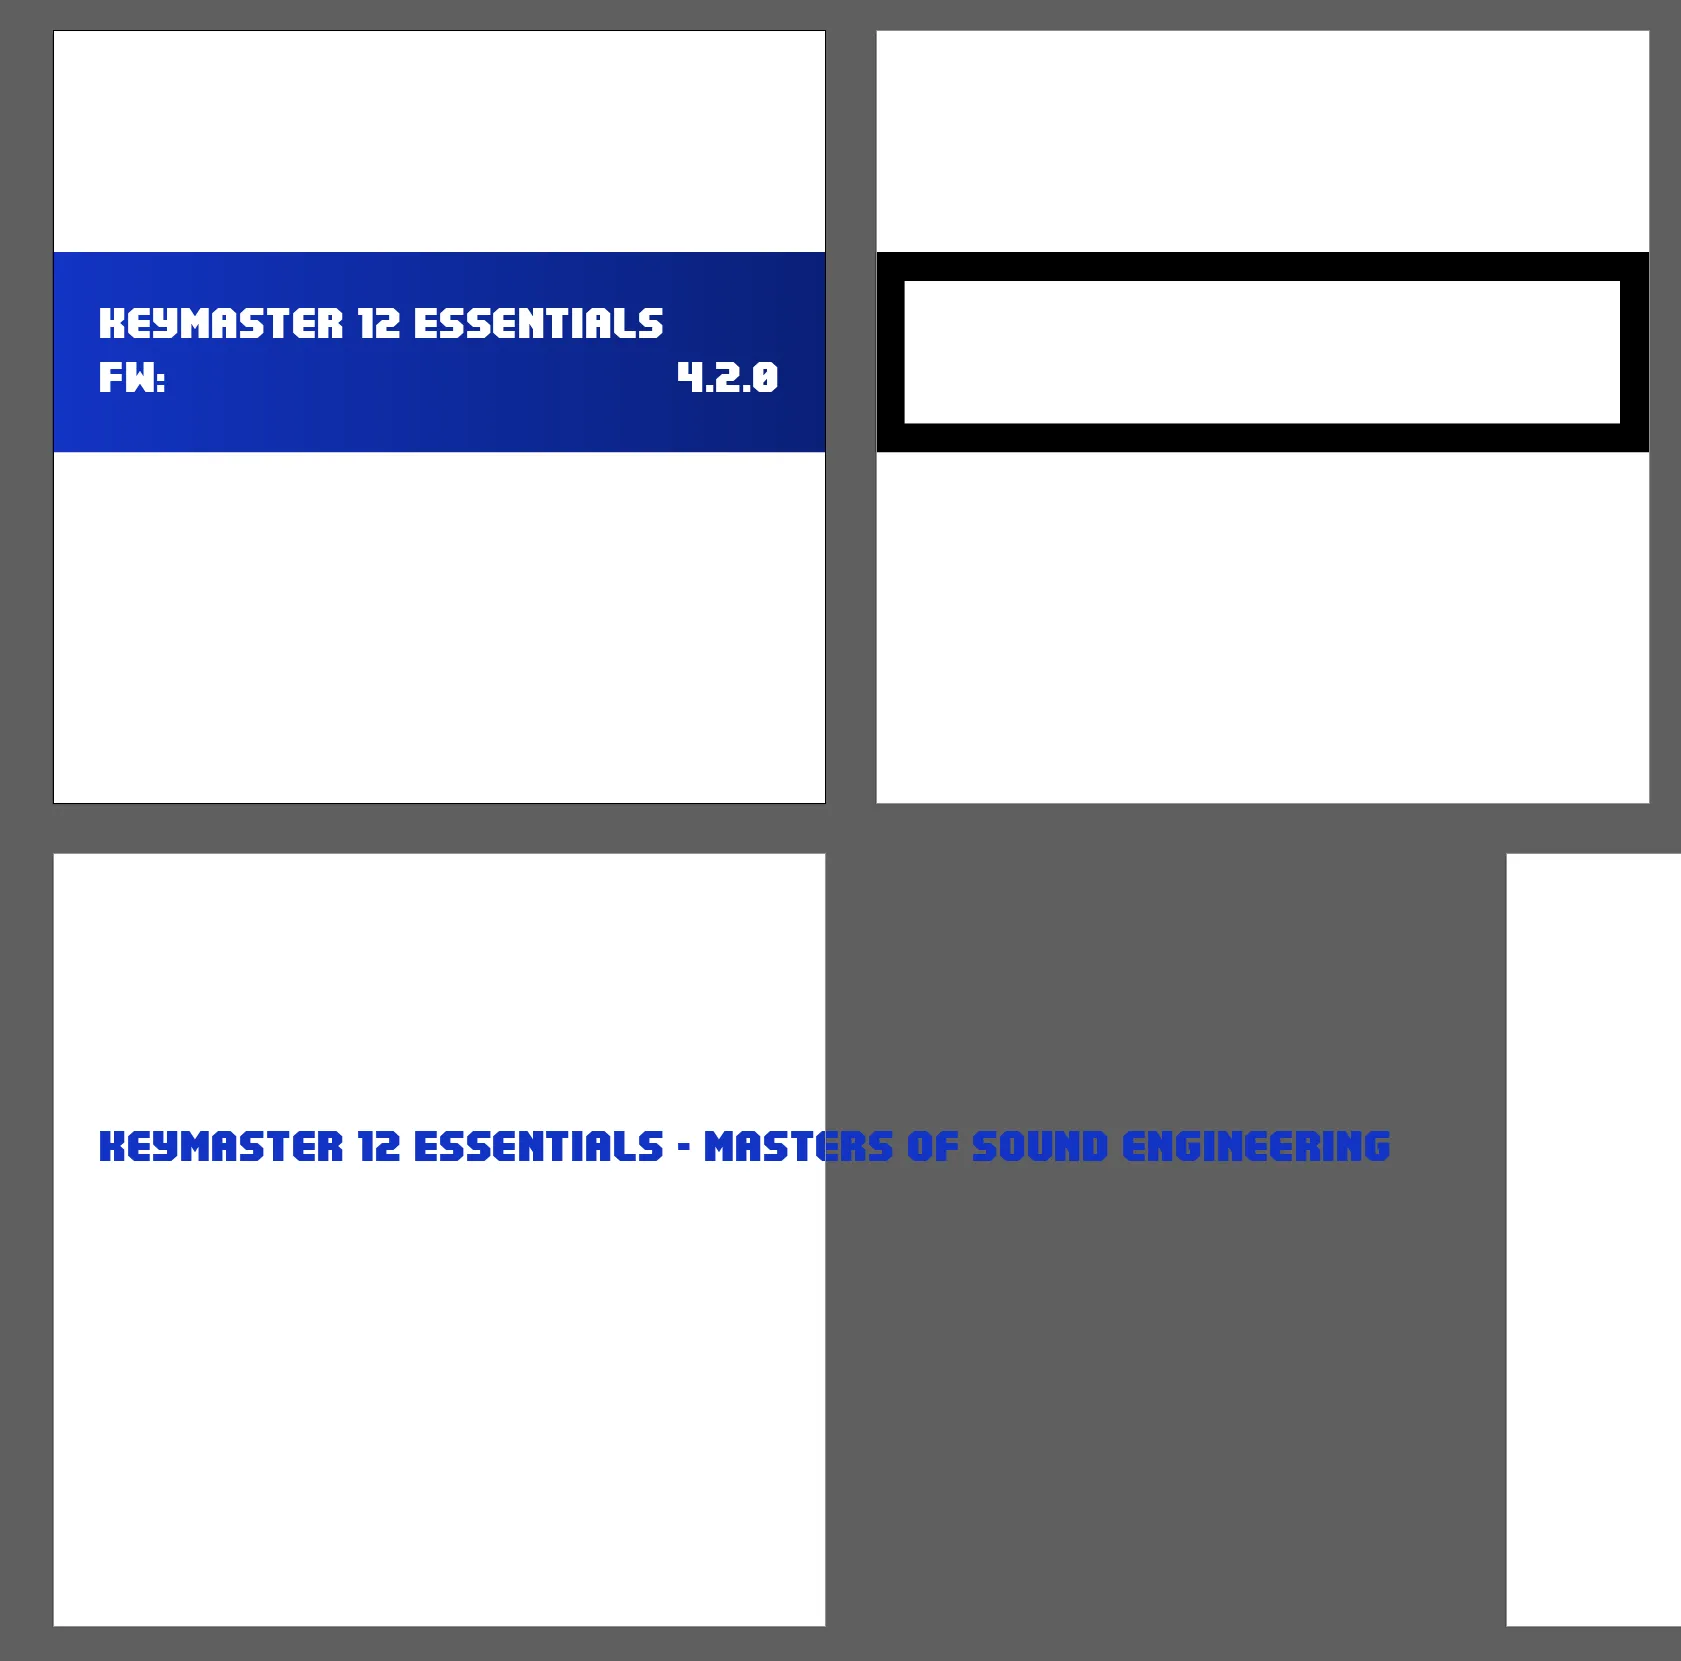
But we need to provide an image that’s larger than the width, so how do we do this?
We lay out the text and then see how many times we have to copy the frame to fit it inside. In Figma, you can just scale your width by multiples (like x2 or x1.5 - doesn’t have to be round but makes things easier later).
Then in the shader, when we use the image and UV map, we divide the UV map’s X coordinates (or width) by the number you multiplied the frame/canvas by. If it was 3x as big, you’d divide by 3. In my case, it was 2x as big, so I multiplied the UVsby 0.5 to achieve the same result.
vec2 marqueeUv = vec2(vUv.x * 0.5, vUv.y);
vec4 marqueeText = texture2D(marqueeTextTexture, marqueeUv);
What does this do? Well, without dividing you can see the image displays but it looks stretched / shrunken into place. By dividing the UV coordinates, we tell the shader to only care about a portion of our image.
Now that we have only a portion showing, we can animate it. we use a sin() function to bounce a value between 0 and 1 (to give us a consistent loop to animate and also easier numbers to work with)
uniform sampler2D bottomTextTexture;
uniform sampler2D marqueeTextTexture;
uniform float time;
uniform vec3 color;
varying vec2 vUv;

float map(float value, float min1, float max1, float min2, float max2) {
  return min2 + (value - min1) * (max2 - min2) / (max1 - min1);
}

void main() {
  float uvSpeed = 0.5;
  float textUvAnim = map(sin(time * uvSpeed), 0.0, 1.0, 0.0, 0.5);

  vec4 bottomText = texture2D(bottomTextTexture, vUv);
  vec2 marqueeUv = vec2(vUv.x * 0.5 - textUvAnim, vUv.y);
  vec4 marqueeText = texture2D(marqueeTextTexture, marqueeUv);

  // ... more code ...
}
And then finally we have the BG color which fades from blue to teal. This is achieved by using another sin() function with UVs and adding time into the mix. Then we tint the color as needed (in my case, blue).
float speed = 3.0;
vec3 animatedColor = 0.5 + 0.3 * sin(vUv.xyy + time * speed);
vec4 adjustedAnimatedColor = vec4(animatedColor + color - 0.5, 1.0);
// Bottom text mixing with color
vec4 combinedColor = mix(adjustedAnimatedColor, bottomText, pow(bottomText.a, 1.4));
// Top text
combinedColor = mix(combinedColor, marqueeText, pow(marqueeText.a, 1.4));
gl_FragColor.rgba = combinedColor;
We toss all this shader code into a custom ThreeJS material:
import * as THREE from "three";
import { useFrame, extend, MeshProps } from "@react-three/fiber";
import { useRef, useState } from "react";
import { shaderMaterial } from "@react-three/drei";

import vertex from "./shaders/shader.vert";
import fragment from "./shaders/shader.frag";

const RyoturiaScreenMaterial = shaderMaterial(
  {
    time: 0,
    color: new THREE.Color(0.05, 0.2, 0.025),
    bottomTextTexture: new THREE.Texture(),
    marqueeTextTexture: new THREE.Texture(),
  },
  vertex,
  fragment
);

// This is the 🔑 that HMR will renew if this file is edited
// It works for THREE.ShaderMaterial as well as for drei/shaderMaterial
// @ts-ignore
RyoturiaScreenMaterial.key = THREE.MathUtils.generateUUID();

export default RyoturiaScreenMaterial;
Then we use the material. I created a <RyoturiaScreen> component to hold it. We need to provide the material a few textures containing the typography. And since the material needs access to the time to animate, we need to setup a useFrame that powers that.
import React, { useRef } from "react";
import { Mesh, TextureLoader } from "three";
import RyoturiaScreenMaterial from "./RyoturiaScreenMaterial";
import { extend, MeshProps, useFrame } from "@react-three/fiber";
import { RepeatWrapping } from "three";

type Props = MeshProps & {};

const createTexture = () => {
  const texture = new TextureLoader().load(
    "./textures/screen-uv-r1-bottom-txt.png"
  );
  return texture;
};

const RyoturiaScreen = (props: Props) => {
  const meshRef = useRef(null);
  const bottomTexture = useRef(createTexture());
  const marqueeTextTexture = useRef(
    new TextureLoader().load("./textures/title-marquee-text-v2.png")
  );

  useFrame((state, delta) => {
    if (meshRef.current.material) {
      meshRef.current.material.uniforms.time.value +=
        Math.sin(delta / 2) * Math.cos(delta / 2);
    }
  });
  return (
    <mesh ref={meshRef} {...props}>
      {/* @ts-ignore */}
      <ryoturiaScreenMaterial
        key={RyoturiaScreenMaterial.key}
        color="blue"
        time={3}
        bottomTextTexture={bottomTexture.current}
        marqueeTextTexture={marqueeTextTexture.current}
      />
    </mesh>
  );
};

extend({ RyoturiaScreenMaterial });

export default RyoturiaScreen;
Nice, now that the screen is animated, what other cool stuff can we do? What about visualizing the audio that’s coming out of the piano?
Waveform
I wanted to have a nice visual that emphasized the audio aspect so I added a waveform-like visualizer.
It’s technically not a waveform of the audio that you’re classically used to seeing (like when they show audio previews on websites or apps). That tends to show the intensity or volume of the audio.
I’m using FFT (or Fast Fourier transform) data, which is more representative of the frequency of the audio. If you look closely while playing keys on the piano, as you progress up the note scale (C, D, E, etc) - you should notice the “waves” rising in different areas based on the note pressed. I think this data made the visual a bit cooler and more interactive than a simple waveform.
I get the FFT data from ToneJS. This is a little tricky in React-land, because to get the data you need access to the FFT object - and the FFT object needs to be attached to the synth object. In the project, the FFT lives in the same component as the synth because it has to “attach” to it. So I added it to a Zustand store (useAppStore) so I could access it anywhere. You could also achieve this using React Context.
const BaseSynth = ({ type, config = {} }: Props) => {
  const {
    setFft,
  } = useAppStore();

  // We'll store the ToneJS FFT object here after initializing
	const fft = useRef<Tone.FFT | null>(null);

	// Create the synth when component mounts
  useEffect(() => {
    if (!synth.current) {
      console.log("creating synth");
      // Initialize plugins
      fft.current = new Tone.FFT();

      // Initialize synth with user's config
      // and "chain" in the plugins
      synth.current = new Tone[type]({
        ...config,
        onload: () => {
          // loaded.current = true;
          console.log("loaded now!");
        },
      })
        .chain(fft.current, Tone.getDestination())
        .toDestination();

			// Save the reference to the FFT object to the store
      setFft(fft);
    }
  }
Then in a separate <WaveformLine> component, I grab the FFT object from Zustand get the latest data from it. The data comes in the form of a big array of 1024 or more integers.
import { useAppStore } from "@/store/app";

const WaveformLine = (props: Props) => {
  const boxRefs = useRef<Mesh[]>([]);

  // We grab the waveform data
  const { fft } = useAppStore();
  const levels = fft.current.getValue();

  // Do something with it!
};

export default WaveformLine;
If you actually visualize all this data, a lot of it on the lower end is not as useful. the data basically repeats itself and gets smaller in intensity as it goes on (you can see it when you press a certain key, certain parts rise and fall like a pattern). I cut it down to a quarter and create <WaveformBox> components to represent each segment of data.
// Generate boxes to represent notches on the waveform
// We only need 1/4 of the boxes (the levels gives us 1024 data points - so we limit it a bit)
// We also store the ref of each box to use later for animation
const objects = useMemo(
  () =>
    new Array(levels.length / 4)
      .fill(0)
      .map((_, index) => (
        <WaveformBox
          ref={(el) => (boxRefs.current[index] = el)}
          key={index}
          offset={index}
        />
      )),
  [levels.length]
);

// The animation (position, color, glow)
useFrame((_, delta) => {
  // We grab the latest waveform data from the store
  // (you can't use hook data above or it'll be out of date)
  const { fft } = useAppStore.getState();
  if (!fft?.current || boxRefs.current.length == 0) return;

  // Get the waveform data from ToneJS
  const levels = fft.current.getValue();

  // We cut the waveform down to only the first quarter
  // because the last 3/4 don't really show much action
  for (let i = 0; i < levels.length / 4; i++) {}
});
To animate them, we attach refs to each of the “bars” when we render them so the parent component can control them. then in an animation loop, we update position and color of the boxes based on the FFT data. I use a “map” function (maybe familiar to Blender users as “Map Range”) to take the weird numbers the FFT returns (ranging between -100 and 50) and making it go between 0 to 1 (making it easier to scale/animate the numbers).
// We cut the waveform down to only the first quarter
// because the last 3/4 don't really show much action
for (let i = 0; i < levels.length / 4; i++) {
  // If you wanted to space it out "evenly" you'd multiply this index by 4
  // but because we want the first quarter - this works
  let index = i;

  // Height of the waveform
  const amplitude = 7;

  // Normalizes the waveform data to 0-1 so it's easier to do animations
  // Waveform data goes from -890 to -90+
  // We clip it though to -100 to 50 to make it look better (you can play with it and see for yourself)
  let waveHeightNormalized = mapRange(levels[index], -100, 50, 0, 1);
  // This increases the height (or "amplitude") of the waveform
  let waveHeightAmplified = waveHeightNormalized * amplitude;

  // Update the box position
  boxRefs.current[i].position.y = waveHeightAmplified;

  // Animate the color (black to blue) based on waveform height
  const adjustedWaveHeight = waveHeightNormalized * 10;
  const material = boxRefs.current[i].material as MeshPhysicalMaterial;
  material.color.r = lerp(WAVE_BASE_COLOR[0], 0, adjustedWaveHeight);
  material.color.g = lerp(WAVE_BASE_COLOR[1], 0, adjustedWaveHeight);
  material.color.b = lerp(WAVE_BASE_COLOR[2], 1, adjustedWaveHeight);

  // Change Emission (glow) based on waveform height
  material.emissive = PRESSED_EMISSIVE_COLOR;
  material.emissiveIntensity = lerp(0, 3, adjustedWaveHeight);
}
And with that, we have a waveform visualizer. Check out the full source code here for reference.
The headaches
I will say, as much fun as I had on this project, there were quite a few pain points that took quite a bit of time to get around. It definitely made things easier in a lot of ways (just “drop in” post processing) - but most of it was never as easy as it seemed.
I’ve honestly stopped using ThreeJS a lot because R3F was so difficult to use. I moved over to P5JS where things were just easier to setup and there were no headaches from APIs massively changing or documentation being missing or inaccurate.
Here’s a couple examples.
- Tried using some post FX from some old Codesandbox examples and I kept getting an obscure error saying something was missing from a ThreeJS shader. Had to upgrade all dependencies to latest version to fix issue 🤷♂️ It’s also difficult to tell what version of ThreeJS I should be using for the myriad of pmndrs libraries when all their versions differ.
- Animation. Ugh. Tried using react-spring (which has a R3F/ ThreeJS specific library) and that was a struggle. It didn’t work so I ended up just animating everything manually frame by frame using a bunch of
lerp. Even tried using the maath library (another part of the neverending R3F ecosystem) and it worked in some cases - but not in others (I left in a brokendampCfunction in my code as an example). - Camera. This one was the most frustrating because of how it worked. I tried to have a dropdown that set the camera angle.
- I fumbled with this for an hour or more. I used the
<OrbitControls>component to move the camera into the place I wanted it and I had auseFramepumping out the camera position and rotation coordinates into theconsole.log(). - I made a camera component that changes the camera position and rotation to these presets
- And it never positioned the camera correctly…
- I kept trying different numbers thinking it was maybe some different in float calculations (since the numbers would be so small/exact).
- After digging around, I found someone with the same issue and apparently having the
<OrbitControls>in the scene when you also want to control the camera just doesn’t work. - I was hoping to have nice preset angles for the user to jump to, then allow them to rotate the model as needed to adjust — but I had to just remove the controls completely so the camera presets could work. I’m sure there’s a workaround for it somewhere - but that’s the problem with the R3F ecosystem. Everything is buried in some random StackOverflow or worse - Discord post.
- I fumbled with this for an hour or more. I used the
Hard to hate cause ultimately I did a lot in React I would have to create a whole architecture for if I wanted to do custom ThreeJS (but honestly….I think about it sometimes…especially after working with P5JS and not having the luxury and losing so much time to R3F….)
What’s left?
I’ve been using this as a nice little playground for other 3D MIDI projects.
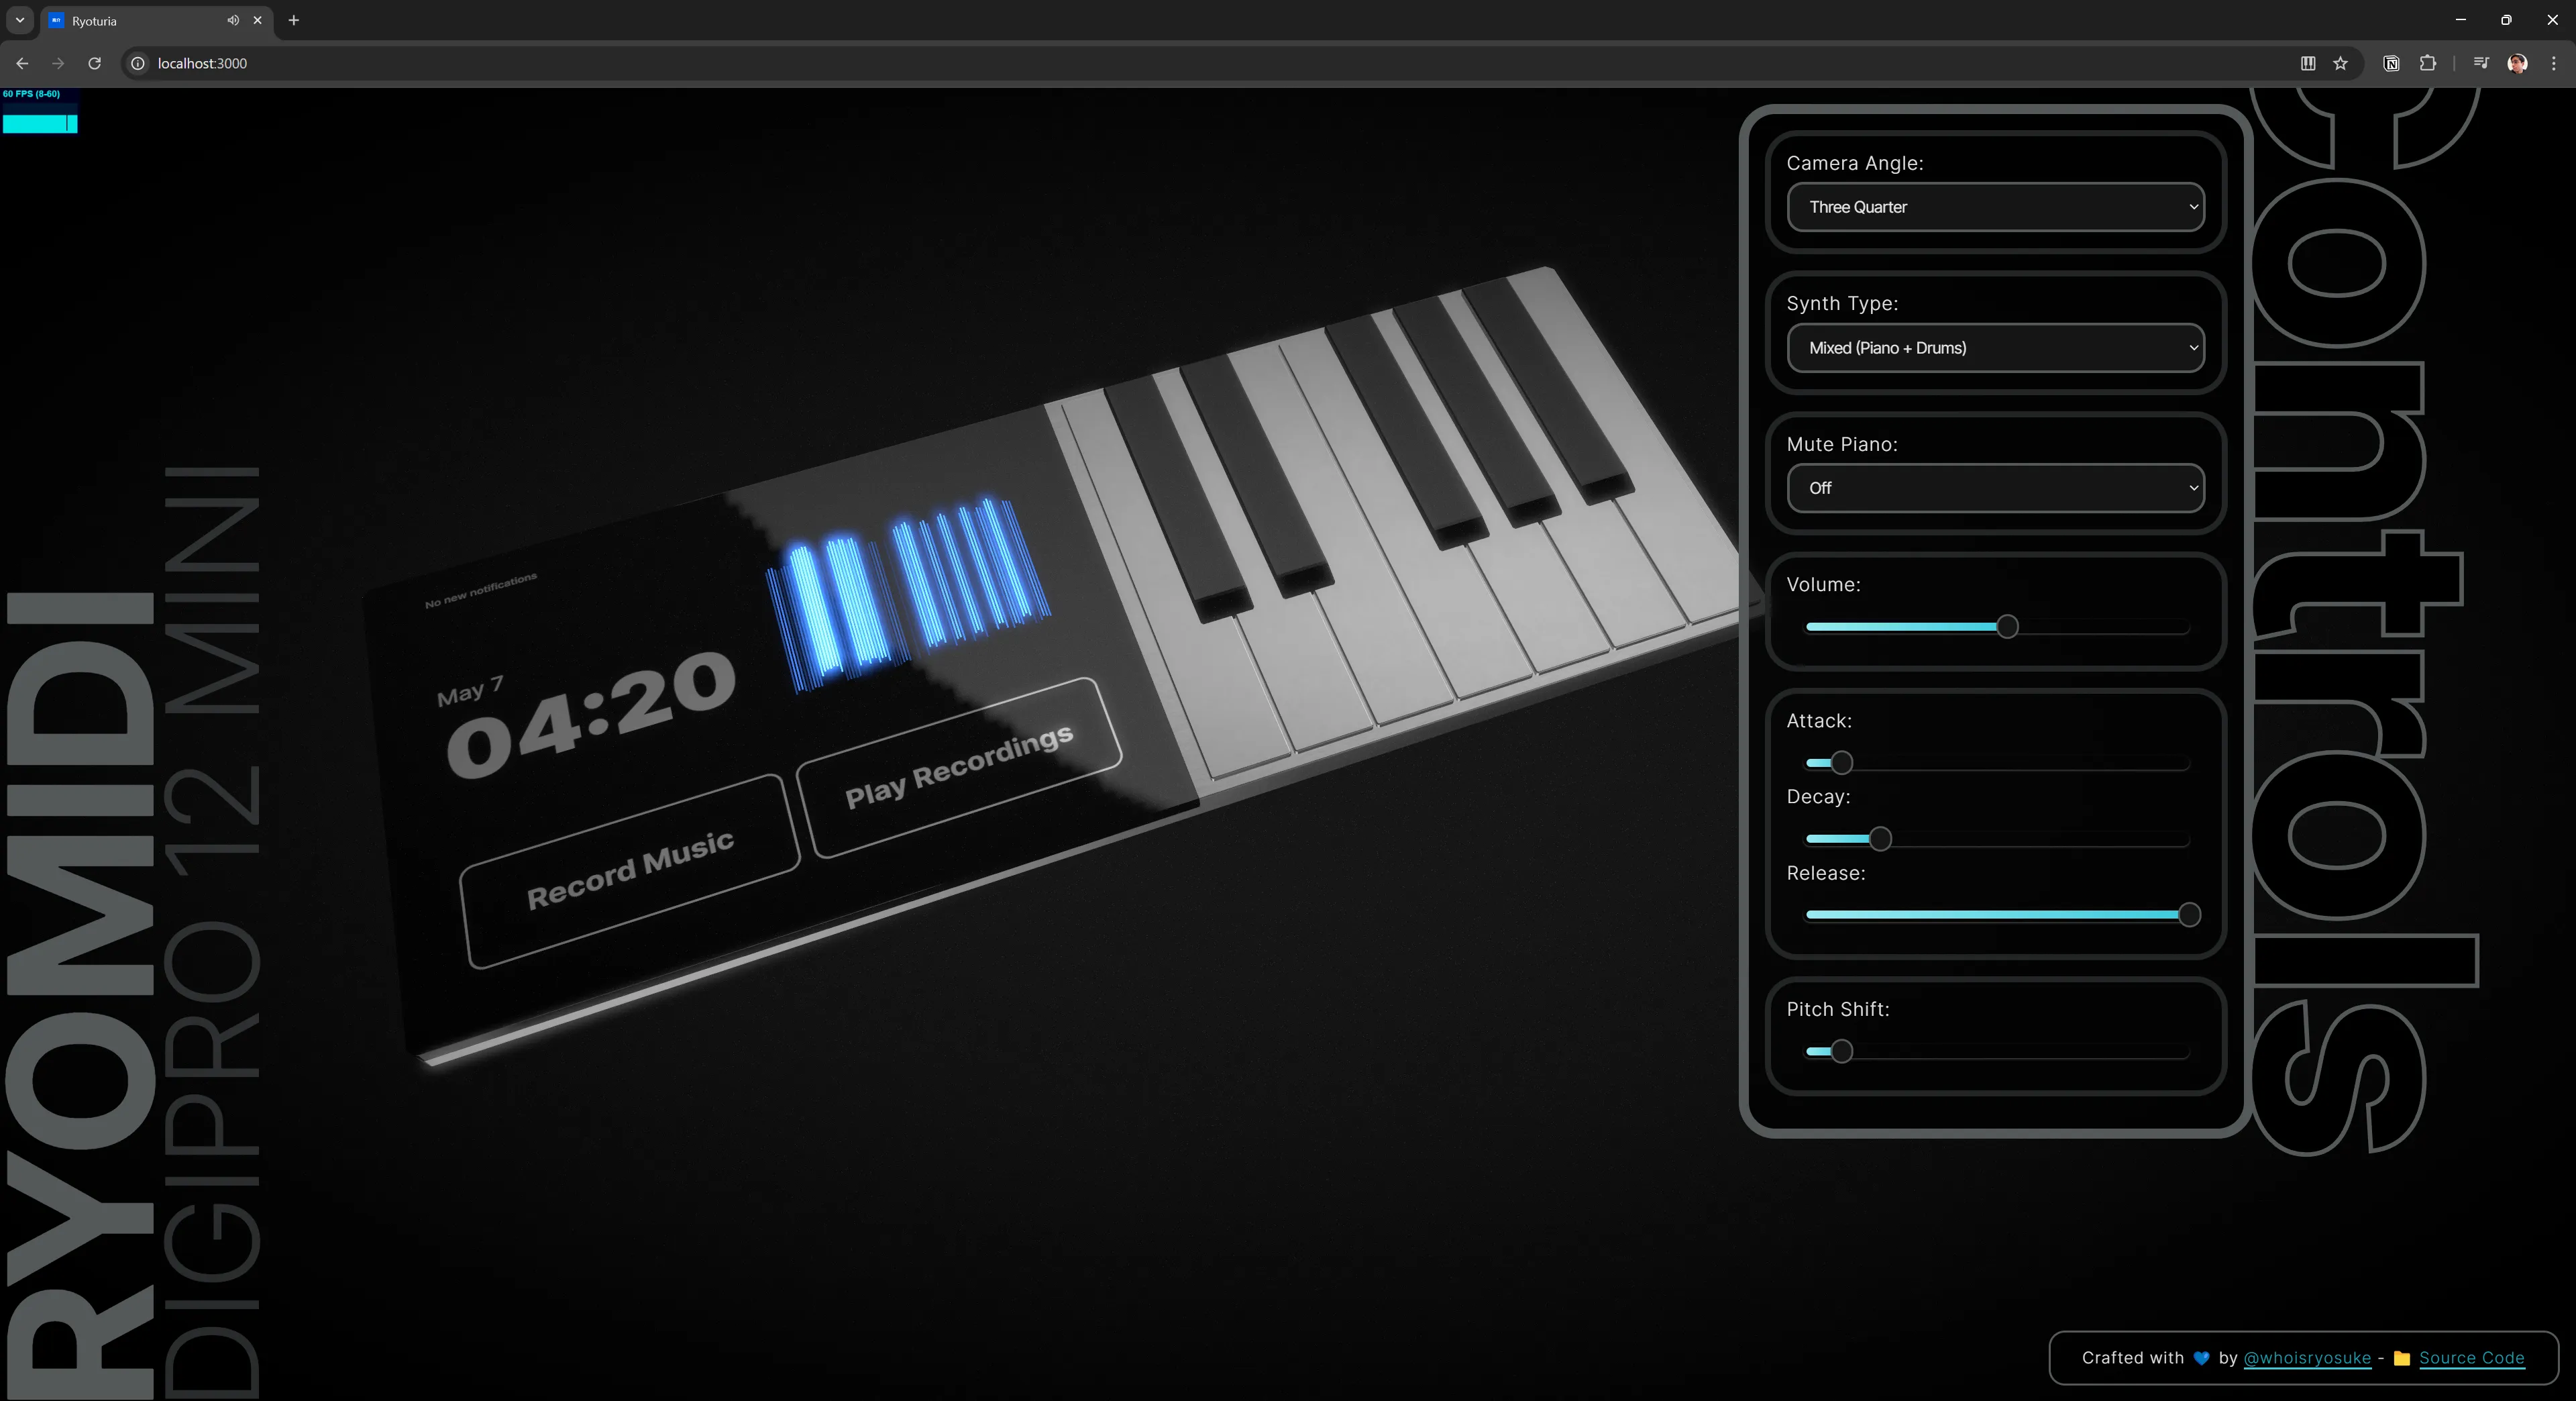
Adding features like VFX on button presses, turning it into a mini DDR game, or just adding the ability to record the playback — all very achievable with this setup (just depends on how much free time I have lol). I’ve already imported another 3D piano into the app and wired it up using the same <AnimatedPianoKey> component, so it’s proven it’s versality.
But like I mentioned before, I’m constantly experimenting win the music and MIDI space — so you’ll likely see some other prototypes and projects out of me too.
As always, I hope this helped bring you insight into involved process of realizing a 3D piano on the web. If you have any questions or want to share your own project, feel free to reach out on social platforms.
Stay curious, Ryo
