Posted on
May 17, 2024
After working on adding gamepad input to Blender, the next logical step was to add MIDI input. I’ve been doing a lot of MIDI work recently for fun since it’s a great way to learn more about music theory and audio programming. And I’ve used audio inside Blender, like importing music files to power animations — but what if I wanted to have a 3D keyboard that actually played music?
I could build a Blender addon that imports MIDI files and parses the data into animation keyframes. That’d probably be the most practical way. But it definitely isn’t as fun. What if you could press a record button, play on your MIDI keyboard, and have your playback saved as keyframes? That’d be way more fun, and of course, less practical.
In this blog I’ll cover how I made my MIDI addon for Blender, and how to animate objects based on MIDI input. I’ll also cover some examples of different uses, beyond saving keyframes.

Check out the video of it in action here. And you can see the addon and source code here on GitHub.
💡 Since this addon is built off the foundation of my Gamepad input addon, I won’t cover a lot of the background of the plugin development. If you’d like a deeper dive, check out my other blog post.
Python library for MIDI input
We need MIDI input, so we’ll need a Python library that’ll provide us with a connection to any active MIDI devices, as well as providing a stream of input data.
I settled on the python-rtmidi, which is a port of a C++ library for handling MIDI input. It supports Linux, Mac, and Windows - which is always great for a Blender addon. It looked pretty simple to use from their getting started guide:
import rtmidi

midiin = rtmidi.RtMidiIn()

def print_message(midi):
    if midi.isNoteOn():
        print('ON: ', midi.getMidiNoteName(midi.getNoteNumber()), midi.getVelocity())
    elif midi.isNoteOff():
        print('OFF:', midi.getMidiNoteName(midi.getNoteNumber()))
    elif midi.isController():
        print('CONTROLLER', midi.getControllerNumber(), midi.getControllerValue())

ports = range(midiin.getPortCount())
if ports:
    for i in ports:
        print(midiin.getPortName(i))
    print("Opening port 0!")
    midiin.openPort(0)
    while True:
        m = midiin.getMessage(250) # some timeout in ms
        if m:
            print_message(m)
else:
    print('NO MIDI INPUT PORTS!')
We basically loop over all the MIDI device ports and then use an infinite while loop to keep checking the device for input data (using getMessage()). We use an inline function called print_message() to parse the input data to determine if the note is pressed or not — or if the user is using other MIDI controls like a slider which provide a number range instead of true/false state.
So how do we get this in Blender? Ideally we can leverage the same architecture I setup in my gamepad addon: use a “modal” with a timer that checks for input - in this case MIDI. Our MIDI input will stream to us on a separate thread, which the modal will tap into as needed. And we’ll animate objects inside the modal based on input changes.
Let’s take that step by step.
Installing dependencies
But because this was a Python library based on a C++ library, it’s not a simple matter of copying the source files into my project for using. I opted instead to use pip to install the dependency. I included a button in my plugin that runs the install process:
class GI_install_midi(bpy.types.Operator):
"""Test function for gamepads"""
bl_idname = "wm.install_midi"
bl_label = "Install dependencies"
bl_description = "Installs necessary Python modules for MIDI input"
def execute(self, context: bpy.types.Context):
print("Installing MIDI library...")
python_exe = os.path.join(sys.prefix, 'bin', 'python.exe')
target = os.path.join(sys.prefix, 'lib', 'site-packages')
subprocess.call([python_exe, '-m', 'ensurepip'])
subprocess.call([python_exe, '-m', 'pip', 'install', '--upgrade', 'pip'])
subprocess.call([python_exe, '-m', 'pip', 'install', '--upgrade', 'rtmidi', '-t', target])
return {"FINISHED"}
# UI Panel
class GI_GamepadInputPanel(bpy.types.Panel):
"""Creates a Panel in the scene context of the properties editor"""
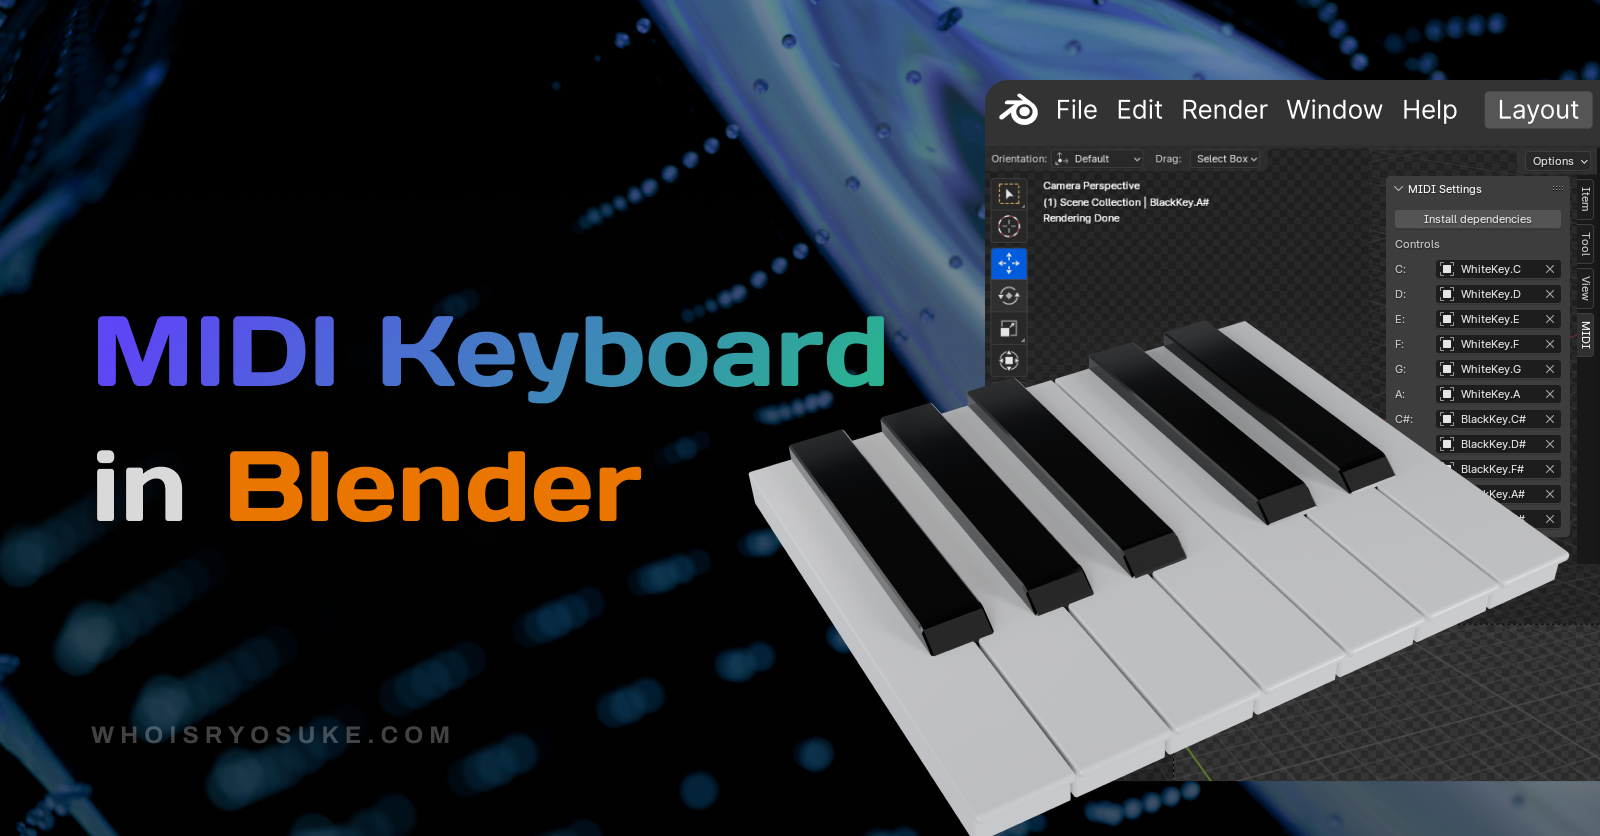
bl_category = "MIDI"
bl_label = "MIDI Settings"
bl_idname = "SCENE_PT_gamepad"
bl_space_type = 'VIEW_3D'
bl_region_type = 'UI'
# bl_context = "output"
def draw(self, context):
layout = self.layout
scene = context.scene
gamepad_props = scene.gamepad_props
# The install button
row = layout.row()
row.operator("wm.install_midi")Now that we have the library installed, we can start using it in the addon.
Syncing MIDI input
Much like the gamepad addon, I created a new class to encapsulate our MIDI input logic. This class would use rtmidi to connect to devices and sync the streaming input data back to our addon.
The class has properties for the piano keys we want to check for. In my case, I’m only interested in the base note (C, D, E, etc) — but you could keep track of the note and octave (like C1, F3, etc) if you wanted that much granularity.
We store the MIDI input state as 2 separate class properties: pressed and velocity. This is because the MIDI keyboard returns input as the button “state” (usually boolean for piano keys, but knobs could have a number range), as well as the “velocity” that the key was struck with. Meaning a stronger push on the key would produce a higher number.
class MIDIInput():
    def __init__(self) -> None:

        # Initialize props to track gamepad input
        self.pressed = {
            "C": False,
            "C#": False,
            "D": False,
            "D#": False,
            "E": False,
            "F": False,
            "F#": False,
            "G": False,
            "G#": False,
            "A": False,
            "A#": False,
            "B": False,
        }
        self.velocity = {
            "C": 0,
            "C#": 0,
            "D": 0,
            "D#": 0,
            "E": 0,
            "F": 0,
            "F#": 0,
            "G": 0,
            "G#": 0,
            "A": 0,
            "A#": 0,
            "B": 0,
        }
Then we setup the multi-threading support. Using Python’s internal threading library we can spawn a new thread that runs a “sync” function. We also create a flag to stop the thread from looping when we need to.
# Setup threads
self._thread_flag= threading.Event() # used to pause thread
self._thread= threading.Thread(target=self._sync_midi, args=(self._thread_flag,))
self._thread.daemon = True # used to kill thread if Blender closes
self._thread.start()
The sync function is basically a while loop that keeps checking for MIDI data using rtmidi. The loop ends when the thread is closed (which we check by using a flag we setup earlier).
def _sync_midi(self, thread_flag):
    # Create "infinite loop" while thread is flagged to run
    while not thread_flag.is_set():
        self._sync_midi_data()
The actual sync function itself looks a lot like the original example from the rtmidi docs. We check for any MIDI ports, loop through them, and stream the device input for the first port (aka port 0). Then we do an infinite while loop to check for input using getMessage(). This returns a “message” with all our note data. We can check if it’s a note or just a knob/button on the keyboard by using the isController() method. And we can see if the note was pressed or released using the isNoteOn() or isNoteOff() methods.
    def _sync_midi_data(self):
        import rtmidi

        midiin = rtmidi.RtMidiIn()

        def print_message(midi):
            if midi.isNoteOn():
                print('ON: ', midi.getMidiNoteName(midi.getNoteNumber()), midi.getVelocity())
                self.save_input(midi, True);

            elif midi.isNoteOff():
                print('OFF:', midi.getMidiNoteName(midi.getNoteNumber()))
                self.save_input(midi, False);

            elif midi.isController():
                print('CONTROLLER', midi.getControllerNumber(), midi.getControllerValue())

        ports = range(midiin.getPortCount())
        if ports:
            for i in ports:
                print(midiin.getPortName(i))
            print("Opening port 0!")
            midiin.openPort(0)
            while True:
                m = midiin.getMessage(250) # some timeout in ms
                if m:
                    print_message(m)
        else:
            print('NO MIDI INPUT PORTS!')
💡 This is a great point to pull out the MIDI keyboard for testing, and mash all the keys to see the output in the console from the print() statements. Make sure to touch every button and see what they’re mapped to (or if they’re mapped at all! - some buttons don’t come through).
Then we can finally save the input once we know it’s a piano key. This function grabs more info about the note that was pressed. We grab the note “name” - aka “C#5” - the piano key and octave. And we also check for the velocity of the key press.
Then like I mentioned before, we take the pressed state (true for pressed, false for released) and the velocity (0 - 120 or so) and store it on our MIDI class. We store the state using the noteLetter - which is the base note without the octave (like “C” or “C#”).
def save_input(self, midi, pressed):
    # We grab the note data. This returns a note like C#2
    fullNote = midi.getMidiNoteName(midi.getNoteNumber())
    velocity = midi.getVelocity()

    # We shave off the octave to focus on the base note (aka the "letter" like "C")
    noteLetter = fullNote[:-1]
    print("Note saving: ", noteLetter)

    # Save internal input
    self.pressed[noteLetter] = pressed
    self.velocity[noteLetter] = velocity
    print("Note saved: ", self.pressed[noteLetter])
Now that the state is synced to our MIDI input class, we can access it in our addon.
The full MIDIInput class is here in the source code for reference.
Using the MIDI input
So how do we use the MIDI input we’ve got saved? I mentioned before we’d be using the gamepad addon architecture, which is based on using Blender’s “modal operators” combined with a timer to create a kind of infinite loop (this loop “ticks” at whatever rate we set the timer, 0.1 seconds in our case).
Here’s what that looks like at the most basic level. We have a class that extends Blender’s Operator class. We define an execute() class (which runs first when the class is initialized) and here we setup the internal timer that re-runs the modal() method. All boilerplate stuff I copied from official examples.
class GI_ModalOperator(bpy.types.Operator):
    """Syncs MIDI input to object animation"""
    bl_idname = "object.modal_operator"
    bl_label = "MIDI Navigation"
    # Timer used for modal
    _timer = None

    def modal(self, context, event):
        current_frame = context.scene.frame_current
        last_frame = context.scene.frame_end
        if event.type in {'RIGHTMOUSE', 'ESC'} or current_frame >= last_frame:
            return self.cancel(context)
        if event.type == 'TIMER':
		        # Grab the 3D objects the user selected
            gamepad_props = context.scene.gamepad_props

            # The current MIDI input
            midi_input = self.midi_input

            # Move each note
            for noteLetter in self.pressed:
                self.move_note(midi_input, gamepad_props, noteLetter, current_frame)

        return {'RUNNING_MODAL'}

    def execute(self, context):
        # Create the timer
        wm = context.window_manager
        self._timer = wm.event_timer_add(0.1, window=context.window)
        wm.modal_handler_add(self)

        # Create the gamepad only when running modal
        self.midi_input = MIDIInput()

        # Start animation
        bpy.ops.screen.animation_play()

        return {'RUNNING_MODAL'}

    def cancel(self, context):
        # Remove timer
        wm = context.window_manager
        wm.event_timer_remove(self._timer)

        # Release gamepad class and threads
        self.midi_input.stop()
        del self.midi_input

        # Cancel animation
        bpy.ops.screen.animation_cancel()

        return {'FINISHED'}
In that modal() method, we check if the user cancels out the “sync” mode using the ESC key or right clicking mouse. This runs the cancel() method that closes our “modal” and releases any resources (like deleting the MIDI input class).
After we check for the cancel in the modal() - we check if it’s the timer running the method - which is where we want to do our “game loop” type logic. Here we grab the MIDI input we stored on the class properties (self.midi_input) and we can just loop through the Dict we created of piano keys and their pressed state.
We also start and stop the animation timeline from playing - this will come into play later when we decide to save keyframes. Same with the current_frame variable we grab from the scene context - we’ll use that later to save keyframes to the current keyframe the animation is on.
Now that we have an infinite loop that runs, and we have MIDI input saving, let’s do something with it! You’ll notice that once we detect a key is pressed, we run a move_note() function. Let’s break that down.
Activating the modal
How does this code actually run though? We need to create a menu item or UI button that triggers our modal class.
In this case, we’ll create a menu item in the Viewport panel under the Objects menu (aka VIEW3D_MT_object). It’ll be called “Enable MIDI Recording” and it’ll run the modal operator when pressed.
# Menu item
def GI_midi_menu_item(self, context):
    self.layout.operator(GI_ModalOperator.bl_idname, text="Enable MIDI Recording")

# Register and add to the object menu (required to also use F3 search "Modal Operator" for quick access).
bpy.types.VIEW3D_MT_object.append(GI_midi_menu_item)
Here’s what it looks like inside Blender:

Save input as keyframe animation
So far we can detect and save MIDI input and we have a infinite loop the user can activate to check for the input.
My goal was to take the MIDI input and save it to keyframes so you could have a 3D model “play” like a real piano. In this case I’d be animating piano keys, but you could apply this to any type of 3D object (like say — floor tiles of a club, or commercial products). I was inspired by artists like Raphaël Erba and their 3D art synchronized to piano playback.
But how do we assign objects to sync to MIDI input? I settled for having the user manually assign objects in the addon’s UI panel. Though you could easily create a function that scans the scene for objects with certain names and use those (like an Empty parent object named Piano.C). I kept it more explicit for simplicity sake.
To achieve this, we’d have to set a few things up. We’ll need to create a class to store our “piano key” objects, as well as a UI panel to assign them. Then we
Properties and UI Panel
This one’s pretty easy, I based it off this GitHub template I found for Blender UI addon development. We create a class that extends Blender’s PropertyGroup class, and here we can add properties we can to user to control through the UI. We need to control objects in Blender, so we can use the PointerProperty to store the a reference (or ID) of the object we can use later. I created a property for each base note - including sharps (like C, C#, etc).
# UI properties
class GI_SceneProperties(PropertyGroup):

    active_midi: EnumProperty(
        name="Active MIDI",
        description="MIDI used for control",
        items=gamepad_items
        )

    obj_c: PointerProperty(
        name="C",
        description="Object to be controlled",
        type=bpy.types.Object,
        )

    obj_d: PointerProperty(
        name="D",
        description="Object to be controlled",
        type=bpy.types.Object,
        )
These properties are stored in the scene under the property name gamepad_props (legacy lol). Whenever we’re doing stuff, we can just use scene.context.gamepad_props to access any property (read only…but that’s all we need).
Then in the UI panel where I had the user install the dependencies, we add all of our object properties.
# UI Panel
class GI_GamepadInputPanel(bpy.types.Panel):
    """Creates a Panel in the scene context of the properties editor"""
    bl_category = "MIDI"
    bl_label = "MIDI Settings"
    bl_idname = "SCENE_PT_gamepad"
    bl_space_type = 'VIEW_3D'
    bl_region_type = 'UI'
    # bl_context = "output"

    def draw(self, context):
        layout = self.layout

        scene = context.scene
        gamepad_props = scene.gamepad_props

        row = layout.row()
        row.operator("wm.install_midi")

        layout.label(text="Controls")
        row = layout.row()
        row.prop(gamepad_props, "obj_c")
        row = layout.row()
        row.prop(gamepad_props, "obj_d")
And here’s what the UI panel looks like. The user can drag and drop their objects into the inputs, use the selector — whatever is their preferred way.
💡 And conveniently, once you assign an object and save your file, it remembers all objects. So you don’t have to remap it every time you close Blender (very useful to me for testing!).

Nice. Now that we have the objects we want to control, let’s start to map these 3D objects to our actual piano keys.
3D Piano
I needed a 3D model to test this with. I initially made a bunch of cubes and just used those, but I eventually modeled a small set of 3D piano keys. Not a necessary step, but just wanted to make the demo look cooler.
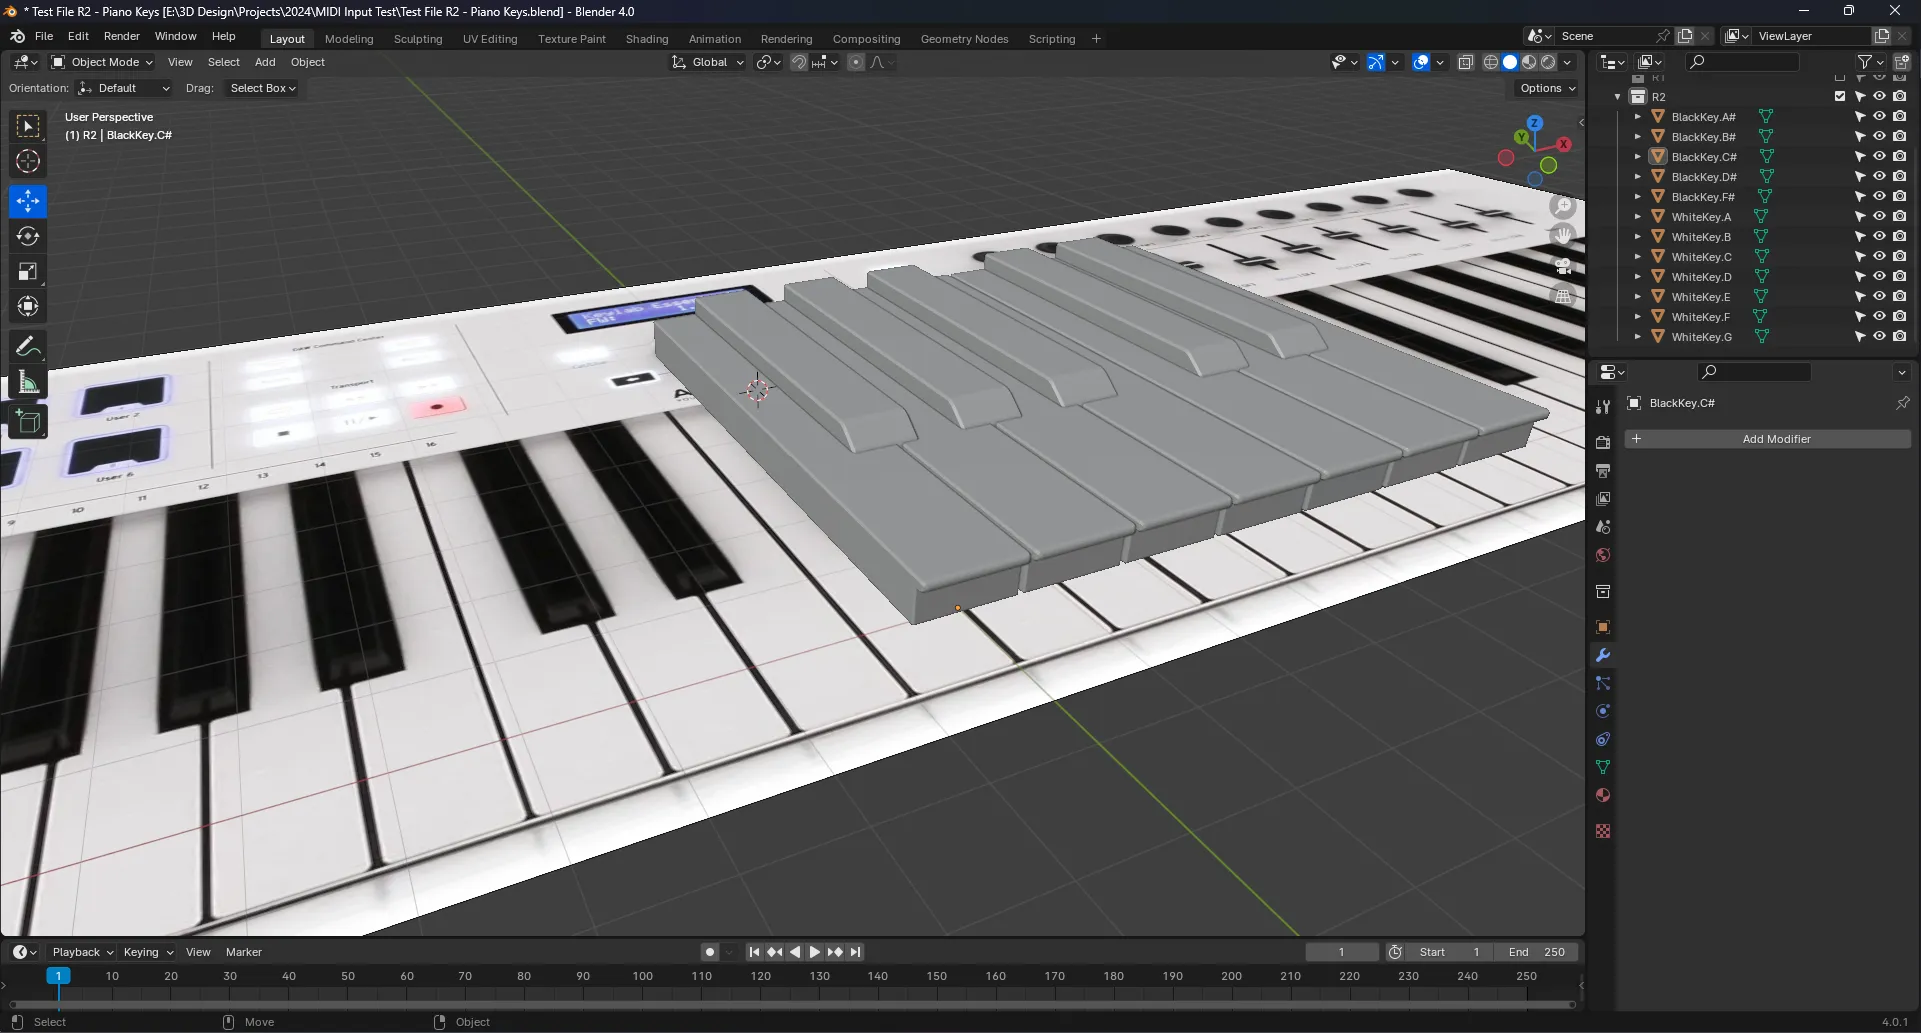
Mapping the keys to 3D objects
We have a bunch of 3D objects we can access that represent different piano keys. So how do know when the user pressed the C key, what object to select? Ideally you’d setup a “map” (like an object in JavaScript, or Dict in Python) that correlates a “key” to a “value” (in this case an object pointer).
But in this case, we’re accessing a dynamic object — not a static one. This means every time a key is pressed, we need to check the latest version of gamepad_props (the list of 3D objects), since it might change from initial runtime (like the user reassigning an object). Again, in JavaScript you’d probably still create some sort of map and dynamically access the properties — something like gamepad_props[dynamic_key]. But in Python you can’t do this with every type of data type, it’s only allowed for arrays or Dict types.
I’m sure there’s a smarter way of doing this, but for now I created a function that crudely maps each piano key to one of the dynamic object properties.
def get_note_obj(self, gamepad_props, noteLetter):
    if noteLetter == "C":
        return gamepad_props.obj_c
    if noteLetter == "D":
        return gamepad_props.obj_d
    if noteLetter == "E":
        return gamepad_props.obj_e
    if noteLetter == "F":
        return gamepad_props.obj_f
    if noteLetter == "G":
        return gamepad_props.obj_g
    if noteLetter == "A":
        return gamepad_props.obj_a
    if noteLetter == "B":
        return gamepad_props.obj_b
    if noteLetter == "C#":
        return gamepad_props.obj_csharp
    if noteLetter == "D#":
        return gamepad_props.obj_dsharp
    if noteLetter == "F#":
        return gamepad_props.obj_fsharp
    if noteLetter == "G#":
        return gamepad_props.obj_gsharp
    if noteLetter == "A#":
        return gamepad_props.obj_asharp
I wanted to touch on that before getting to the actual movement logic, because it’s used early in this next function - move_note().
Moving the notes
So to recap us to this point - the user has clicked a menu item for “Enable MIDI Recording”, a modal operator has fired off, started syncing MIDI input, and started a loop using a timer. In this loop we check what MIDI key has been pressed - and then if it has been - we run this move_note() method.
What does it mean for a key to move? In this case, if a piano key is pressed, I want the corresponding 3D object to move up (Z) in space. For now it’ll just move between the position of 0 and 1. But ideally we’d want to save the objects initial position and use that as the basis (instead of 0) so nothing moves unexpectedly - but for the MVP - this works fine.
def move_note(self, midi_input, gamepad_props, noteLetter, current_frame):
    ## Buttons
    btn_c_depth = 1 if midi_input.pressed[noteLetter] else 0
    move_obj = self.get_note_obj(gamepad_props, noteLetter)

    if move_obj == None:
        return;
We also want to animate the object moving up and down. So let’s think about that for a second. How would an animation of a piano key going up and down? There’d be a keyframe of it “down” right before it’s pressed, then a keyframe of it “up”, then another of it “down”. That’s 3 keyframes for each input.
We already have access to the piano key state and whether it’s “pressed” or “released”. Using this, we can make a keyframe when the object is “pressed” to set an “up” keyframe. And inversely, when “released” we create a “down” one. But how do we get that initial “down” keyframe before the “pressed”?
💡 Ideally you’d reverse this to where “pressed” is “down” — that’s more logical to how buttons work in reality.
We can create local state in our modal operator class that keeps track of the button presses. This way we know something has changed, because we have a sort of “previous value” to compare it against (similar to using a ref in React). This also prevents us from creating keyframes every loop and only when something is changing.
class GI_ModalOperator(bpy.types.Operator):
    """Syncs MIDI input to object animation"""
    bl_idname = "object.modal_operator"
    bl_label = "MIDI Navigation"

    # The "local" state for "pressed" keys
    pressed = {
            "C": False,
            "C#": False,
            "D": False,
            "D#": False,
            "E": False,
            "F": False,
            "F#": False,
            "G": False,
            "G#": False,
            "A": False,
            "A#": False,
            "B": False,
        }
Now that we have a local state to compare against, we can determine if we need to create that initial “down” keyframe. We create the keyframe using the pointer to the 3D object (move_obj) and the keyframe_insert() method. The keyframe is created 1 frame before the current one because the note is currently pressed - so we want that to be accurately represented as now.
# Save initial position as previous frame
if midi_input.pressed[noteLetter] and not self.pressed[noteLetter]:
    self.pressed[noteLetter] = True
    move_obj.keyframe_insert(data_path="location", frame=current_frame - 1)
We have a keyframe of it “down” initially, next we can actually move the object:
# Move objects
move_obj.location.z = btn_c_depth
And now that the object has been moved, we can make the keyframes for it. We use the same keyframe_insert() method again here. And finally, if we detect that the key has been released, we update the internal state to know that.
def move_note(self, midi_input, gamepad_props, noteLetter, current_frame):
    ## Buttons
    btn_c_depth = 1 if midi_input.pressed[noteLetter] else 0
    move_obj = self.get_note_obj(gamepad_props, noteLetter)

    if move_obj == None:
        return;

    # Save initial position as previous frame
    if midi_input.pressed[noteLetter] and not self.pressed[noteLetter]:
        self.pressed[noteLetter] = True
        move_obj.keyframe_insert(data_path="location", frame=current_frame - 1)

    # Move objects
    move_obj.location.z = btn_c_depth

    # Make keyframes
    move_obj.keyframe_insert(data_path="location", frame=current_frame)

    # Released
    if not midi_input.pressed[noteLetter] and self.pressed[noteLetter]:
        self.pressed[noteLetter] = False
And with that - we have MIDI input animating objects in Blender! You can see a video of the prototype here on Threads. Trying to save bandwidth on my blog 😅
What’s next?
Art! For me at least. I’ve got a few pieces I want to approach using this method and see what kind of results I can get. I’m inspired by a lot of artists that do “live” performances where the MIDI controller influences a 2D or 3D canvas (or even lights and lasers in the space). It’d be cool to recreate this effect in Blender. And of course, I’m into a lot of product design and that often features animations that I often animate using manually or using math — so it’d be interesting to try and “play” something instead.
Is this practical? Of course not. Why would you want to play live into Blender? It’s much more efficient to record everything before hand and import that “baked” data into Blender. Realistically you’d want to create some sort of external app that can record playback into a data format like MIDI or JSON, then have the addon read that file. This way you could also record real playback using the other app - or even just give the person music feedback (cause this Blender addon definitely won’t do that).
But just like my gamepad addon, this opens the door for interfacing with Blender in more creative ways. I didn’t touch on it in this blog, you could the “controllers” on a MIDI keyboard to have a finer control on objects in the scene. You could assign this input to an animation rig - like facial controls - and get a different “performance” than you would manually keyframing. You can see an example of this with my gamepad addon controlling an arcade gamepad rig.
As always, if you make anything cool using this or have any questions feel free to share or reach out on Threads, Mastodon, or Twitter.
Stay curious,
Ryo