Posted on
April 18, 2023
Ever since I got a MIDI keyboard I look for any excuse to use it. I’ve experimented before with MIDI on the web using the Web MIDI API. And lately I’ve been playing with Rust and rendering UI and making games. I thought it’d be cool to make an app or game that uses the MIDI keyboard.
After a bit of exploration, I made a 3D MIDI piano visualizer app using the Bevy game engine. I thought I’d share what I learned along the way - from reading MIDI input using Rust, to integrating MIDI input with a game engine.
Exploration
The first step was figuring out how to get MIDI input in a Rust application. Luckily this process is simplified immensely by the midir crate. It manages the process of selecting the correct backend (Windows, Linux, Web, etc), creating a connection with a MIDI device, and transmitting any key presses.
Hello MIDI World
The first step was creating a new Rust project for our app. Then I installed the midir crate, and copied over the “input” example from the Github repo.
extern crate midir;

use std::io::{stdin, stdout, Write};
use std::error::Error;

use midir::{MidiInput, Ignore};

fn main() {
    match run() {
        Ok(_) => (),
        Err(err) => println!("Error: {}", err)
    }
}

fn run() -> Result<(), Box<dyn Error>> {
    let mut input = String::new();

    let mut midi_in = MidiInput::new("midir reading input")?;
    midi_in.ignore(Ignore::None);

    // Get an input port (read from console if multiple are available)
    let in_ports = midi_in.ports();
    let in_port = match in_ports.len() {
        0 => return Err("no input port found".into()),
        1 => {
            println!("Choosing the only available input port: {}", midi_in.port_name(&in_ports[0]).unwrap());
            &in_ports[0]
        },
        _ => {
            println!("\nAvailable input ports:");
            for (i, p) in in_ports.iter().enumerate() {
                println!("{}: {}", i, midi_in.port_name(p).unwrap());
            }
            print!("Please select input port: ");
            stdout().flush()?;
            let mut input = String::new();
            stdin().read_line(&mut input)?;
            in_ports.get(input.trim().parse::<usize>()?)
                     .ok_or("invalid input port selected")?
        }
    };

    println!("\nOpening connection");
    let in_port_name = midi_in.port_name(in_port)?;

    // _conn_in needs to be a named parameter, because it needs to be kept alive until the end of the scope
    let _conn_in = midi_in.connect(in_port, "midir-read-input", move |stamp, message, _| {
        println!("{}: {:?} (len = {})", stamp, message, message.len());
    }, ())?;

    println!("Connection open, reading input from '{}' (press enter to exit) ...", in_port_name);

    input.clear();
    stdin().read_line(&mut input)?; // wait for next enter key press

    println!("Closing connection");
    Ok(())
}
Let’s walk through this for a minute:
- We run the app through the
main()function - which runs arun()function - A mutable
inputvariable is created to store user input from the CLI when they need to type - The MIDI library is initialized using
MidiInput::new() - We grab all the “ports” (aka available devices) using the
.ports()method on the MIDI instance we created. - If we detect devices, the app loops over them and displays the names in a list.
- The user is prompted for input using the
stdlibrary’s.read_line()method. - We grab the integer provided by user (a number from 0 to the number of devices we have) and use the
.get()method on the ports we grabbed earlier. This will return the port (aka device) we’re looking for. - We then connect to the device using the
.connect()method on the MIDI instance and the port (aka device) the user selected. We also pass a callback to this method that will run whenever there is input. And inside that callback we log out the input data we get.
I was able to run the example code without any changes. It bundles a CLI app that initializes the MIDI library and shows a list of the available devices in the console.

When you select one you get a stream of input events as you press keys on the selected MIDI device.
You can find some info about these parameters in the docs. This is what each of these values represents:
timestamp: [keyEvent, keyId, strength]Understanding the API
Each of the properties returned are u8 integers. Typically for piano keys there are 3 values returned, the keyEvent (pressed or not?), keyId, and it’s strength. However for certain keys it may return more values, so you’ll need to figure out some logic to distinguish piano keys vs others.
When you first look at them - properties like the keyId make sense, you’ll notice the number increments as you press each key on the MIDI keyboard. And the strength also becomes clear once you slam a key and lightly press another.
The keyEvent is a bit more innocuous. As you press and release keys you’ll quickly find that 144 is on and 128 is off. But there’s also a integer representing keys that can be “held” down like the drum pad on certain MIDI keyboards.
Here’s what everything looks like laid out for reference:
keyEvent- 144 = on
- 128 = off
- 160 = holding button (doesn’t apply to keyboard keys - only input like drum pad)
keyId- Each key on device increments.
- Starts from 36 to 96 on default octave for my Arturia 61 key
- 24 to 84 on 1 lower octave
- 48 to 108 on 1 higher octave
- 36 to 43 on drum pad
- Slider 1 is 73 - “strength” is value of slider
strength- Power of press on key or value of a slider
- 0 to 120+? (not sure the limit, scared to test lol)
- Lower is less powerful, higher is more.
Differences
The octave up and down keys had 12 properties.
// Octave down
1028761000: [240, 0, 32, 107, 127, 66, 2, 0, 0, 16, 127, 247] (len = 12)
// Octave up
1028862000: [240, 0, 32, 107, 127, 66, 2, 0, 0, 16, 0, 247] (len = 12)
Once I had an idea on how to read this data we could start displaying it in UI.
The visualizer app
To visualize our MIDI input I chose the egui crate, an immediate-mode UI library for Rust. I also wanted to use Bevy as a game engine to provide me APIs and architecture for simple stuff like rendering 3D or animating objects. And with bevy_egui, it’s very easy to integrate egui with Bevy.
📘 If you’re interested in egui, check out my recent blog post on how to get started with egui. I also have a great introduction to Bevy by recreating a Galaga game.
Bootstrapping the app
I created a fresh Rust app using the cargo CLI. Installed bevy and bevy_egui crates. Then used the “hello world” example from bevy_egui as a sanity check to ensure everything works correctly.
Once that was setup, I installed midir and started the process of integrating it into Bevy.
Integrating MIDI with Bevy
Getting a list of devices
So we had MIDI input working in another Rust app — we just have to implement that same functionality inside the Bevy architecture. This was probably the trickiest part, only because of my lack of experience with Bevy and it’s various APIs. It’s similar to adapting a vanilla JavaScript library to the ReactJS architecture — it takes a good understanding of how ReactJS works, like it’s lifecycles, refs, and every other intricacy. By the end of this I definitely learned a bit more about Bevy.
To start, I created a “Resource” to store the MIDI state, like the available devices and the MIDI instance.
// App state to store and manage notifications
#[derive(Resource)]
pub struct MidiState {
    // An instance to access MIDI devices and input
    input: MidiInput,
    // Available ports
    available_ports: Vec<MidiInputPort>,
    // The ID of currently selected device's port
    selected_port: Option<usize>,
}
I created a “Startup System” that runs once when my app initially begins. This system handles initializing the MIDI instance and inserting the resource into the app.
fn setup_midi(mut commands: Commands) {
    let mut midi_in = MidiInput::new("midir reading input").expect("Couldn't initialize MidiInput");
    midi_in.ignore(Ignore::None);

    commands.insert_resource(MidiState {
        input: midi_in,
        available_ports: Vec::new(),
        selected_port: None,
    });
}
Then we create a system that runs constantly that will get the available devices (aka “ports”) using the MIDI instance in our resource. Then in the same resource, we can save the vector collection of available ports we receive.
fn select_device(mut midi_state: ResMut<MidiState>) {
// Is there a device selected? Skip this system then.
if midi_state.selected_port.is_some() {
return;
}
// Get all available ports
midi_state.available_ports = midi_state.input.ports();
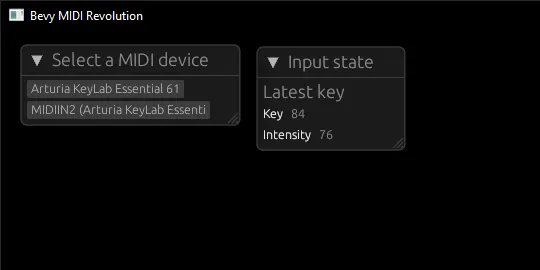
}Now we can finally show some UI. We create another system that runs constantly and handles rendering UI. We create a new window using egui to display the list of devices inside. And inside that window, we loop over the devices we stored in our resource.
fn select_device_ui(mut contexts: EguiContexts, mut midi_state: ResMut<MidiState>) {
    let context = contexts.ctx_mut();
    egui::Window::new("Select a MIDI device").show(context, |ui| {
        let ports = midi_state.available_ports.iter().enumerate();
        for (index, port) in ports {
            if ui
                .button(midi_state.input.port_name(port).unwrap())
                .clicked()
            {
                // midi_state.selected_port = Some(index);
            }
        }
    });
}
When you run this Bevy app with a MIDI device connected, you should see the name of it inside a window. This was enough to prove that the midir crate could integrate with Bevy minimally. The next goal was establishing a device connection and syncing device input with Bevy state (using a resource like we did above).
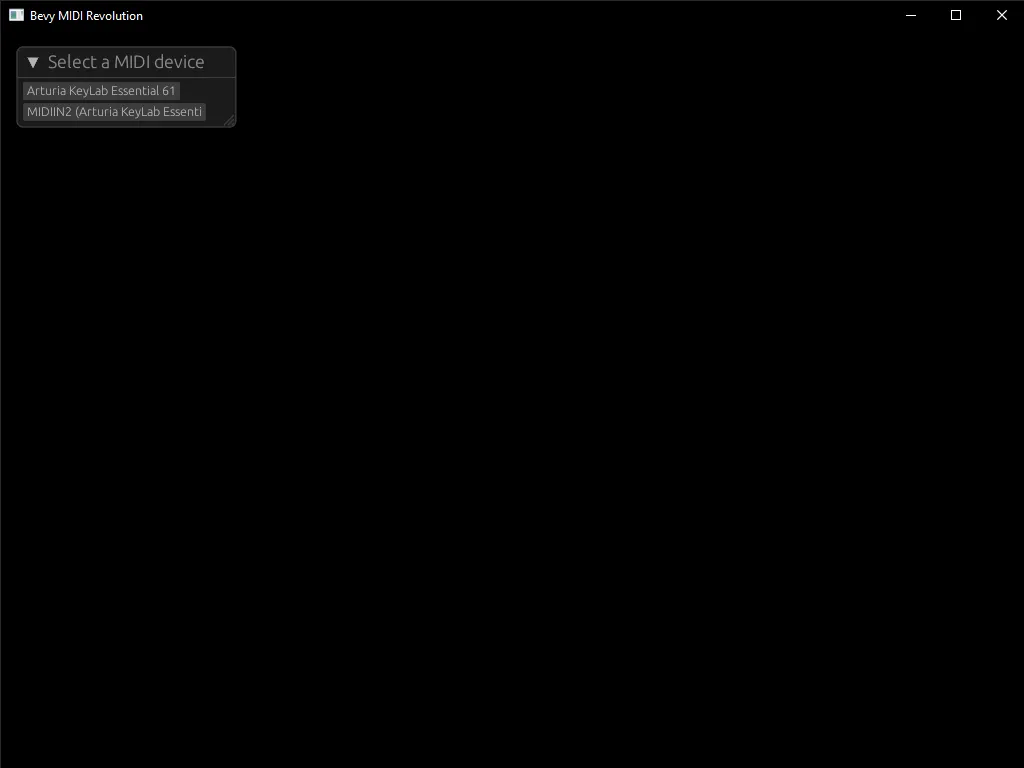
You can see this commit on Github here.
Connecting to a device
Cool, so we have a list of devices, let’s connect to one like the CLI example app. This is where things got interesting from an “architecture” perspective. We’ll go over the way I tried to do things the first way — then what I ended up doing to make it work — and even an alternative path I discovered.
First we create an “Event” that we can call whenever the user wants to connect to a device. We’ll call it SelectDeviceEvent and it’ll be a tuple struct that hold an usize integer representing an index to our device.
// Event to trigger a notification
#[derive(Default)]
struct SelectDeviceEvent(usize);

fn main() {
		// Condensed for clarity - missing lots of plugins/systems
    App::new()
        .add_event::<SelectDeviceEvent>();
}
Now that have an event, let’s call it when the user selects a device using the egui UI we setup earlier. We use Bevy’s EventWriter API to .send() our event, and we pass in the index of the device (basically an “array index”).
fn select_device_ui(
    mut contexts: EguiContexts,
    midi_state: Res<MidiState>,
    mut device_event: EventWriter<SelectDeviceEvent>,
) {
    let context = contexts.ctx_mut();
    egui::Window::new("Select a MIDI device").show(context, |ui| {
        let ports = midi_state.available_ports.iter().enumerate();
        for (index, port) in ports {
            let device_name = midi_state.input.port_name(port).unwrap();
            if ui.button(&device_name).clicked() {
                // midi_state.selected_port = Some(index);
                println!("Selecting device {}", &device_name);
                device_event.send(SelectDeviceEvent(index));
            }
        }
    });
}
Let’s create a new system to check for that event. I named this one select_device() and renamed the previous one to discover_devices() since it made more sense that way. In this system we check for events and grab the device index from the event. We then create a new MIDI instance (because the connection method consumes the instance via it’s self) and use that instance to grab the actual port (aka device). Then we connect to that port using the connect() method on the MIDI instance.
fn select_device(
	device_events: EventReader<SelectDeviceEvent>,
) {

    if !device_events.is_empty() {
        for device_event in device_events.iter() {
            // Get the port from the event
            let SelectDeviceEvent(device_id) = device_event;

            let mut input =
                MidiInput::new("midir reading input").expect("Couldn't initialize MidiInput");
            input.ignore(Ignore::None);
            let ports = input.ports();

            match ports.get(*device_id).ok_or("invalid input port selected") {
                Ok(device_port) => {
                    println!("Connecting...");
                    let _conn_in = input
                        .connect(
                            device_port,
                            "midir-read-input",
                            move |stamp, message, _| {
                                println!("{}: {:?} (len = {})", stamp, message, message.len());

                                // stamp = incrementing time
                                // message = array of keyboard data. [keyEvent, keyId, strength]
                                // key
                            },
                            (),
                        )
                        .expect("Couldn't connect to that port. Did the devices change recently?");
                    connection_result = Some(_conn_in);
                }
                Err(error) => {
                    println!("Error {}", error);
                }
            }
            // let in_port_name = midi_state.input.port_name(device_id).expect("Couldn't connect to that port. Did the devices change recently?");
        }
}
This didn’t work at first. It seems that when you establish a connection with the midir crate, the connection lives as long as the variable does (you can see this in the .connect() method docs). And this Bevy system runs once when an event is fired — then is essentially “thrown away”, along with any local variables inside of it (part of Rust’s “lifetimes” and block scope based garbage collection).
So if we need to persist this connection - we can just shove it inside our MidiState resource right? Right?

This isn’t the case. If we try to do the following code, we’ll receive an error from Bevy.
// Adding our connection to our resource
#[derive(Resource)]
pub struct MidiState {
    connection: MidiInputConnection<()>,
}

// Adding the connection to the resource in our system (condensed)
if let Some(connection) = connection_result {
    midi_state.connection = connection;
}
This returns an error from Bevy about all properties in our Resource struct requiring Sync trait sync since resources are shared across threads. Basically the MidiConnection type that gets returned by the .connect() method doesn’t implement the Sync trait (you can see the !Sync in the docs). And I don’t think you can add traits to types you don’t own (like 3rd party crates).
So how do we persist this connection? The answer lies in “Non-Send” Resources. These are resources that you insert into the World that only runs on the main thread. This allows you to avoid the issues with multithreading and resources that can’t support it.
// Add the connection as a "non-send" resource.
// Lets it persist past this system.
// And connection can't be used across threads so this enforces main thread only
if let Some(connection) = connection_result {
    world.insert_non_send_resource(connection);
}
But since we’re using a World query, we can’t use system parameters like EventReader to fetch our events. Instead, we need to use the SystemState API to query our World for any properties we want (in this case our events).
fn select_device(world: &mut World) {
    let mut event_system_state = SystemState::<(EventReader<SelectDeviceEvent>)>::new(world);
    let (mut device_events) = event_system_state.get(&world);
With these changes we insert the connection as a resource itself. We don’t need to define a struct for it with a Resource trait — you can just insert it and query for the type later. It’s pretty neat.
Now you should be able to run the app, select a MIDI device from the UI, and see the MIDI input displayed in your shell logs 👍
You can see this commit on Github here.
Syncing user input
We have a new problem. We can make a list of devices, connect to one, and even get input back to our logs. But how do sync that input state with Bevy?
The first inclination is to just query the MidiState as a mutable resource and shove some data in there - or write an event with the data. But if you look closely at the way we capture in put — it’s a callback. If we try to move our resource or event inside of it, we’ll get an error from Rust. It seems that in order to do this, you need to make the World mutable — which is a whole other rabbit hole in of itself.
I had an inkling that I needed to have some sort of message channel between the callback and my Bevy app — I just didn’t know how to go about it. This is where I started to research the issue a bit deeper and I discovered bevy_midi - a plugin that does exactly what I’m trying to do.
The way they resolve the callback communication issue is using a “message channel” to send events from the callback to a Bevy system that syncs it to a Bevy resource. Message channels are commonly used to communicate between multiple threads in an app, but in our case we can use it to talk to the same thread.
📘 The bevy_midi crate uses the crossbeam_channel crate to handle the message channel (instead of the
stdlibrary’s mspc module - which ironically is getting merged with crossbeam). The crossbeam_channel crate is the same library bevy uses (for now).
We create a new resource to store our message channel inside of. This allows us to send and receive messages anywhere in our Bevy app.
#[derive(Resource)]
pub struct MidiInputReader {
    receiver: Receiver<MidiResponse>,
    sender: Sender<MidiResponse>,
}
We also need a new data type for the event data we’re sending (let’s call it MidiResponse). And this response will also have our input data inside, we’ll keep it simple for now and just take a single u8 - representing a key ID.
pub struct MidiResponse {
    key: u8,
}
Now inside the callback, we can send the response with the callback’s input data.
// Send the key via message channel to reach outside this callback
sender.send(MidiResponse { key: message[1] });
And we can create a new system that checks the message channel. We grab the message channel receiver from the MidiInputReader resource, and use the try_recv() method to check for messages.
// Checks MIDI message channel for new key inputs each frame
fn sync_keys(input_reader: Res<MidiInputReader>) {
    if let Ok(message) = input_reader.receiver.try_recv() {
        println!("Key detected: {}", message.key);
    }
}
Running the app now shows the key input from inside the callback (with the log we left in) — and the through this new sync_keys() method we just added.
You can see this commit on Github here.
🏎️ I’d be curious to analyze the performance of this in terms of the game’s entire call stack. The
try_recv()method blocks to achieve the message, so having a system that’s constantly running and blocking something might clog up a whole thread by itself. I was seeing this issue when I tried a similar architecture to bevy_midi and their multithreading setup - the receiver would block the thread and freeze the app occasionally. Haven’t noticed the issue with this implementation yet though.
I extend this a bit and save the latest key to a resource, and display that in the UI.
You can see this commit on Github here.
Better input handling + saving input
With the rudimentary input system setup, let’s expand upon it to include more input data, as well consider other response cases (like just letting us know it connected — or when it finally disconnects).
We can do this by converting our MidiResponse to an enum with cases for each type of response we need (input and connection status). For the Input case, we make it a tuple that contains our actual input data (MidiInputKey). And we structure out the input data similar to how we discussed earlier, with a timestamp, event, ID, and “intensity” or strength.
pub enum MidiResponse {
    Input(MidiInputKey),
    Connected,
    Disconnected,
    // Error(String),
}

#[derive(Default, Debug, Clone, Copy)]
pub enum MidiEvents {
    #[default]
    Pressed,
    Released,
    Holding,
}

// Event for MIDI key input
#[derive(Default, Clone, Copy)]
pub struct MidiInputKey {
    pub timestamp: u64,
    pub event: MidiEvents,
    pub id: u8,
    pub intensity: u8,
}
And if we want to save our input, we’ll need a place to put it. Let’s create a new resource and store it inside there.
#[derive(Resource)]
pub struct MidiInputState {
    // Is a device connected?
    connected: bool,
    // History of last pressed keys
    keys: Vec<MidiInputKey>,
}

fn main() {
    App::new()
        .insert_resource(MidiInputState {
            connected: false,
            keys: Vec::new(),
        })
Now when when we send the signal, let’s change use the new response types we created.
let event_type = match message[0] {
    144 => MidiEvents::Pressed,
    128 => MidiEvents::Released,
    160 => MidiEvents::Holding,
    _ => MidiEvents::Pressed,
};

// Send the key via message channel to reach outside this callback
sender.send(MidiResponse::Input(MidiInputKey {
    timestamp: stamp,
    event: event_type,
    id: message[1],
    intensity: message[2],
}));
Finally, we update the sync system we created and make sure it can accept the new response type. We do a match on the response type to differentiate saving input instead of the device connecting. When a device connects, we update the MidiInputState resource we created earlier with the new bool (true or false). And for the input push the key data into the Vec in our resource, and remove the earliest entry if the collection exceeds a certain size - so we only keep a “history” of 20 keys.
// Checks MIDI message channel and syncs changes with Bevy (like input or connectivity)
fn sync_keys(input_reader: Res<MidiInputReader>, mut input_state: ResMut<MidiInputState>) {
if let Ok(message) = input_reader.receiver.try_recv() {
match message {
MidiResponse::Input(input) => {
println!("Key detected: {}", input.id);
// Clear previous key history if it exceeds max size
while input_state.keys.len() >= KEY_HISTORY_LENGTH {
input_state.keys.remove(0);
}
input_state.keys.push(input.clone());
}
MidiResponse::Connected => {
input_state.connected = true;
}
MidiResponse::Disconnected => {
input_state.connected = false;
}
}
}
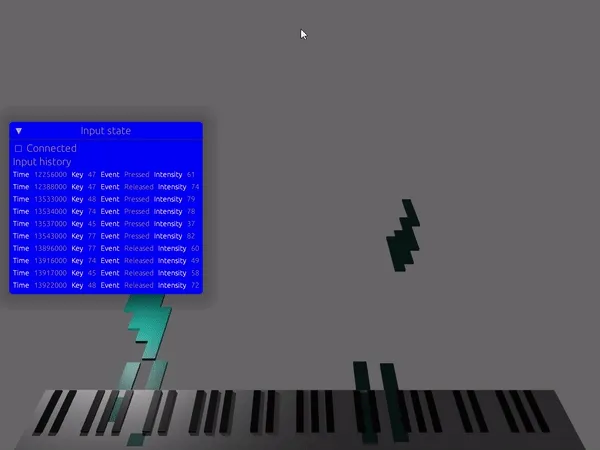
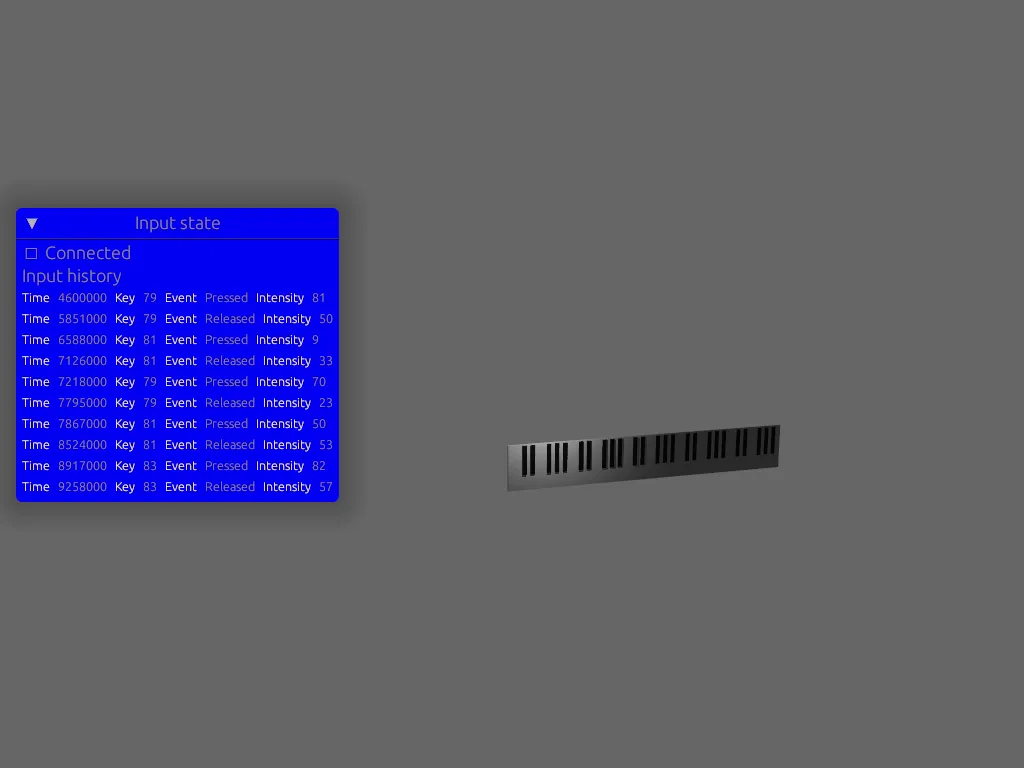
}One last thing, let’s show this new data to the user in a debug UI. Here we create a new UI window for our input data. Right up top we show if a device is connected or not. Then underneath we loop over all the keys and display each key property — all laid out kinda nicely using egui’s horizontal() layout method.
// The UI for selecting a device
fn debug_input_ui(mut contexts: EguiContexts, input_state: Res<MidiInputState>) {
    let context = contexts.ctx_mut();
    egui::Window::new("Input state").show(context, |ui| {
        // Connected status
        let mut name: String;
        if input_state.connected {
            name = "🟢 Connected".to_string();
        } else {
            name = "🔴 Disconnected".to_string();
        }
        ui.heading(name);

        ui.heading("Input history");
        for key in input_state.keys.iter() {
            ui.horizontal(|ui| {
                // let date_time = Utc.timestamp_millis_opt(key.timestamp as i64).unwrap();
                ui.horizontal(|ui| {
                    ui.strong("Time");
                    // ui.label(date_time.timestamp_millis().to_string());
                    ui.label(key.timestamp.to_string());
                });

                let name = key.id.to_string();
                ui.horizontal(|ui| {
                    ui.strong("Key");
                    ui.label(name);
                });

                let intensity = key.intensity.to_string();
                ui.horizontal(|ui| {
                    ui.strong("Intensity");
                    ui.label(intensity);
                });
            });
        }
    });
}
When we run the app now, connect a device, select it, and press some keys — we should see a stream of input displayed to the user.
You can see this commit on Github here.
3D Piano
Now that the MIDI has been successfully integrated, we can move on to the fun part — doing stuff with the input! Let’s create a 3D piano to visualize the keys the user will be pressing, change their color when the user presses. And to really step it up — let’s visualize the notes the user is playing by creating 3D blocks that’ll fly out from the corresponding piano key pressed.
Laying out a piano
How do you lay out piano keys? The white keys are simple, you just lay them down side by side. But the black keys aren’t as simple. And then how do you handle incrementing the key ID correctly across keys when white and black keys mix IDs (e.g. 0 = white, 1 = black). This was a nice developer practice that felt like one of those “l33t” code exercises.
⚒️ At this point, I had refactored the game using Bevy’s “app states” to separate the logic of modules (like the MIDI integration vs the actual game). You can learn more about app states in my blog post where I recreate Katamari in Bevy.
I created a new startup system called spawn_piano() that handles “spawning” or adding the 3D piano objects to “scene”. There are probably a few ways of handling this, but I settled on this way since it seemed like the simplest and most grok-able.
To understand what we’re doing, let’s take a quick look at the MIDI keyboard I’m using, the Arturia 61-key.
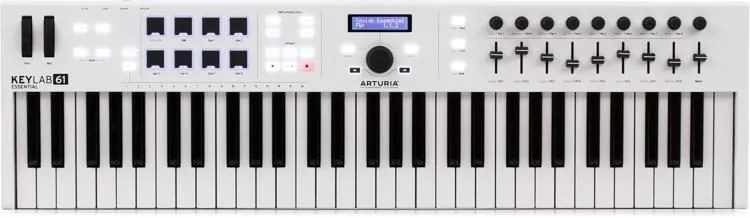
The white keys go side by side from start to finish — nothing fancy there. But the black keys, that’s where things get interesting.
Pianos work in octaves, or a set of 12 keys — 7 white and 5 black. When you have a 61 key piano (like the one above), it has 5 octaves. We can figure that out by dividing the number of keys by 12 (61 / 2 = 5 and some change).
.Cv-jIFbG_Z1bCIA5.webp)
If you look back to the keyboard above, look closely and you might see that the keys repeat in a pattern (literally based on the octaves). And we have 5 sets like we calculated. So every 7 white keys is a “chunk” we need to repeat.
And the keys need to be numbered correctly. If you have access to a MIDI keyboard and test the app, you’ll find that keys are numbered similar to the graphic above. The first white key is 0 (similar to an array index), and then the next white key is 2. This is because the first black key (1 in this case) is counted when we go across the keyboard.
So going back to rendering the 3D piano, we just need to figure out how to render one octave or “set” of keys correctly, then we can repeat that as many keys as we need.
The first step was rendering them in the right order. I created an array that represents the “pattern” the keys repeat in. When we loop over the total number of keys (61 in this case), we use the modulo operator.
const KEY_ORDER: [i32; 12] = [0, 1, 0, 1, 0, 0, 1, 0, 1, 0, 1, 0];

// A set of keys is 12 (5 black, 7 white)
let mut white_key_offset = 0;
for index in 0..NUM_TOTAL_KEYS {
    let key_type_index = index % 12;
    let key_type_id = KEY_ORDER[key_type_index];
    let key_index = index as f32;
A modulo operator returns the remainder of a division, after one number is divided by another. So when we get to say the 14th key index, the modulo operator would return 2. This is because 14 divided by 12 is 1.1667. If we take the “remainder” (aka the decimal amount) and multiply that by 12 we get 2.
This lets us use the loop index (0 - 61 keys) as the basis to figure out where we are in the KEY_ORDER array “pattern”. Every 12 keys it’ll basically “repeat” and start grabbing from the beginning of the KEY_ORDER array.
let index = 5;
let key_type_index = index % 12; // 5

let index = 14;
let key_type_index = index % 12; // 2

let index = 15;
let key_type_index = index % 12; // 3
Once we’ve got the keys incrementing in the right pattern, we can work on positioning them. In the KEY_ORDER array we make 0 into white keys and 1 into black keys. The white keys are pretty simple. We keep a variable outside the loop that keeps track of incrementing white keys. Then as we loop over each white key, we increment that variable, and use it to determine the position. If we multiply the size of the piano key by the “offset” index, we can lay the white keys down side by side.
// A set of keys is 12 (5 black, 7 white)
let mut white_key_offset = 0;
for index in 0..NUM_TOTAL_KEYS {
  let key_type_index = index % 12;
  let key_type_id = KEY_ORDER[key_type_index];
  let key_index = index as f32;
  let position_x = (white_key_offset as f32) * WHITE_KEY_WIDTH;

	// White key
	if key_type_id == 0 {
	    println!("generating white key {}", key_index.to_string());
	    // We get the position of white keys by incrementing an external offset
	    // since we can't use the index of the loop
	    white_key_offset += 1;

	    // Spawn white piano keys
	    commands.spawn((
	        PianoKey(index, PianoKeyType::White),
	        // Mesh
	        PbrBundle {
	            mesh: meshes.add(Mesh::from(shape::Box::new(
	                WHITE_KEY_WIDTH,
	                WHITE_KEY_HEIGHT,
	                WHITE_KEY_DEPTH,
	            ))),
	            material: materials.add(Color::WHITE.into()),
	            transform: Transform::from_xyz(position_x, 0.0, 0.0),
	            ..default()
	        },
	    ));
	}

	// ...black key here...
}
Cool. Now for the black keys. This one is a bit trickier, but also kinda simple. If you look at the piano you’ll see that every black key is halfway into white keys (not “side by side”). So when we’re looping, if we used the white key offset index, we can figure out where we’re “currently” at in the piano. Then we can subtract half the white key width from that and determine our black key’s position.
// Black keys
if key_type_id == 1 {
    println!("generating black key {}", key_index.to_string());
    let black_position_x = position_x + WHITE_KEY_WIDTH / 2.0;

    // Spawn white piano keys
    commands.spawn((
        PianoKey(index, PianoKeyType::Black),
        // Mesh
        PbrBundle {
            mesh: meshes.add(Mesh::from(shape::Box::new(
                BLACK_KEY_WIDTH,
                BLACK_KEY_HEIGHT,
                BLACK_KEY_DEPTH,
            ))),
            material: materials.add(Color::BLACK.into()),
            transform: Transform::from_xyz(black_position_x, 0.0, 0.0),
            ..default()
        },
    ));
}
This should render the keyboard fairly closely to the real version. But we need to adjust the black keys and push them up a little on the Y axis. Then it’ll be much more to spec.
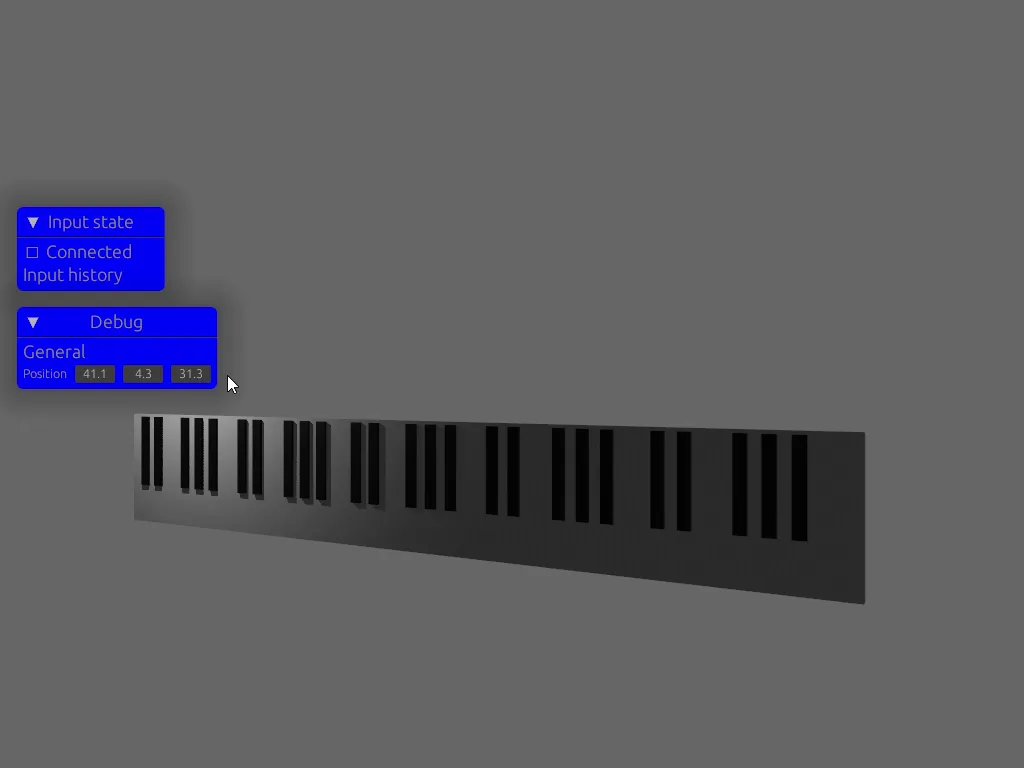
You can see the initial commit on Github here, and the black keys shifted up here.
Lighting up keys
To light up the keys we’ll need to make a new system that listens to MIDI key events. When a key is pressed or released, we’ll light or un-light a piano key by changing the “material” of the 3D object.
I didn’t mention it before because the last section was complicated enough with all the math — but in order to distinguish keys I created a few components called PianoKey, PianoKeyId, and PianoKeyType. These components let us query the piano keys in another system so we can find a specific key (for highlighting or other stuff).
// Distinguishes a piano key entity
#[derive(Component)]
pub struct PianoKey;

// The index of a key (0 to total number of keys)
#[derive(Component)]
pub struct PianoKeyId(usize);

// The type of key (black, white, etc)
// The types of inputs on a MIDI keyboard
#[derive(Component)]
pub enum PianoKeyType {
    White,
    Black,
    // Slider,
    // Button,
}
When the white and black keys are spawned, these components are attached to each entity and the piano key’s ID is inserted into the PianoKeyId tuple.
// Spawn white piano keys
commands.spawn((
    PianoKey,
    PianoKeyId(index),
    PianoKeyType::White,
    // Mesh
    PbrBundle {
        mesh: meshes.add(Mesh::from(shape::Box::new(
            WHITE_KEY_WIDTH,
            WHITE_KEY_HEIGHT,
            WHITE_KEY_DEPTH,
        ))),
        material: materials.add(Color::WHITE.into()),
        transform: Transform::from_xyz(position_x, 0.0, 0.0),
        ..default()
    },
));
I also created a new event in Bevy and just used the MidiInputKey type we created before for the input data. That way whenever a key press is detected, we can emit an event to the rest of the game to let it know something happened.
impl Plugin for MidiInputPlugin {
    fn build(&self, app: &mut App) {
        app.add_event::<SelectDeviceEvent>()
            .add_event::<MidiInputKey>()
Now we can create a system that detects this event called highlight_keys().
pub fn highlight_keys(
    mut key_events: EventReader<MidiInputKey>,
    midi_state: Res<MidiInputState>,
    key_entities: Query<(Entity, &PianoKeyId, &PianoKeyType), With<PianoKey>>,
    mut materials: ResMut<Assets<StandardMaterial>>,
    mut key_materials: Query<&mut Handle<StandardMaterial>>,
    // mut assets: Assets<StandardMaterial>,
) {
    if key_events.is_empty() {
        return;
    }

    for key in key_events.iter() {
			// Use the key data
		}
}
Here we encounter one of the first issues when parsing MIDI input. When we press on a piano key on the MIDI keyboard, it returns piano key index that’s relative to the current octave. Usually pianos start on the “middle” octave (not too deep or high). So when I press the first key on my piano, it returns 36 as the key ID.
This is because my Arturia 61-key starts on the 3rd octave, which means the piano key indices are offset by 3 octaves times 12 keys (or 36 — the first key we see).
In order to keep track of this, we need to store the octave in our game’s state. This let’s us calculate the “actual” piano key index - so we can do things like highlight the correct key.
#[derive(Resource)]
pub struct MidiInputState {
    // Is a device connected?
    pub connected: bool,
    // History of last pressed keys
    pub keys: Vec<MidiInputKey>,
    // Octave offset
    pub octave: i32,
}
So back to our highlight_keys() system, let’s calculate the piano key offset using the current octave.
let octave = 3 - midi_state.octave;
let octave_offset = octave * 12;
println!("octave {} {}", &octave, &octave_offset);
Then we can loop over all the piano keys, grab the PianoKeyId component, and check if the piano key index matches.
// Select the right key and highlight it
for (entity, key_id_component, key_type) in &key_entities {
    let PianoKeyId(key_id) = key_id_component;
    // Get the "real" key ID
    // We store keys from 0 to total, but MIDI outputs it relative to octave
    // So we do the math to "offset" the keys to match MIDI output
    let real_id = key_id + (octave_offset as usize);
    let check_id = key.id as usize;

		println!("checking keys {} and {}", &real_id, &check_id);

    if real_id == check_id {
        println!(
            "[EVENTS] Highlighting key {} {}",
            key.id,
            key.event.to_string()
        );
		}
}
This should log out when a key is pressed and let you know a key will (eventually) be highlighted.
We’ve got the right key - next we need to actually change the color of the piano key. This one is tricky if you’ve never done it before. Basically the way Bevy works is it creates 3D objects (using the PbrBundle type earlier). It contains a mesh - in our case a 3D “box” or cube primitive. And it also contains a material - which we set to black or white depending on the key.
Materials are not stored alongside your 3D object (aka “entity”). They’re stored as “assets” in a separate place, and they store a “handle” in another place. The handle is basically an ID to the asset and an ID of the Entity to associate the two.
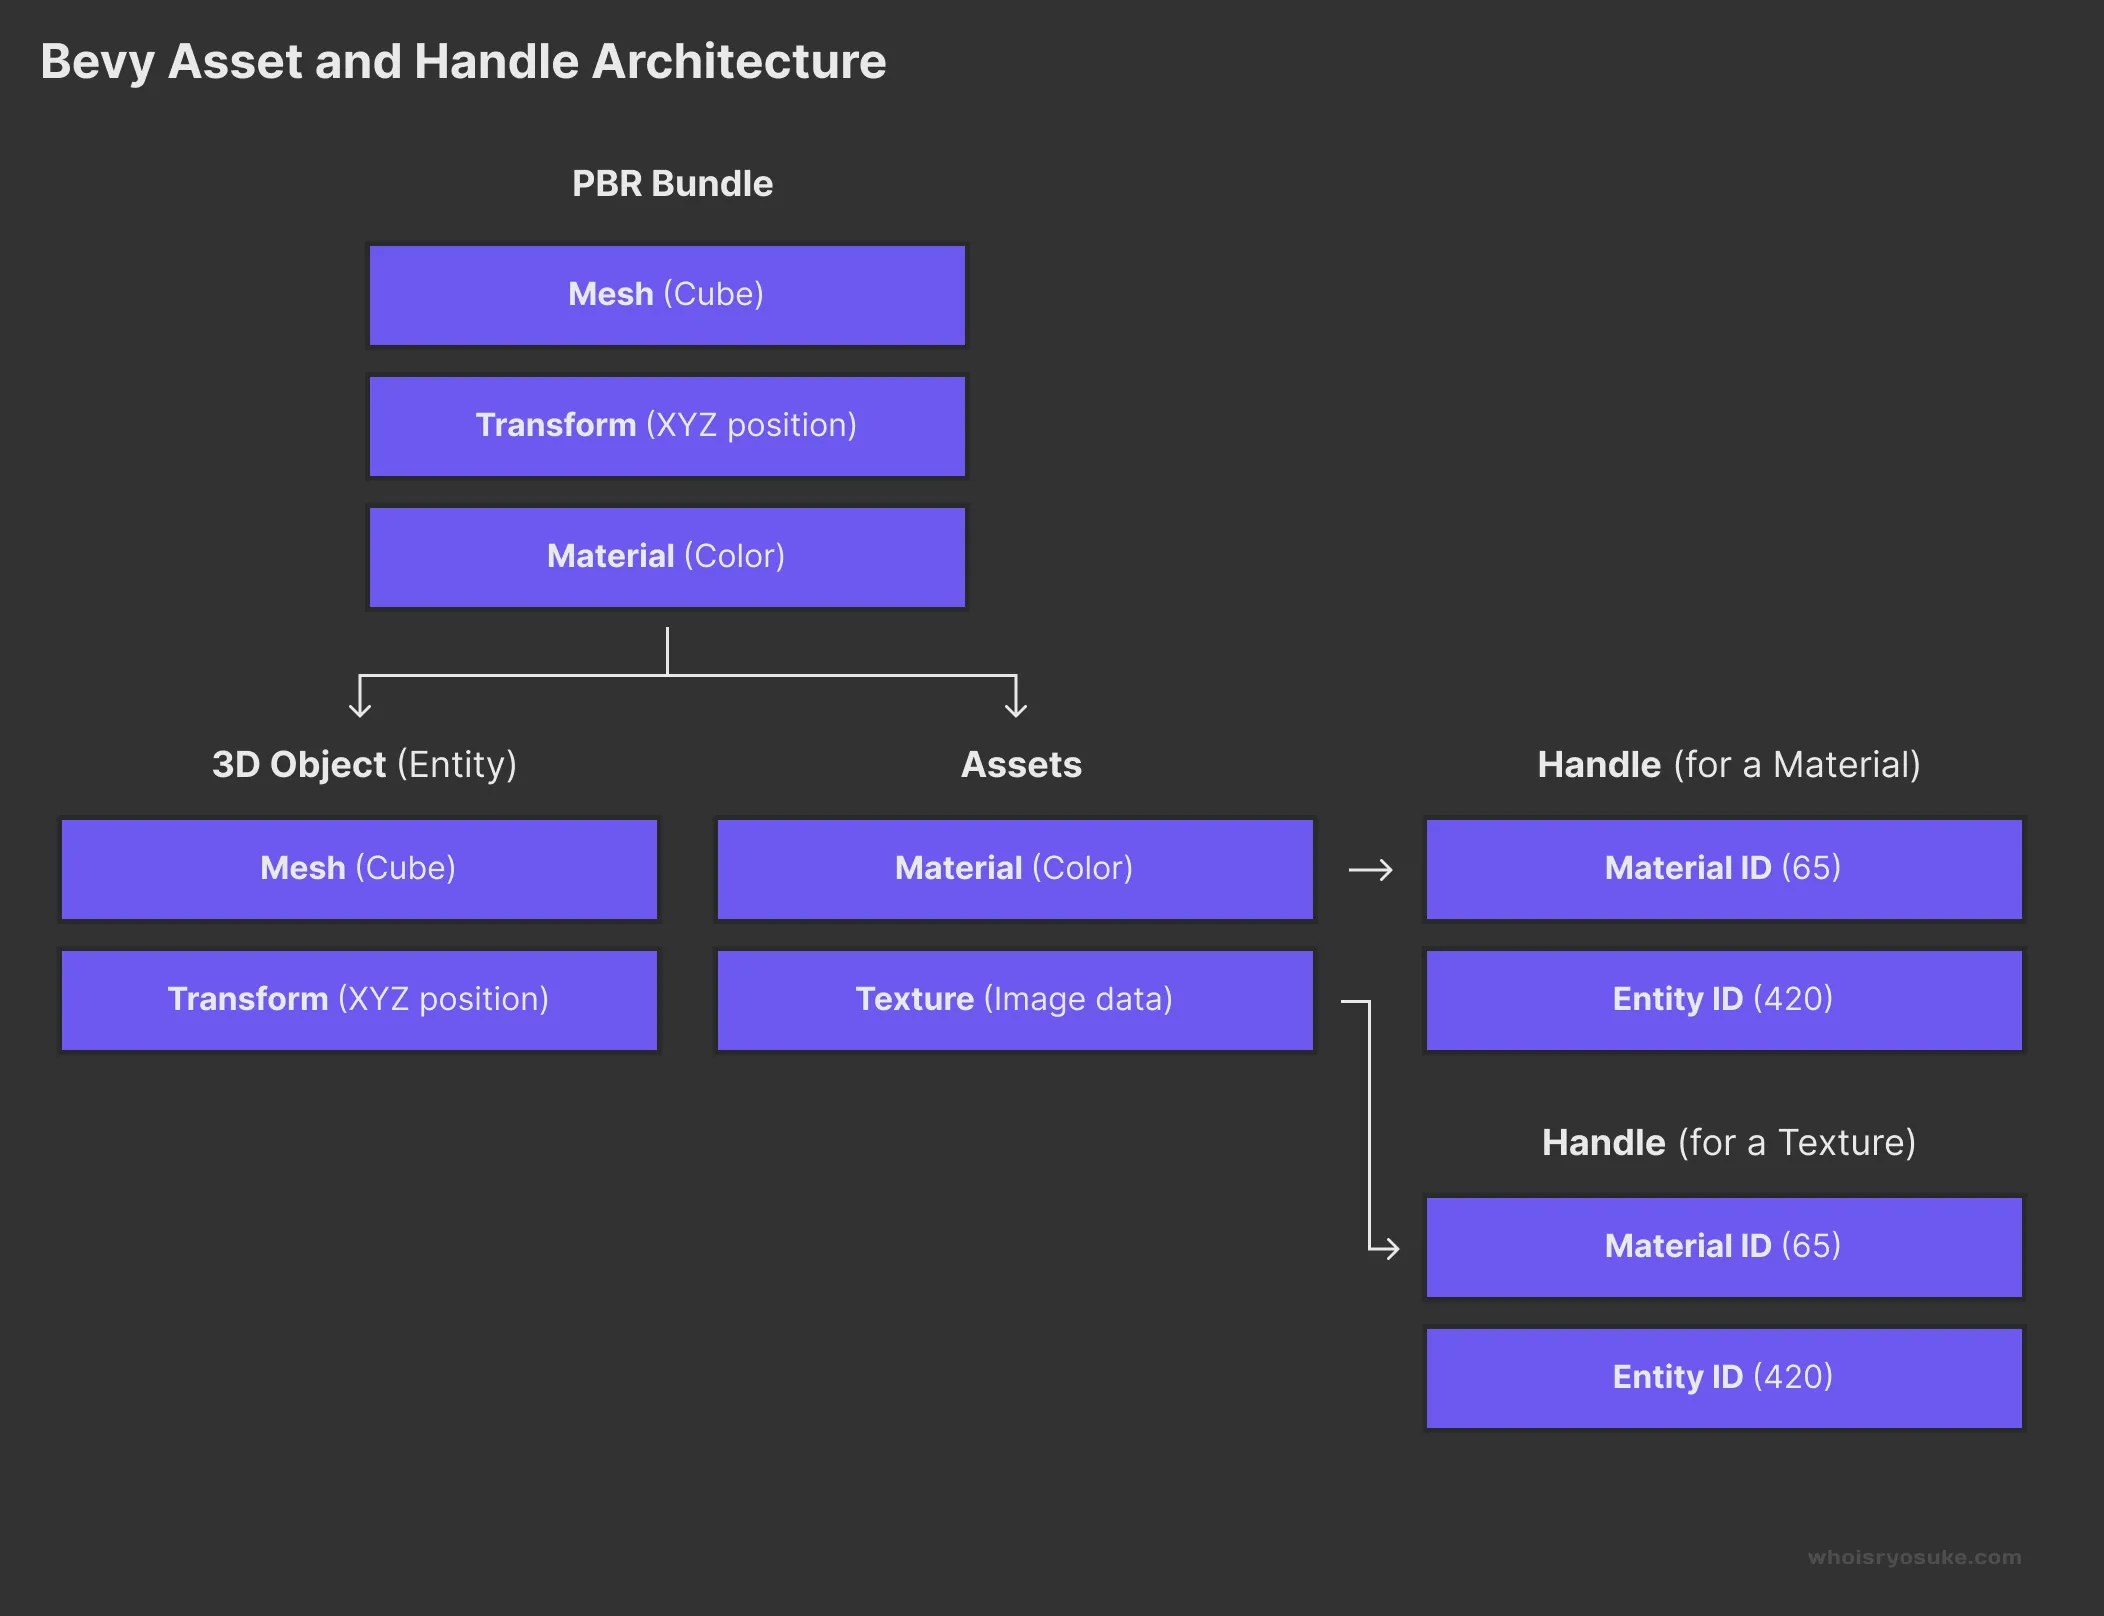
In order to change a material on a 3D object, you’ll need to query a few things in your system parameters:
- The
Entitythat has the material - All the
Handles for materials - All the materials in
Asset
You first need to grab the “entity” that contains the materials. In our case, we query the Entity when we grab the PianoKeyId and PianoKeyType. Then you have use the get() (or get_mut()) methods on the Query for the Handle to grab the material’s specific handle by our entity’s ID. Then we can finally use the .get_mut() method on our ResMut<Asset> resource to grab specific material by our handle ID.
pub fn highlight_keys(
    mut key_events: EventReader<MidiInputKey>,
    midi_state: Res<MidiInputState>,
		// Getting the entity
    key_entities: Query<(Entity, &PianoKeyId, &PianoKeyType), With<PianoKey>>,
		// Getting the materials stored in Asset
    mut materials: ResMut<Assets<StandardMaterial>>,
		// Getting the "handle" to the material associated to the entity
    mut key_materials: Query<&mut Handle<StandardMaterial>>,
    // mut assets: Assets<StandardMaterial>,
) {
		if let Ok(handle) = key_materials.get_mut(entity) {
	    if let Some(material) = materials.get_mut(&handle) {
				// Change the material color! We use `base_color` property on PBR materials.
				material.base_color = Color::BLUE.into();
			}
		}
}
If we check for the “event type” we receive (aka is the key pressed or released?) we can color highlight a key when it’s pressed, and return it to it’s original color when it’s not.
let color: Color;
match key.event {
    crate::midi::MidiEvents::Pressed => {
        color = Color::BLUE;
    }
    crate::midi::MidiEvents::Released => match key_type {
        PianoKeyType::White => {
            color = Color::WHITE;
        }
        PianoKeyType::Black => {
            color = Color::BLACK;
        }
    },
    crate::midi::MidiEvents::Holding => {
        color = Color::BLUE;
    }
}
material.base_color = color.into();
Now it should work as we intended and highlight a key when pressed — and also return it to the original color.

You can see this commit on Github here.
⚠️ You’ll notice I left in a commented out system parameter directly accessing the
Assets. This was from my first attempt when I didn’t understand how Bevy worked. If you try to leave it in, you’ll get an error from Bevy that you can’t query the assets in a non-startup system. We have to query for a resource containing the assets that’s available during the game loop.
Animated piano blocks
Now that we have a 3D piano, let’s spawn some blocks that come out from the keys that’ll represent the music notes being played.
Let’s create a component to signify our note, aptly called PianoNote.
// Distinguishes a piano note entity (blocks going up from keyboard)
#[derive(Component)]
pub struct PianoNote;
Next we need a system that spawns the notes when a key is pressed. This system should look very similar to our system to highlight keys. It listens to key input events and instead of changing the piano key color, it’ll spawn a 3D cube representing a piano note in the same position as the key pressed.
I won’t go too deep into detail here since it’s kinda copy/paste from the last section. The interesting part here is the find() method I do to to find the right piano key (instead of using a for loop like we did last time).
// Check for input events and change color of 3D piano keys
pub fn spawn_music_notes(
    mut commands: Commands,
    mut meshes: ResMut<Assets<Mesh>>,
    mut materials: ResMut<Assets<StandardMaterial>>,
    mut key_events: EventReader<MidiInputKey>,
    piano_keys: Query<(&Transform, &PianoKeyId), With<PianoKey>>,
    midi_state: Res<MidiInputState>,
) {
    if key_events.is_empty() {
        return;
    }

    // Loop through key input events
    for key in key_events.iter() {
        println!("[SPAWN] Music note - finding key");
        // Figure out the current octave offset
        let octave_offset = get_octave(midi_state.octave);

        // Find key and get position
        let piano_key_result = piano_keys.iter().find(|(_, key_id_component)| {
            if let PianoKeyId(key_id) = key_id_component {
                let real_id = key_id + (octave_offset as usize);
                println!("[SPAWN] Music note - {} - {}", key_id, key.id);
                real_id == (key.id as usize)
            } else {
                false
            }
        });

        if let Some((piano_key_transform, _)) = piano_key_result {
            println!("[SPAWN] Music note - spawned");
            // Spawn note where key is
            commands.spawn((
                PianoNote,
                // Mesh
                PbrBundle {
                    mesh: meshes.add(Mesh::from(shape::Box::new(
                        WHITE_KEY_WIDTH,
                        WHITE_KEY_HEIGHT,
                        WHITE_KEY_DEPTH,
                    ))),
                    material: materials.add(Color::TEAL.into()),
                    transform: Transform::from_xyz(
                        piano_key_transform.translation.x,
                        piano_key_transform.translation.y,
                        piano_key_transform.translation.z,
                    ),
                    ..default()
                },
            ));
        }
    }
}
If we run the app and play the keys, we’ll spawn “notes” in the same place as our piano keys. But if they just stay there it isn’t very cool, so let’s animate them to move “up” away from the piano.
We create a new system to handle the animation of notes. It queries all the notes in a scene and steadily changes their position to move them up (the Y axis in this case).
pub fn animate_music_notes(mut notes: Query<&mut Transform, With<PianoNote>>, time: Res<Time>) {
    let speed = 5.0;
    let animation_delta = time.delta().as_secs_f32() * speed;

    for mut note in notes.iter_mut() {
        note.translation.y += animation_delta;
    }
}
Now if we run the app, we should see our notes spawn and start moving away from the piano.
A native rust app renders a 3D scene using Bevy. Piano keys are positioned at the bottom of the screen tilted forward slightly. random keys change color, and as they do a block appears in the same position and starts to move up and away from camera kinda like star wars text
You can see this commit on Github here.
And that’s all I have time for today! You can find the complete “game” in the 3d-output branch on Github. I also have an extra commit you can check out that shows how to handle “holding” notes and making the notes longer.
The password is “rustburger”
I always wonder if anyone gets this far in a blog article, particularly when they get this long 😅 Send me a tweet or toot with the codeword “rustburger” or “🦀🍔” and I’ll know you read this 😂
But if you have gotten this far, thanks for reading. Hope this helps you learn more about game development with Rust and Bevy, and how to work with MIDI devices in Rust. And I’d definitely recommend checking out bevy_midi if you’re looking for an “out-of-the-box” MIDI solution.
Stay curious, Ryo