Posted on
May 8, 2026
Recently I had an idea while exploring a new project that had some Tailwind components - why be forced to use UI I don’t want to use? In this age of LLMs, is it possible to take a component created with one library and styling paradigm - and convert it to another?
It’s something incredibly practical and a task you’ll inevitably have to do when maintaining an older project. Sometimes UI gets outdated, or the next shiny design system pops up and entices you. Regardless, you’ll find that you end up doing a lot of tedious work essentially converting one API to another.
I often compare the experience of converting APIs to wiring up electronics. You have set ports, like HDMI or audio jack, and these take very specific cables that connect them to other matching ports. This process of wiring something up correctly is just like coding with an existing framework - the API contract is the holes, and your code is the wires. Once you understand the system, it’s a tedious and often repetitive process.
Instead of wiring things up by hand, why not entrust an LLM? They’re specialized in tasks like association and structure - we just need to feed it the right data and it should produce what we need. Right…? Let’s find out.
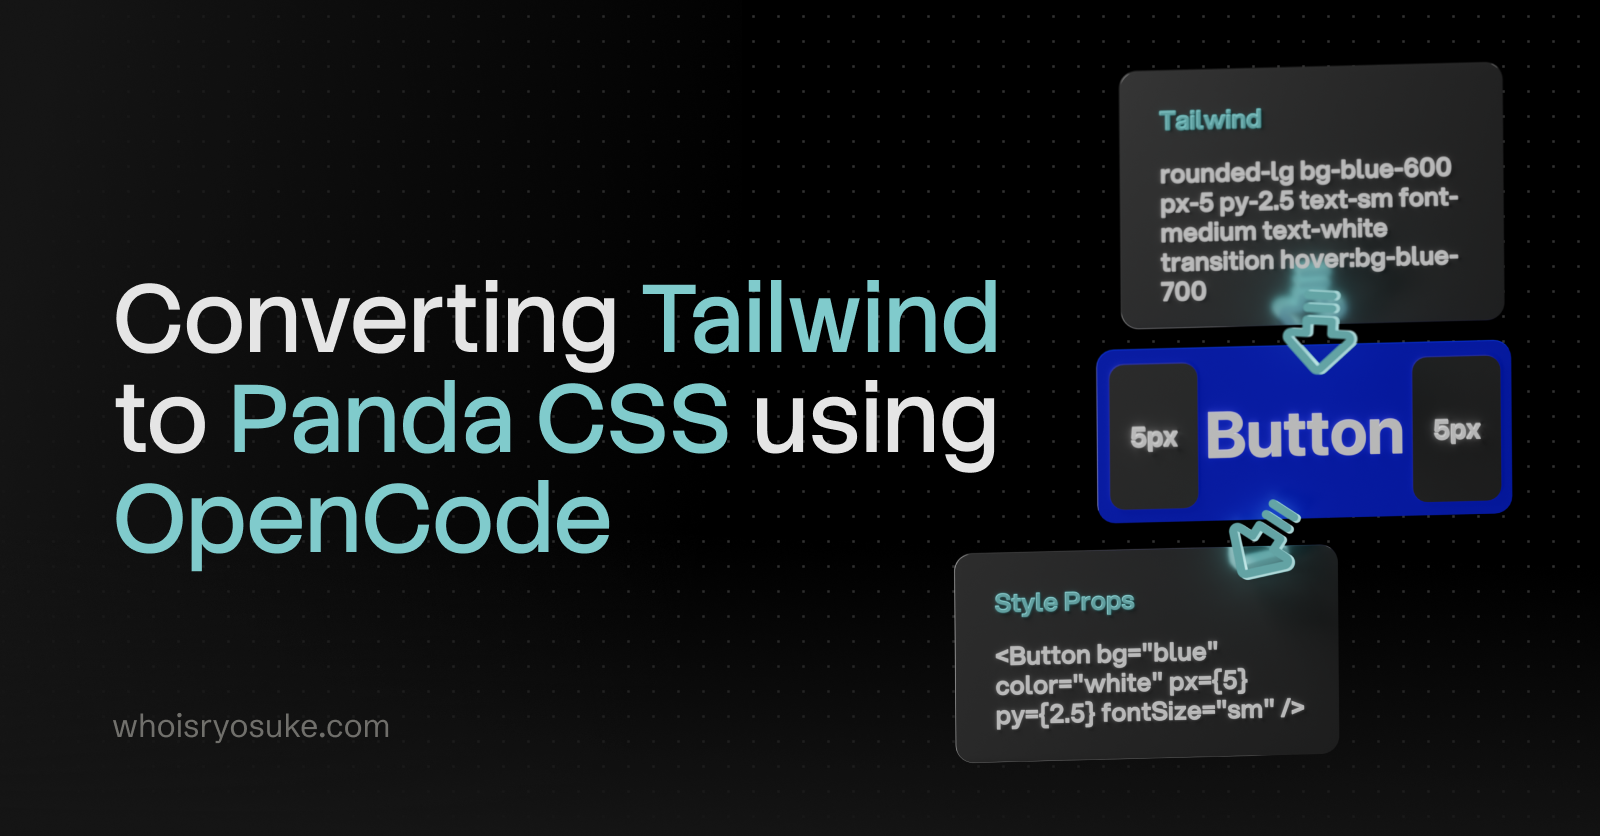
In this blog we’ll explore the process of converting UI components from the AI Elements and shadcn libraries to use Park UI components instead. And all the Tailwind will be converted to PandaCSS, the styling engine powering Park UI. Is it possible? How efficient is it? Spoiler alert: yes and depends.
📂 TLDR?: Check out the source code and give it a spin.
What is shadcn and AI Elements?
shadcn UI is a UI library with a CLI that generates components like a Button. It uses Radix UI or Base UI under the hood, along with Tailwind for styling, so most of the code is copy and paste friendly for projects with that setup.
import { ArrowUpIcon } from "lucide-react";
import { Button } from "@/components/ui/button";

export function ButtonDemo() {
  return (
    <div className="flex flex-wrap items-center gap-2 md:flex-row">
      <Button variant="outline">Button</Button>
      <Button variant="outline" size="icon" aria-label="Submit">
        <ArrowUpIcon />
      </Button>
    </div>
  );
}
AI Elements is a UI library for creating client-side AI agents. It’s got components like a chat box, or random stuff like an audio player (if the user records mic or LLM sends text to speech maybe). They use shadcn components as the basis, and Tailwind for the styling. It’s part of Vercel’s AI SDK package.
Here’s a “snippet” component that displays a code block with a copy button:
"use client";

import {
  Snippet,
  SnippetAddon,
  SnippetCopyButton,
  SnippetInput,
  SnippetText,
} from "@/components/ai-elements/snippet";

const Example = () => (
  <div className="flex size-full items-center justify-center p-4">
    <Snippet className="max-w-sm" code="npx ai-elements add snippet">
      <SnippetAddon className="pl-1">
        <SnippetText>$</SnippetText>
      </SnippetAddon>
      <SnippetInput />
      <SnippetAddon align="inline-end" className="pr-2">
        <SnippetCopyButton />
      </SnippetAddon>
    </Snippet>
  </div>
);

export default Example;
Why convert?
You might have your own UI components and design system you want to use. Or if you’re like me, you don’t like Tailwind and prefer other styling solutions.
If you’re building an LLM chat app, there’s a lot of components to consider. Even if you’re creating a custom chat experience and UI - you’ll probably want a decent scaffolding for the project that connects to the API and displays data logically. Otherwise you’re going to spend a lot of time rebuilding the UI from scratch by analyzing the LLM AI specification / output.
I’ve built a couple LLM chat apps in the past and there’s a lot of edge cases to handle - from tool calls to agentic workflows - there’s a few features that would require unique UI. So having a library to use as the basis - and integrated with the official SDK, is a time saver.
Regardless, it’s an interesting experiment to test the capabilities of LLMs and their ability to migrate codebases.
The setup
To convert the code we’ll need a few things:
- OpenCode
- Local LLM (optional)
I’ll be using OpenCode to connect to the LLM, chat with it, and give it access to read and write code. I’ll be using a local LLM, which isn’t necessary, but it’s a nice basis for comparison so you can see the disparity between the cloud models.
For my local model I’ll be testing out the Qwen Coder 30B model (came out last year or so) and running it on a PC with an i9 CPU, GeForce RTX 4080, 24GB RAM. I’ll share model configuration details as I go, since I change them throughout. I’m using LM Studio to run my models, but you can use ollama, Anywhere LLM, or any other app that exposes the LLM as a local API (like localhost:1234).
ℹ️ You can do this with any AI agent really, as long as it has access to read and write to your disk and ideally specializes in code — you’re good to go. If you’re rocking the Claude CLI and a subscription there, you can try this process. But I will say, it’s token intensive, so be cautious of your usage.
Process
Getting Started
This whole thing started with me browsing the Mastra documentation and doing their getting started guide. They ask you to setup a fresh app (like Vite and React in my case), and then walk you through the process of installing AI Elements.
Let’s walk through that process step by step to see what we’re starting with. I’ll cut out all the Mastra stuff that isn’t applicable now.
- First we create a new Vite project.
yarn create vite mastra-react --template react-ts- Then we add Tailwind to the project. This also involves editing the Vite config.
yarn add tailwindcss @tailwindcss/vite- Install AI Elements using a
npxscript (basically NodeJS script that runs once). Here I’m using the Yarndlxsyntax. This is where a lot of the heavy lifting happens.
yarn dlx ai-elements@latestI actually had this command fail for me because I didn’t have Tailwind setup, so I was able to see all the deps they add during the npx process:
yarn add clsx tailwind-merge "shadcn@latest" class-variance-authority tw-animate-css radix-ui lucide-react embla-carousel-react cmdk ai media-chrome "@xyflow/react" "@radix-ui/react-use-controllable-state" shiki tokenlens use-stick-to-bottom react-jsx-parser "@streamdown/cjk" "@streamdown/code" "@streamdown/math" "@streamdown/mermaid" streamdown "@rive-app/react-webgl2" nanoid motion ansi-to-react "@fontsource-variable/geist"We can see that AI Elements tries to install like…20 different libraries. And honestly stuff that I question if it even uses — like an entire node graph library? Or the Rive runtime? There’s also a few third party UI libraries, like the Embla carousel component.
Looking past that though, we can focus on a few dependencies:
- shadcn
- Radix UI
- Lucide React
Like I mentioned earlier, AI Elements is built primarily with these.
This generates 2 folders inside the src/components/ folder: ui and ai. The ui contains shadcn “primitive” components like the Button, and the ai contains chat components using the shadcn primitives.
|-- components
    |-- ai-elements
    |   |-- agent.tsx
    |   |-- artifact.tsx
    |   |-- attachments.tsx
    |   |-- audio-player.tsx
    |   |-- canvas.tsx
    |   |-- chain-of-thought.tsx
    |   |-- checkpoint.tsx
    |   |-- code-block.tsx
    |   |-- commit.tsx
    |   |-- confirmation.tsx
    |   |-- connection.tsx
    |   |-- context.tsx
    |   |-- controls.tsx
    |   |-- conversation.tsx
    |   |-- edge.tsx
    |   |-- environment-variables.tsx
    |   |-- file-tree.tsx
    |   |-- image.tsx
    |   |-- inline-citation.tsx
    |   |-- jsx-preview.tsx
    |   |-- message.tsx
    |   |-- mic-selector.tsx
    |   |-- model-selector.tsx
    |   |-- node.tsx
    |   |-- open-in-chat.tsx
    |   |-- package-info.tsx
    |   |-- panel.tsx
    |   |-- persona.tsx
    |   |-- plan.tsx
    |   |-- prompt-input.tsx
    |   |-- queue.tsx
    |   |-- reasoning.tsx
    |   |-- sandbox.tsx
    |   |-- schema-display.tsx
    |   |-- shimmer.tsx
    |   |-- snippet.tsx
    |   |-- sources.tsx
    |   |-- speech-input.tsx
    |   |-- stack-trace.tsx
    |   |-- suggestion.tsx
    |   |-- task.tsx
    |   |-- terminal.tsx
    |   |-- test-results.tsx
    |   |-- tool.tsx
    |   |-- toolbar.tsx
    |   |-- transcription.tsx
    |   |-- voice-selector.tsx
    |   |-- web-preview.tsx
    |-- ui
        |-- absolute-center.tsx
        |-- accordion.tsx
        |-- alert.tsx
        |-- avatar.tsx
        |-- badge.tsx
        |-- button-group.tsx
        |-- button.tsx
        |-- card.tsx
        |-- carousel.tsx
        |-- collapsible.tsx
        |-- command.tsx
        |-- dialog.tsx
        |-- dropdown-menu.tsx
        |-- group.tsx
        |-- hover-card.tsx
        |-- index.ts
        |-- input-group.tsx
        |-- input.tsx
        |-- loader.tsx
        |-- popover.tsx
        |-- progress.tsx
        |-- scroll-area.tsx
        |-- select.tsx
        |-- separator.tsx
        |-- span.tsx
        |-- spinner.tsx
        |-- switch.tsx
        |-- tabs.tsx
        |-- textarea.tsx
        |-- tooltip.tsx
Once this is setup, we should be good to go. Mastra provides an example app that uses these components, so I copied that into the root App.tsx to use as a test. It obviously uses all the AI element and shadcn components we just installed.
UI CLI vs UI CLI
Now let’s start converting some of these shadcn components to Park UI.
The first thing I noticed was that the Park UI (and Ark UI - the underlying UI library) components reflect a similar API to shadcn.
I went through and just added the components directly from Park UI and they replaced the shadcn ones in the same folder:
yarn dlx @park-ui/cli add button card carousel badge avatar alert collapsible dialog input input-group popover tabs textarea tooltip switch progress scroll-areaℹ️ You could also just run
yarn dlx @park-ui/cli add --allto add all components.
This replaced 90% or so of the components. I had a few that weren’t covered by Park UI:
Surprisingly, when I looked at the Ark UI docs, I noticed it had a few of the missing components there - like Hover Card. So that covered those (albeit with a little more work).
LLM Conversion
For other components, like the Command component, it was a bit more bespoke of an API. It seems it was made using the cmdk library, which is an accessible popup combobox (like the “CTRL/CMD + K” shortcut menus most apps have nowadays). And it’s a compound component, so it’s not just <Command /> — it like <Command.Root> and whatnot.
Park UI has a combobox, and it’s own popup system, so it seemed fine to remove (especially if the cmdk library is “unstyled” — any opinions will be encoded with Tailwind).
I opened up OpenCode with my project, set it to Plan mode, and loaded up my Qwen Coder 30B model. I initially set the context to 20k tokens (a standard for most agentic experiences with tools), and the temperature to 0.7 (kinda high / “creative”) and GPU offload to 5 (initially did testing at 30 which capped my GPU, so bumped down a bit).
I asked the LLM to convert the Command component to Park UI from shadcn:
I'm converting the UI elements in this project from shadcn and Tailwind to using Park UI (and Panda CSS for any necessary custom CSS).

Can you change the components inside @src\components\ui\command.tsx  to use Park UI components and convert any Tailwind styles to Park UI styled properties - or Panda CSS custom styles when necessary. You can use any components inside @src\components\ui/ that are made with Park UI or Ark UI, like the @src\components\ui\dialog.tsx and @src\components\ui\input-group.tsx.
ℹ️ When you see
@symbols here, it means I’m linking to source files so the LLM can directly reference them. This is a nice feature of OpenCode.
This seemed to work, the LLM started to browse existing components in the project and scanning for Ark UI components in the node modules. I also had the LLM agent fetch Park UI documentation from the web and it failed a few times before it retreated to using shell commands to search my project.
But then it took a bit of a turn…the agent spawned a sub-agent with the initial plan that was generated. This spawned 2 agents at once, overloading my GPU a little bit.
All that was fine, but the secondary agent started to go through the plan and basically repeat all the same tooling steps the first agent took - like scanning for UI components. At this point I cancelled the request after about 15 minutes of waiting and watching tools re-run.
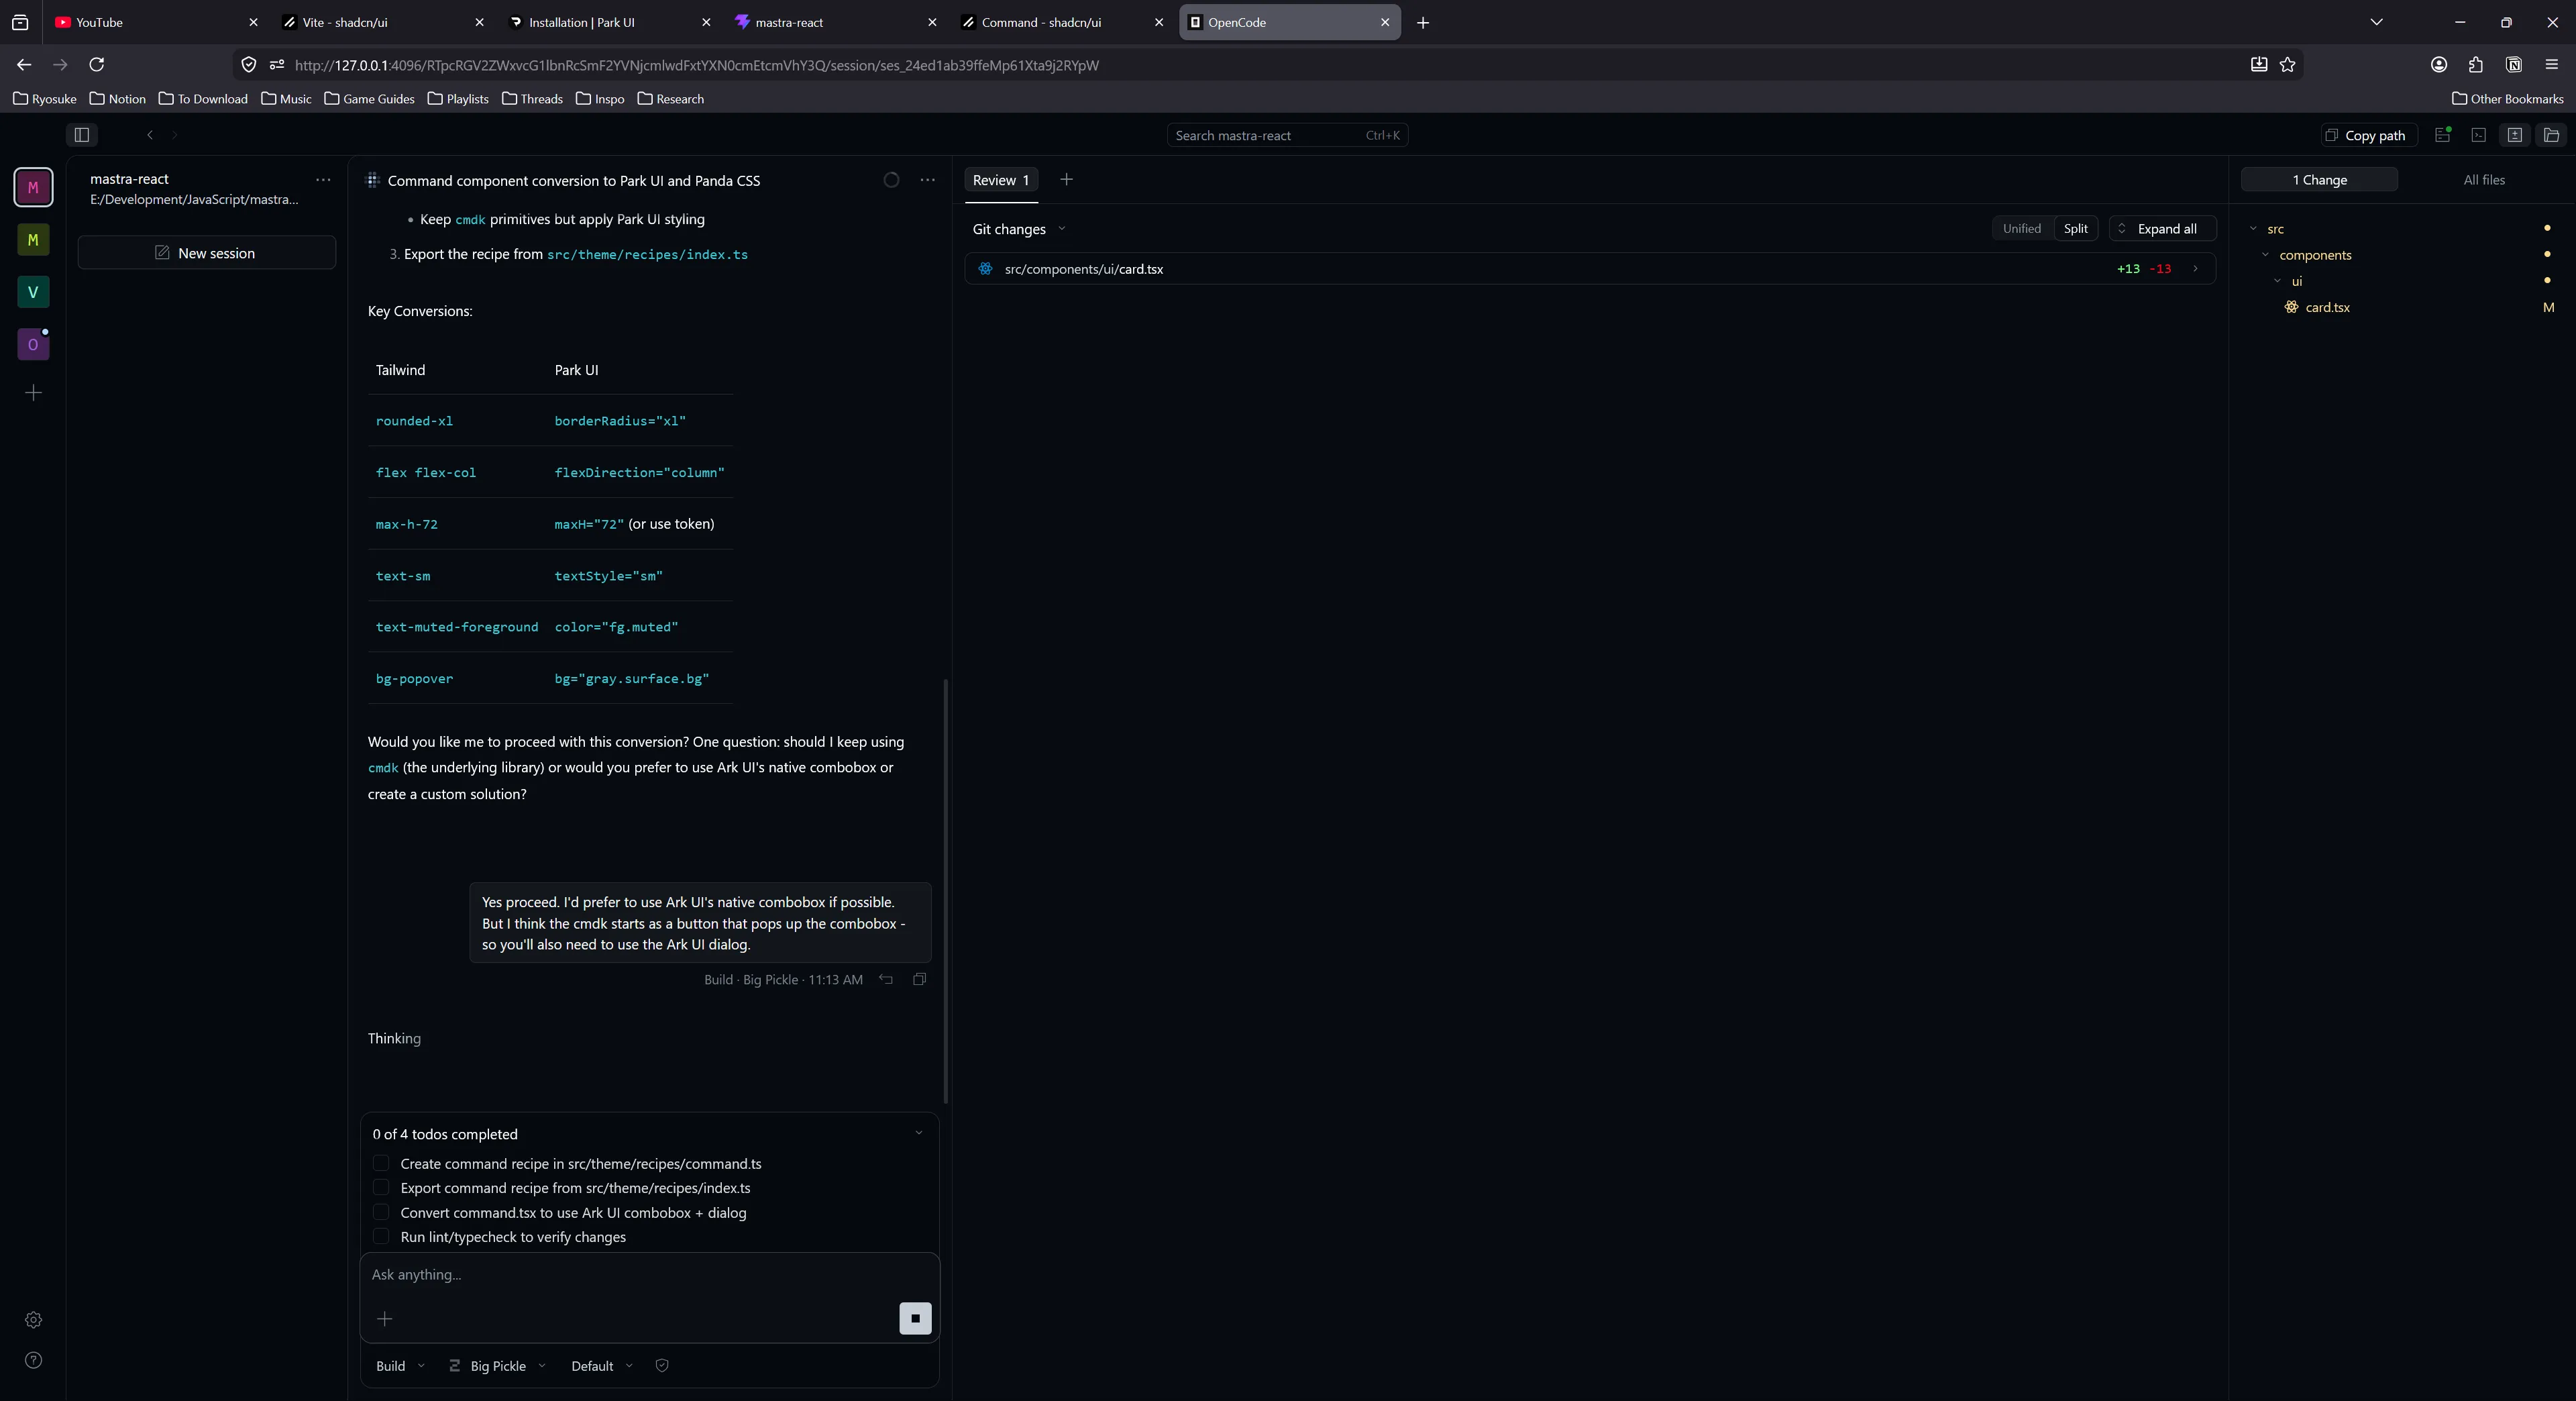
I switched over to OpenCode’s Big Pickle model, switched to Build mode, and sent over the same prompt. It followed a similar process of calling tools and checking components, but instead of spawning the sub agent it just finished the task itself. At the end it ran Typescript and ESLint checks to validate the code.
It was impressive, it picked up PandaCSS and it’s fairly convoluted “recipe” styling system and created the component and appropriate styles.
The “recipe”:
import { comboboxAnatomy } from "@ark-ui/react/anatomy";
import { defineSlotRecipe } from "@pandacss/dev";

export const command = defineSlotRecipe({
  className: "command",
  slots: comboboxAnatomy
    .extendWith("itemCommand", "itemText", "separator")
    .keys(),
  base: {
    root: {
      position: "relative",
      width: "full",
    },
    // More styles...
  },
});
The components:
"use client";
import { Combobox } from "@ark-ui/react/combobox";
import { Dialog } from "@ark-ui/react/dialog";
import { ark } from "@ark-ui/react/factory";
import { CheckIcon } from "lucide-react";
import { forwardRef, type ComponentProps } from "react";
import { createStyleContext } from "styled-system/jsx";
import { command } from "styled-system/recipes";
import type { HTMLStyledProps } from "styled-system/types";

const { withProvider, withContext } = createStyleContext(command);

export const Root = withProvider(Combobox.Root, "root");
export const Control = withContext(Combobox.Control, "control");
export const Input = withContext(Combobox.Input, "input");
export const Trigger = withContext(Combobox.Trigger, "trigger");
export const Positioner = withContext(Combobox.Positioner, "positioner");
export const Content = withContext(Combobox.Content, "content");
export const List = withContext(Combobox.List, "list");
export const Item = withContext(Combobox.Item, "item");
export const ItemText = withContext(Combobox.ItemText, "itemText");
export const ItemGroup = withContext(Combobox.ItemGroup, "itemGroup");
export const ItemGroupLabel = withContext(
  Combobox.ItemGroupLabel,
  "itemGroupLabel",
);
export const Empty = withContext(Combobox.Empty, "empty");

const StyledItemIndicator = withContext(
  Combobox.ItemIndicator,
  "itemIndicator",
);

export const ItemIndicator = forwardRef<
  HTMLDivElement,
  ComponentProps<typeof StyledItemIndicator>
>(function ItemIndicator(props, ref) {
  return (
    <StyledItemIndicator ref={ref} {...props}>
      <CheckIcon />
    </StyledItemIndicator>
  );
});

const ItemCommandBase = withContext(ark.span, "itemCommand");

export const ItemShortcut = ItemCommandBase;

export { ComboboxContext as Context } from "@ark-ui/react/combobox";
export type {
  ComboboxInputValueChangeDetails,
  ComboboxValueChangeDetails,
} from "@ark-ui/react/combobox";

export interface CommandProps extends HTMLStyledProps<"div"> {}

export interface CommandDialogProps extends Dialog.RootProps {
  title?: string;
  description?: string;
}

export const Command = Root;
export const CommandDialog = Dialog.Root;
export const CommandList = List;
export const CommandInput = Input;
export const CommandEmpty = Empty;
export const CommandGroup = ItemGroup;
export const CommandItem = Item;
export const CommandShortcut = ItemShortcut;
export const CommandSeparator = withContext(ark.hr, "separator");
This was pretty impressive and took about 17 minutes with the Big Pickle cloud-based model.
Simpler component
Next I tried converting the Button Group component. It was fairly simple, it’s just a bunch of Tailwind styles to make the buttons go inline.
I had the Big Pickle model convert this one using a similar prompt as last time, and it finished within 5 minutes. Much faster without the compound component.
"use client";

import { ark } from "@ark-ui/react/factory";
import type { ComponentProps, HTMLAttributes } from "react";
import { styled } from "styled-system/jsx";
import { group } from "styled-system/recipes";
import { Separator } from "@/components/ui/separator";

export const ButtonGroupRoot = styled(ark.div, group);

export type ButtonGroupProps = ComponentProps<typeof ButtonGroupRoot>;

const StyledButtonGroupText = styled(ark.span);

export interface ButtonGroupTextProps extends HTMLAttributes<HTMLSpanElement> {
  asChild?: boolean;
}

export function ButtonGroupText({
  className,
  asChild,
  ...props
}: ButtonGroupTextProps) {
  return (
    <StyledButtonGroupText
      data-slot="button-group-text"
      className={className}
      {...props}
    />
  );
}

export interface ButtonGroupSeparatorProps extends HTMLAttributes<HTMLDivElement> {
  orientation?: "horizontal" | "vertical";
}

export function ButtonGroupSeparator({
  className,
  orientation = "vertical",
  ...props
}: ButtonGroupSeparatorProps) {
  return (
    <Separator
      data-slot="button-group-separator"
      orientation={orientation}
      className={className}
      {...props}
    />
  );
}

export const ButtonGroup = Object.assign(ButtonGroupRoot, {
  Text: ButtonGroupText,
  Separator: ButtonGroupSeparator,
});
No recipe required because it used the correct Park UI components and their style props. Nice.
Testing local model again
I’m not a huge fan of using cloud based models, from the huge cost to the privacy concerns, so I went back to testing out the local Qwen model.
I tuned the Qwen model this time to 0.2 temperature and 10 GPU offload. Whenever the LLM starts using the tools too much and getting lost, it’s clearly being too “creative” so I cranked the temperature down. And this time we’d be testing on Build mode instead.
I tried the same prompt again, but this time on the “Hover Card” component.
This time the LLM didn’t get stuck looping on tools, and it was actually smart enough to scan the Ark UI components, discover it has a hover card, then replaced the shadcn with it. It was nice, considering that I’m using Park UI - a wrapper around Ark UI - but since it’s just a wrapper we can always dip back in to grab components they didn’t expose.
import * as React from "react";
import { HoverCard } from "@ark-ui/react/hover-card";

const HoverCardRoot = (props: any) => {
  return <HoverCard.Root data-slot="hover-card" {...props} />;
};

const HoverCardTrigger = (props: any) => {
  return <HoverCard.Trigger data-slot="hover-card-trigger" {...props} />;
};

const HoverCardContent = React.forwardRef(
  (
    { className, align = "center", sideOffset = 4, ...props }: any,
    ref: any,
  ) => {
    return (
      <HoverCard.Portal data-slot="hover-card-portal">
        <HoverCard.Content
          data-slot="hover-card-content"
          align={align}
          sideOffset={sideOffset}
          className={className}
          ref={ref}
          {...props}
        />
      </HoverCard.Portal>
    );
  },
);

// Re-export the components
export { HoverCardRoot as HoverCard, HoverCardTrigger, HoverCardContent };
The only hard part? This took 30 minutes to generate. Pretty rough. I’d like to think that if I worked on this I could probably do it faster (and validate it beyond just TS and linting). But it was nice being able to run this task in the background, do other things, and have it complete at some point.
AI Elements
After converting all the primitive shadcn components to Park UI, we can move on to the AI Elements.
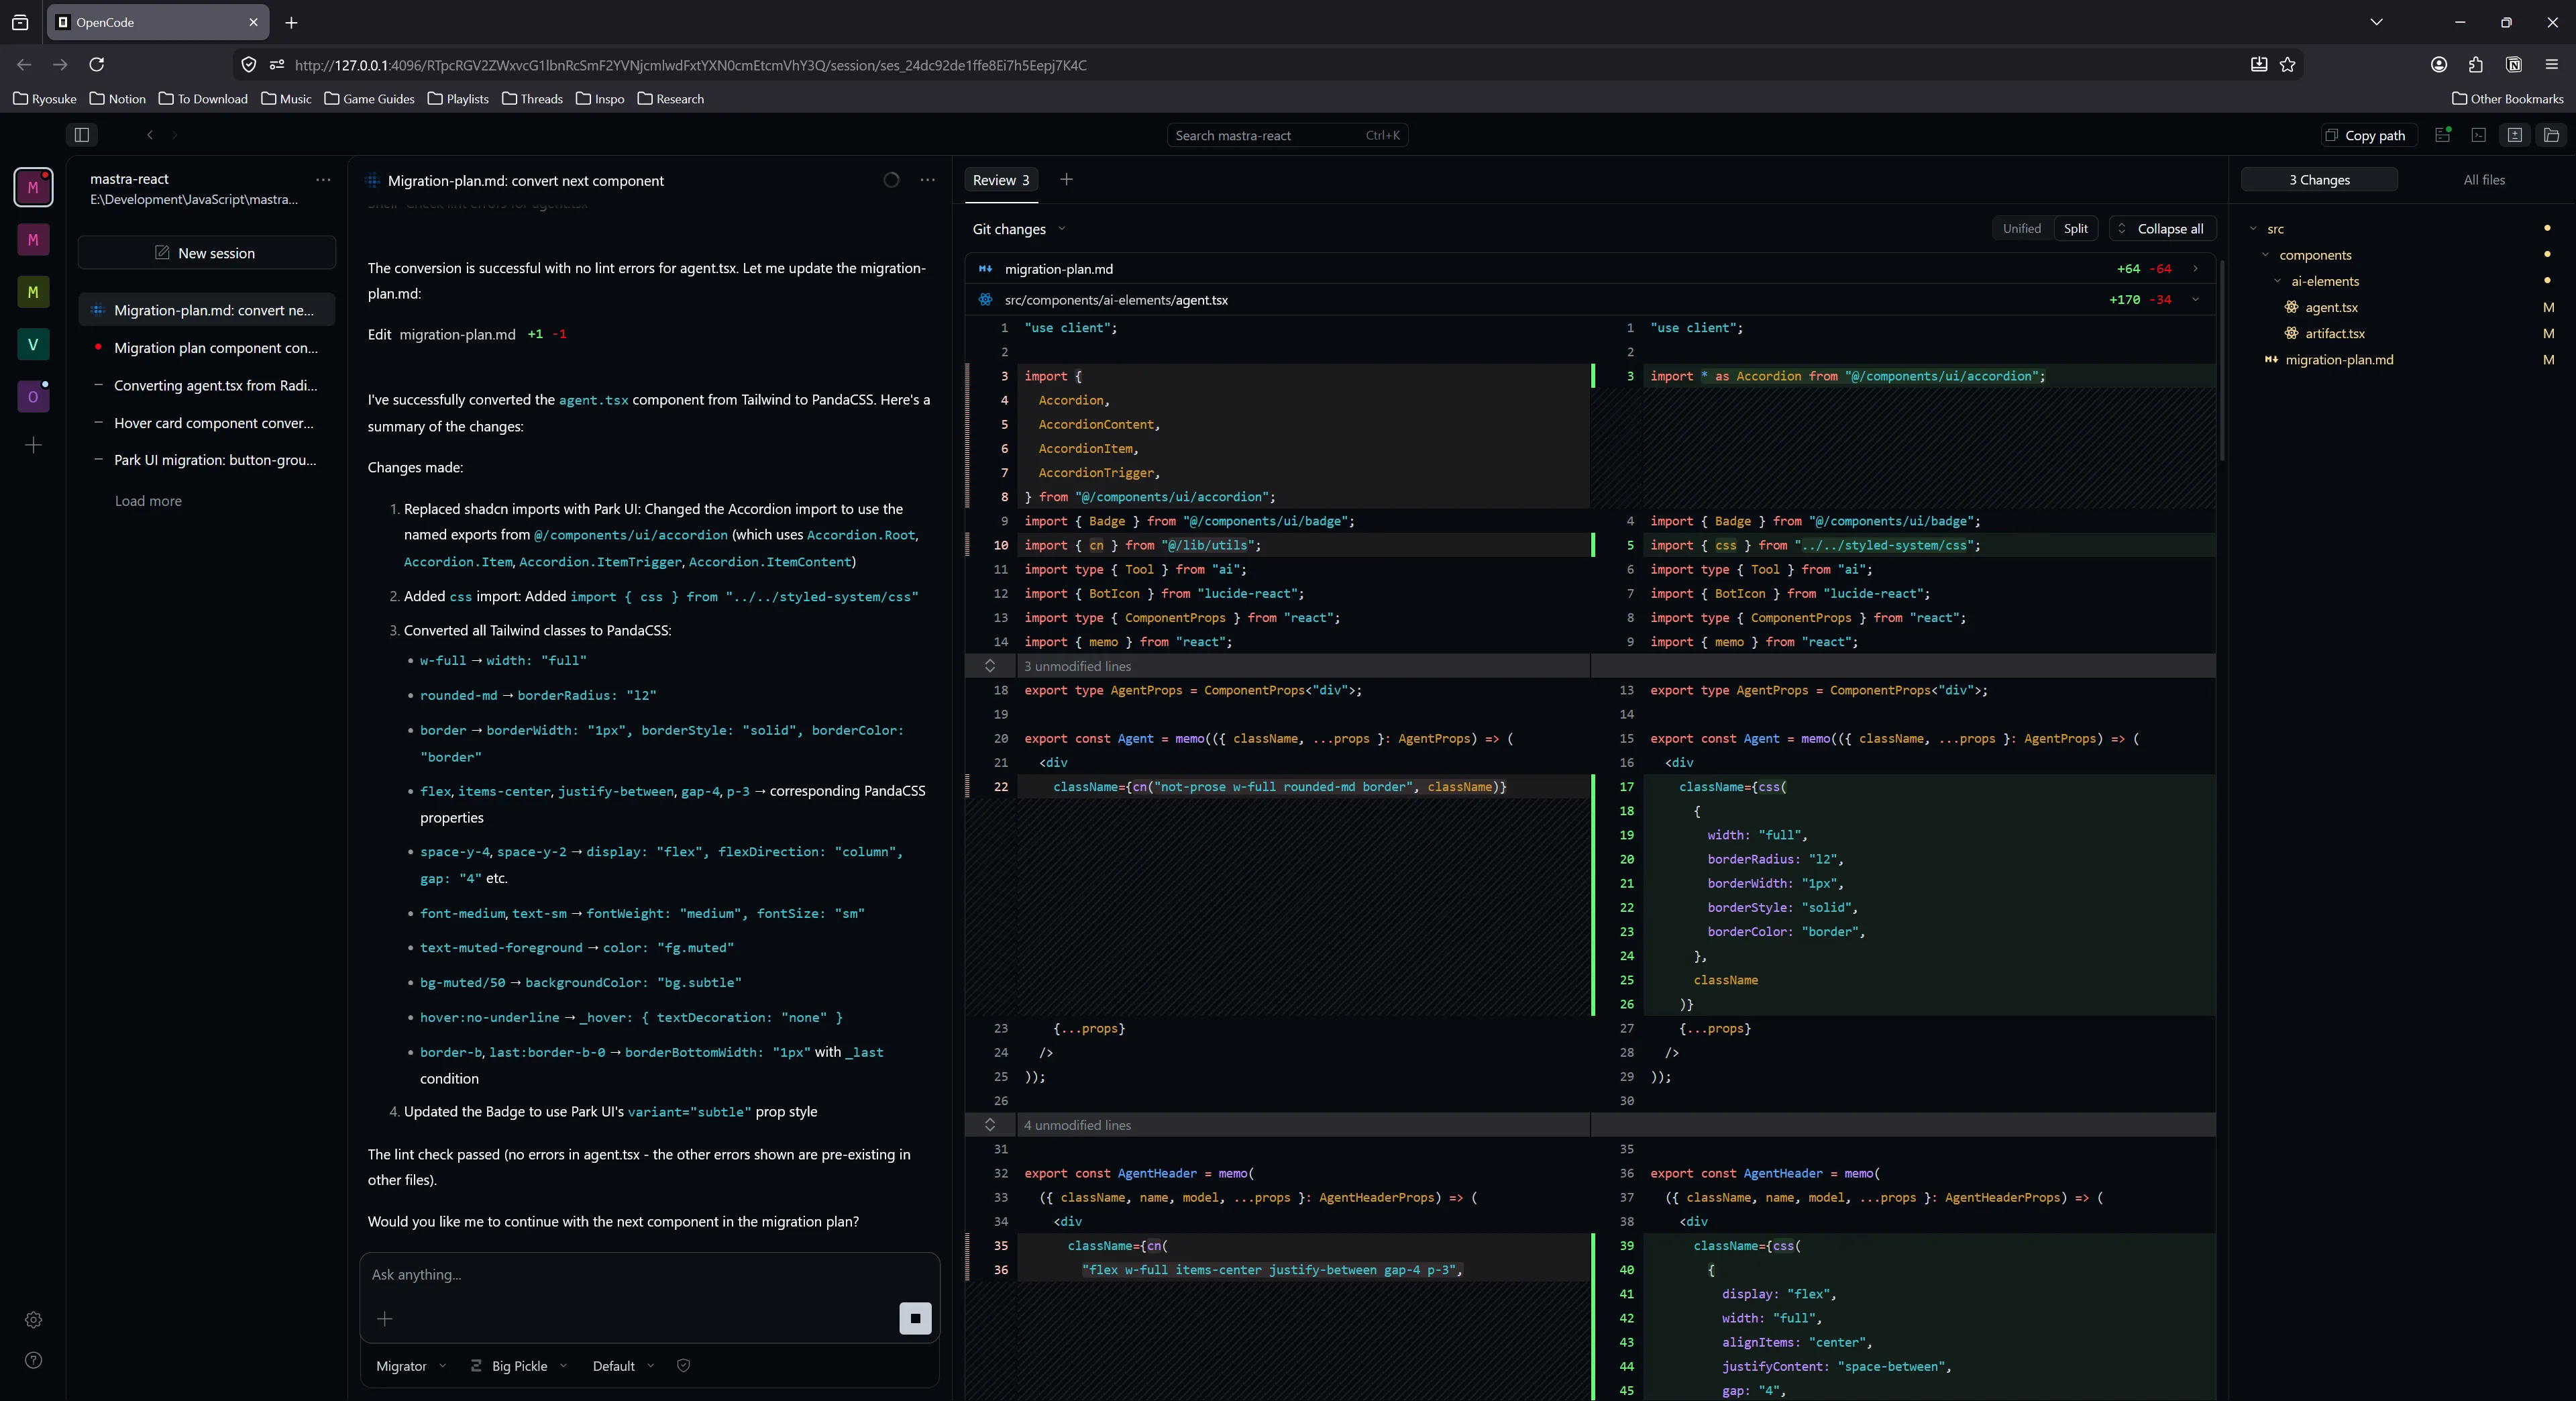
I started at the top of the list with the agent.tsx file. I ran this through Qwen with the same settings as last time.
Can you convert the @src\components\ai-elements\agent.tsx component from using Radix UI + shadcn to Park UI / Ark UI components? You can find components in the @src\components\ui/ directory.This time, the results were kinda whack, partially due to my prompt.
It generated a component, and converted shadcn components to Park UI — but it kept all the Tailwind styles. And if you notice, my prompt didn’t mention anything about converting styles this time, so it didn’t even consider it (each time I run these prompts, I’d start a fresh context to ensure my local LLM’s context isn’t overloaded).
It took 18 minutes to generate it, and it basically just swapped one Accordion component for another one. I discarded these results and continued on to automate the process a bit more.
Automating the process
This whole process…kinda works so far. Theoretically, if I wanted to keep going, how do we automate this so I don’t have to keep prompting one component at a time?
If we’re using a local model, we still want to do it 1 at a time. As we’ve seen, the context stacks up pretty quickly with a lot of tool calls so it’s imperative to wipe it clean after each component. But if we can simplify the prompting process, and encode some of the logic so we don’t have to repeat it (like telling it to convert Tailwind styles), that’s be cool.
For OpenCode, we can create a custom agent called a “migrator” that specializes in the conversion process. We’ll tell it to follow a “migration plan”, which is just a Markdown file we can store anywhere in our project.
---
description: "Tailwind to PandaCSS Specialist"
tools:
  write: true
  edit: true
  bash: true
---

You are an expert at migrating React components from Tailwind to PandaCSS.
Use the `migration-plan.md` file to track progress.

**Workflow:**

1. Read `migration-plan.md` to find the next unchecked component.
2. Open the file and convert it using PandaCSS best practices.
3. Verify the change (run build/lint).
4. Update the checklist in `migration-plan.md`.
5. STOP and ask the user for permission before moving to the next file.
ℹ️ If you’re familiar with using apps like Antigravity this flow might feel familiar, it’s how those apps handle their agentic workflow.
The migration plan acts just like the plan generated by the “plan mode” agent — where it just details instructions for the LLM to follow. I added a list of all the components as a checklist. Now the LLM can read this file and check it off as it goes.
# Tailwind to PandaCSS Migration Plan

**Goal**: Convert 48 components from Tailwind classes to PandaCSS `css()` or `defineRecipe()` calls. Also, swap the old shadcn components for Park UI components inside `src/components/ui/` folder.

## Rules

- Import Park UI components from `src/components/ui` and replace with any matching shadcn UI components (e.g. if you find an `Accordion` in conversion file, try to find matching component in `src/components/ui`).
- Import `css` from `../styled-system/css`.
- Place recipe files inside `src\theme\recipes`.
- Convert Tailwind classes to Panda object syntax (e.g., `px-4` -> `paddingX: '4'`)
- Prefer Ark UI or Park UI component style props (like `<Button colorPallette="blue">`) if possible over creating PandaCSS styles.
- Preserve all existing component logic and props.
- Run `npm run lint` after each conversion.

## Component Checklist

- [ ] src/components/ai-elements/agent.tsx
- [ ] src/components/ai-elements/artifact.tsx
ℹ️ To get the list of components I went into VSCode, selected them all in the browser list, and copied using the CTRL+C hotkey. This copied the files a list of relative paths which I used find and replace to add the checkbox in front of.
Once I rebooted my OpenCode, I can open it up in the web browser and switch over to my Migrator agent. Then we can just tell it to follow the plan - and it’ll go and grab the Markdown file we created, read it, and follow it’s instructions.

I tried this setup using my local Qwen setup and it took about 40 minutes to generate a single recipe for a component - and it didn’t update the actual component. So I just had styles. Fantastic.
Switching over to Big Pickle again, it’s much more successful, and it only takes 4 minutes to generate a component. You can see here it detecting the Tailwind styles and showing the Panda CSS equivalents, and the code snippet where it uses the css() function to define styles inline.
So as you can see, this process is pretty hit or miss depending on your setup (even on high end PCs like mine). You can definitely pursue this kind of workflow if it’s absolutely necessary and you have a lot of tokens (and cash likely) you’re willing to waste.
I’m still debating how I want to handle this process. I’m thinking about prototyping a few LLM experiences soon, and these components would be useful, but waiting basically 24 hours (likely more) for them to generate locally is pretty wild.
ℹ️ It was interesting, the migrator agent is programmed to stop at each component. And when I ran it with Big Pickle, it did, for the first 6. Then it just kept going. I think I said “keep it going” instead of “yes please”, and I wonder if that took priority over the migrator instruction.
Testing the cloud
I figured I’d try out the free model to see how much I’d be able to generate before it kicked me off. Turns out, I did all the components in one sitting.
Coming back after using Big Pickle, it worked fast (~2 hours for 48 components), but it made a few small mistakes (that multiplied across all the files). It would have benefited from a dry run of 1 component, testing and validating, then tweaking migration plan to adjust. But luckily the mistakes weren’t too bad.
For example, it imported styled-system relatively - which would be ok, but it was wrong about path - easy fix with find and replace across all files.
Or when it swapped the Tailwind styles, it correctly created css() calls, but it didn’t know how to handle passing down the className from the props, so it applied them incorrectly as an additional param to the css() call. Instead PandaCSS has a “class concatenation” cx function that combines them it could have used.
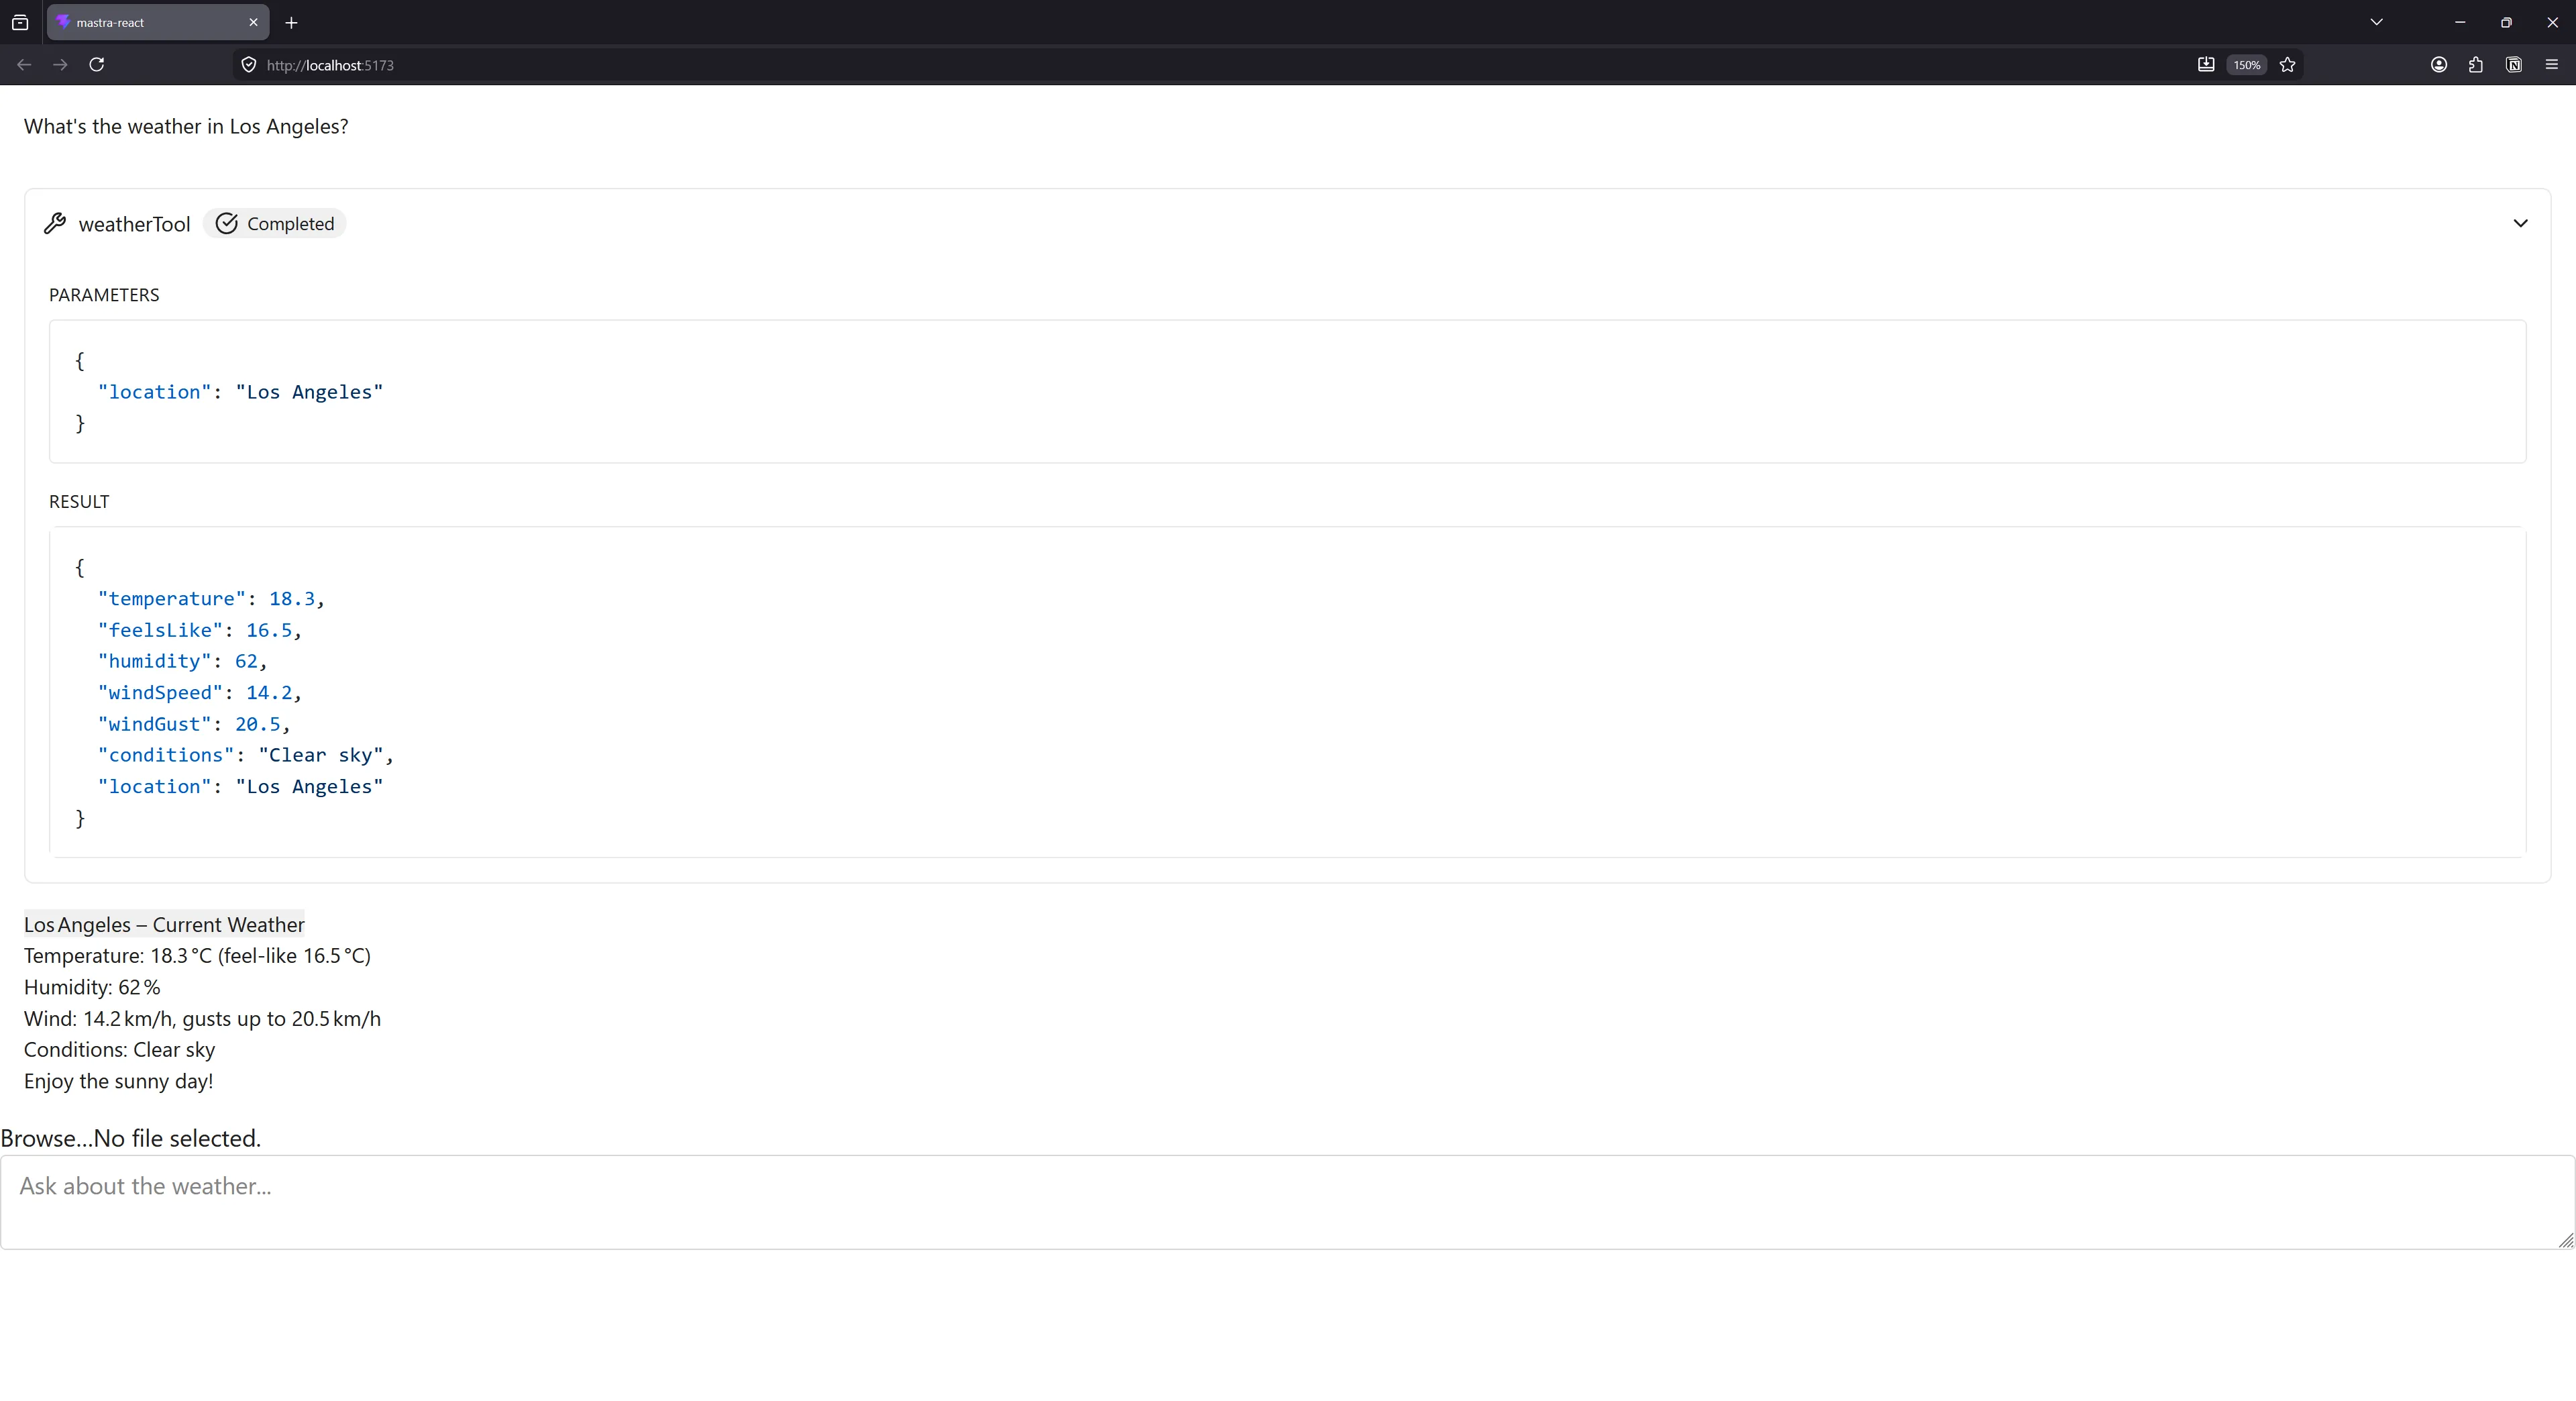
Here’s the final design. At least it’s more legible? And easier to work with than a slew of Tailwind classes. I’m able to now quickly go into any component and edit it’s css() function to edit or extend styles - or just use the style props to access design tokens.
And here’s the final codebase with all the converted components.
Final thoughts
The process works, but it’s a bit slow. If I do a local model, it takes 30 mins to do — if it doesn’t get caught in an infinite loop of failing or producing the wrong results. And that’s blazing my GPU at 100%. I can luckily still work on my PC - but nothing intensive like Blender or GPU work obviously. Cloud based models are a little faster, but even at 15 minutes, that’s a chunk of time for a single component. I also hit cloud limitations — like the requests failing during high traffic periods.
This process works well with cloud models — but that always feels like cheating. Yeah of course it runs well on a Ferrari most people can’t even afford. For local use, the Qwen Coder model worked much better than the GPT model. The GPT model struggled with tool calls and agentic workflows. Gemma worked ok, but it was much slower than both Qwen and GPT (usually 2x as slow).
Park UI touts being “AI friendly” because the UI code is inside library — but I found that the LLM still tried doing web searches for component examples. Ultimately, even if LLM has the entire source code, it doesn’t inform it how to use it without it crunching on it and making assumptions. This might be improved by adding comments to code files with examples (at risk of bloating context), or utilizing an MCP to provide code snippets. Having some provided would probably reduce tool calls scrambling for web and file searches.
LLMs struggled with PandaCSS layer. Even cloud one had to go back and forth checking my “recipe” files to verify the correct syntax because it was unsure of itself. Even as a developer, it’s definitely a lot to juggle (recipe vs slots and variants - there’s a lot to grok). This might also be improved with a skill or MCP server.
There’s also some 3rd party libraries you can have the LLM use, like tw2panda, which converts Tailwind classes to Panda CSS definitions. This ensures the LLM doesn’t have to “guess” (which can lead to hallucinations depending on context size and temperature). Or better yet, skip the LLM and just make your own migration script using the tool (like most people do for big version updates in design system).
Overall shadcn-style components worked ok, but the format of shoving everything in 1 file is problematic. You can see it in the AI Elements prompt-input.tsx file - it’s over 1400 lines long and has like 20-30 components inside. I get the need to “copy and paste” but at a certain point it’s overkill. Files like that become harder for the LLM (and humans) to process without bloating the context.
Time saver? Electricity blazer.
I’m still going back and forth how efficient this process was. Having a process take 15-30 minutes and sometimes fail and not produce any good output isn’t very useful. And as much as I can multi-task, it takes more effort to keep one feature in my mind while also prompting the LLM with other features (and constantly reading it’s code to validate and approve it’s to my standards). And like I mentioned, if it’s only efficient on an expensive cloud service — the cost evaluation is much different. Suddenly that time is money and I can measure it more clearly to my own output.
Was the bread worth baking in the automated bread making oven if the oven costs $10k to run a month and makes 100 loaves, versus me using a regular oven and my hands making 50. Ultimately we’re just making bread, so the product is the same price to the consumer, and if anything I have to make the automated one cheaper (despite the higher maintenance cost).
Maybe for a particularly nasty API this would be useful. Like dealing with low level code, graphics programming, or old audio plugins or something. Or being forced to convert components from React to a new - likely internal or custom - paradigm (like Penpot’s UI layer). But even then, it’d require those APIs to be documented enough for the LLM to get the context it needs for conversion. And as anyone knows - lots of monitoring to avoid hallucinations or slop.
Like I’d like to imagine this would be nice for converting a large design system at scale, but with how much fine tuning I have to do with the prompt making (and testing/research/writing to get there — like defining better code standards in a skill) - it almost outweighs the benefit. By the time I finish teaching the LLM how to code correctly I could have made some progress myself. And I try to imagine this at scale, and it sounds like a good idea, but I’d need a slew of validation layers to ensure there’s no hallucinating happening across an even larger vector. It definitely helps if you’re converting from an existing project with a solid testing framework, as you can use tools like UI snapshots to verify the new UI is formatted correctly - or unit and integration tests to validate props and functions.
But I must say, it was definitely convenient taking 50+ components and automating their conversion from one paradigm to another. I can use the AI Elements library now and integrate it more effectively into a design system I enjoy more. Even if there were mistakes and some styles were slightly off — the amount of work that got done correctly was enough for me to quickly polish and take it over the finish line (for prototyping standards anyway). If only it didn’t require building immense water and electricity sucking pollution machines to accomplish. I’d be much happier if this all feasibly ran on my pretty high end consumer grade PC (and honestly, more efficiently without my CPU and GPU working the same as it does when I render Death Stranding 2 in 4k full settings).
Are you experimenting with LLMs and code generation? What’s your process like? I’m interested in seeing what other devs are cooking up. And as always, if you enjoyed this article, make sure to share it on socials and consider contributing to my Patreon.
Stay curious, Ryo