Posted on
November 19, 2025
I’ve been working on a research app that leverages a local LLM to enhance the learning experience. You can upload Markdown or PDF files and use them as context for your chats. Part of this process involves searching for documents based on relevance to the user’s chat, which requires using a vector database for storing the documents and querying them. I’d never used one before, and since the app has to be offline-friendly, this was quite an interesting project to setup.
In this blog I’ll break down how I added a SQLite database to my Tauri app, and specifically, how to use it as a vector database. I’ll treat it like a real world application, so we’ll see how to make and manage other database tables and with this setup (like a “documents” table with the files we’re analyzing). And we’ll even make a migration system to handle setting up the database.
ℹ️ This will be focused on the intricacies of setting up a vector database from scratch in Tauri. I recommend learning about Tauri before diving into this one, maybe check out one of my previous blogs. I also won’t cover the technical aspects of why I’m using the vector database (aka how LLM embeddings work), that is covered by the case study for this app.
The Constraints
Before I dive too deep into the implementation, let’s zoom out to a macro perspective to understand what I’m making, that way we can understand why our tech stack looks the way it does.
The app
I built a local AI-powered notebook app that lets the user create “projects” that represent different areas of study (like say a WebGPU notebook). Inside each project, the user can upload documents like PDFs and save them to the app’s file storage.
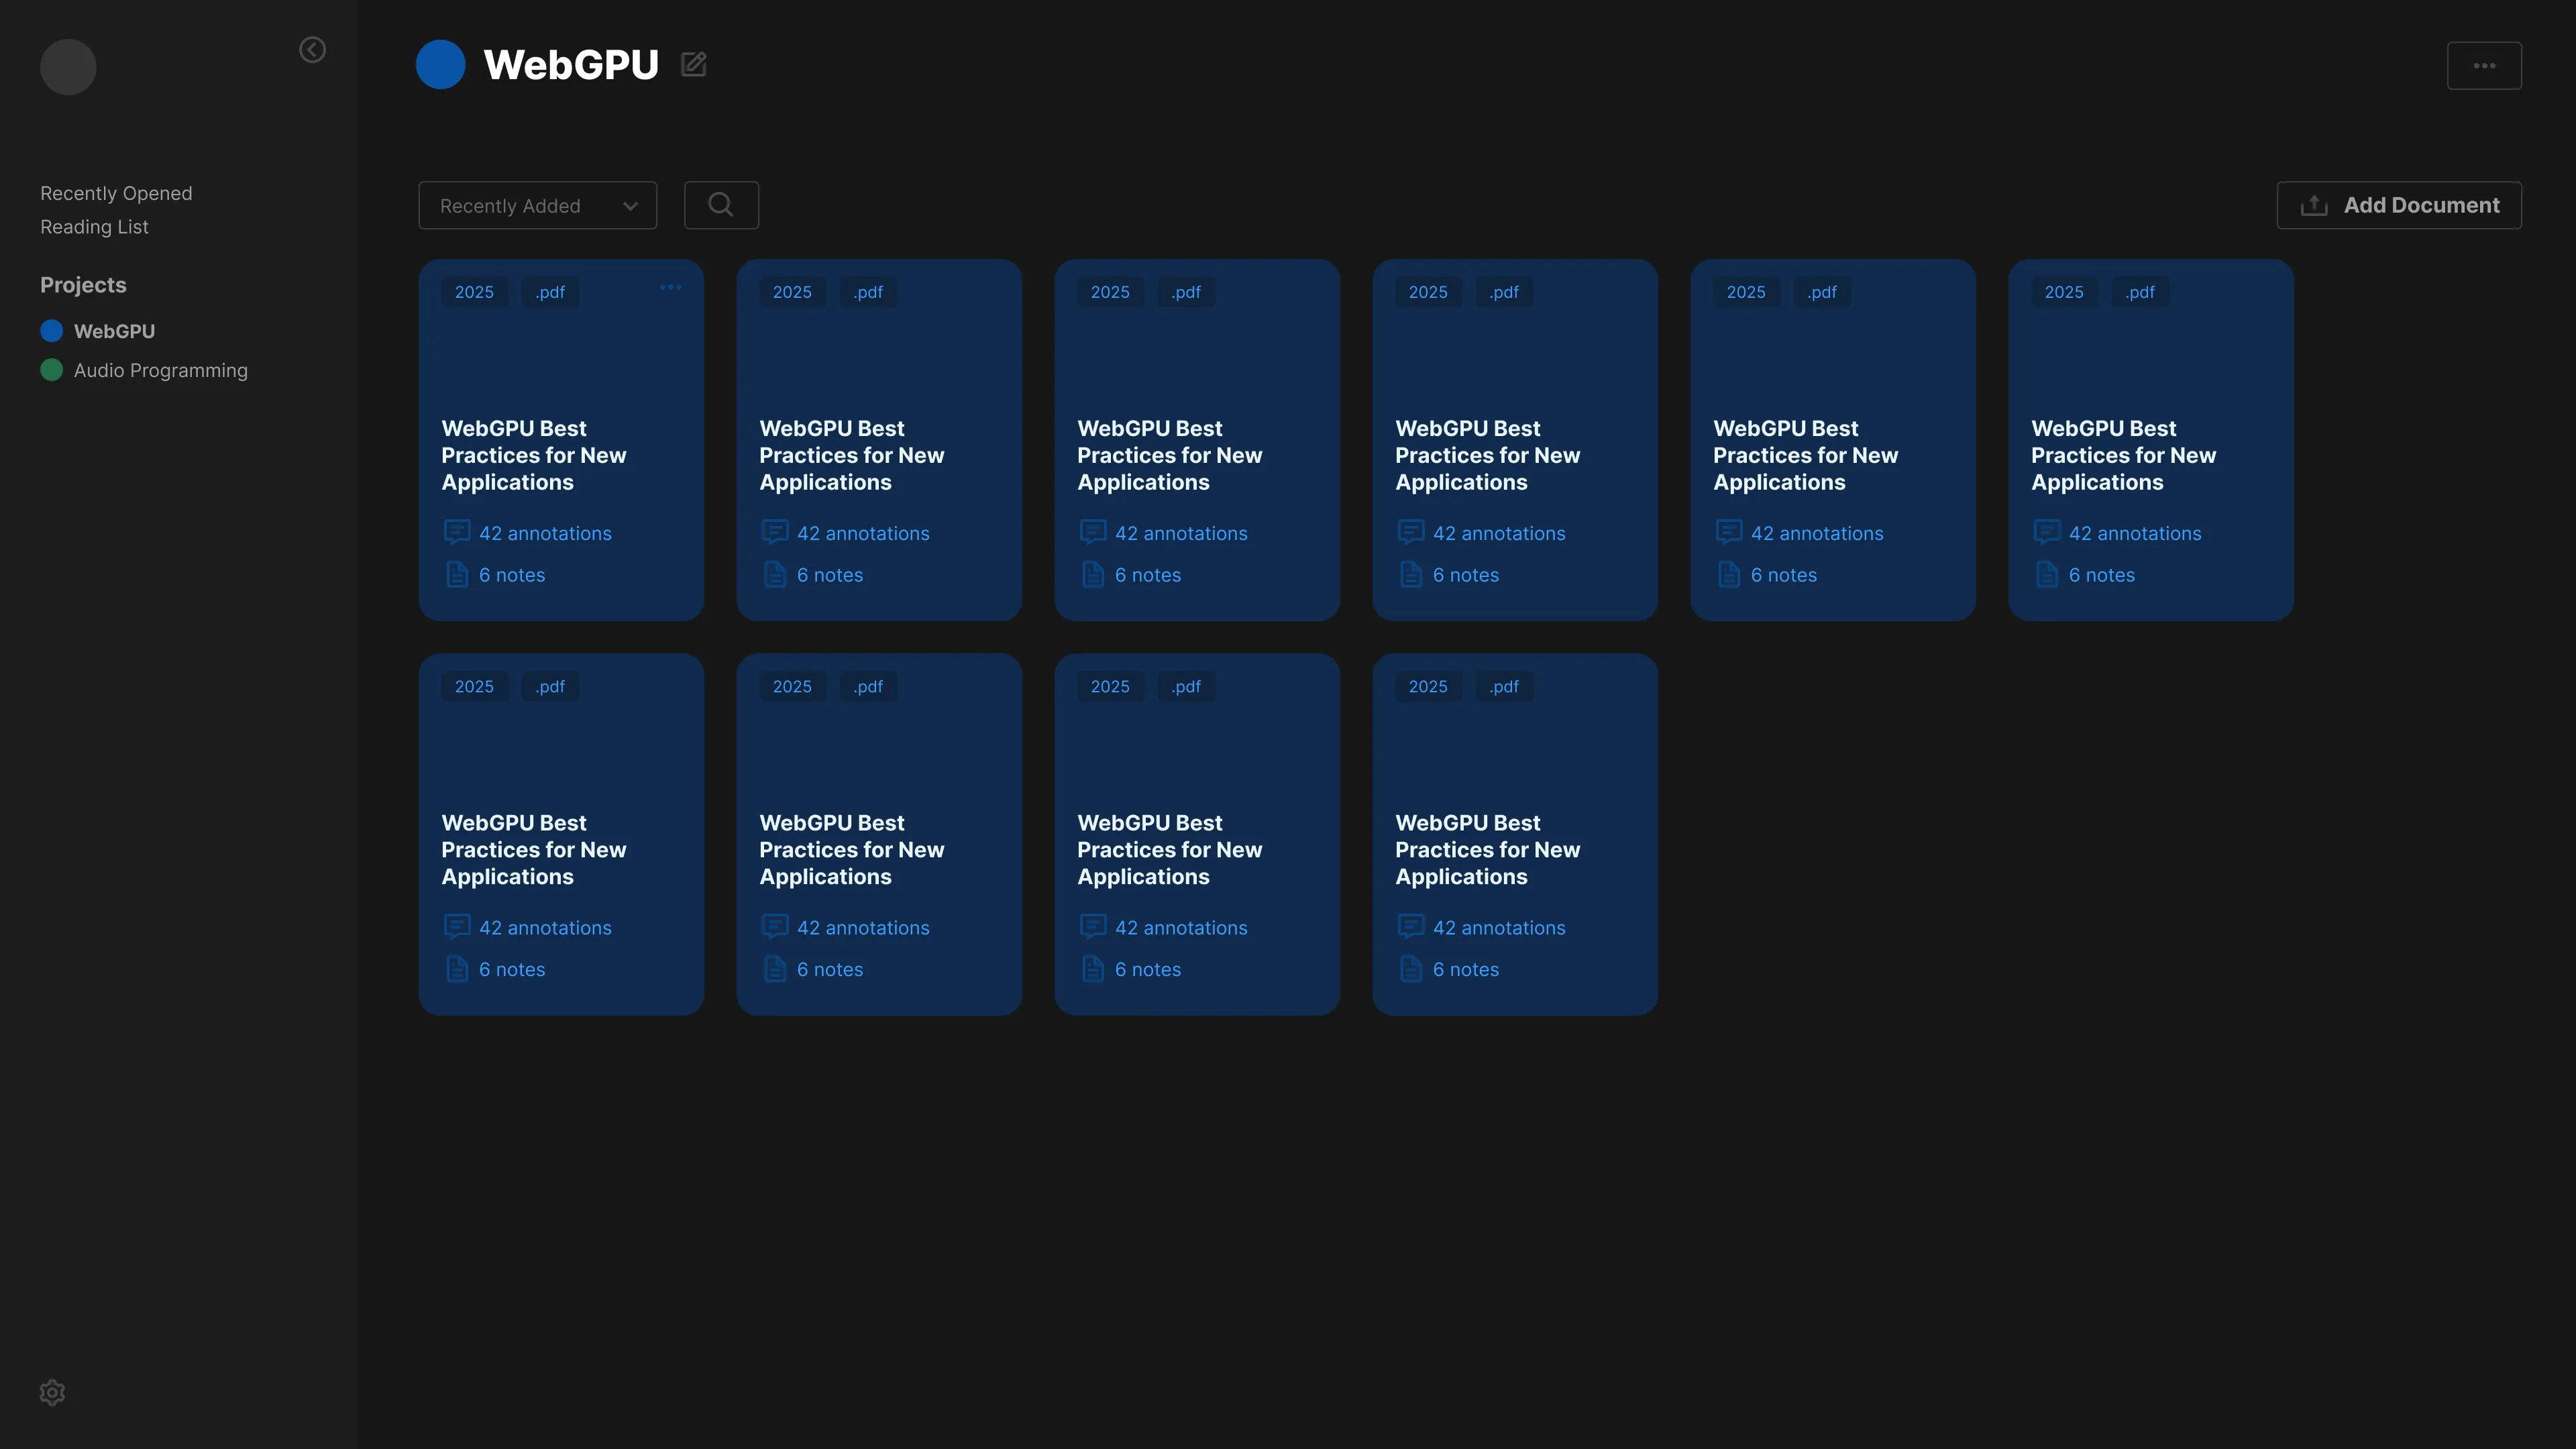
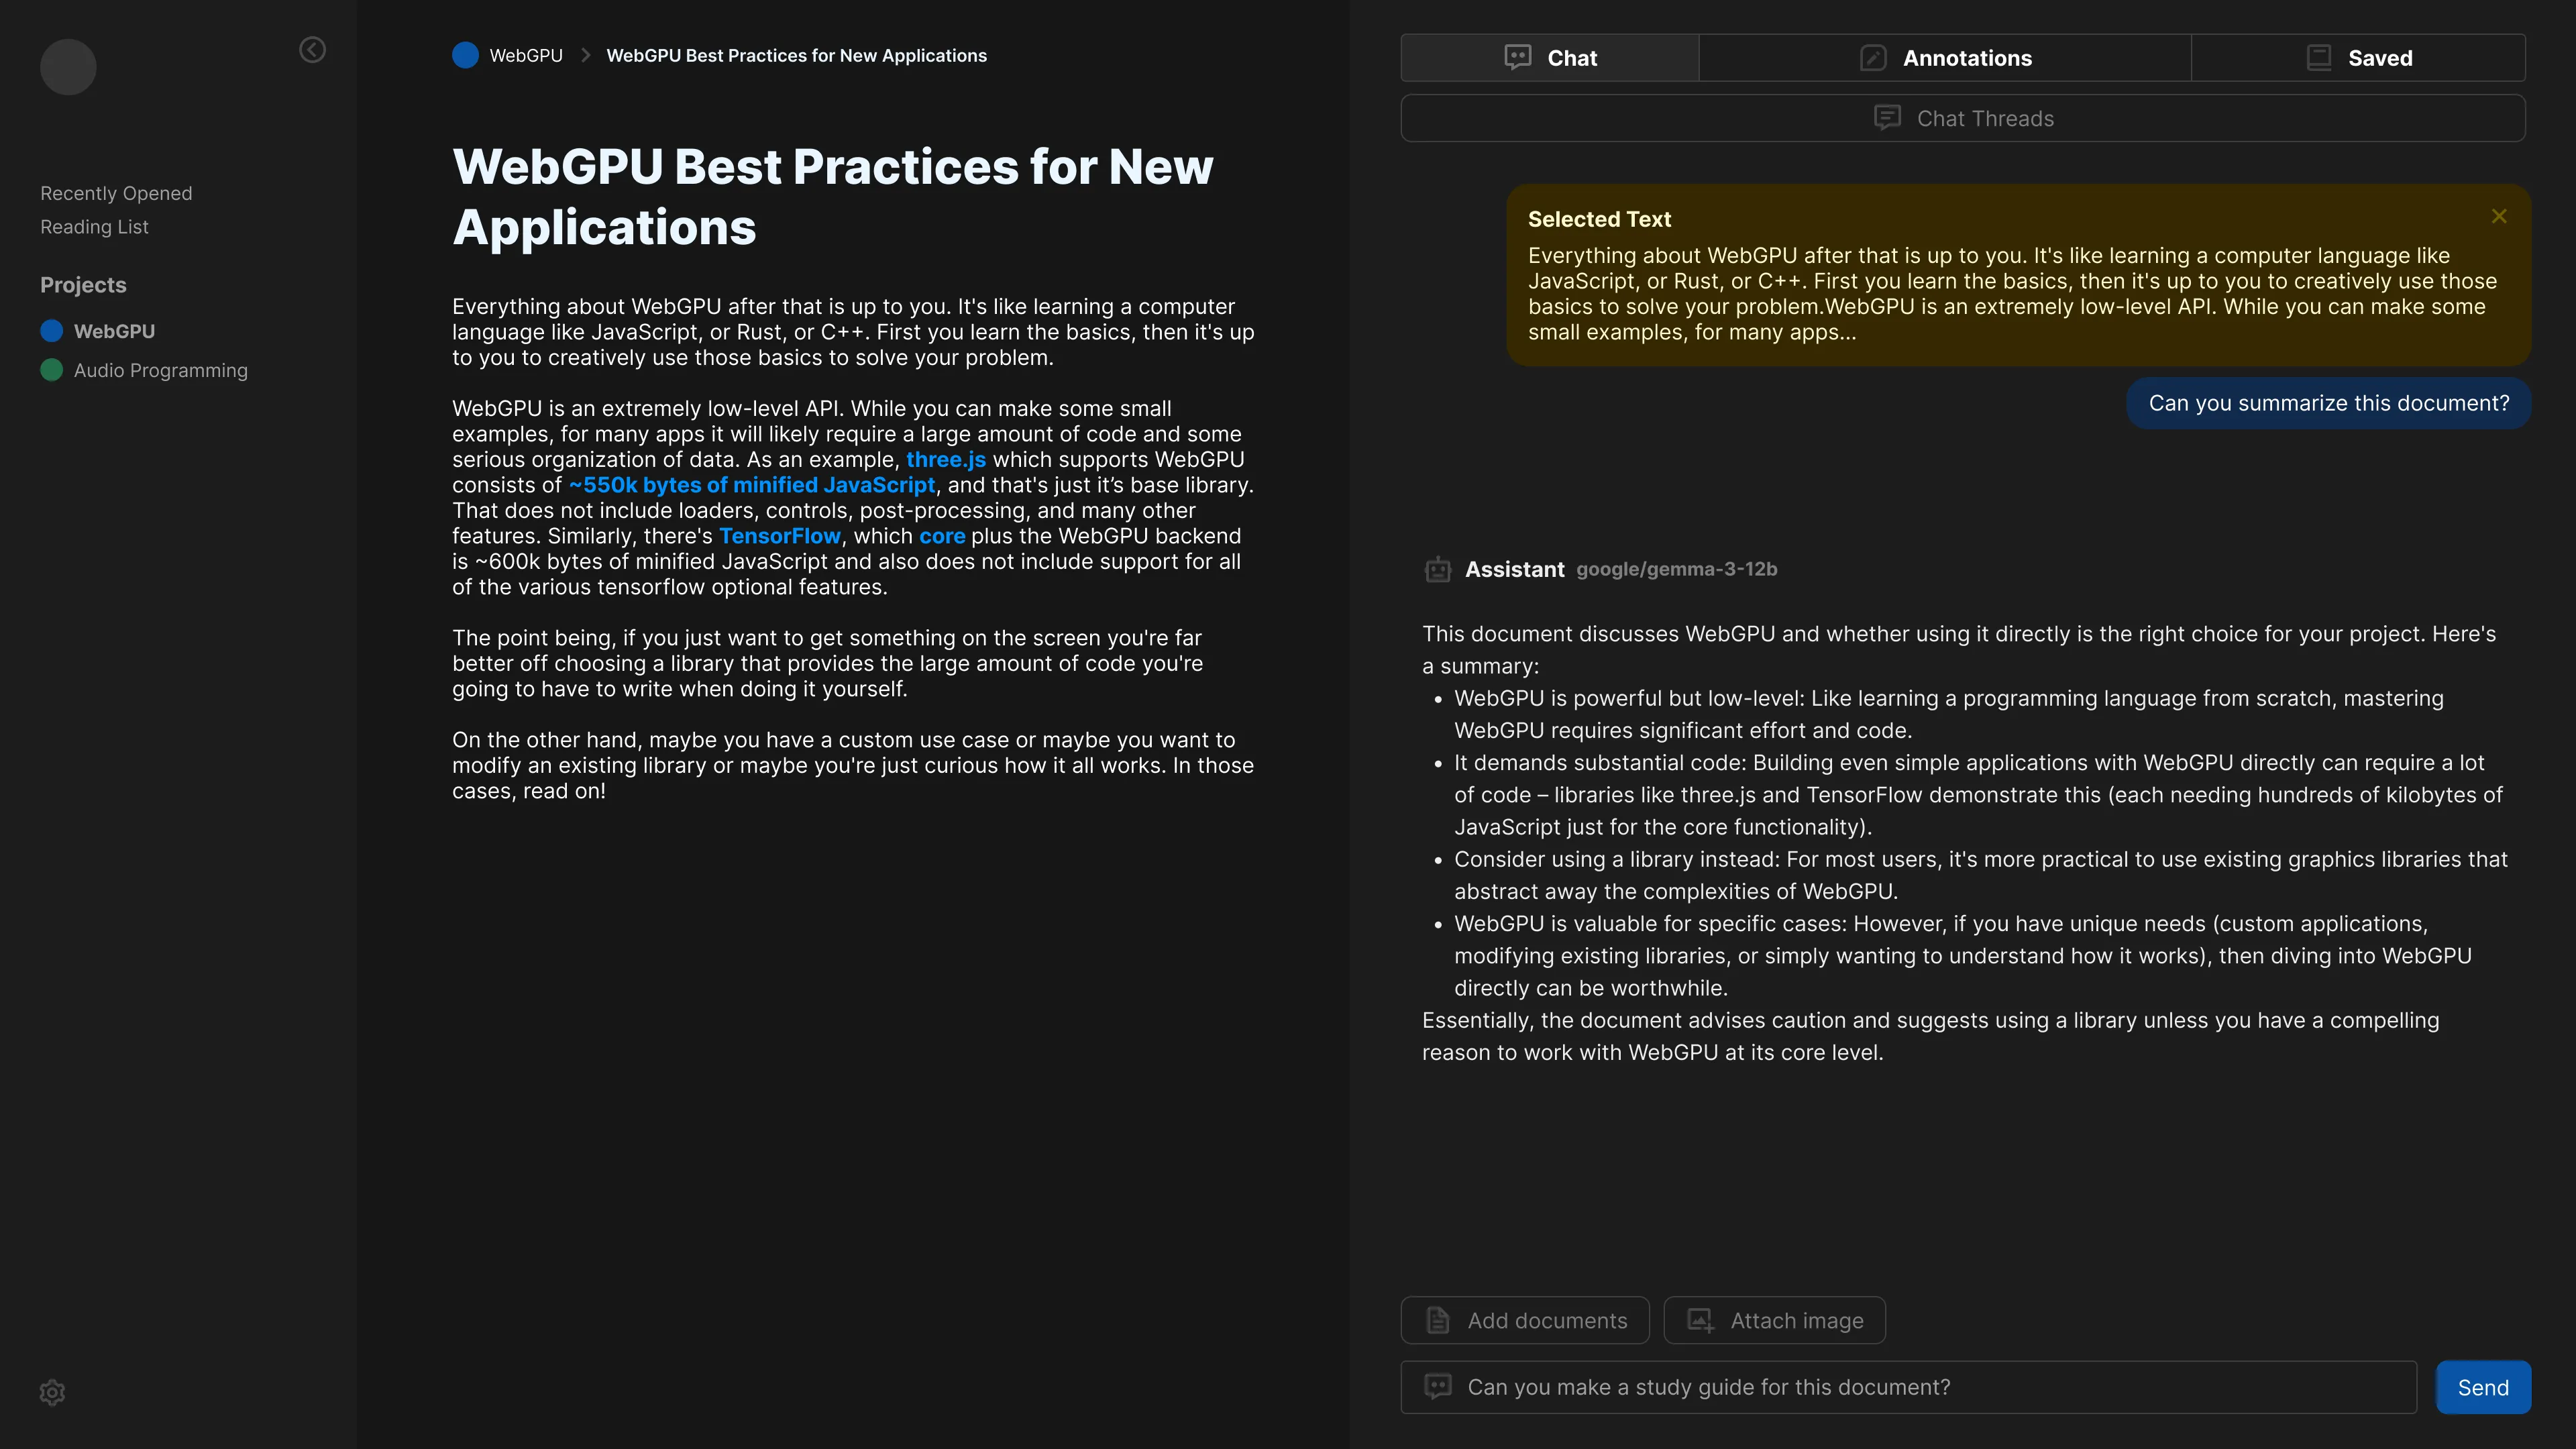
Each document appears as a card in the project view, and when you click it, it takes you to a document view. The document view contains a live preview (like the rendered PDF), along with selectable text for reference, and a sidebar with a chat connected to a local LLM.
The user can type messages to chat with the LLM, and then use their chat to search for related documents to attach as context. Or they can select text and send that directly. The LLM receives the additional data and chat, then returns an appropriate message that’s rendered in the app’s chat box.
The whole process is kind of similar to cloud-based apps like Google’s NotebookLM. But my goal was to make it completely offline-friendly, so your documents are completely safe and only run through AI models you control and approve of. This provides a bit more flexibility over NotebookLM, where you can change up the model for better results (like using a math-focused model, or just using a larger model).
The app connects to a local LLM using API requests, assuming it’s an OpenAI compatible structure (aka using the old-school “completions” endpoint and whatnot).
ℹ️ You can read more about this app in my case study on my blog.
The requirements
- Local cross-platform app
- Offline-friendly
- Local file + data storage
- “Uploading” documents and storing their metadata - like the file name or path
- Analyzing documents and storing embeddings for AI search and context
What I tried initially
Storing data in local storage
This process actually works really well for prototyping, and I honestly would just stick with it in the future if I didn’t need to ship the app to production, or needed something to scale better (since local storage is limited to 5MB).
Essentially all the data, from the document metadata - to the vector embeddings, was all stored inside separate Jotai “atoms” (aka data stores). And each atom was persisted to local storage using a simple wrapper they provide called atomWithStorage.
export type Project = {
  id: string;
  name: string;
  color: string;
  description: string;
  date_created: string;
  // documents: string[];
};

type ProjectStore = Project[];

export const projectsStore = atomWithStorage<ProjectStore>("projects", []);
One of the limitations with this setup was when you needed to search for vector data. You can get all the embeddings from the storage, but to actually “search” them we needed to run a cosine similarity function from the JavaScript side to filter the embeddings by relevance. This also worked fine at smaller scale, but with larger apps and embedding sizes it gets slower.
Being able to use the SQLite database to do a vector-based search would be much faster. And we get different sorting options beyond our simple cosine method — like euclidean distance (aka L2).
Rust-based ORM
You’ll notice soon that I end up using a JavaScript based ORM as part of the tech stack. I initially tried searching for a Rust option, since the Tauri backend is written in Rust.
Why use an ORM? Since we’re using a SQL database we need to query it using, well, SQL. And that sucks. So if we can avoid that and use a simpler API, that’d be more productive for developers - and keep them safer from improper SQL use.
But the only major option was Diesel - and it didn’t support sqlite-vec (an extension used for adding vector support to SQLite) out of the box. Instead, we’d need to build the sqlite-vec library into cross-platform binaries (aka 3 different files), then load those and run a special LOAD_EXTENSION SQL statement with them. I wasn’t a fan of having to build a library and/or store it’s binaries in my app. If I’m having to write a pre-build script to build other dependencies in this project, it’s getting more complex than I want it to be for a side project.
The stack
With all of these features considered, I ended up with the following stack:
- **Tauri** - Framework for creating cross-platform apps using Rust and web technology (like ReactJS in my case)
- **SQLite** - This is a SQL database that persists to disk as a
.dbfile. - sqlite-vec - An extension for SQLite that enables you to store vector data.
- **rusqlite** - Rust library for connecting to SQLite databases. Supports sqlite-vec.
- Drizzle ORM - This is a JavaScript library for managing databases. This includes a CLI to automatically generate migrations as
.sqlfiles.
How to follow along
If you create a Tauri app with a React frontend you can follow along, but I’d recommend using my project, as there’s lots of specific settings I enabled (like enabling file system support).
And as always, feel free to browse through the commit history to get a sense of how things naturally were assembled (versus the final perfect picture painted here).
Creating embeddings
Before we create a vector database, let’s create the data we’d store inside of it.
In my app, we have a PDF viewer that can load multiple PDF pages. It uses pdf.js under the hood to render the PDF - as well as grab raw text from pages.
For each PDF page, we basically combine all the text together from one page, then break it up into “chunks” — just in case the text is very long. It also helps break up the text into “thoughts” which provides the LLM better context, and gives us better searching.
// Combine each PDF page's text into context-friendly chunks
// We limit each chunk by a certain token amount so it can fit within a query
// Go too small here and searching docs becomes unreliable. Best to keep at minimum 400 characters.
let dataset: string[] = [];
let currentItem = "";
rawTextItems.map((rawTextItem) => {
  // Check if item exceeds max
  const testItem = currentItem + rawTextItem;

  // We take the text and check how many LLM tokens it represents
  const tokenCount = countTokens(testItem);

  // console.log("tokenCount", { tokenCount, length: testItem.length });

  if (tokenCount > MAX_TEXT_LENGTH) {
    // Add text to stack
    dataset.push(currentItem);
    currentItem = "";
  }

  currentItem += rawTextItem;
});

// Convert the data to "embeddings" for AI context
//   console.log("creating embeddings...", dataset);
const embeddings = await processChunksToEmbedding(dataset);
These chunks get run through a function that handles the “embedding” process. That basically means we take each text chunk and send it to a smaller AI model specifically tuned for parsing text. Since we’re using an OpenAI compatible API, we can use the /v1/embeddings endpoint to generate them.
async function generateEmbeddingsForTextBatch(
  chunks: string[],
  modelName: string = LM_MODEL_TEXT_EMBED,
): Promise<DocumentEmbedding[]> {
  const embeddings: DocumentEmbedding[] = [];

  try {
    const response = (await invoke("create_embeddings", {
      data: {
        model: modelName,
        input: chunks,
      },
    })) as CreateEmbeddingResponse;

    if ("error" in response) {
      throw response.error;
    }

    // Process the response data
    response.data.forEach((embeddingData, index) => {
      embeddings.push({
        text: chunks[index],
        embedding: embeddingData.embedding as number[],
      });
    });
  } catch (error: any) {
    console.error("Error generating embeddings:", error);
    // Re-throw to handle upstream
    throw error;
  }

  return embeddings;
}

export async function processChunksToEmbedding(chunks: string[]) {
  const embeddings: DocumentEmbedding[] = [];
  try {
    const chunkEmbeddings = await generateEmbeddingsForTextBatch(chunks);
    embeddings.push(...chunkEmbeddings); // Spread the results into the main embeddings array
  } catch (error) {
    console.warn(`Error processing batch. Retrying later...`);
    // @TODO: Handle retry edge case
  }
  return embeddings;
}
I initially tried doing it on the frontend, and I think I was getting CORS issues or something, so I ended up creating a Tauri command that runs the POST request on the backend. This mean I had to install the Tauri HTTP plugin to access their API for making fetch requests. This was basically a wrapper around reqwest, a popular Rust crate.
async fn post_ai_api(url: &str, data: &serde_json::Value) -> Result<serde_json::Value, String> {
    use tauri_plugin_http::reqwest;

    let client = reqwest::Client::new();

    let res = client
        .post(url)
        .json(data)
        .send()
        .await
        .expect("Failed to POST");

    println!("{:?}", res.status()); // e.g. 200

    match res.json().await {
        Ok(data) => return Ok(data),
        Err(error) => {
            eprintln!("Error deserializing JSON: {}", error);
            // Return the error to the frontend
            return Err(format!("Error deserializing JSON: {}", error));
        }
    };
}

/**
 * Creates embeddings using OpenAI. Expects user to send JSON as string.
 */
#[tauri::command(async)]
async fn create_embeddings(data: serde_json::Value) -> Result<serde_json::Value, String> {
    let url = format!("{}{}", AI_API_URL, "v1/embeddings");
    post_ai_api(&url, &data).await
}
And with all that — we essentially take text like this:
Sed tincidunt diam at elit pretium ultrices. Ut velit velit, malesuada non tincidunt nec, consectetur nec anteAnd turn it into this:
const embedding = [
  0.123, -0.456, 0.789, -0.234, 0.567, -0.89, 0.345, -0.678, 0.901, -0.123,
  0.456, -0.789, 0.234, -0.567, 0.89, -0.345, 0.678, -0.901, 0.123, 0.456,
  -0.789, 0.234, -0.567, 0.89, -0.345, 0.678, -0.901, 0.123, 0.456, -0.789,
  0.234, -0.567, 0.89, -0.345, 0.678, -0.901, 0.123, 0.456, -0.789, 0.234,
];
Cool. This is a vector representation of our text, where each vector represents “tokens” from our text (maybe a letter or chunk of letters) and their weight according to the model. We can use this data to search for documents later. To give you a good picture, for a single PDF page with a few paragraphs, we might have 6 embeddings.
ℹ️ If you’re interested in this process, check out my case study for this app where I go into more depth.
Now we have the data we want to store inside our database, let’s start setting that up.
Introducing sqlite-vec
So we need to save data to a database, we want it to be local, and we need to be able to save and query vector data. Immediately the first thing that comes to mind for local database is SQLite. It’s the best option off the shelf with lots of libraries that support it.
But by default, SQLite doesn’t support vector data - it’s pretty simple with only text and integer types basically. That’s where sqlite-vec comes in. This library is the foundation of our setup. It’s an extension for SQLite that enables you store vector data inside the database.
Once this extension is enabled, when you create a “vector” table it generates additional tables that handle storing the vector data as segments of BLOBs.
-- This is the SQL to generate a vector compatible table using sqlite-vec.
CREATE VIRTUAL TABLE embeddings USING vec0(embedding float[1024])
And when you query for data, it can use vector math equations for measuring the “distance” between the vectors.
SELECT
    rowid,
    distance
FROM embeddings
WHERE embedding MATCH :embedding_data --the embedding as byte code
ORDER BY distance
LIMIT 3
I picked this library specifically because it was the top option when searching, it seemed to be a successor to another popular option, and it was supported by Mozilla.
The table structure
What actually happens when we create our VIRTUAL vector-compatible table? We actually create a few database tables:
embeddings- The virtual table. Doesn’t actually contain anything.embeddings_vector_chunks- This is where the vector data is stored. Each row has aBLOBthat contains the array of numbers (aka vectors).embeddings_chunks- This is metadata for each chunk, like it’s size and associated row IDs.embeddings_rowids- This is where each “item” we create goes. We get a new row ID that represents a single “embedding” we inserted, and it associates it to a certain chunk segment.
As a user of sqlite-vec, you don’t really need to know anything about these. You just query the embeddings table and it handles the logic behind finding the correct chunk in the BLOB and whatnot. I discovered this when I tried to add a property to the table and wondered why it wasn’t working, leading me to inspect the DB structure.
Adding more properties
My first inclination when working here was to add more properties to the vector table (like a foreign key to a document, to associate an embedding with specific doc). But that didn’t work.
CREATE VIRTUAL TABLE embeddings USING vec0(
	embedding float[1024] NOT NULL,
	content TEXT NOT NULL,
	doc_id TEXT NOT NULL
)
I was able to get it working by removing the extra NOT NULL properties.
CREATE VIRTUAL TABLE embeddings USING vec0(
	embedding float[1024] NOT NULL,
	content TEXT,
	doc_id TEXT
)
Though this limited the structure of the table. For example, we can’t have a foreign key that relates the embedding to a document. We can set a doc_id to relate it, but it won’t have the same automated assurances as a foreign key assignment (like deleting embeddings automatically when related docs are deleted from database).
Instead, I had to create a separate embeddings_metadata table that contains all the special properties I wanted to add to the embeddings table. This metadata table creates a relationship between the documents and embeddings table. Basically anytime we created an embedding, we had to get the ID of the embedding and also create an entry in the metadata table with it (2 step process).
Now let’s see how we can set this up with Tauri.
SQLite and Tauri
How do we setup SQLite inside Tauri? Normally you’d just use the Tauri SQL plugin, which exposes a Database module you can use to connect to a database and query it.
// Example from https://v2.tauri.app/plugin/sql/#usage
import Database from "@tauri-apps/plugin-sql";

const db = await Database.load("sqlite:test.db");
await db.execute("INSERT INTO ...");
You can see here that we load a SQLite DB from disk (in this case test.db). By default the database is stored inside the “app config” folder. If it doesn’t exist, the Database module creates it.
This works great if you need to use SQLite without any extensions. But since we need to use sqlite-vec, we’ll need a different setup.
ℹ️ Regardless if you use the Tauri SQL plugin or not, you’ll probably need the kind of architecture I’ll be introducing here (like data models and migrations). This is all pretty applicable to any database scenario - Rust or not.
Introducing rusqlite
According to the sqlite-vec docs, for Rust apps they use the rusqlite crate to connect to SQLite. Here’s the example from the docs:
use sqlite_vec::sqlite3_vec_init;
use rusqlite::{ffi::sqlite3_auto_extension, Result};
use zerocopy::AsBytes;

fn main()-> Result<()> {
    unsafe {
        sqlite3_auto_extension(Some(std::mem::transmute(sqlite3_vec_init as *const ())));
    }

    let db = Connection::open_in_memory()?;
    let v: Vec<f32> = vec![0.1, 0.2, 0.3];

    let (vec_version, embedding): (String, String) = db.query_row(
        "select  vec_version(), vec_to_json(?)",
        &[v.as_bytes()],
        |x| Ok((x.get(0)?, x.get(1)?)),
    )?;

    println!("vec_version={vec_version}, embedding={embedding}");
    Ok(())
}
The most notable thing here is the sqlite3_auto_extension() function that initializes sqlite-vec for us. This function comes from rusqlite, which essentially uses an underlying SQLite C function to activate the extension.
If we wanted to set this up with Tauri’s SQL plugin (which is sqlx under the hood) — or really any other Rust-based SQL crate (like say Diesel ORM) — we’d need to manually load the extension by building the binaries for each platform (basically 3 different files), then loading the right one for each platform, and finally running some LOAD_EXTENSION SQL with it included.
ℹ️ In the future I might explore this for a more serious project, because figuring this out would probably be worth it to get to use Diesel’s toolkit (instead of Drizzle - which creates a layer of separation from Rust backend).
Integrating rusqlite with Tauri
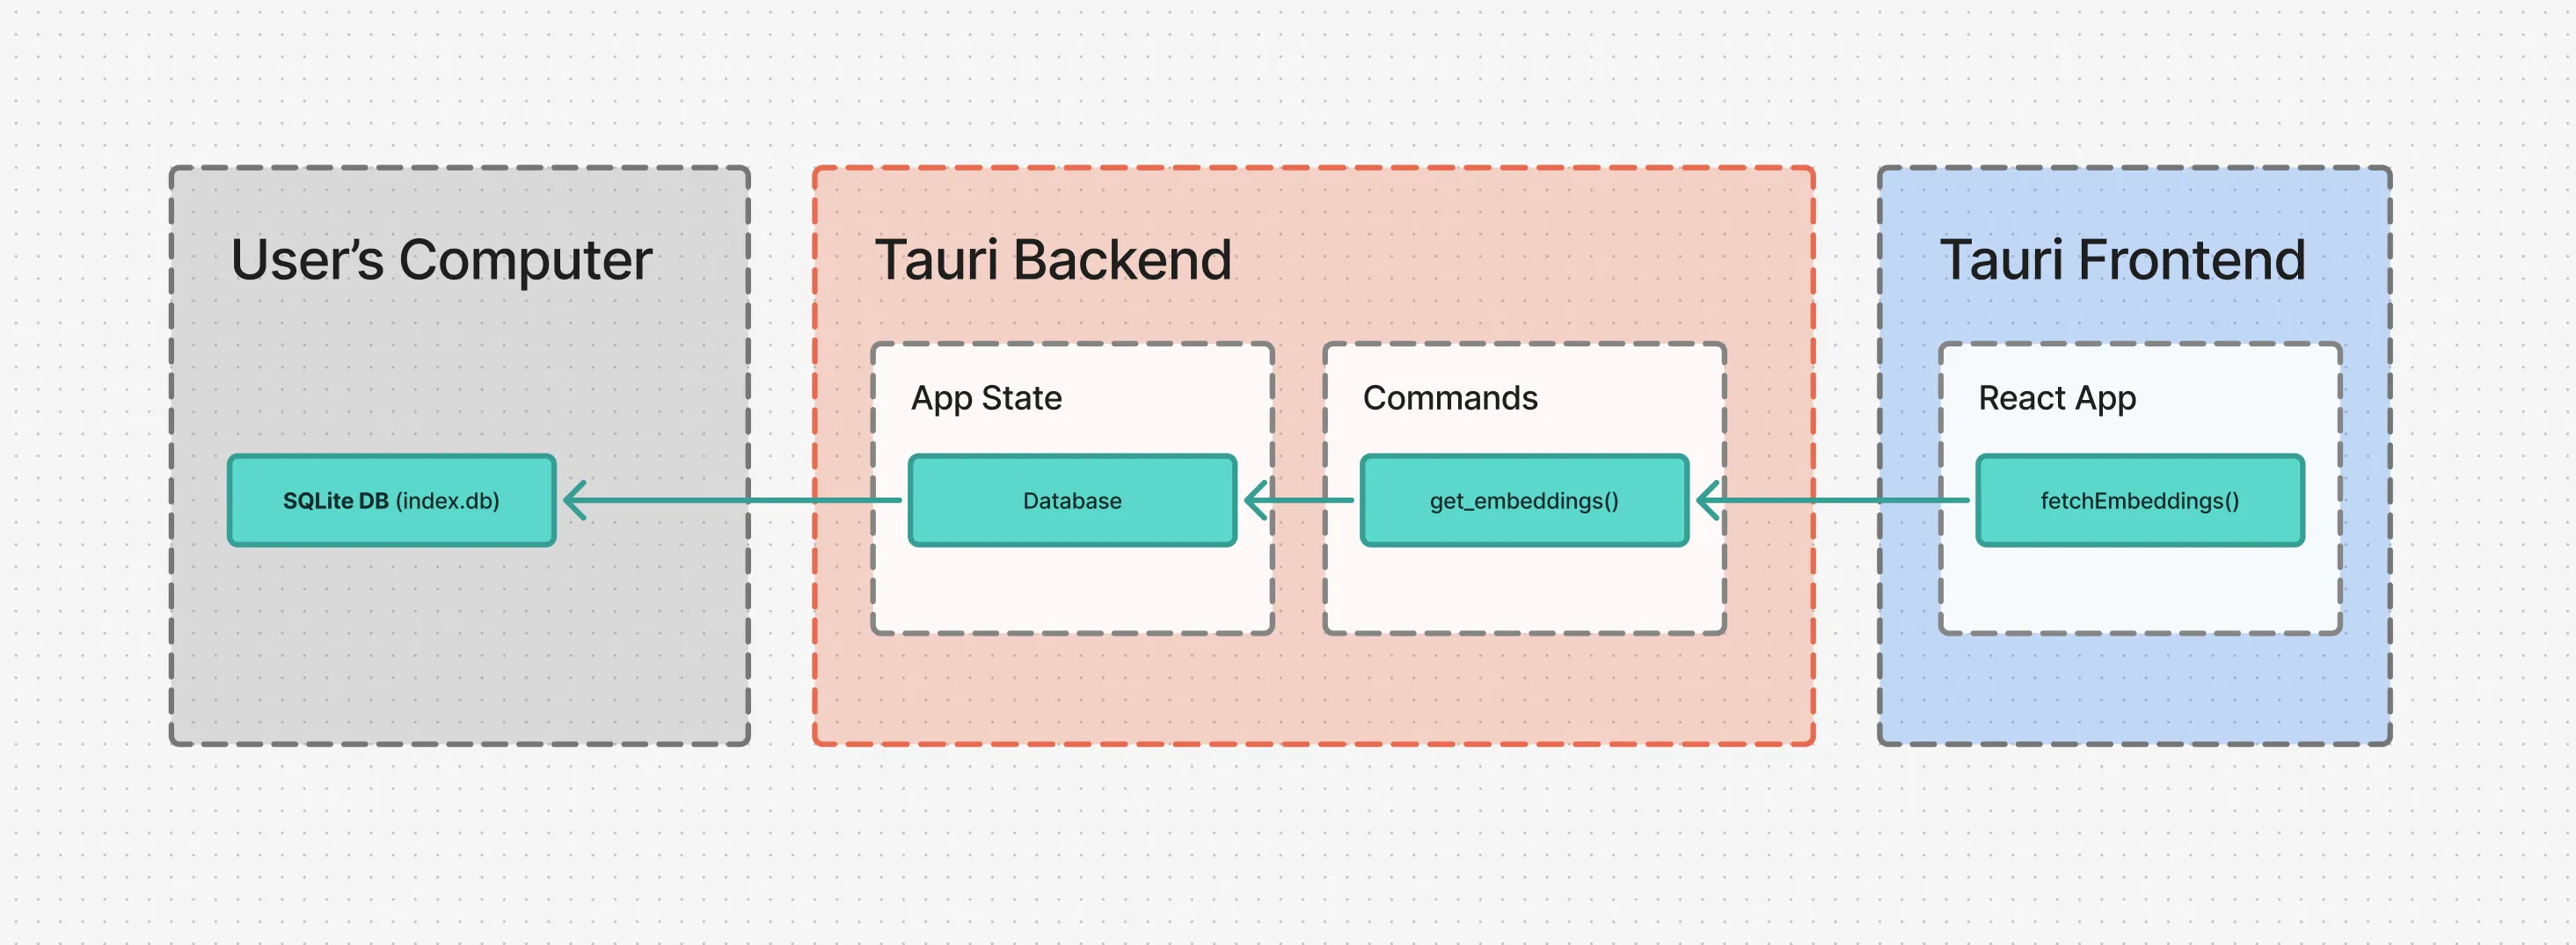
Instead of using Tauri’s built in SQL plugin, we want to use our own custom SQL backend. This is actually fairly easy to setup with Tauri’s systems - namely using state management. This let’s us save data (aka “state”) to the Tauri backend and then access it across the Tauri backend (like inside “commands”, which the frontend uses to communicate with backend - like requesting database data).
We’ll use Tauri’s app builder to run a setup() function that will run when our app initially loads. Inside that function we’ll create a connection to our database. Then we’ll create some app state and store the connection inside of it.
#[cfg_attr(mobile, tauri::mobile_entry_point)]
pub fn run() {
    setup_sqlite_extensions();

    tauri::Builder::default()
        .plugin(tauri_plugin_fs::init())
        .plugin(tauri_plugin_dialog::init())
        .plugin(tauri_plugin_http::init())
        .plugin(tauri_plugin_opener::init())
        .setup(|app| {
            // Get the app local folder to store DB inside
            let app_data_dir = app.path().app_local_data_dir().expect("Couldn't get app directory for DB init...");
            println!("App data directory: {:?}", app_data_dir);

            // Create the DB
                let result = Database::new(&app_data_dir);
                match result {
                    Ok(db) => {
                        // Optional: Check DB version if needed
                        db.check_version();

                        // Run migrations and add necessary DB tables
                        db.run_migrations(&app_data_dir);

                        // Store DB in global app state
                        app.manage(Mutex::new(DatabaseState {
                            database: db,
                        }));
                    },
                    Err(error) => {
                        println!("{}", error);
                    },
                };
            Ok(())
        })
ℹ️ I also created a wrapper function around the
sqlite3_auto_extension()code you saw earlier and called itsetup_sqlite_extensions(). Then I call it before the app loads to ensure it’s setup before we create our database connection.
Then when we want to access the database (like inside a Tauri “command”), we can just access the app variable which contains the app state:
#[tauri::command]
pub fn query_embeddings(state: State<'_, Mutex<DatabaseState>>, query: Vec<f32>) -> Vec<(i64, f64)> {
  // We "lock" the app state because it's available across multiple threads
  // so this ensures it's not getting used by two commands at once
  let mut state = state.lock().unwrap();

  // Then we can access the database we stored earlier and query with it
  let result = state.database.query_embeddings(query);

  result
}
And this works pretty well out of the box to get our database shared across our backend.
But you’ll notice I created a wrapper around our database called Database. This is just to simplify things and abstract away any 3rd party code. Let’s take a dive into that and see what’s inside.
The Database struct
This struct is pretty simple. It just contains a single property called connnection that contains our Connection struct from rusqlite (aka the “connection” to our database we can use to query things anytime).
Then we define a new() function to establish the connection - and handle any edge cases, like if it fails.
pub struct Database {
    pub connection: Connection
}

impl Database {
    pub fn new(app_local_path: &PathBuf) -> Result<Database, DatabaseError> {

        // Create DB folder if necessary
        let db_folder_path = app_local_path.join("db");
        if !db_folder_path.exists() {
            fs::create_dir(&db_folder_path).expect("Couldn't create DB folder..."); // Attempt to create the directory
        }

        // Get the path to DB
        // We store it in "app local" folder, inside `/db`
        let path = db_folder_path.join("test.db3");
        println!("db path {}", path.display());

        let result = Connection::open(path);

        match result {
            Ok(connection) => {
                let db = Database {
                    connection,
                };

                Ok(db)
            },
            Err(error) => {
                println!("Couldn't open SQLite DB: {}", error);
                Err(DatabaseError::ConnectionFailed(format!("Failed to connect: {}", error)))  // Wrap and return a custom error.
            },
        }
    }
Here’s where things get interesting and Tauri specific. Before we could rely on Tauri’s SQL plugin and their Database struct to find our SQL database in the right path. But since we’re doing this from scratch, we don’t have that luxury. So when we create our connection with rusqlite, we’ll need to pass an absolute path to where we want to store our SQL database.
In my case, I picked storing it in the app’s local path, which is where I also store the documents. On Windows the folder looks like this:
C:\Users\<pc-user>\AppData\Local\com.<your-username>.<app-name>ℹ️ In hindsight I’m sure app config would have technically been better, but I don’t think it really matters ultimately. Both work conventionally the same.
In order to get the app’s local path, we need to use the app from the setup() function earlier and use it’s path() method to get to the app_local_data_dir() method — which finally returns the path to our app’s local data folder.
// Get the app local folder to store DB inside
let app_data_dir = app.path().app_local_data_dir().expect("Couldn't get app directory for DB init...");
It technically returns a PathBuf type, which is more useful to us, because we can do cool stuff like join() another path to it. In my case, I store my database inside a db folder.
let db_folder_path = app_local_path.join("db");But because I decide to do this, I need to ensure the folder exists, otherwise rusqlite won’t be able to make a SQL database.
// Create DB folder if necessary
let db_folder_path = app_local_path.join("db");
if !db_folder_path.exists() {
    fs::create_dir(&db_folder_path).expect("Couldn't create DB folder..."); // Attempt to create the directory
}
And then from there it’s basically the rusqlite example code - just creating a connection using the new path we joined, then returning our Database struct to the user with the connection inside.
Handling queries
I wanted to keep the Database struct simple. It shouldn’t have any table-specific logic in it. It should only have functions that anyone would be able to use, or are specific to the database — like “run this SQL” or “check the version of the SQLite we’re using”.
One of the first methods I implemented on the Database was a simple function that takes SQL and runs it. That’s it.
/**
 * Utility for quickly creating new tables. Used for migrations.
 */
fn execute_sql(&self, sql: &str) -> Result<usize> {
    self.connection.execute(
        sql,
        [],
    )
}
I also made a function for “querying” the database and getting data back.
/**
 * Query the DB with SQL and get data back
 */
pub fn query<T>(&self, query: &str, options: &[&dyn rusqlite::ToSql], map_fn: impl Fn(&rusqlite::Row) -> Result<T, rusqlite::Error>) -> Vec<T> {
    println!("Query embeddings DB");

    let result: Vec<T> = self.connection
        .prepare(query)
        .expect("Couldn't form query")
        .query_map(options, map_fn)
        .expect("Couldn't query embeddings")
        .collect::<Result<Vec<_>, _>>().expect("Couldn't collect embeddings after query");

    result
}
ℹ️ I’ll be honest, it was so specific to the rusqlite API, that I just opted to use the underlying connection directly (e.g.
db.connection.execute()). Adding a wrapper felt a bit unnecessary since I wasn’t adding any layer of misdirection for the API (like making my own way to handle parameters then converting to rusqlite).
Handling errors
The one tip I will share is handle your errors. Using rusqlite there were errors on a myriad of levels: from connecting, to parsing the SQL, to running the query, to getting the data back, to getting each individual row column…it’s a lot of spots for errors to pop up.
Because of this I made an enum to handle all the different types of errors we might encounter. It extends the Display trait so the errors can be easily logged (using say println!()).
// Custom error type for Database errors
#[derive(Debug)]
pub enum DatabaseError {
    // Example: Connection string issue
    ConnectionFailed(String),
    // Example: Couldn't allocate file space
    FileAllocationError(String),
    // Generic error case
    Other(String),
}

// Convert enum to debug log
impl fmt::Display for DatabaseError {
    fn fmt(&self, f: &mut fmt::Formatter<'_>) -> fmt::Result {
        match self {
            DatabaseError::ConnectionFailed(msg) => write!(f, "Connection failed: {}", msg),
            DatabaseError::FileAllocationError(msg) => write!(f, "File allocation error: {}", msg),
            DatabaseError::Other(msg) => write!(f, "An unexpected error occurred: {}", msg),
        }
    }
}

impl Error for DatabaseError {} // Implement the `Error` trait.  Crucial!
How rusqlite works
Now that we have a Database struct, we could add functions to it that handle querying data. But this is where things get a little tricky. Let’s take a step back and look at how the rusqlite library works, and that’ll inform how our API is shaped a bit.
Since we’re using SQL, we need to write specific statements to get data back. When we want to get documents, we need to SELECT from a specific table and get certain columns back. We could just use a * to get all the properties back. But the way rusqlite works, when we get data back, we need to access each row using a “getter” function, so if we use * we need to know what columns we want anyway:
let result = statement.query_map(params, |row| -> Result<Document, rusqlite::Error> {
    // rusqlite returns each row with a "getter" function
    Ok(YourData {
      id: row.get("id").unwrap_or("".to_string()),
      name: row.get("name").unwrap_or("".to_string()),
    })
});
rusqlite also lets us write dynamic SQL statements by adding special characters like ? to the file which can be replaced with other values at runtime. This does make them a bit more extensible, allowing us to run WHERE statements with dynamic data (like getting documents by the project ID).
SELECT
    id,
    name,
    path,
    type,
    project_id,
    date_created,
    date_added
FROM documents
WHERE project_id = :id
ORDER BY date_created DESC
LIMIT :offset, 10
You can see an example above where I use an :id , this is nice because we can use rusqlite’s named_params! macro to assign data to these string-based “keys”, instead of guessing the correct order of the ? and using the standard params! macro with a flat array of data.
let params = named_params! {
    ":id": project_id,
    ":offset": offset,
};
// Run the SQL command and get data back
let result = statement.query_map(params, |row| -> Result<Document, rusqlite::Error> {});
This works great for quick parameters, like column values, or setting a LIMIT. And we technically could use it for defining a table name, so we could do something like:
SELECT *
FROM :table
But this is a big security risk. What if we have data the user isn’t supposed to access? If someone misused our function, they could access any table, despite permissions we might have set in the backend.
Also small things limit us from making a “one-query-fits-all” scenario. We might need to have a WHERE statement specific to a table, or order the results by a particular column by default (like the date_created) which might not exist on all tables. It really shows the power of a good ORM and why their composable APIs simplify this process.
Now seeing all this, here’s what I ended up with.
Data models
I created modules for each data model (aka tables in our database), like a documents.rs that contains all the functions to access the documents. If you’ve ever built a REST API or any database application this should feel fuzzy and familiar. We need a way to “GET” data from the DB, and a way to add elements (aka “POST”).
- Documents (located in
db/models/documents.rs)get_documents()- Gets all documents.insert_document()- Adds a document to DB.update_document()- Updates a document data in DB.delete_document()- Deletes document from DB.
Here’s an example of a function that inserts documents into the database. We pass in the database so it can rusqlite’s functions directly like prepare() in this case. We load in a pre-defined SQL statement that handles the INSERT SQL process along with dynamic parameters for inserting the data. Then run that statement using rusqlite’s execute() method.
pub fn insert_document(db: &Database, query_params: &[&dyn ToSql]) -> Result<usize, rusqlite::Error> {
    let mut statement = db.connection.prepare(include_str!("../sql/documents/store_document.sql"))?;
    statement.execute(query_params)

}
ℹ️ The
named_params!andparams!macros both return a&[&dyn ToSql]type, so that’s where I gotquery_paramsfrom. This was visible in the IDE by hovering over one of the param variables. A lot of this Rust stuff can seem like magic or overly complex from the outside, but the actual process was simpler than it seems.
Now we have a function that interacts with our database, but we need a way for our frontend code to get that data. In Tauri we use “commands” to handle this. So we’ll create a command for each function. It’s a bit of doubling up, but it separates the DB logic from the “use” of the DB logic, just in case another function needs to also use the same query.
#[tauri::command]
pub fn store_document(state: State<'_, Mutex<DatabaseState>>, id: String, name: String, path: String, doc_type: String, project_id: String) -> Result<usize, String> {
  println!("[COMMAND] Storing document in database...");

  let mut state = state.lock().unwrap();
  let query_params = params![id, name, path, doc_type, project_id];
  let result = insert_document(&state.database, query_params);

  match result {
    Ok(docs_added) => Ok(docs_added),
    Err(error) => {
      println!("error: {:?}", error);
      Err("Couldn't insert document into DB".to_string())
    },
  }
}
ℹ️ You can see an example of using the
params!macro here and how terse it is. If I removed a single?in my SQL statement I’d have to rearrange the array correctly — much trickier than just using key names.
And with that, we can add data to our database from the frontend by using the Tauri’s invoke() API to access our backend command we created.
const newDocument: AppDocument = {
  id: generateSimpleHash(),
  name: fileName,
  path: newFileName,
  doc_type: fileExtension == "pdf" ? "pdf" : "md",
  project_id: projectId,
  date_created: Date.now(),
  date_added: Date.now(),
};

// Save to DB
await invoke("store_documents", { documents: newDocs });
I basically repeated this process for each data model’s function - creating Tauri commands and using them on the frontend.
Data types
We’re able to add stuff to the database…but how do we get data back? And specifically — how do we return the data in a normalized way that the user can use? For example, when we query “projects” from the database, we should return an JS object to the frontend with all the properties in a Project type.
To set this up on the Rust side, we need to create a struct for each data model. And to allow us to send the data through Tauri commands, we need to add the serde crate’s Serialize and Deserialize traits (this allows our struct to convert to JSON easily).
#[derive(Serialize, Deserialize)]
pub struct Document {
    pub id: String,
    pub name: String,
    pub path: String,
    pub doc_type: String,
    pub project_id: String,
    pub date_created: String,
    pub date_added: String,
}
This works great for returning structured data to the user:
let result = statement.query_map(params, |row| -> Result<Document, rusqlite::Error> {
    // rusqlite returns each row with a "getter" function
    Ok(Document {
      id: row.get("id").unwrap_or("".to_string()),
      name: row.get("name").unwrap_or("".to_string()),
      path: row.get("path").unwrap_or("".to_string()),
      doc_type: row.get("doc_type").unwrap_or("".to_string()),
      project_id: row.get("project_id").unwrap_or("".to_string()),
      date_created: row.get("date_created").unwrap_or("".to_string()),
      date_added: row.get("date_added").unwrap_or("".to_string()),
    })
});
And they get back:
let documents = [
	{
		id: '12912912',
		name: 'Test',
		path: 'filename.pdf',
		doc_type: 'pdf',
		project_id: '420',
		date_created: '2025-09-25T20:48:34+0000',
		date_added: '2025-09-25T20:48:34+0000',
}
Which can be cast to a Typescript type of AppDocument:
export type DocumentTypes = "pdf" | "md";

export type AppDocument = {
  id: string;
  name: string;
  path: string;
  doc_type: DocumentTypes;

  // tags: string[];

  /**
   * Relates document to a project
   */
  project_id: string;

  /**
   * Date when document was created on user's PC
   */
  date_created: number;
  /**
   * Date when document was uploaded to this app
   */
  date_added: number;
};
ℹ️ At this point you probably see how tedious this setup this. We have to define our data models in Rust and Typescript — and we haven’t even gotten to the migrations yet. Even if we used an ORM however like Diesel, we’d still need to write a custom script to convert the Rust types to Typescript (or vice versa if using say — Drizzle on the JS side).
Cool this works pretty well. But there’s one thing missing. Earlier I showed the process of storing/inserting a document to the DB. The command had all the document parameters listed as function params — making it a bit lengthy. What if we could just use a struct like Document and have the user pass an object?
This gets a tricky again. It’s actually very simple to accept a struct as a command parameter — that’s not the issue. The issue lies in our setup. When we create things in the database, like a project or document, we have a date_created field that get automatically populated by the SQL DB with a current timestamp. So we don’t need the user to pass one. But when they query the DB, they expect to see the property on the Document.
Ideally in Typescript, if you need to support something like this, you’d probably just create a “base” type and then extend from it to add any additional properties:
type PartialDocument = {
  name: string;
};
type FullDocument = PartialDocument & {
  date_created: string;
};
But Rust doesn’t allow for this. They’re best setup is something like this called “composition” - which is a joke:
struct PartialDocument = {
	name: String,
}
struct FullDocument = {
	partial: PartialDocument,
	date_created: String,
}
struct PartialDocument = {
name: String,
}
struct FullDocument = {
partial: PartialDocument,
date_created: String,
}Meaning when the user’s queries for the document from the frontend, they’ll get a weird JS object back with a nested object inside…not good DX.
I ended up just copy/pasting the struct since it’s small enough, but there’s definitely a bit of duplicate code here (especially with the separation of the upcoming JS Drizzle setup, Rust types, actual SQL, and JS frontend types).
/**
 * Used for creating new documents since we don't require user to provide all fields
 */
#[derive(Serialize, Deserialize)]
pub struct PartialDocument {
    pub id: String,
    pub name: String,
    pub path: String,
    pub doc_type: String,
    pub project_id: String,
}

#[derive(Serialize, Deserialize)]
pub struct Document {
    pub id: String,
    pub name: String,
    pub path: String,
    pub doc_type: String,
    pub project_id: String,
    pub date_created: String,
    pub date_added: String,
}
This made it much simpler to allow the user to say, insert multiple documents at once by just providing an array of PartialDocument types:
#[tauri::command]
pub fn store_documents(state: State<'_, Mutex<DatabaseState>>, documents: Vec<PartialDocument>) -> Vec<DatabaseResponse> {
  println!("[COMMAND] Storing multiple documents in database...");
  let mut state = state.lock().unwrap();

  let responses = insert_documents(&state.database, documents);

  responses
}
But this all assumes the database is setup with all the tables and columns we need. So far though, we haven’t tackled this yet. We’ve only created a DB and created functions to interact with it - but if you tried any of these they’d fail, since they lack the proper SQL tables to run them. Let’s figure that out next.
Migrations
Normally when you use a database, you often use an “ORM”. This is a library that handles interacting with the database completely — from creating database tables to querying data. They often provide a simple to use API that allows you to “model” your data (similar to how we did before). And using these models, we can simplify our process by automatically generating things like the SQL for creating tables and columns — or the SQL for querying those tables.
Usually the process for creating tables, altering them after they’re creating, and keeping track of these changes is called “migrations” in the database world.
Imagine if we have an app where we create a database. First we need tables to populate it, that requires us to run SQL one time to set it up. Then what if later on, when we update our app, we want to change one of the database tables. We could just delete the database and update the original CREATE TABLE SQL with our updates (like say a new column) — but this is destructive, and would delete all the user’s data. Instead, we can ALTER an existing table to change it if we need.
This is where migrations come in. They’re often a sequence of SQL files that run in a specified order (usually chronologically, from oldest to newest) that handle getting the database setup the way it needs to be. This is not only useful for production, but great for development. Say if another developer needs to work on the app, they can just spin it up and get a working and up to date database without any extra setup (or deviation from the set structure). They’re also useful for populating databases with data, either mock or real.
I keep mentioning Diesel, which is currently the most popular (and stable) ORM option for Rust. If you used Diesel, you could leverage their CLI to generate a migration. The CLI generates an up.sql and down.sql files. Basically migrations work in a concept of “up” and “down”. This allows migrations to be non-destructive and rollback if needed. So my “up” would contain the CREATE TABLE statement — and my “down” would contain a DELETE TABLE statement to remove it.
To keep things simple, I won’t be creating a full migration system with up and down, only “up”. Ideally it won’t need to be rolled back (at leas this early in development).
Avoiding SQL
As experienced as I am with SQL, I prefer not to write it directly. If I can use an ORM of any kind, I’d prefer it. It gives you some guardrails and a clearer understanding of things like relationships.
I considered using Diesel, but it wasn’t the right tool for the job. I’d still have to manually write my migrations, and I’d have to define all my types for data models in Rust for a “schema” I wouldn’t get to use as it doesn’t support sqlite-vec out of the box. And to be honest, Rust is overkill for a lot of things. All I need is a library that can generate SQL for creating tables (and altering them over time). It’d be nice if it used types to generate these, but I don’t think that’s feasible with the way databases work anyway (like needing to specify a column is primary for instance — that’d be a leaky abstraction in the type / data model).
I ended up using Drizzle ORM to simplify things. It let me write my database tables in Typescript and generate the SQL migrations files as those Typescript files changed. It adds files with metadata to your repo to keep track of changes, making it work without a database, which was ideal.
We can define tables and their columns using the sqliteTable() function:
import { integer, sqliteTable, text } from "drizzle-orm/sqlite-core";
import { projectsTable } from "./projects";
import { dateTime } from "./helpers";

export const documentsTable = sqliteTable("documents", {
  id: text("id").notNull().unique().primaryKey(),
  // @ts-ignore: This pops up because of my dateTime function
  name: text("name").notNull(),
  path: text("path").notNull(),
  type: text("type").notNull(),
  project_id: text("project_id")
    .notNull()
    .references(() => projectsTable.id, { onDelete: "cascade" }),
  date_created: dateTime("date_created"),
  date_added: dateTime("date_added"),
});
Which generates SQL like this when we run the Drizzle CLI:
CREATE TABLE `documents` (
	`id` text NOT NULL,
	`name` text NOT NULL,
	`path` text NOT NULL,
	`type` text NOT NULL,
	`project_id` text NOT NULL,
	`date_created` text DEFAULT (DATETIME('now')) NOT NULL,
	`date_added` text DEFAULT (DATETIME('now')) NOT NULL,
	FOREIGN KEY (`project_id`) REFERENCES `projects`(`id`) ON UPDATE no action ON DELETE cascade
);
Which was pretty nice. I didn’t have to think about how nasty long that FOREIGN KEY statement is, or messing up any of this syntax.
And using the Drizzle config, I was able to export the SQL files in a nice spot - a dedicated db folder outside the frontend and backend apps.
import { defineConfig } from "drizzle-kit";

export default defineConfig({
  schema: "./backend/db/schema/index.ts",
  out: "./backend/db/migrations",
  dialect: "sqlite",
});
Now I just run yarn db-migration:generate and it makes the SQL migrations and keeps them up to date.
  "scripts": {
    "db-migration:generate": "drizzle-kit generate --config=./backend/db/drizzle.config.ts"
  },
This created a folder full of migrations that looked like this:

You can see they increment by number to ensure they go in the correct order. Each one can contain multiple SQL statements, the first one for example has like 3-4 tables created inside.
We’ll run these using rusqlite and get our database setup with the correct structure so we can actually insert data into it.
Quick tip - Dates in SQLite
The one thing that was tricky was dealing with dates in SQLite. I initially created an integer() type for my date_created column and inserted a Unix-style timestamp in there. This worked fine when I used the data in the frontend (since I can convert Unix dates fine) — but when I wanted to ORDER the database by that date-based column it failed and gave me an error. All dates should be text format in ISO8601 format:
2025-09-25T20:48:34+0000I made a quick little function to handle this. It makes a date field and handles automatically setting the date to the current day and time:
import { sql } from "drizzle-orm";
import { text } from "drizzle-orm/gel-core";

export const dateTime = (key: string) =>
  text(key)
    .notNull()
    .default(sql`(DATETIME('now'))`);
Migration System
We need a system to handle running migrations. Before the app runs, we should be able to define a set of migrations and then run them in order. And we’ll also need to keep track of our migrations, since we don’t want to create a table twice (who knows what might happen with some commands) or needlessly run SQL every time we load app if it’s already been setup.
With our current setup, the migrations would be pretty simple. We just need an array of SQL statements to run, then we can use the execute_sql() method in the Database to run them. Pretty simple. But how do we get the migrations?
Migration struct
First let’s create a struct for our migrations called - you guessed it - Migration. This will store the SQL we need to run, as well as the SQL filename for reference.
#[derive(Clone, Debug)]
pub struct Migration {
    pub filename: String,
    // pub description: &'static str,
    pub sql: String,
}
Load migration files
Now we can grab migrations from the disk. We’ll just load all the SQL files that Drizzle ORM generated. And since they’re ordered correctly with their nice numerated filenames, we can just insert them into a Vec (aka array).
pub fn get_migrations_from_disk() -> Vec<Migration> {
    println!("[MIGRATIONS] Getting migrations from disk...");

    // Get working folder (usually /src-tauri)
    let current_dir = env::current_dir().expect("Couldn't get current path");

    // println!("current dir: {}", current_dir.to_str().expect("stringified current dir"));

    // Get DB migrations folder path
    // @TODO: Store migrations in production appropriate place + switch to local folder
    let relative_folder_path = Path::new("../backend/db/migrations");
    let folder_path = current_dir.join(relative_folder_path);

    // println!("folder path: {}", path.to_str().expect("couldn't do it"));

    // Loop over each SQL file in the migrations folder and save SQL to array
    let mut migrations: Vec<Migration> = vec![];

    if let Ok(files) = fs::read_dir(folder_path) {
        for file in files {
            if let Ok(file) = file {
                let file_path = file.path();
                let file_name = file.file_name().into_string().unwrap_or("".to_string());

                // Get the file extension
                let file_path_clone = file_path.clone();
                let extension = file_path_clone.extension().and_then(std::ffi::OsStr::to_str).unwrap_or("");

                if extension == "sql" {
                    println!("[MIGRATIONS] Got migration {}", &file_name);

                    // Get SQL from file
                    let results = fs::read_to_string(file_path);

                    match results {
                        Ok(file_content) => {
                            // println!("file content: {}", file_content);

                            // Add SQL to migration stack
                            let new_migration = Migration {
                                filename: file_name,
                                sql: file_content,
                            };
                            migrations.push(new_migration);
                        },
                        Err(error) => {
                            println!("Couldn't fetch the SQL migration file text...")
                        },
                    }
                }

            }
        }
    }

    migrations
}
ℹ️ There is one consideration here that I haven’t completed yet — production code. This works in development to grab the SQL files locally from the source code, but in production the app won’t be able to grab the files from the same place. We’ll touch on this later.
Keeping track of migrations
Before we run these though, we have one consideration to make. We don’t want to run the same migration twice. How do we control that? Usually with frameworks that manage migrations (like Laravel or Wordpress in PHP-land, or any CMS really) you’ll find that they have a dedicated database table dedicated to keeping a log of migrations. This way, they can query it and check what’s been run - and skip it if so.
In this case, I kept it simpler, and I created a text file in the user’s app local folder called migration.txt. We can read the file to check for the last migration run, and update it whenever we run a migration.
pub static MIGRATION_FILE_NAME: &'static str = "migration.txt";

pub fn check_last_migration(app_local_path: &PathBuf) -> String {
    let migration_file_path = app_local_path.join(MIGRATION_FILE_NAME);

    let results = fs::read_to_string(migration_file_path);

    let content = results.unwrap_or("".to_string());

    content
}
Now we have the filename of the last migration run, we can take all the migrations we load from the disk and filter them out using it. We only want the migrations that come after this, so I created a filter_after() function that handles this:
/**
 * Filters an array by an element removing it and any elements before
 */
fn filter_after(vec: &[Migration], target: &str) -> Vec<Migration> {
    let mut result = Vec::new();

    // Find the index of the target string
    if let Some(target_index) = vec.iter().position(|s| s.filename == target) {
        // Iterate from the index after the target to the end of the vector
        for i in (target_index + 1)..vec.len() {
            result.push(vec[i].clone()); // Clone the string to create a new String object
        }
    }

    result
}
Running the migrations
Cool, let’s create a method on our Database struct that can handle running the migrations. We grab the filename of the last migration from our text file, grab all the migrations, and then filter the migrations by that last one (using the filename prop we added to the Migration struct). Then we finally loop through each Migration and run the sql attached to it.
/**
 * Run all initial migrations for DB
 */
pub fn run_migrations(&self, app_local_path: &PathBuf) {


    let last_migration = check_last_migration(&app_local_path);
    println!("Last migration: {}", last_migration);


    let mut migrations = get_migrations_from_disk();
    // println!("[DATABASE] migrations: {:?}", &migrations);

    if last_migration != "".to_string() {
        println!("[DATABASE] Detected last migration, filtering migrations");
        migrations = filter_after(&migrations, &last_migration);
    }

    println!("filtered migrations: {:?}", &migrations);

    let mut new_last_migration = last_migration;
    for migration in migrations {
        println!("[DATABASE] Running migration: {}", migration.filename);
        self.split_sql_and_run(&migration.sql);

        new_last_migration = migration.filename;
    }

    store_new_migration(&app_local_path, &new_last_migration);
}
Though you may notice we have a different function for handling running the SQL called split_sql_and_run(). This is because Drizzle ORM puts multiple SQL statements inside 1 file. They do this to keep their system work in “stages” (with each update you make across all tables updating in a single file).
Initially I tried just running the entire SQL file using the rusqlite crate but it would only run the first statement and skip the rest. I assumed it could only support 1 at a time, so I split the SQL statement up by each individual statement.
Drizzle has multiple SQL statements inside one file and separates each one using a SQL comment with a “line break” key. I just had to split() the text based on that special line break and I got each separate SQL statement to run.
/**
 * Splits SQL statement by Drizzle breakpoints and runs SQL commands
 */
fn split_sql_and_run(&self, sql: &str) {
    // Drizzle packs multiple SQL statements into one file
    // so we split them up and run each individually
    let statements = sql.split("--> statement-breakpoint");

    for statement in statements {
        self.execute_sql(statement);
    }
}
We have a way to make and run the migrations, now let’s actually get them running when the app loads. Inside of our setup() function on the Tauri builder, we’ll setup our database and immediately run any migrations we need.
#[cfg_attr(mobile, tauri::mobile_entry_point)]
pub fn run() {
    setup_sqlite_extensions();

    tauri::Builder::default()
        .setup(|app| {
            // Get the app local folder to store DB inside
            let app_data_dir = app.path().app_local_data_dir().expect("Couldn't get app directory for DB init...");
            println!("App data directory: {:?}", app_data_dir);

            // Create the DB
                let result = Database::new(&app_data_dir);
                match result {
                    Ok(db) => {
                        // Run migrations and add necessary DB tables
                        db.run_migrations(&app_data_dir);
                    },
                    Err(error) => {
                        println!("{}", error);
                    },
                };
            Ok(())
        })
        .run(tauri::generate_context!())
        .expect("error while running tauri application");
}
And with all that we have a working migration system (at least in development).
Migrations in production
Our migrations work for developers running from source code, but if we bundled the app right now it’d crash on opening because it’s looking for a folder that doesn’t exist. We need to copy our migrations to our app’s production bundle so that when the app is running as an .exe / .app or whatever — it can load the SQL files from somewhere relatively.
Tauri makes this pretty simple with the concept of “resources”. If we add a resources property to our Tauri configuration file (tauri.conf.json), we can have Tauri copy any files you specify to the app’s “bundle” (aka alongside the app’s executable).
In my case, I specified the DB migration folder we created earlier, and I had it grab all the SQL files in there using a glob (*.sql):
 {
  "$schema": "https://schema.tauri.app/config/2",

  "bundle": {
    "resources": {
      "../backend/db/migrations/*.sql": "migrations/"
    }
  }
Then you can access these files by using the Tauri Application struct (aka the app variable in the setup() function we made earlier).
let migration_path = app.path().resolve("migrations", BaseDirectory::Resource)?;Then we need to load the migrations, instead of using the path we created with the current_dir() method, we can just use this folder and it works the same:
fs::read_dir(migration_path)And with those small changes, our migration system now works in production. Pretty nice.
ℹ️ If your app was simpler and didn’t require a migration system, you could just provide a pre-made DB as a resource and copy that over initially (if a DB doesn’t exist). Good tip for quick prototypes / releases.
Databases are hard work
Nothing like working with a bit of the backend to make you appreciate the tools and ecosystem that has developed over time. My reflex is often to reach for a headless CMS like Strapi or Directus, where I can define my data models in a nice GUI and have them generate the database, structure, and even REST API for me to access them.
Setting everything up from scratch is definitely a lot of work. This process really got me thinking about making a simpler framework for Rust to deal with this kind of situation. I work with Tauri a lot, and I prefer to make my apps offline-friendly, so that often involves avoiding any cloud based APIs with luxuries like managed databases. I can often get away with localStorage for most apps because they’re small enough, but as I deal with larger quantities of data it falls apart.
If anything, I hope this process was enlightening and helped you understand how to setup a SQLite database from scratch in Rust, and how to practically use it.
Stay curious, Ryo
comments?
what's up?