Posted on
March 25, 2025
I’ve been doing a bit of motion graphics and animation in Blender recently. It’s a fun open source alternative to more closed source options like After Effects, Rive, or Cavalry. But I will say, Blender is made from the perspective of it being a 3D app primarily. Common features that are present in more modern design and animation apps haven’t found their way into the Blender workflow yet.
One of the these features Blender is lacking is design tokens. I use them all the time in Figma and code to create a cohesive design system that’s easy to use for the designer or developer. But Blender doesn’t really have the concept of tokens, or even saving colors for reuse easily.
Which is why I’ve made a plugin for Blender to bring design tokens to the platform. You can create color tokens in the plugin - or import tokens from another app using JSON. Then you can use these tokens in your shaders, or even geometry nodes.
You can download the plugin here or check out the source code.
What are design tokens
Design tokens are values that are reused in design, like colors, or different font presets (like a heading vs a paragraph). Basically any value in design that needs to be reused in another place can become a token.
A design token itself represents a name and a value. We often name tokens semantically to represent their meaning. Instead of naming a blue hue color “blue”, we might name it “primary” if it’s the main blue used everywhere.
It’s incredibly simple in concept, but it can scale to a large level, with concepts like aliasing tokens or just how deep and nested tokens may become organizationally.
To get an idea of some of the standard tokens and their values, I’d recommend looking at some UI component libraries. They often have design tokens in the form of “CSS variables” (aka custom properties) - or just stored as straight JSON. You can find an example of the design tokens I use on this website on GitHub.
Why design tokens in Blender?
When I’m working on motion graphics, I’m usually reusing design elements to keep the graphics consistent. Elements like color are commonly reused, since they often represent the “brand” (whether it’s my own personal one - or for a client). I probably reuse the same blue hex code 100 times a month and have to hunt it down in the style guide to use in Blender.
You could easily create custom node groups that contain RGB nodes with each color token you need — but that’s cumbersome to create manually, may change between projects, and requires manual updating if and when tokens change.
And for things like design tokens, they’re often represented in a source of truth like a CMS or design app. Why spend time manually recreating something that’s already been input into another app — and has options to export that data?
How it works
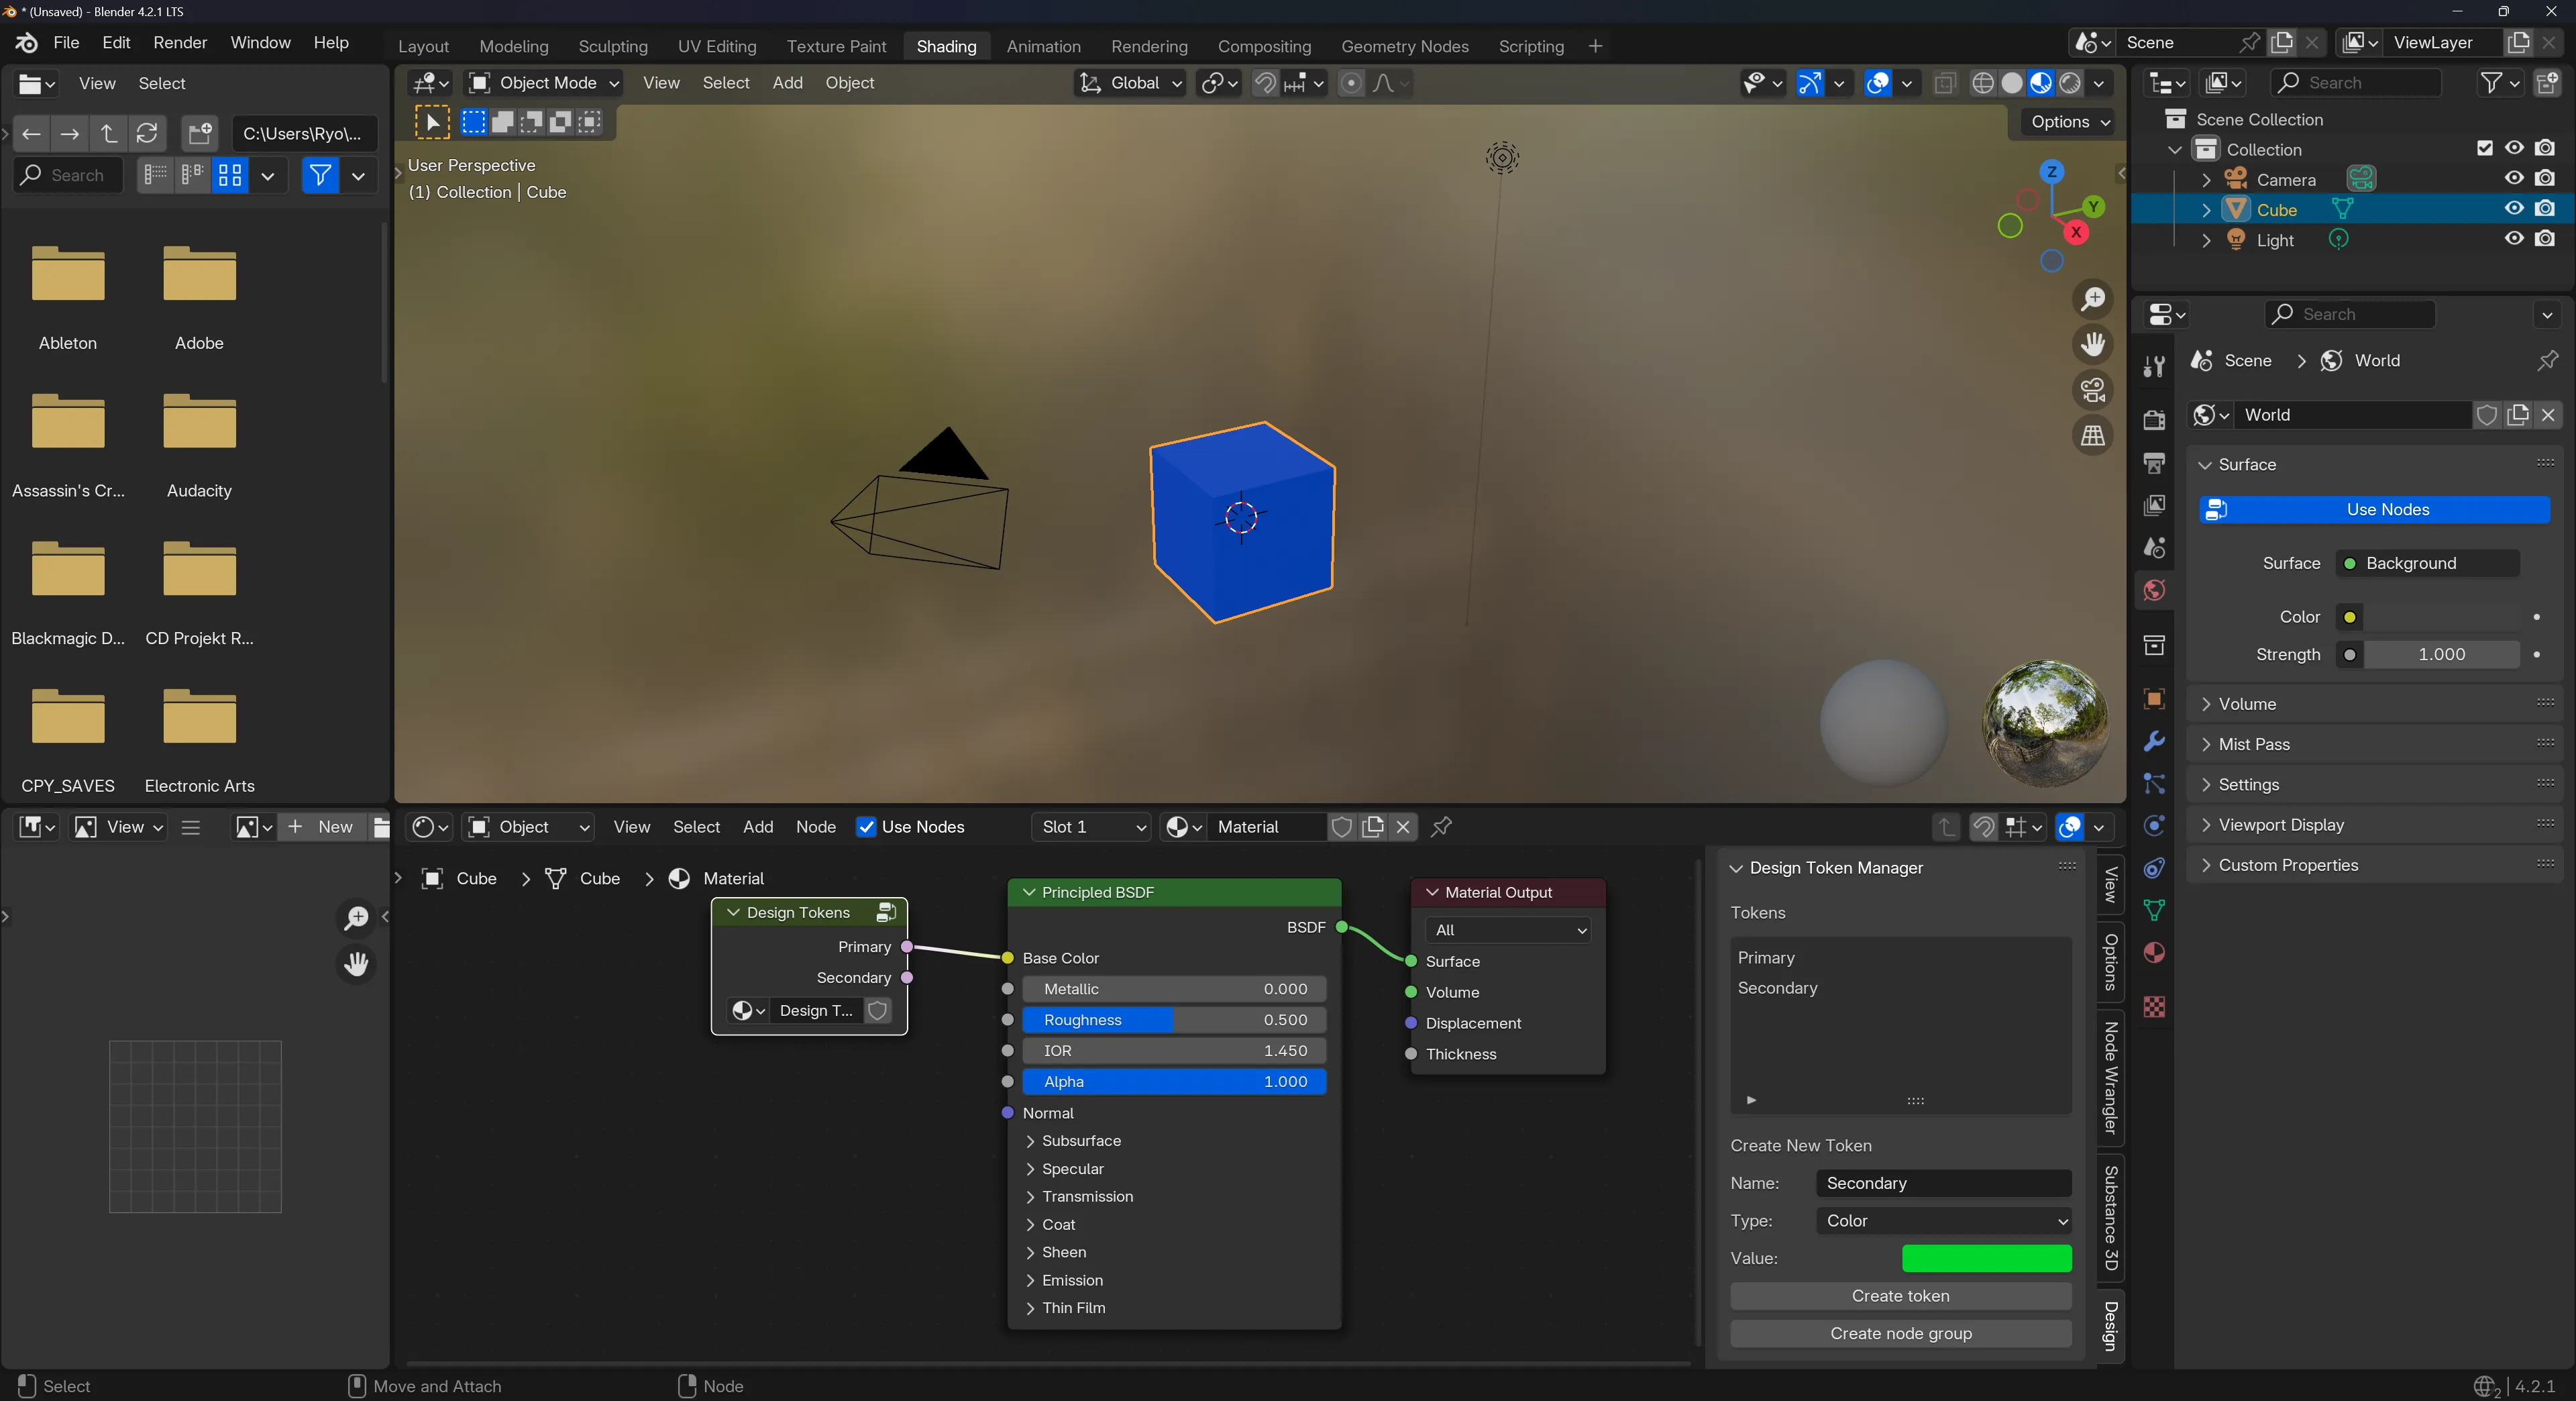
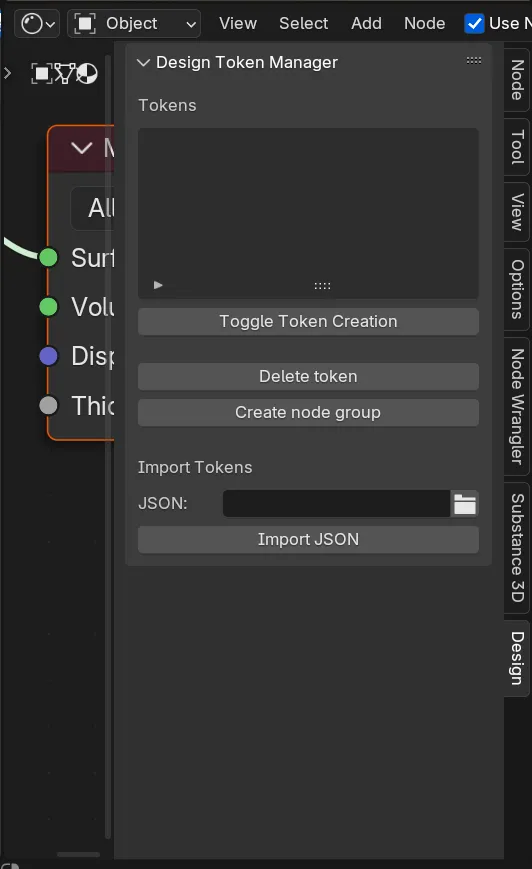
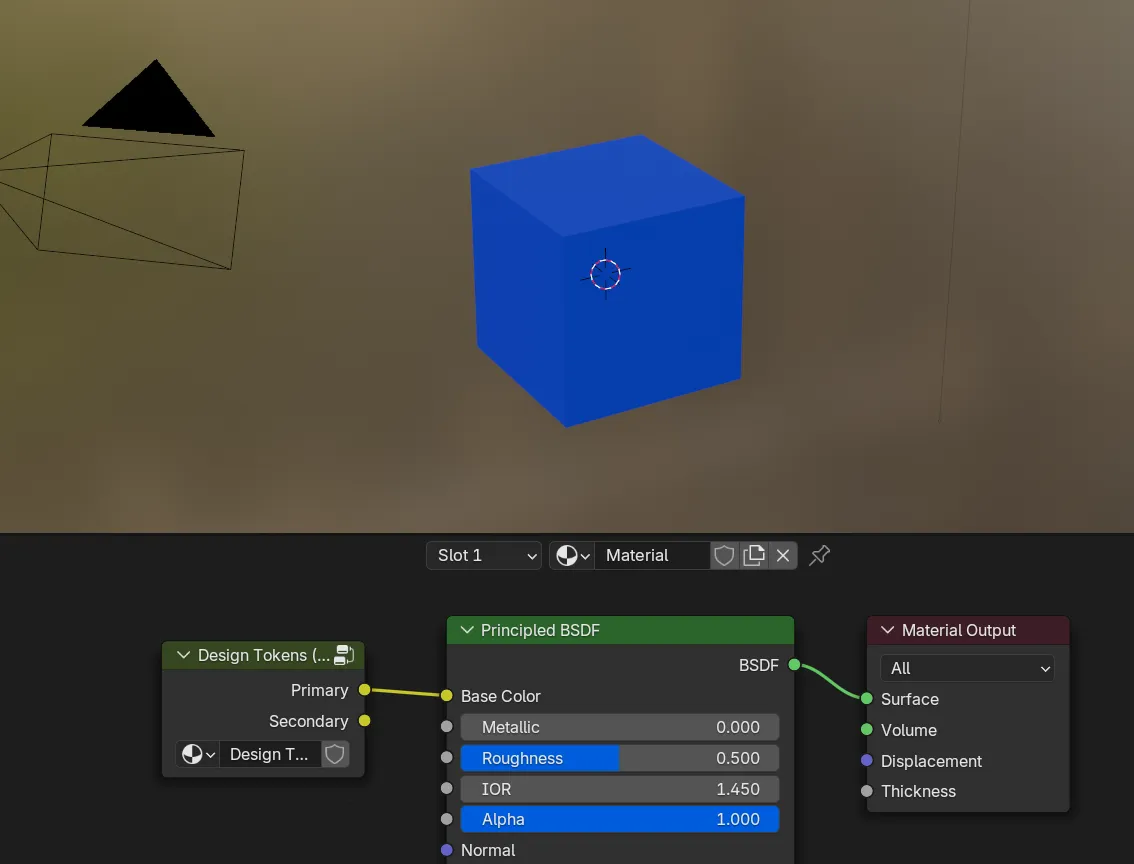
In a Shader Editor or Geometry Node Editor window, open up the n-panel (the little arrow on right side) to find a tab called “Design”. This contains the “Design Token Manager” panel.
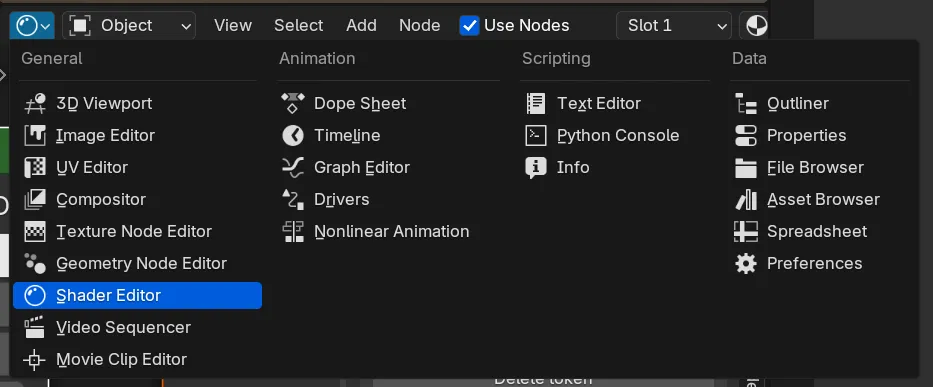
⚠️ Make sure you’re in a window set to Shader Editor or Geometry Node Editor.
Adding a new token
- Click “Toggle Token Creation” button to show the input fields for creating a new token.
- Add your token name and value (the color).
- Click “Create Token”
- Rinse and repeat as needed.
Importing tokens
- Select a JSON file
- Click “Import JSON” button
- The tokens should appear in the Tokens list above.
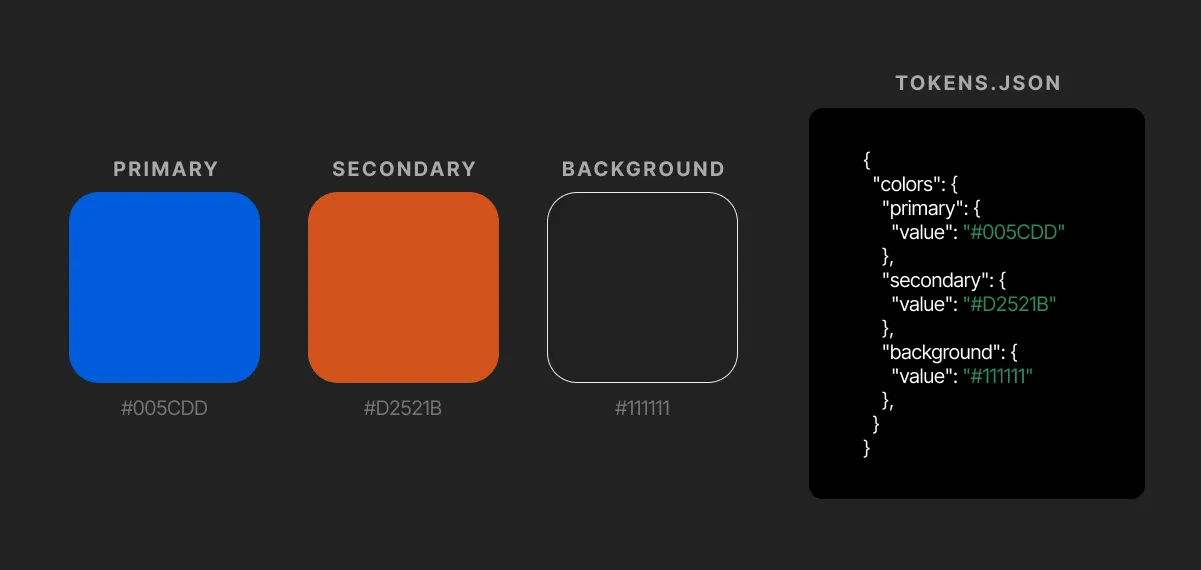
Currently the importer expects tokens to be in a simple format that’s reminiscent to the unofficial WCAG Design Token Module standard.
{
  "colors": {
    "primary": {
      "value": "#FFFFFF"
    },
    "secondary": {
      "value": "#000000"
    }
  }
}
There should be a top level colors property. Each property underneath that will be considered a token (e.g. colors.primary becomes primary token). We check each token for a value property for the actual value (in this case a color).
We don’t check for nested tokens yet - or non-hex formats (like rgba()).
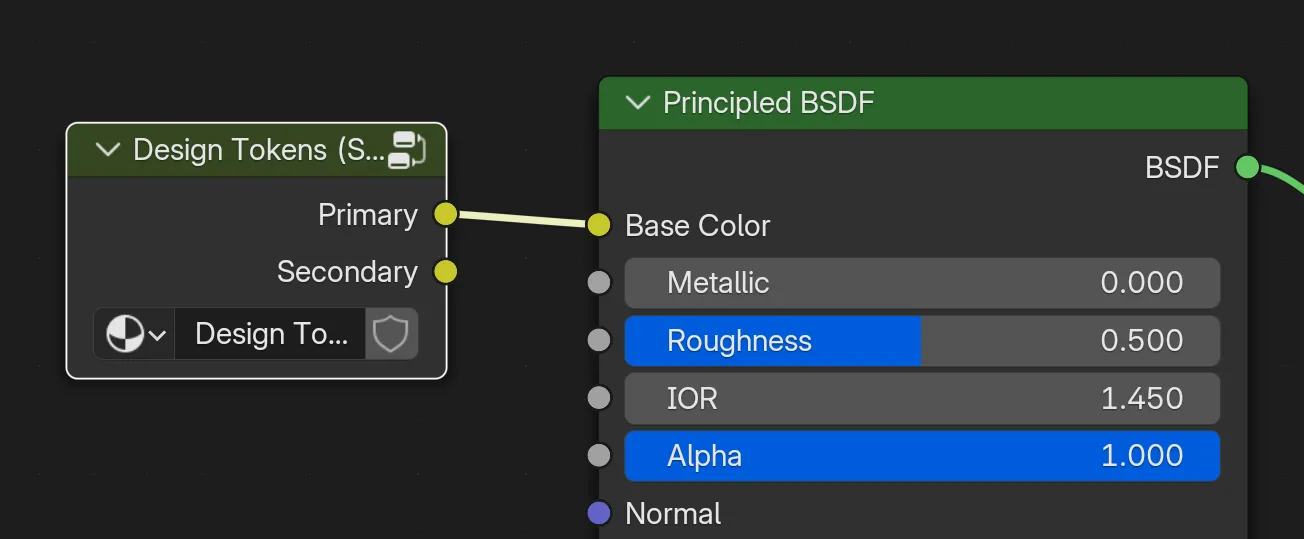
Using the tokens
-
Click “Create Node Group” button to create a custom node group for shaders/materials and geometry nodes.
-
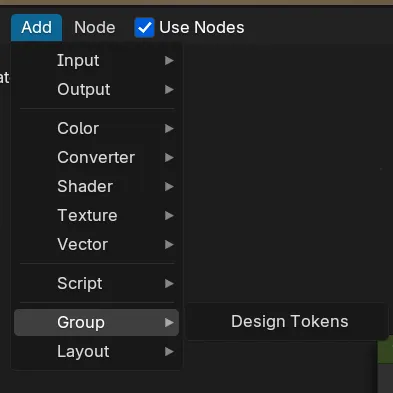
Go to the Shader Editor or Geometry Node Editor window and search for the Design Tokens node.
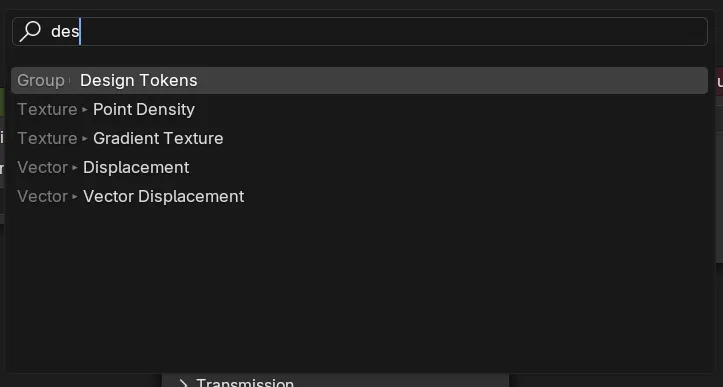
You can also go to the top of the window and click Add > Group > Design Tokens
-
Connect the colors as needed.
Updating tokens
Whenever you want to update the tokens, just make any changes in the Design Token Manager panel, then click “Create node group”. It’ll override the existing node groups and add/remove/update tokens as needed.
⚠️ Note that links may break if the token name or value is changed, requiring you to re-link the Design Tokens to other nodes.
How it works
The plugin works by leveraging Blender’s properties to store design tokens in the Blender file. Then we display them as a “collection” in the panel UI for the user. And creating the nodes is it’s own can of worms to open.
I started the project by copying one of my previous Blender plugins as the basis (MIDI to Keyframe specifically). You can learn more about my development process in previous blog posts.
Tokens in Python
The primary thing we’re storing are design tokens. What is a design token? It’s basically a property name and a value, similar to an HashMap in Rust, Object in JavaScript or Dict in Python. It’s often stored in a larger hash map or dictionary with all the other tokens, usually organized by token type (colors, typography, etc).
{
  "colors": {
    "primary": {
      "value": "#FFFFFF"
    },
    "secondary": {
      "value": "#000000"
    }
  }
}
So how do we store this data in Blender? We could create a dict to store it in and shove it in the Blender file properties somewhere — but we want the user to see the tokens in the UI somewhere. Which means we’ll need to use Blender’s PropertyGroup system.
If you’re not familiar with Blender development, properties are a way to store data to specifically use in your plugin’s UI panel. For example, you may want to have a string that represents a file location on the user’s system. Using Blender’s StringProperty allows the UI to find the string and render it as needed (aka efficiently).
But what if we have an Array of properties to store - like a bunch of strings? We could create individual input fields for each string - or leverage the CollectionProperty.
You’ve probably seen a collection in Blender before. Anytime you’ve created a new material, vertex groups, or bones - you’ve used the collection UI.
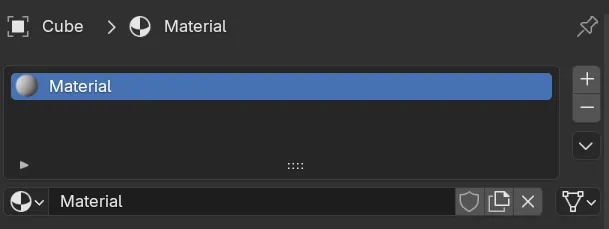
A collection is basically an Array of items that can have custom properties (like the Material name or it’s ID to reference later).
In our case, we want to create a “collection” of design tokens.
How to use Blender’s CollectionProperty
This process is a bit tricky and I had a hard time finding good documentation on it.
Creating a property group
Before we create a property, we need a class that extends PropertyGroup. This is Blender’s way of storing properties we want to display in the UI.
Then we attach a pointer to this class to the Scene object. This lets us access the properties from other parts of the plugin, and saves the data to the file.
class GI_SceneProperties(PropertyGroup):
    # Example boolean property
    new_token_mode: BoolProperty(
        name = "New Token Mode",
        description = "Lets user add new token via panel",
        default = False,
        )

def register():
    bpy.types.Scene.token_props = PointerProperty(type=GI_SceneProperties)
ℹ️ For a full list of available properties, check out the Blender docs on
Propertyand the subclasses section on top. You can also find examples of most of each in this handy code snippet.
Creating the collection
Now that we have a PropertyGroup we can add a CollectionProperty to it. We define a type here for our collection item, more on that in a second.
We’ll also need an integer to keep track of what collection item is selected (by storing it’s “index”).
class GI_SceneProperties(PropertyGroup):
    token_map: CollectionProperty(type=DesignTokenCollectionItem)
    active_token_id: IntProperty(min=-1,default=-1)
Creating a collection item
When we create a collection, we also need to define what an item in our collection looks like. We do this by creating a new class that extends PropertyGroup and just like before - uses property classes for data types (like StringProperty for strings).
This basically ensures Blender can save our data, since their property classes handle all the serialization and backend stuff for rendering. You can try to use more primitive types - but you’ll get an error from Blender.
We’ll call our new class DesignTokenCollectionItem and the 2 properties I mentioned earlier - name and value. And we’ll add a token type, since later we may want to support different kinds of token data (like a border radius, or typography presets).
class DesignTokenCollectionItem(PropertyGroup):
    name: StringProperty(
        name="Name",
        description="The name of the token you want to create",
    )
    value: FloatVectorProperty(
        name="Value",
        description="The value of the token you want to create",
        subtype='COLOR',
        min=0.0,
        max=1.0,
    )
    token_type: StringProperty(
        name = "Type",
        description = "The type of token (color, typography, etc)",
        )
For the value property I use the FloatVectorProperty which represents a 3D float (or float[3]) — aka a position or color. And to make sure Blender shows the user a color selector, we set the subtype property to COLOR.
⚠️ Ideally for other token types we’d want to handle the data structure differently, since other tokens may not be
float[3]format. But for MVP purposes, we’ll just run with this for now.
The last thing we need to do is make sure to register our custom collection item class (DesignTokenCollectionItem) with Blender. If you don’t do this, you’ll get an error about Blender not knowing what the collection item type is.
# Load/unload addon into Blender
classes = (
		# The collection item
    DesignTokenCollectionItem,
	  # The property group containing our collection
    GI_SceneProperties,
    # The UI displaying the collection
    GI_TokenManagerPanel,
)

# We call this method when the plugin runs for the first time
def register():
    from bpy.utils import register_class

	  # It loops through all the classes we provide above
    for cls in classes:
		    # And "registers" them with Blender (aka loads the pointers into memory)
        register_class(cls)

if __name__ == "__main__":
    register()
Displaying the collection
Now that we have a property for the collection setup we should be able to display it to the user inside a UI panel. I won’t go too deep into this process, you can check out my previous plugin breakdowns to see how this works in depth.
# UI Panel
class GI_TokenManagerPanel(bpy.types.Panel):
    """Creates a Panel in the scene context of the properties editor"""
    bl_category = "Design"
    bl_label = "Design Token Manager"
    bl_idname = "SCENE_PT_design_token_panel"
    bl_space_type = 'NODE_EDITOR'
    bl_region_type = 'UI'
    # bl_context = "output"

    def draw(self, context):
        layout = self.layout

        scene = context.scene
        token_props = scene.token_props

        layout.label(text="Tokens")

        row = layout.row()
        row.template_list("UI_UL_list", "token_collection", token_props, "token_map", token_props, "active_token_id")
In our case, we want the panel visible in the shader and geometry node editors - so we set the bl_space_type to NODE_EDITOR.
We grab the properties from the Scene object by using the context.
Then we render the collection using the template_list() method. You’ll notice we pass in the entire token_props variable — which contains all of our properties. The function requires a pointer to the entire PropertyGroup that contains the collection — then we also provide the prop name for the collection so it can access it (instead of just passing token_props.token_map directly). We do the same for the active_token_id integer prop we created earlier too. You can see the docs for this method here.
You should be able to see an empty box that represents the collection in your plugin UI.
Adding collection items
Now that we have a collection and the user can see it in the UI, let’s try adding items to it.
The first thing we need are UI elements for the user to input their token data. I basically created a few input fields that represent the name and value of the token. We’ll use the data from those to create our item.
Now we can add our collection item. Grab the collection prop from the context like we did in the UI part, then we can use the add() method to create a new item. This method returns a point to the new item in the collection. We store the new item (or it’s pointer technically) in a variable called new_collection_item. This lets us access and edit each property to include the data from our input fields.
class GI_create_new_token(bpy.types.Operator):
    """Toggle new token"""
    bl_idname = "wm.create_new_token"
    bl_label = "Create token"
    bl_description = "Saves token to Blender file"

    def execute(self, context: bpy.types.Context):
        props = context.scene.token_props
        token_map = props.token_map

        # New token data
        name = props.new_token_name
        token_type = props.new_token_type
        token_value = props.new_token_value

        # Add to collection
        print("Creating collection for token")
        # TODO: Check for existing first
        new_collection_item = token_map.add()
        new_collection_item.name = name
        new_collection_item.token_type = token_type
        # new_collection_item.value = token_value.hsv
        print("Value:")
        print(token_value)
        new_collection_item.value = token_value

        # Clear input fields
        props.new_token_name = ""

        return {"FINISHED"}
This function runs when the user pressed a “Create token” button.
# Load/unload addon into Blender
classes = (
    GI_create_new_token,
)

def register():
    from bpy.utils import register_class
    for cls in classes:
        register_class(cls)
Removing a collection item
Removing an item is fairly easy. You just need to run the remove() method on the collection prop and provide the index you want to remove.
In this case, we remove the currently selected collection (assuming the user selected it and wants to delete it now).
class GI_delete_token(bpy.types.Operator):
    """Delete tokens"""
    bl_idname = "wm.delete_token"
    bl_label = "Delete token"
    bl_description = "Deletes the selected token from the collection"

    def execute(self, context: bpy.types.Context):
        props = context.scene.token_props
        token_map = props.token_map
        active_token_id = props.active_token_id

        token_map.remove(active_token_id);

        return {"FINISHED"}
And that’s most of the operations you’ll need to know with collections.
Creating a node group
Now that we have a collection of design tokens that the user can add and remove from, how do they use them?
Like I mentioned earlier, Blender doesn’t have a concept of “saved” colors. Without forking Blender, we have other systems we can leverage through the plugin, like Materials.
But how do we expect a user to access the tokens easily? We could create a material for each object, but what if someone wants to mix 2 or more colors? This is where custom node groups come into play.
Blender has the concept of custom node groups, which are basically a bunch of nodes that you can “group” together and then re-use inside another node graph as a single node. So you can take 10-20+ nodes and do something cool with them (like say a “Pill” node group that creates a rounded cylinder geometry out of a few spheres, delete geometry nodes, and a cylinder).
And the beauty of node groups is being able to create custom input and output for them. So if I needed, if I had text inside my node group, I could make a Size input that controls the font size. And equally so, I can output multiple properties. So instead of just taking in geometry and outputting geometry — I could output a bunch of different properties (like say…our tokens?).
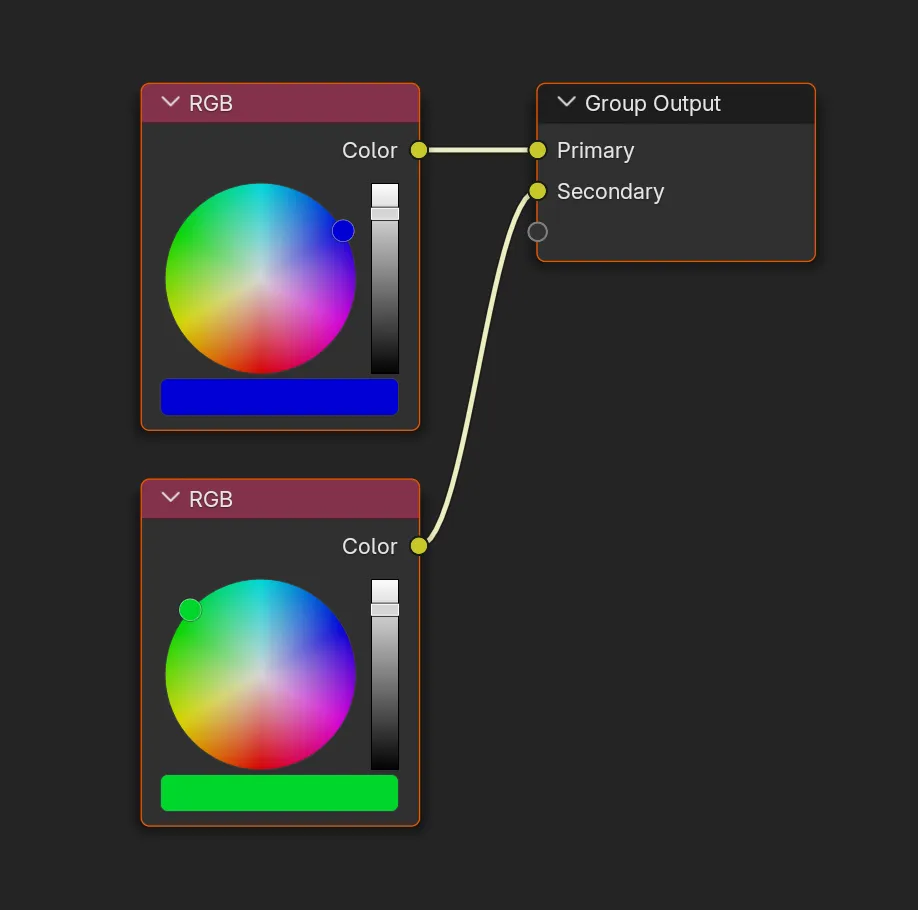
Plugins can create these custom node group programmatically, which allows us to take our token data and translate it into nodes. For shaders and geometry nodes, Blender has a “RGB” node that lets you store color data (or float[3]). We can create a few of these RGB nodes representing each of our tokens, then connect them to the node group output to make them accessible to the user.\
Here’s what that would look like as a node group in the UI:
So how do make this programmatically?
Creating a node group
Blender stores node groups in the bpy.data.node_groups property. You can loop over this and check for any existing groups - or in our case - use the new() method to create a new one.
name = "Design Tokens"
# Create a shader node group
shader_group = bpy.data.node_groups.new(name, 'SHADER')
# Create a geometry node group
gn_group = bpy.data.node_groups.new(name, 'GEOMETRY')
Ideally you’d want to check if the group exists then make one. This function does just that, and returns a reference to the new node group so we can keep using it.
def get_node_group(node_group_type, name):
    """Gets existing node group (and resets it) - or creates new one

    Args:
        node_group_type: See NODE_GROUP_TYPES
        name: Node group name

    Returns:
        A node group
    """
    for group in bpy.data.node_groups:
        # print("Group")
        # print(group.name)
        # print(group.type)
        if group.name == name and group.type == NODE_GROUP_TYPES[node_group_type]:
            # Remove all nodes
            for node in group.nodes:
                group.nodes.remove(node);

            # Remove all sockets from output
            for node in group.interface.items_tree:
                group.interface.remove(node);

            return group

    # No group found? Make a new one
    return bpy.data.node_groups.new(name, node_group_type)
Adding nodes to the group
Once we have our group we can start adding nodes to it. Nodes are stored in the nodes property (so node_group.nodes). We can loop over them, or use the new() method to make a new one. The new() method accepts a node type as the parameter.
Depending on the node type (shader or geometry), you can find a list of the available node types on the NodeInternal docs under the subclasses section on top. For example, shader nodes types can be found on the ShaderNode docs.
ℹ️ There’s nodes for each node type (shader, geometry, compositor, etc) — but there’s also nodes that get used between all of them. You’ve probably encountered one before, like the Math node. These are called “Function” nodes and are found under
FunctionNodedocs.
Once we have the node created, we can also change things like where it’s placed on the node graph by using the location property and passing a 2D tuple representing it’s position ((x, y)).
Right off the bat we’ll want to include Input and Output nodes. Let’s also wrap this in a nice function, because we’ll need to create multiple node groups each time. We’ll return a ref to the node group we created, and the input and output nodes so we can connect things to them later.
def create_node_group(node_group_type, name):
    # Create node group
    node_group = get_node_group(node_group_type, name)

    # create group inputs
    group_inputs = node_group.nodes.new('NodeGroupInput')
    group_inputs.location = (-350,0)

    # create group outputs
    group_outputs = node_group.nodes.new('NodeGroupOutput')
    group_outputs.location = (300,0)

    return (node_group, group_inputs, group_outputs)
But we probably want to add some color nodes for the tokens, right? Let’s get the design token collection from the context and then loop over it to create an RGB node for each one. And then we’ll connect that RGB node to the output so the user can access it.
def generate_color_tokens(node_type, token_map, node_group, group_outputs):
    for token in token_map:
	    print(token)

class GI_create_node_group(bpy.types.Operator):
    """Create node groups"""
    bl_idname = "wm.create_node_group"
    bl_label = "Create node group"
    bl_description = "Adds a node group to shaders and geometry nodes with all design tokens"

    def execute(self, context: bpy.types.Context):
        props = context.scene.token_props
        token_map = props.token_map

        # Create shader node group
        (node_group, _, group_outputs) = create_node_group('ShaderNodeTree', 'Design Tokens (Shader)')
        generate_color_tokens('SHADER', token_map, node_group, group_outputs)
Creating input/output sockets
The first thing we’ll need to do is create the “socket” on the output that we want to connect our color to. In Blender’s UI, you’d just drag the input line/link over to the output’s inputs (confusing I know lol). But here we have to explicitly do it.
We can create the socket by accessing the node group’s interface property (or node_group.interface). This has a method called new_socket() that takes the socket name and socket_type - as well as a in_out to signify if it’s a input or output socket (in our case - we want output). You can find a list of all the socket types in the NodeSocketStandard docs under subclasses.
node_group.interface.new_socket(name=token.name, socket_type="NodeSocketColor", in_out='OUTPUT')Now we can create the RGB node and hydrate it with our token data.
But there’s one key difference we’ll have to account for. I mentioned earlier that there’s different nodes for each node type (shader, geometry, etc). Both the Shader and Geometry Node Editor have RGB nodes, but they don’t have the same data structure. The shader version stores it’s values under it’s outputs property and a default_value property under that. But the geometry node is directly accessible via a value property.
COLOR_NODE_TYPES = {
    'SHADER': 'ShaderNodeRGB',
    'GN': 'FunctionNodeInputColor'
}

# Create Color/RGB node
# Shaders and geo nodes use different nodes for color (see `COLOR_NODE_TYPES`)
new_node = node_group.nodes.new(COLOR_NODE_TYPES[node_type])
# `node_offset_y` here - it's just a number we add to each loop to shift nodes down
new_node.location = (100, node_offset_y)
new_node.name = token.name

if(node_type == "SHADER"):
    new_node.outputs[0].default_value[0] = token.value.r
    new_node.outputs[0].default_value[1] = token.value.g
    new_node.outputs[0].default_value[2] = token.value.b
if(node_type == "GN"):
    new_node.value[0] = token.value.r
    new_node.value[1] = token.value.g
    new_node.value[2] = token.value.b
Now that we have a new node, let’s link it to the output we created earlier. We can find all the node groups connections (aka “links”) under the links property, and just like before, we can create a new one using a new() property. It accepts the output of one node and the input of another. In our case, we want the output of our new node (the RGB one), and the input of our output we created earlier. We can luckily quickly reference the output’s input using the name property we assigned earlier.
# connect node to output
node_group.links.new(new_node.outputs[0], group_outputs.inputs[token.name])
And that’s it! We have created our RGB nodes and linked them to the output. If try using your node group now, you should see a property for each token we’ve created.
I’d leave it there for now - the features like importing JSON weren’t immensely interesting (besides maybe converting hex code to RGB) and leaned off many concepts already conveyed here.
What’s next?
There’s lots that could be added to this plugin to make it more flexible and appealing to more users. Exporting tokens would be interesting. Finding a way to store plugin settings globally so tokens can persist across files (without having to make a “template” file for each design system). And there’s a myriad of things that could be done to improve support for the import system (like supporting more color types - or integrating services like Supernova).
There’s a few other tokens I’m interested in experimenting with as well - from typography to other spacing or sizing tokens (like border radius). I’d be curious what kind of conversion or math would have to occur to transfer web-based number (pixel, EM, etc) to a 3D space.
Enjoy!
As always, if you use this plugin feel free to tag me on socials so I can see what cool stuff you’re tinkering on. And if you want to support more of my work like this, you can subscribe to me on Patreon. Or you can always show support by following me on any socials and interacting with my posts (those likes/reblogs really make a difference!).
Stay curious,
Ryo