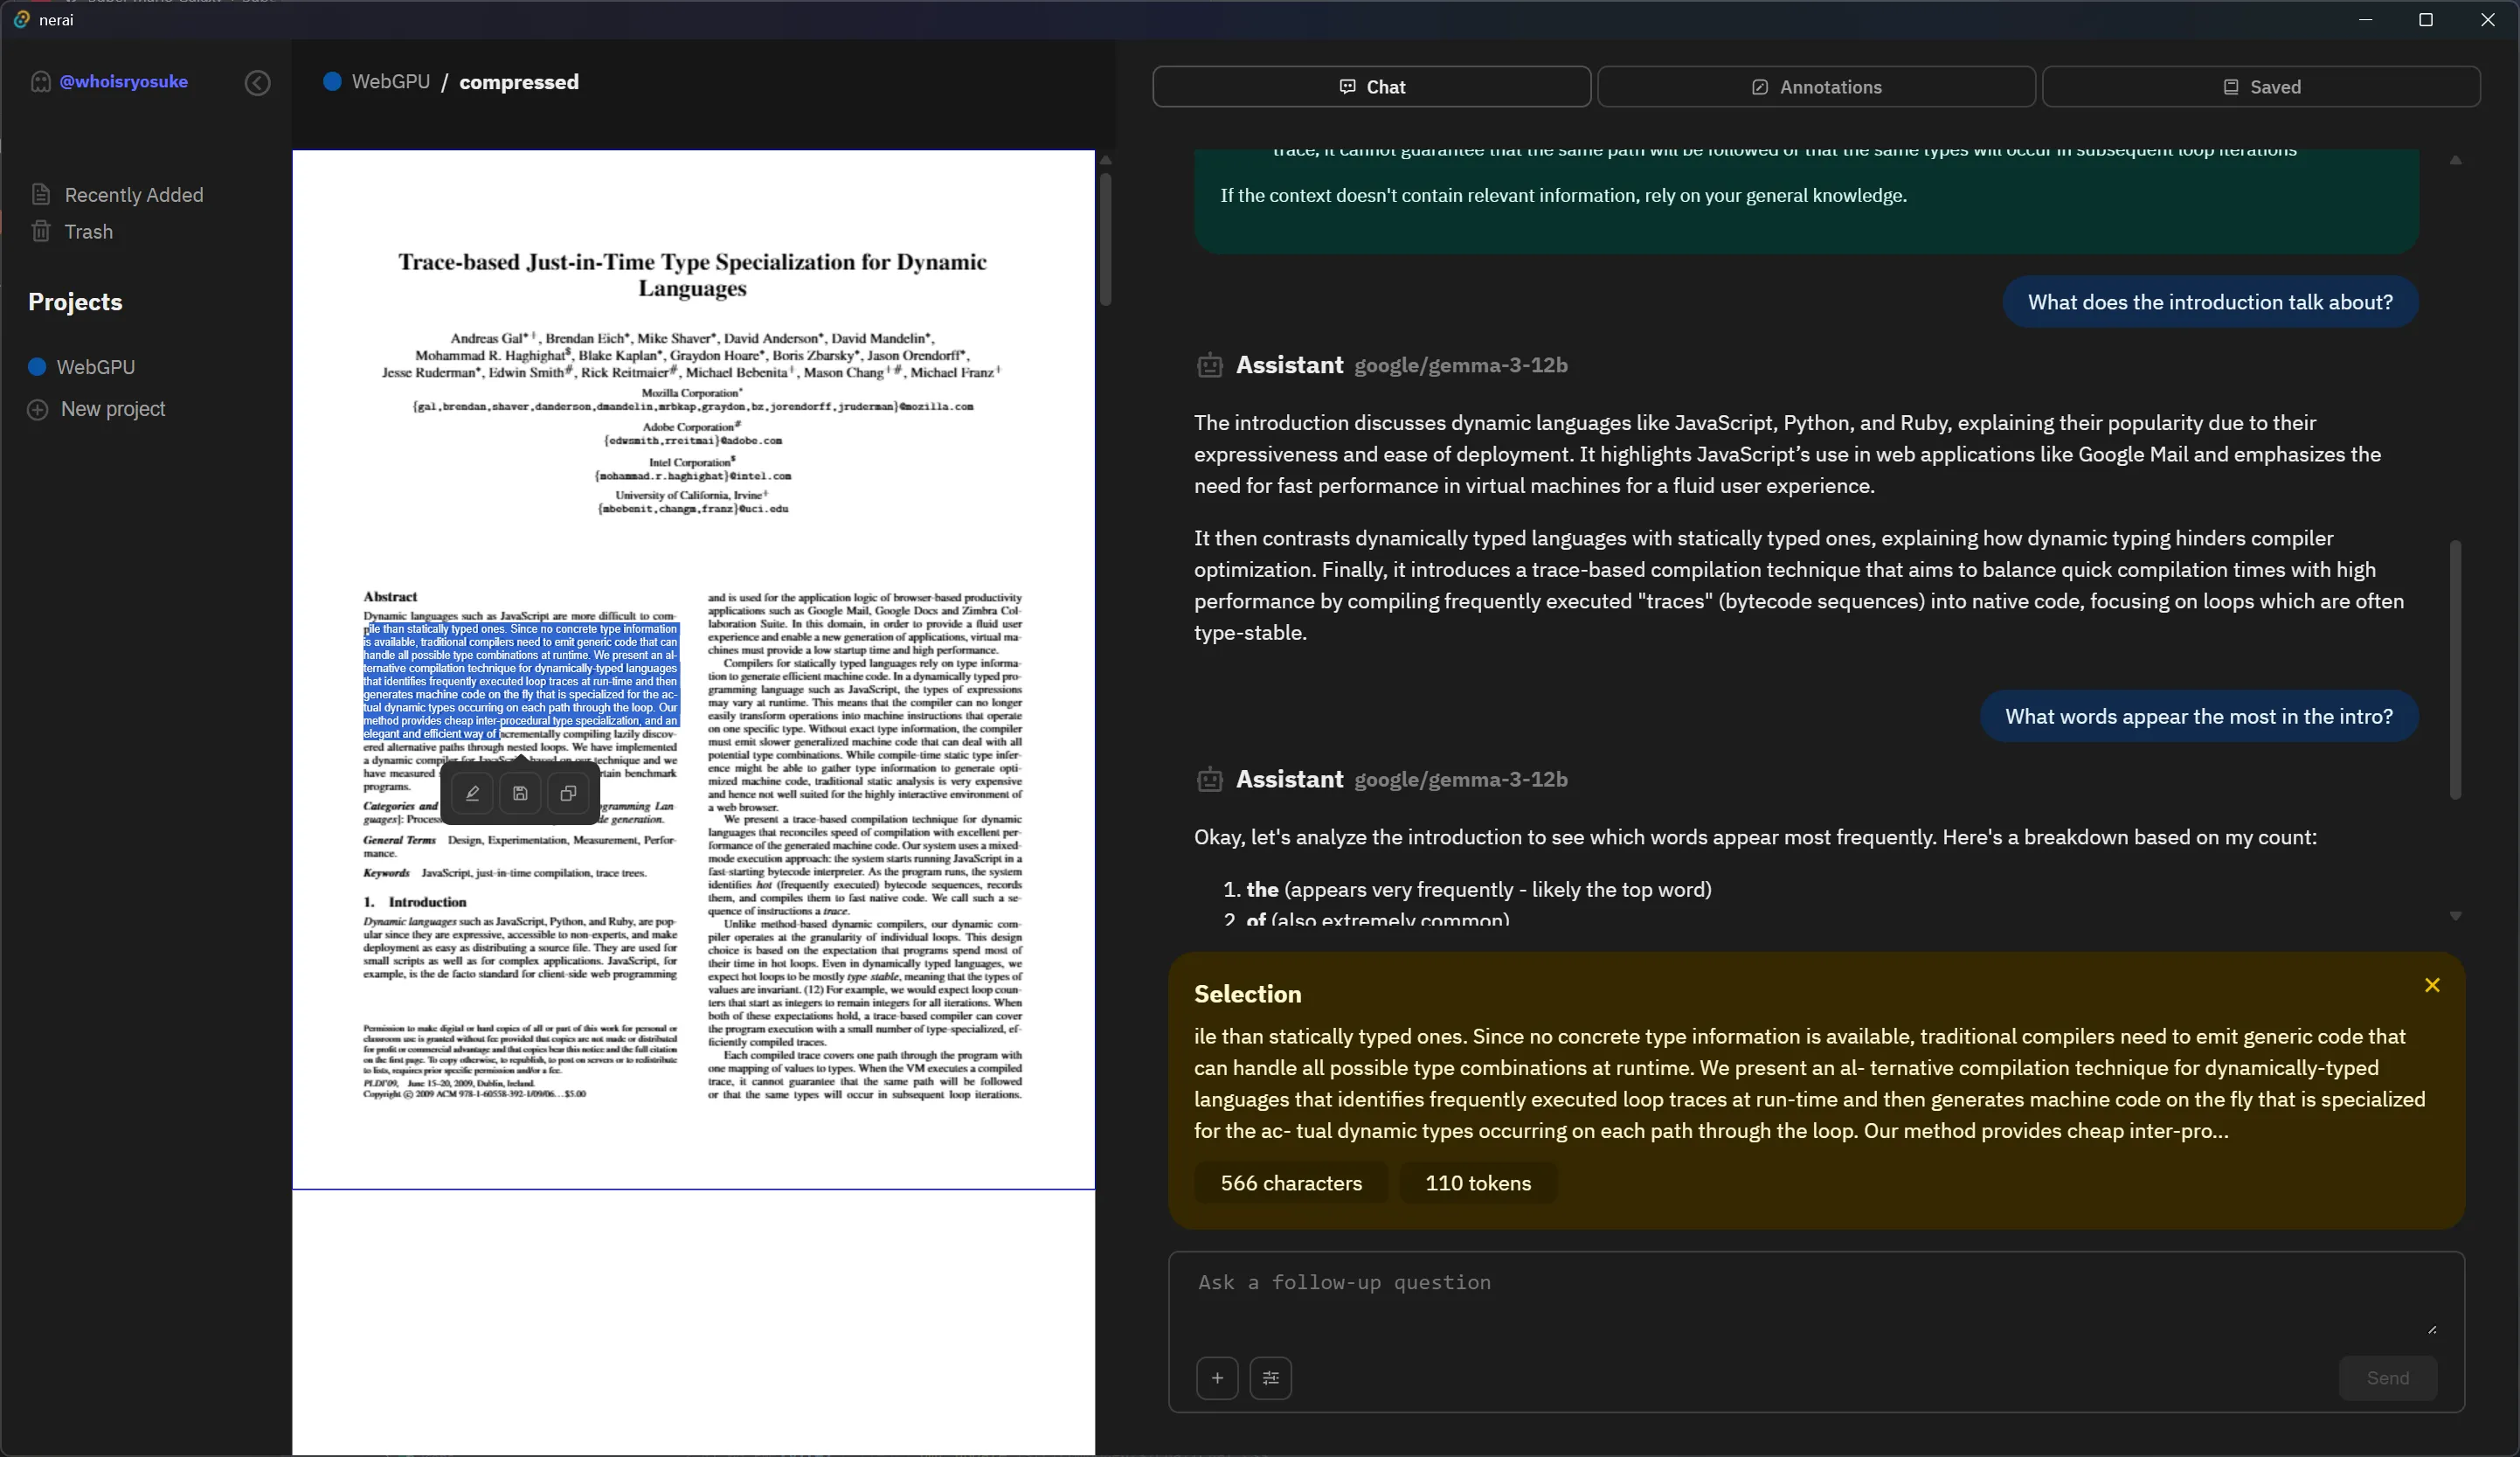
Posted on
November 11, 2025
There’s no denying that LLMs have exploded in the past couple years. Whether we like it or not, they’ve worked their way into every process thanks to corporate greed. It becomes hard to separate the hype from the results when all the evangelists show locked down controlled demos and the actual product never meets expectations.
One area that I’ve been finding genuine use for LLMs is research. They’re fantastic for digesting information and providing summaries, even shifting the perspective of the information — or expounding on the subject matter. For example, as I dive deeper into audio programming, the LLM becomes invaluable in breaking down complex mathematic algorithms or electrical diagrams.
But I’m sure like you, I’m not a fan of the current ecosystem of cloud-based LLMs. With most of the major services changing their terms of service to use the data that you provide, it’s hard to justify LLM use for anything important or private.
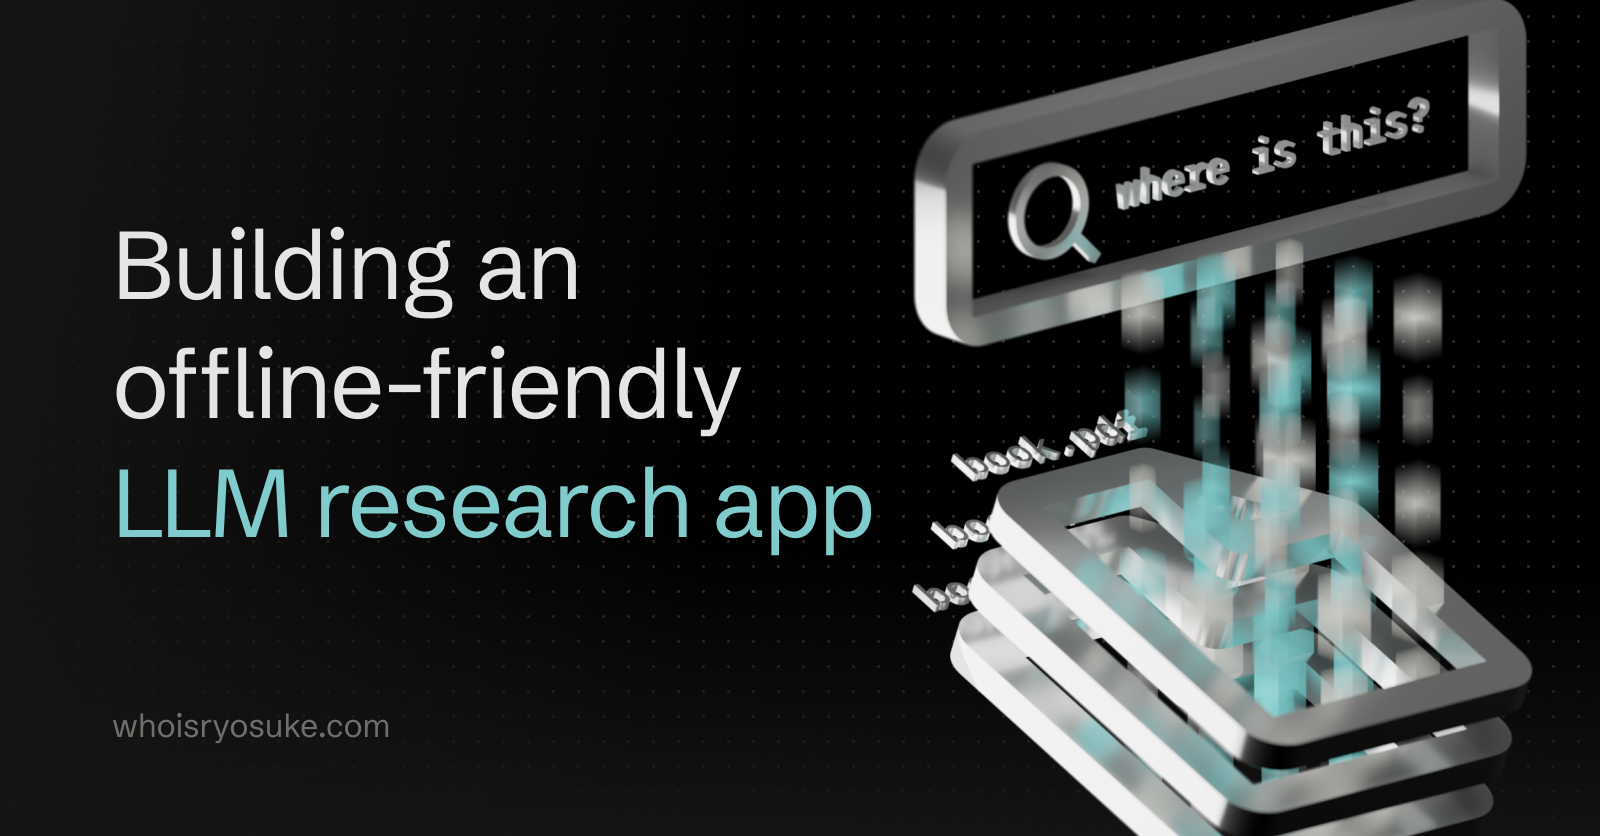
That’s why I created an offline-friendly app for learning and researching. It uses a local (or private cloud-based) LLM to crunch your documents and provide greater insight. It’s similar to apps like Google’s NotebookLM, but instead of using Google’s Gemini LLM on their cloud servers, you can leverage any local AI of your choosing.
ℹ️ Interested in the source code? This is one of the few projects I’ve made that isn’t open source immediately. If you’re a supporter of me on Patreon you can get access to the source code here.
LLM Powered Research
So why would you want to use LLM for your research? It’s important to remember that “AI” and LLM chats are just another tool in your toolbox.
You might already be using tools in your studies already to enhance your learning — like annotating or highlighting your PDF. Or back in the day you might have used a 3rd party site with summarizes your book like SparkNotes to ensure you didn’t miss any key points in your studies. Maybe you have that fancy Google app that can solve your math equations, and you can use it to check all your answers (or get a step by step walkthrough of a solution).
Tools are here for us to use — and abuse. The one differentiator between something like SparkNotes and LLM, is SparkNotes is a repository of information verified by a community of people, and the LLM is a giant slot machine for words with oddly high payouts. You’ll notice a similar warning on services like Google’s NotebookLM software, and most other LLM chat services — “AI can be inaccurate, please verify all information”.
So why use LLMs if they they have a tendency to be wrong? Why use Google if I can’t find what I need 100% of the time? Because I often get my answer, it just isn’t as simple as advertised.
LLMs work great when paired with independent research to help validate the results. And usually when you’re learning, it’s best not to take any single source as truth - and it’s important to aggregate knowledge.
Complex math
Much of my own research often involves very complex math formulas, whether I’m working in audio or 3D and game development. It’s incredibly important that I can read these formula myself, but as an independent body (not working on a team or group), it’s nice to have a way to validate my work.
LLMs work great for taking the math formula (either copy/pasted as plain text or LaTeX, or even a screenshot) and then parsing it as needed. Maybe I want it to break down each step and understand the significance of “magic” numbers, or I’d like to convert it to a programming language like JavaScript to actually use it.
When I was working on clawdio, as I was learning about each audio effect I was creating, I would prompt the LLM to break down related topics. Instead of solely relying on Wikipedia or a specific online source, I could have the LLM explain some concepts in layman’s terms. With subjects like audio, it can be easy to step into a pool of technical terms that turn informative statements into jargon for the less informed.
Documentation search
Another great use case is for parsing through large amounts of documentation. As a developer I often have to read through hundreds of pages of documentation to find the exact API I’m looking for. The larger documentation sites will have a built-in search, but most smaller libraries don’t. And even for the larger ones, the search can often be lacking, requiring you to leverage other services like Google.
Using Google’s NotebookLM, and later my own app, I was able to download the docs from code libraries and search for specific topics, even generate more relevant code examples (like taking a vanilla JS example and pumping out a ReactJS compatible component).
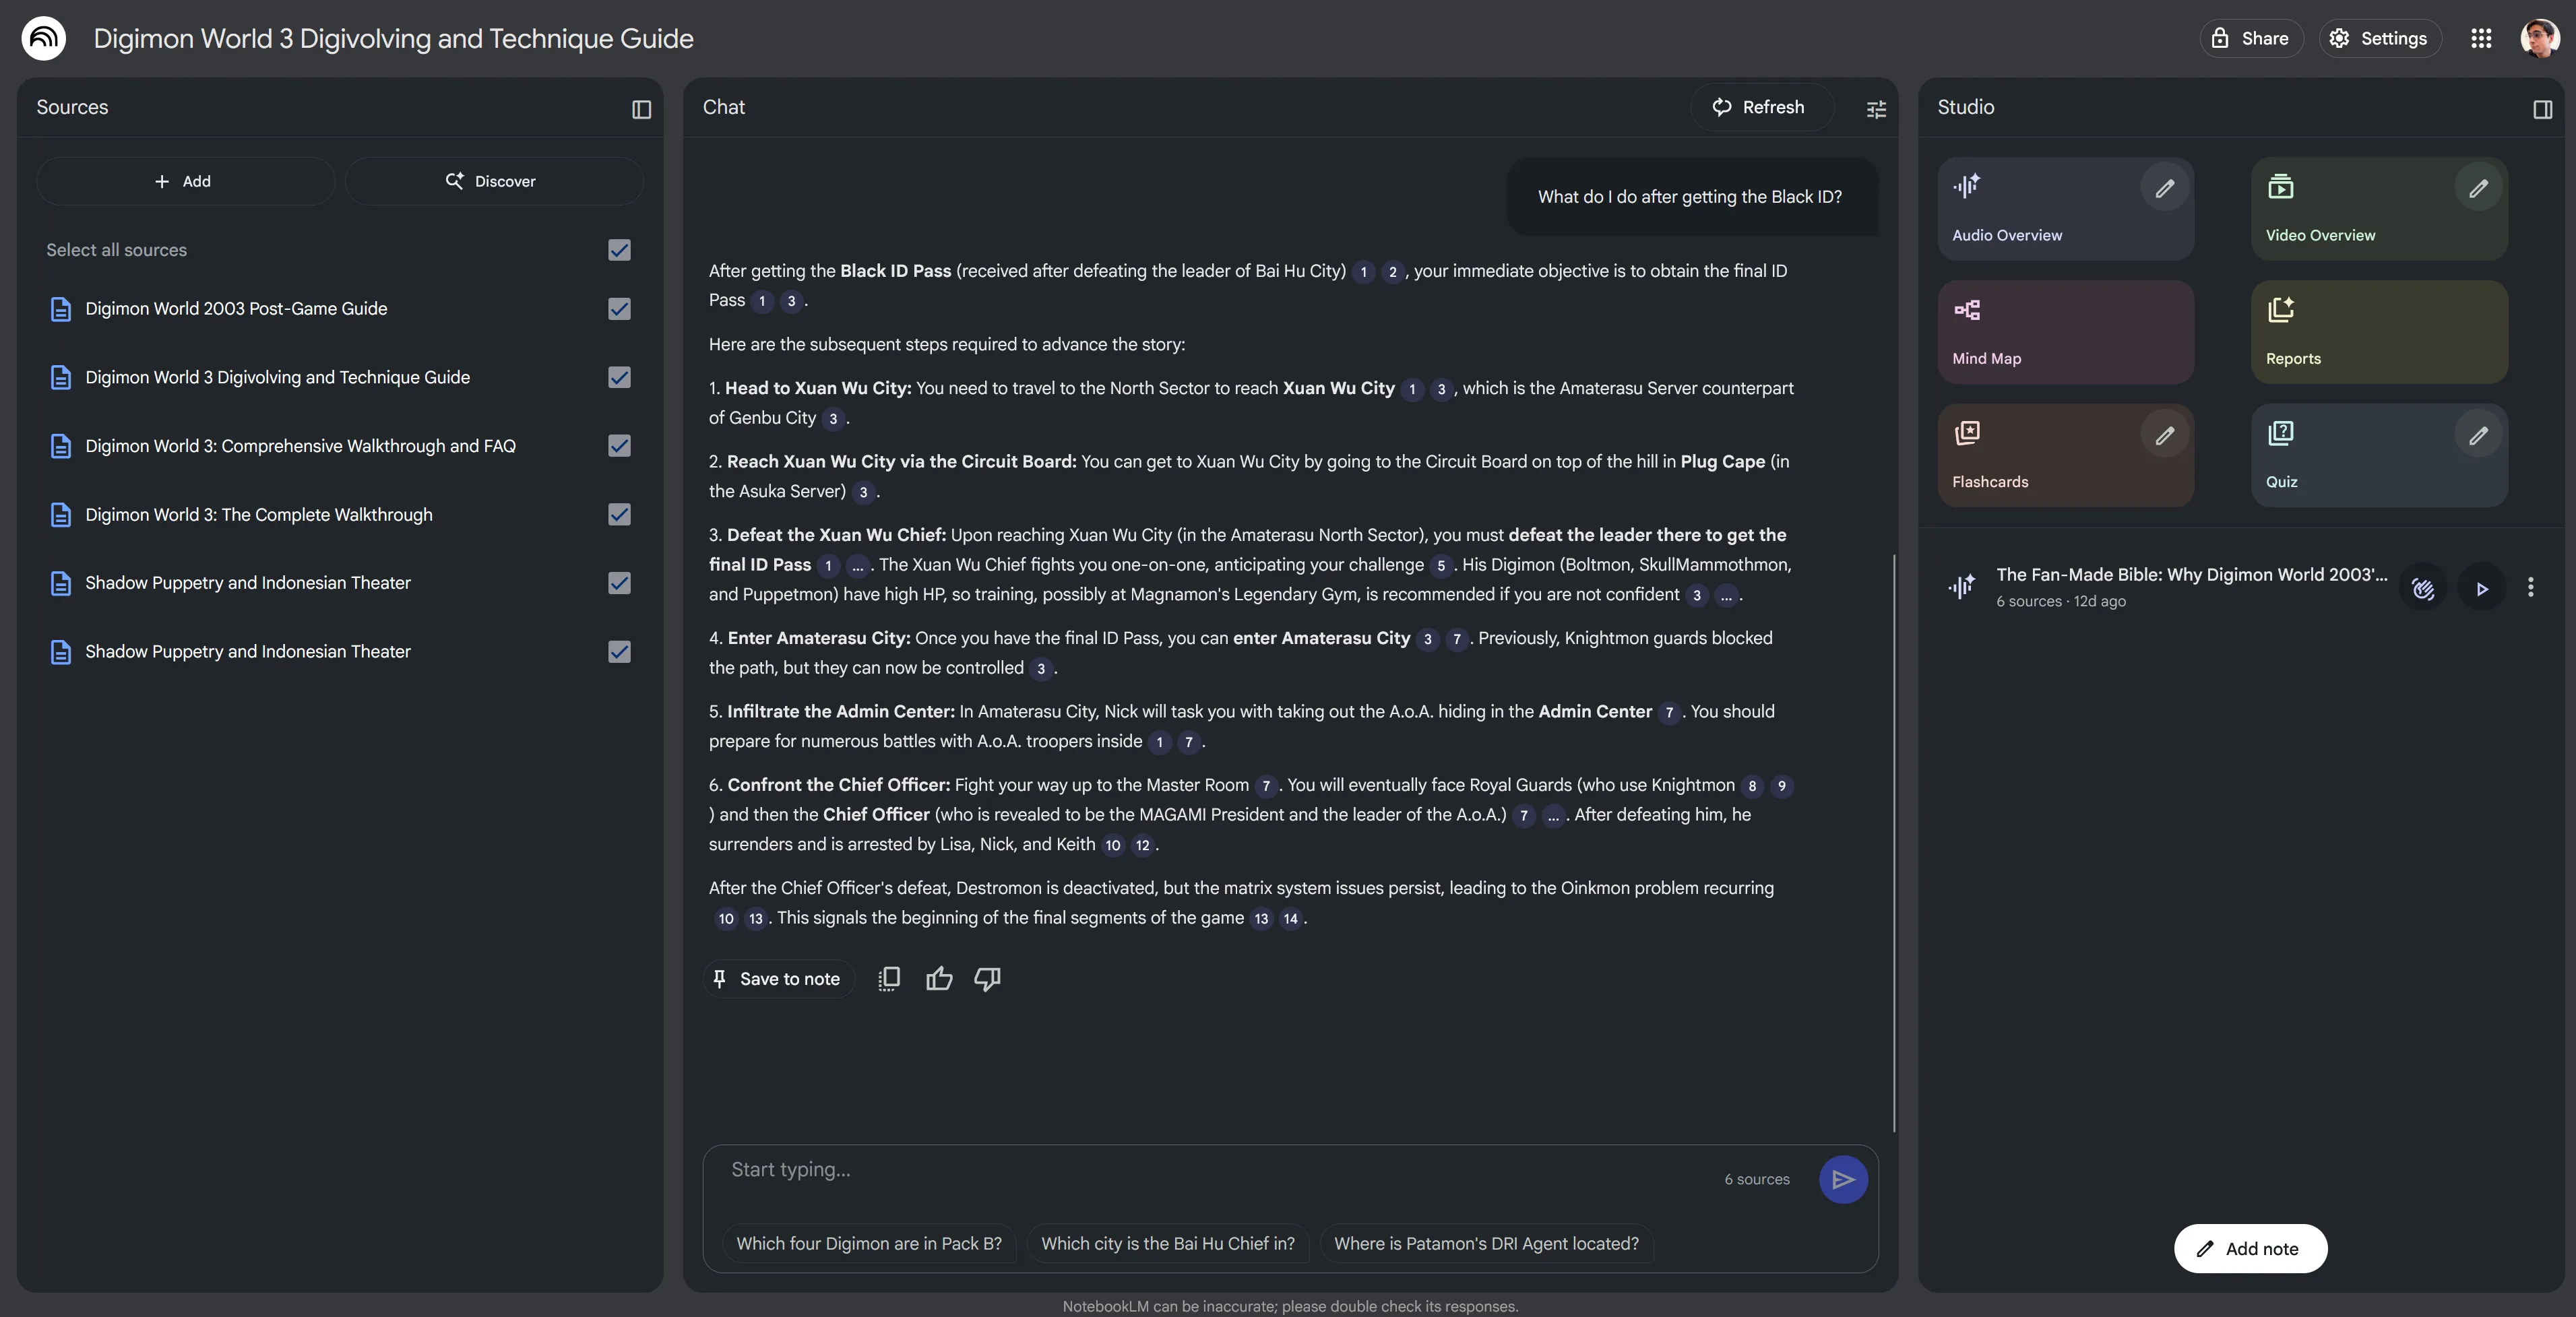
In a more practical, less professional case, this also works great for retro video game guides. I was recently playing Digimon World 3 for the PlayStation 1 and all the information on it was scattered in GameFAQs walkthroughs and old forum posts. I downloaded all the guides (since they’re available as .txt files), added them to the app, then was able to search in a natural language like I would on Google. For example, I’d ask something like “What do I do after beating the 3rd boss?” and I’d get a nice list of next steps.
I’ve seen other people use it to search and parse through technical manuals for hardware, which also sounds like another lifesaver when you’re digging through a PDF for a specific topic and keyword searching is failing.
The current landscape
There are plenty of apps that have an LLM-based chat, like OpenAI’s ChatGPT and Anthropic’s Claude. And most of these now feature multiple document searching (like Claude’s “Projects”).
But few specialize in working alongside a document. Usually your workflow when studying is reading source material on a website or PDF, then opening a separate tab or window with your preferred LLM chat and pasting context in there (like text or screenshots).
What if the LLM was integrated into your reading experience? There are a few apps that enable this.
Dia by Arc / Comet by Perplexity
For the web, if you’re on a Mac you could try Arc’s Dia or Perplexity’s Comet web browsers. They allow you to grab snippets of the webpage and chat directly with an LLM to get answers. You can also provide multiple web pages and have it parse them all.
This workflow is great if you mostly read content on the web. Though you have to use their in-app LLM, which is often cloud-based, meaning no chat is private. I’m also primarily a Windows user, so these apps are unavailable to me completely.
NotebookLM by Google
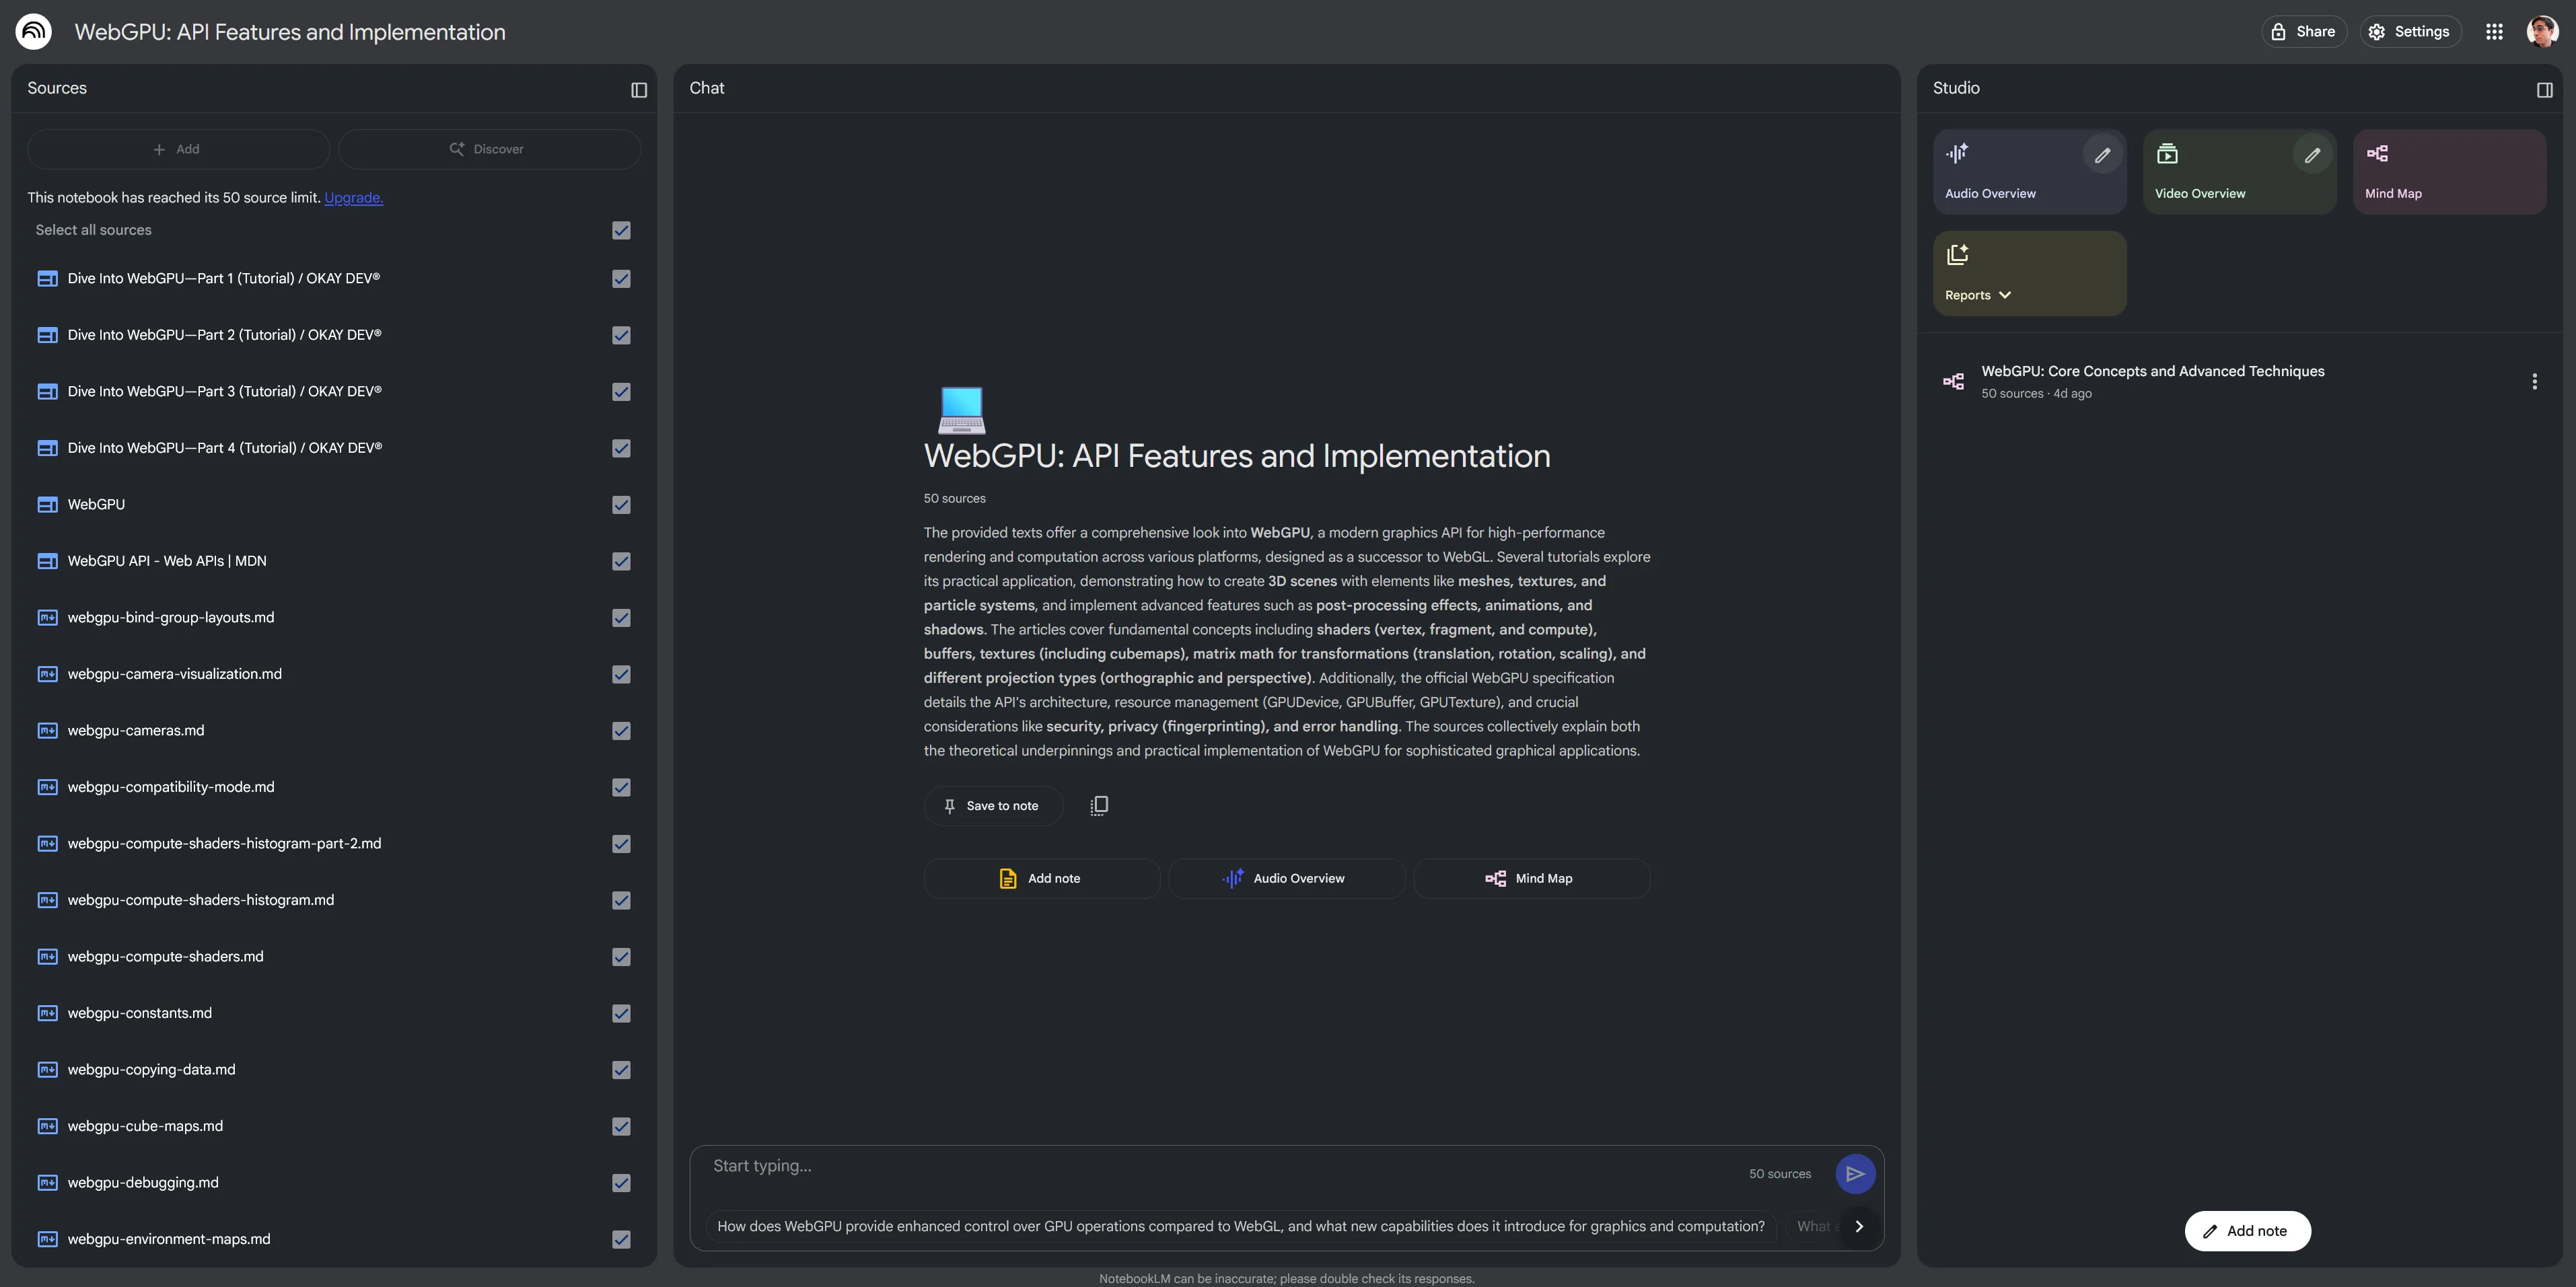
I mentioned before Google’s NotebookLM. They allow you to upload up to 30 documents to one “notebook” and use them inside the chat. This worked great for me like I mentioned for quick stuff like uploading game guides or coding docs and summarizing data points. When I say “documents” it means you can add web pages by a link, upload text files or PDFs, or just paste some text from your clipboard.
NotebookLM has a few academic specific features, like generating a study guide from all the documents — or providing citations for all content it references from documents.
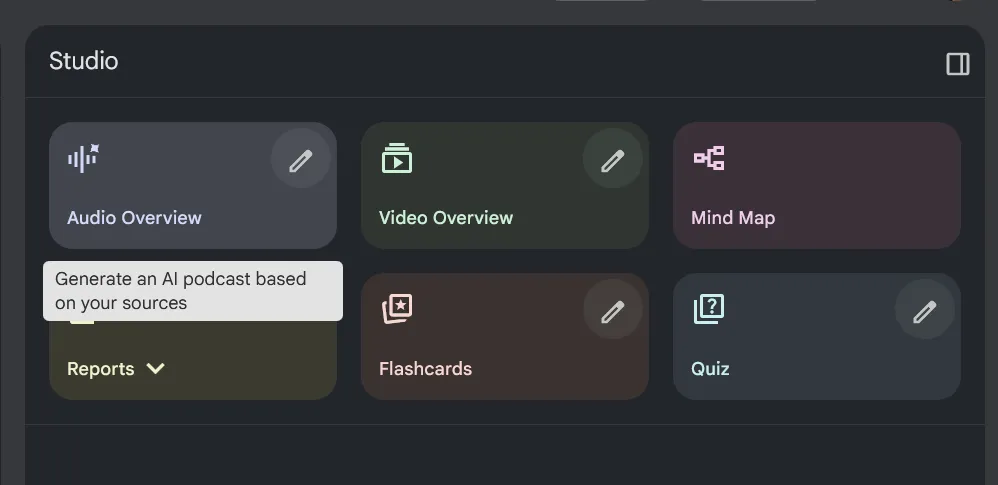
Again though, you’re limited to using Google’s cloud-based LLM (aka Gemini), which is actually kind of slow to provide responses. Generating a study guide took me about 10 minutes or more in some cases, chatting would take 2-5 minutes for small simple responses. The app’s UX is also quite atrocious?
You can upload Markdown files but it’s rendered as plaintext (meaning no syntax highlighting for code), same with PDF context (losing any images or diagrams). Chat responses have some formatting (like bold and inline code blocks), but don’t feature syntax highlighting for any longer code blocks).

The biggest issue I have with the app is that it’s made to work exclusively with the context you provide. So if you’re researching a certain topic, it can’t expound on it in any form. Which is kind of ok, it forces you to find alternative sources that might be more accurate. But that means it also can’t handle simple tasks, like say, converting a math equation to a JavaScript interpretation. That’s one of my favorite things to do with a long complex equation to help break it down and ultimately make it more practical for me. When I asked the chat to do this with an equation from one of my DSP books, it responded that the book contained the math equations — but not the JavaScript code.
I will say though, this app is very new, and as I was researching it they were adding new features (like the study guide). So some of these issues might be resolved in the future with updates. Though the larger issues, like limited context, might stay around since it seems like a core mission of the app. I’d be curious to see if they create some sort of separate Gemini integration to extend off the current chat.
ℹ️ If you’re interested in the design process of the NotebookLM app, one of the designers put up a breakdown on his site that has a lot of behind the scenes gems (like preliminary wireframe sketches for UI that never made it through).
Research by UNMS
The closest app to what we’re looking for is Research by UNMS. It’s a local app where you can upload documents, read them directly in the app, then chat with an LLM with document context. And lucky for me - it’s not Mac exclusive with a Windows version.
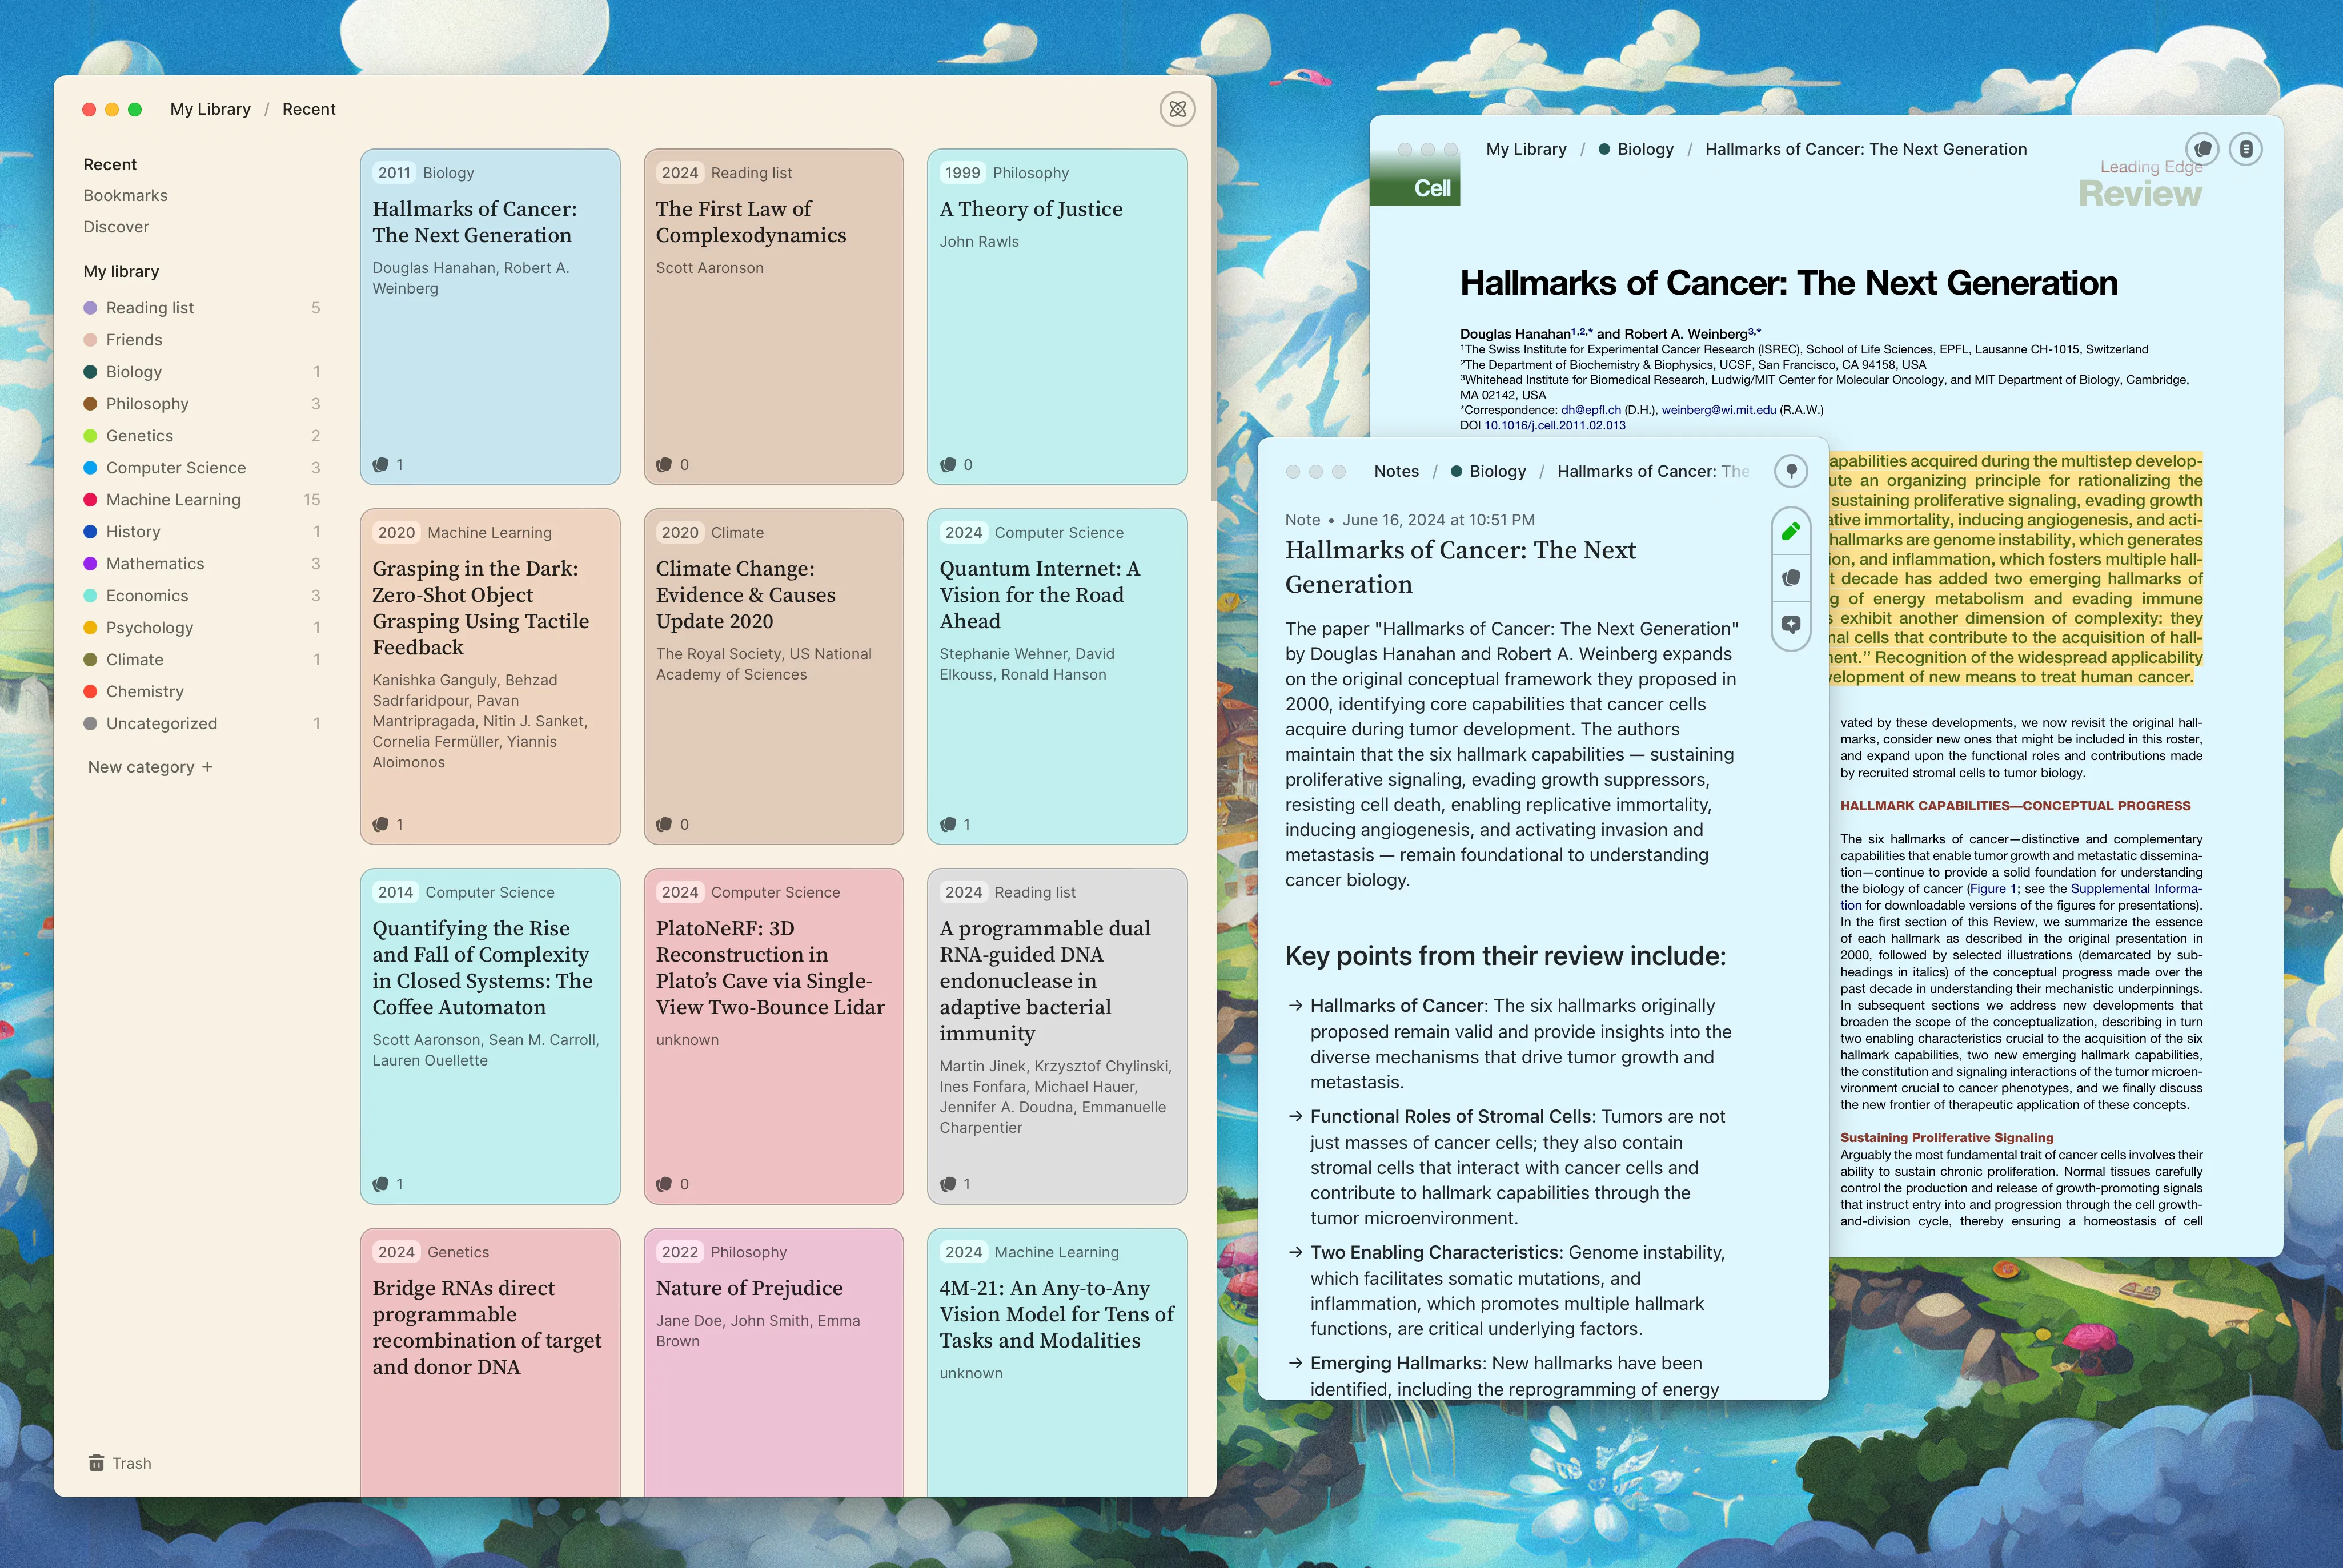
The LLM chat is all run locally and you put in an API URL to your instance (whether it’s on your PC, or personal server on the cloud). I couldn’t personally get it working with my setup using LM Studio, and I even tried sniffing their API requests to create a middleware server to pass off requests but it was a bit tricky (not sure what their API expects, it’s definitely not OpenAI compatible). You can pay for a Pro plan and get access to their cloud-based AI, but I wasn’t interested in that.
I was a big fan of the app’s Mac-inspired design system. Applying a color to each document was fun, and I appreciate it carried over to the background gradient when reading. And I liked the reading experience, it was nice having the PDF rendered properly and being able to select and even annotate text.
I think this app is also limited to a single document context, so if you had multiple files to search across you’d have to do search inside each one individually.
Now that we’ve seen what the competitive landscape looks like, let’s take a look at the product I ended up creating.
Overview of my app
My goal was to combine the functionality of NotebookLM and some UX sensibility from the Research app. I wanted to be able to upload multiple documents to a “set” of some kind and search across them when needed to provide the LLM more context. Ideally I should want to open this app up whenever I want to study and I should enjoy reading and notetaking inside it.
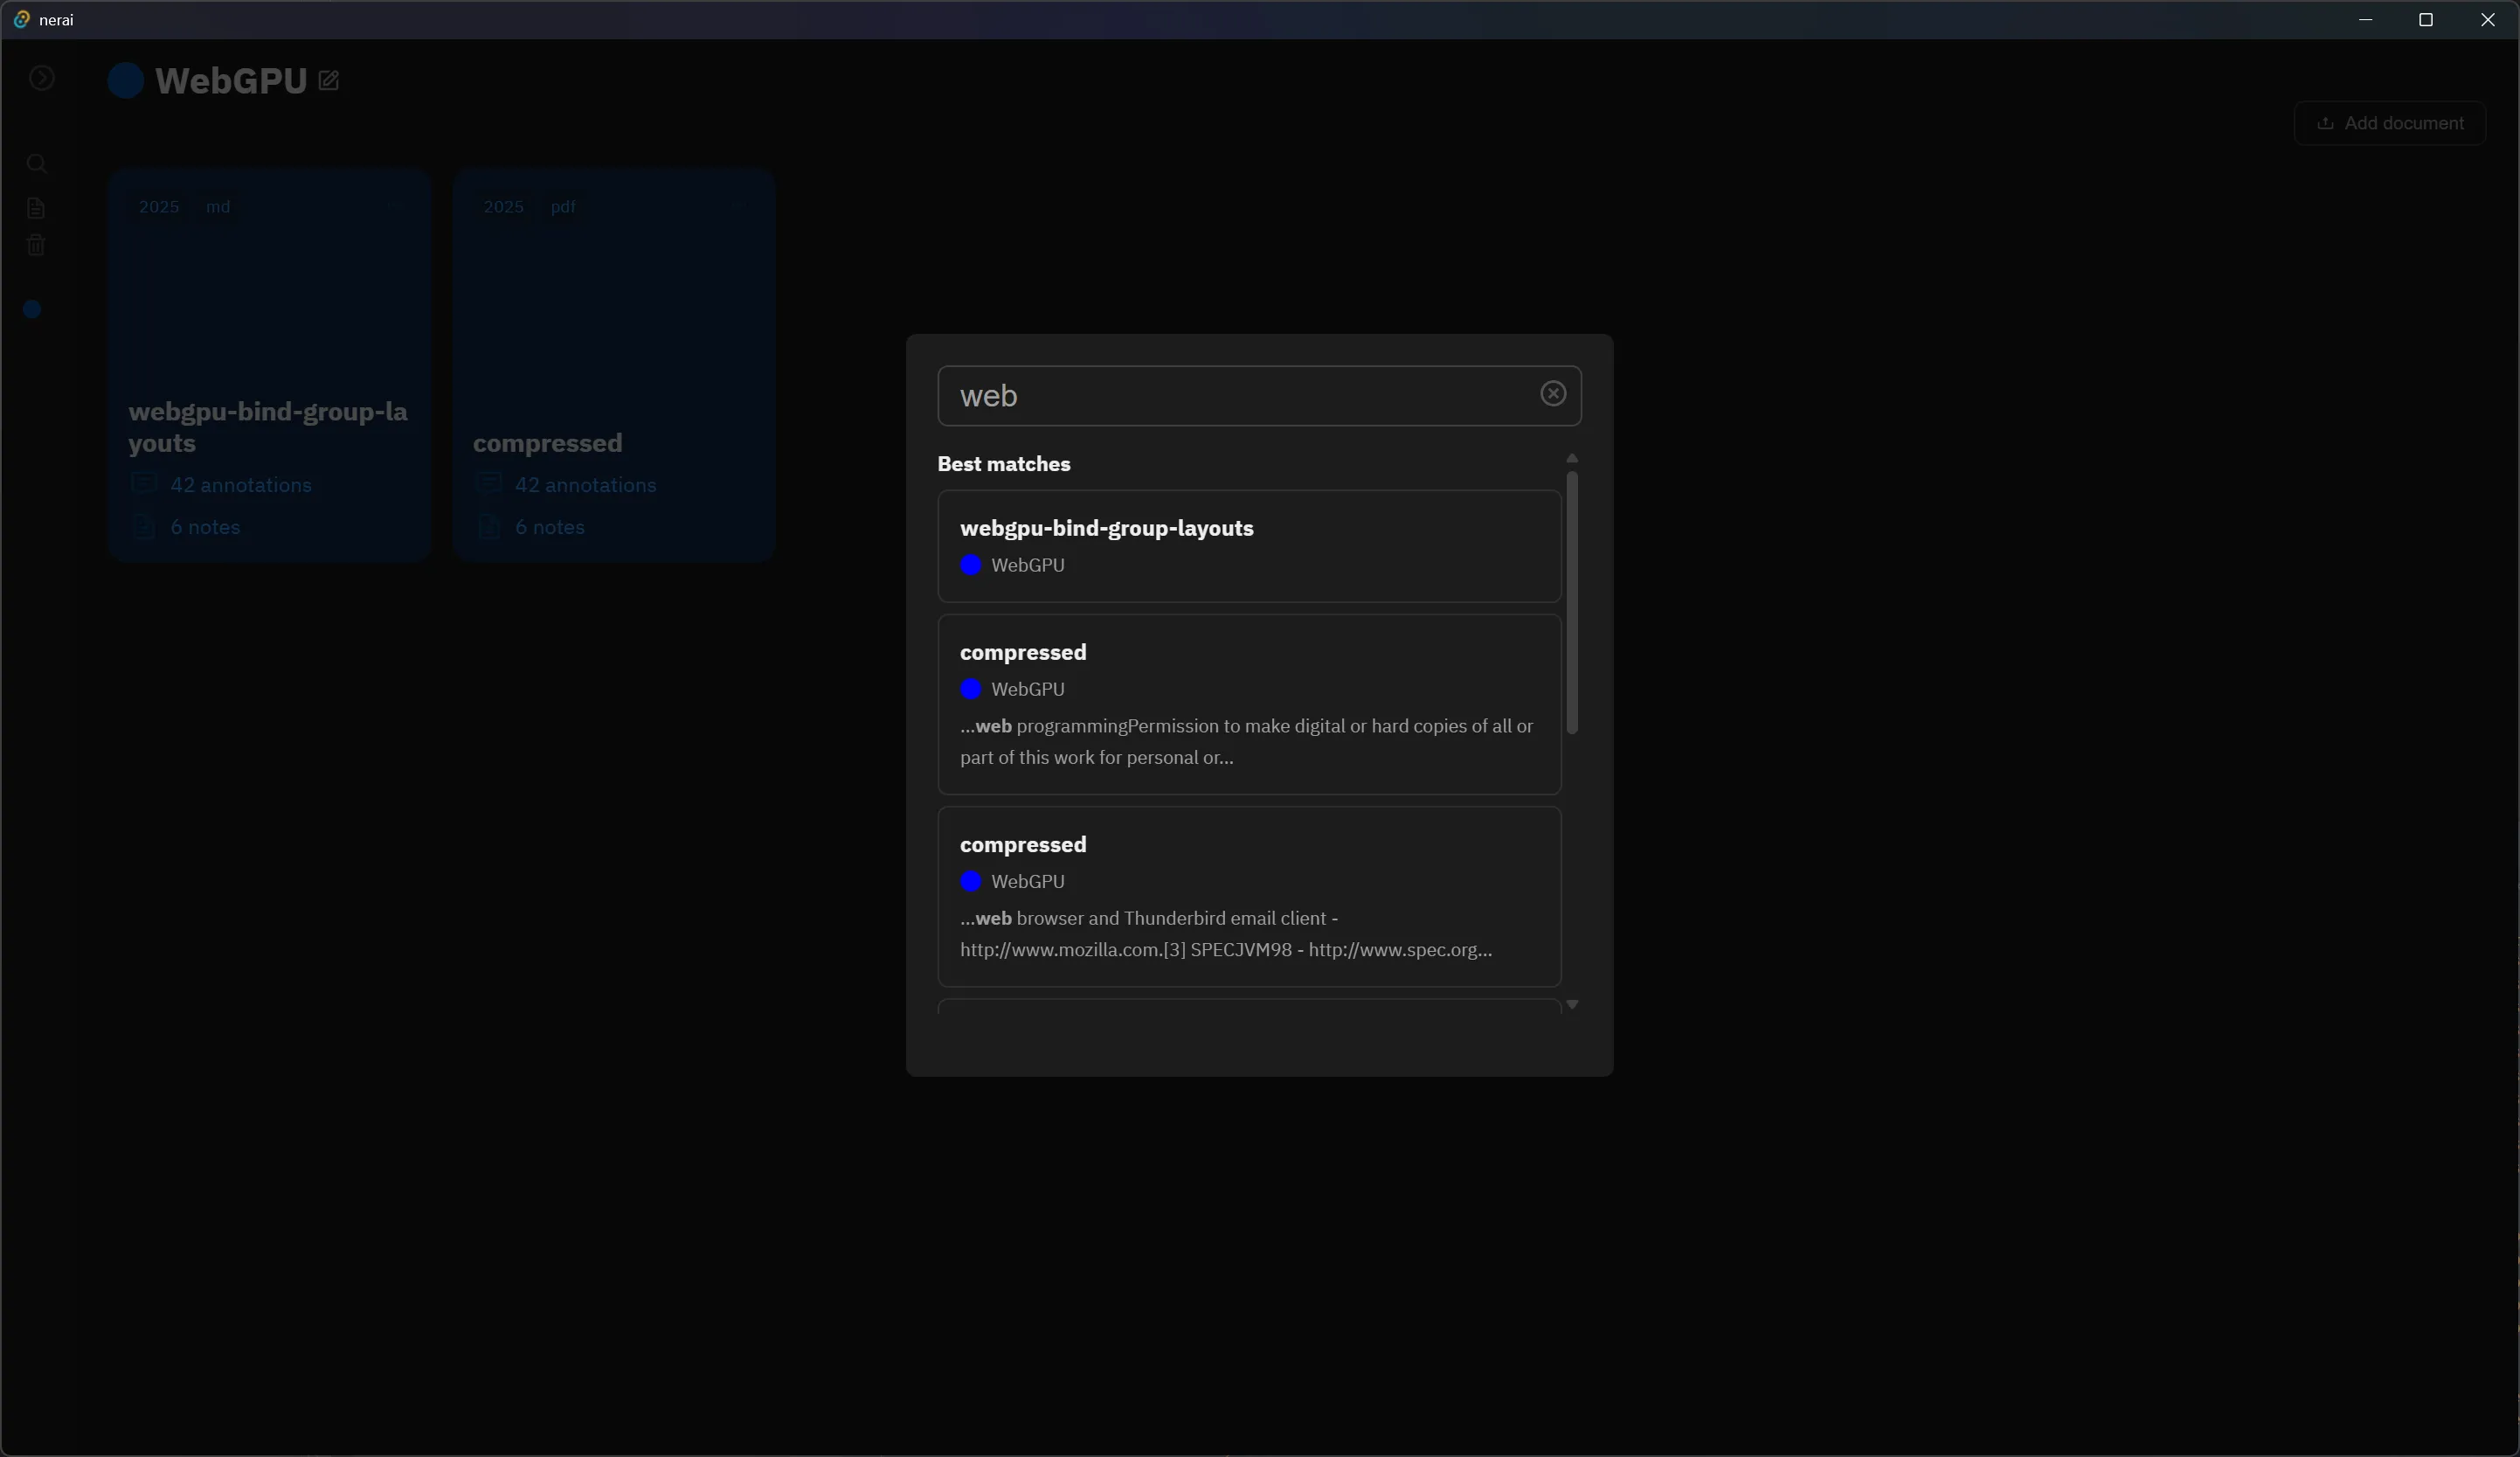
You can create “projects” that contain multiple documents that you’ll be able to search between.
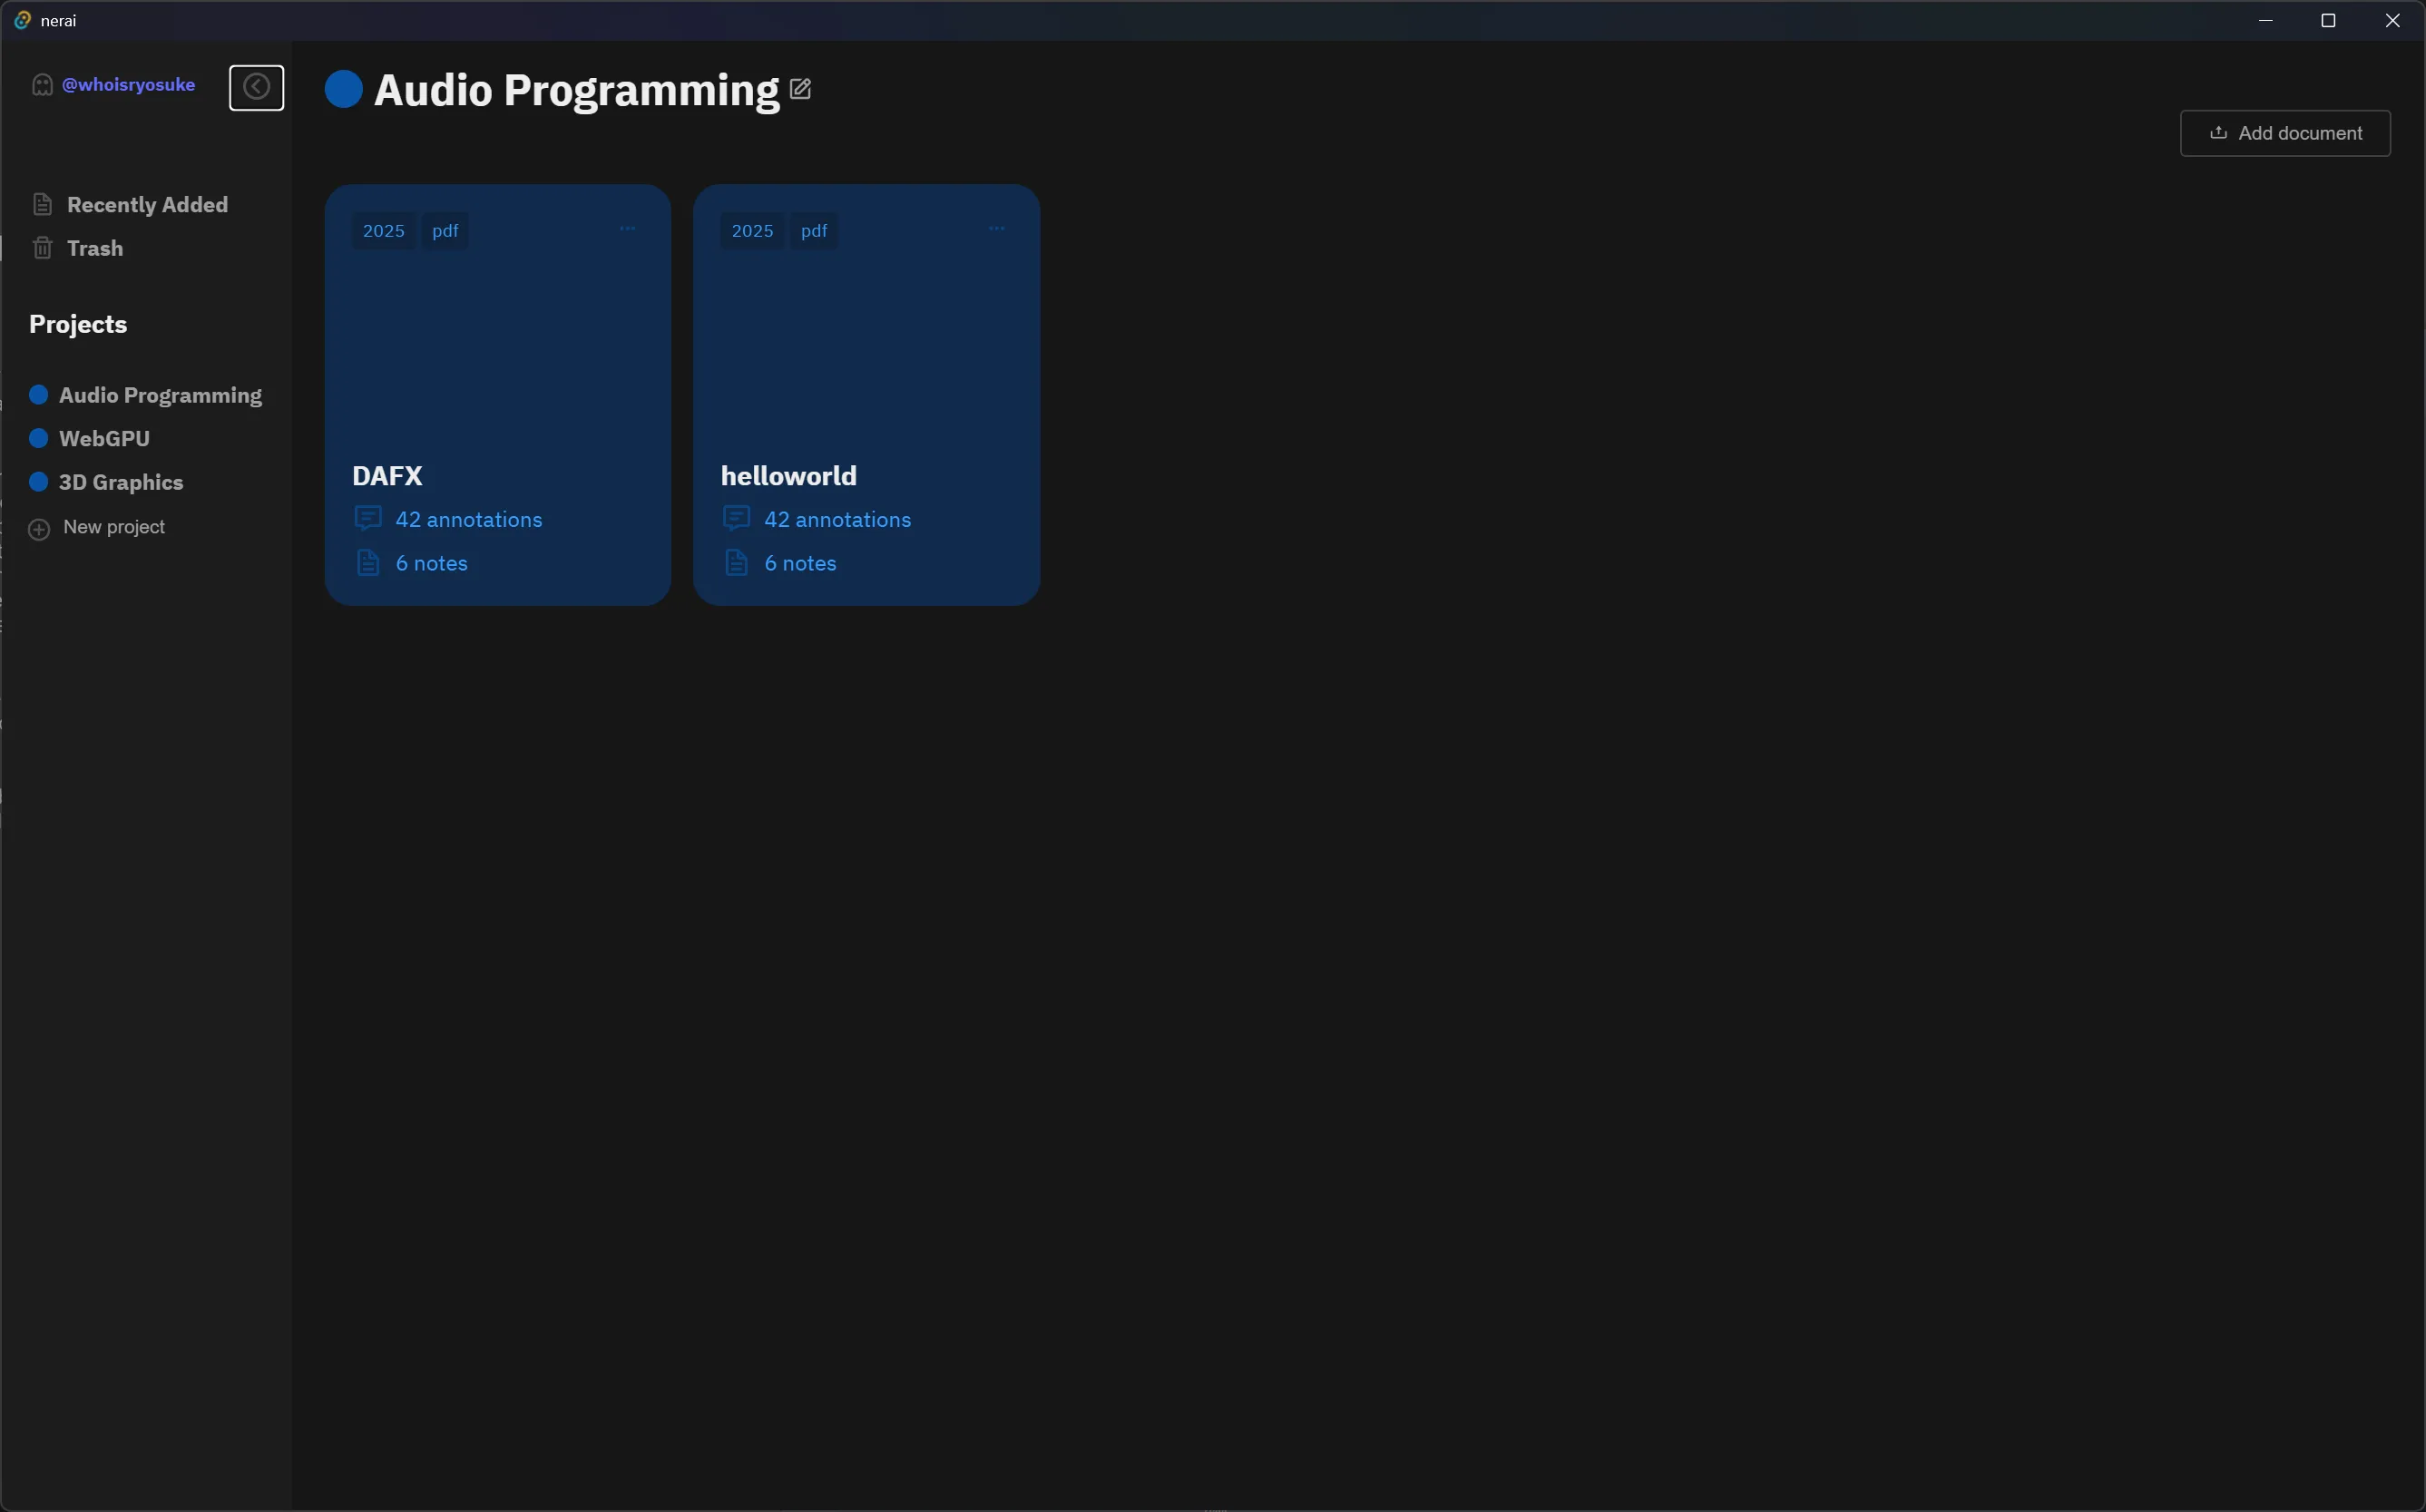
Clicking on a card takes you to a page where you can read it and chat with the LLM at the same time. Currently we support Markdown and PDF files and render each accordingly, along with all features you’d expect (like dark mode or selecting PDF text). When you select text inside the document, it’s automatically added to your chat message. Or you can search for specific documents and snippets to append to the chat.
This was a really fun app to put together. There were a few interesting topics to handle, like understanding then ultimately optimizing the search for relevant documents. And it was fairly simple to put together with my experience with most features (like cross-platform apps, rendering Markdown, or working with APIs).
The architecture
The stack was pretty simple ultimately. I just needed a local app with a database to store data, and ideally the database needed to support vector data (we’ll get into that later).
The LLM would be provided by the user, so I didn’t need to worry about packaging one with the app and spinning up a separate backend server for it. I was using LM Studio to power my AI, but you could use any setup as long as it’s an Open AI compatible API.
The tech stack:
- Tauri — Cross-platform framework for app development. Similar to Electron, but Rust-based instead of NodeJS.
- LM Studio — Provides an Open AI compatible API for local LLM use. Could also just use ollama CLI, or a cloud-hosted model.
- SQLite — Local offline friendly database for storing our user’s data.
- sqlite-vec — Adds vector support to SQLite allowing for storing and searching vector data (aka “embeddings”).
- rusqlite — Rust library for SQL queries that supports sqlite-vec.
- Base UI — For complex UI components like dropdowns (aka the “combobox”).
Not much honestly. As you’ll see, the database is even kinda optional if you’re not working at scale, you could just leverage a good global state library like Jotai and persist it to local storage.
How it works
Before we dive too deep into the app itself, let’s break down how each step works practically.
- How do we chat with an LLM?
- How do we “attach” a document?
- And finally, how do we search for relevant documents to provide more context to the LLM?
We’ll go over each step in isolation to get a grip on it before we apply it inside a real app.
Connecting to LLM
First we need to connect to our LLM. We’ll be accessing it through an OpenAI compatible API, so we just need to send API requests to an endpoint (like localhost:1234/v1/chat/).
ℹ️ I recommend checking out the the OpenAI API documentation to understand how to use various aspects.
To simplify things, we can leverage the OpenAI JavaScript SDK library. This establishes a connection to our API and provides easy to use methods for actions like sending a chat.
import OpenAI from "openai";

const llmClient = new OpenAI({
  baseURL: "http://localhost:1234/v1",
  apiKey: "ollama", // required but unused
  // Ideally we should only be running this on a server
  // but since this is a local app with a user's local LLM
  // shouldn't really matter.
  dangerouslyAllowBrowser: true,
});

export default llmClient;
Technically you’re supposed to use this at a server level (aka NodeJS), but I used it on the frontend by passing the dangerouslyAllowBrowser parameter.
Then we can just make requests by importing the llmClient into any file and using the methods attached:
llmClient.chat.completions.create(chatData);Or you could also just access the API directly, without the OpenAI client, but this requires you to format the data correctly:
const sendChat = async (prompt: string) => {
  const url = "http://127.0.0.1:1234/v1/chat/completions"; // Placeholder API

  try {
    const response = await fetch(url, {
      method: "POST",
      headers: {
        "Content-Type": "application/json", // Important for JSON data
      },
      body: JSON.stringify({
        model: LM_MODEL,
        messages: [
          {
            role: "user",
            content: prompt,
          },
        ],
      }), // Send an empty JSON object
    });

    if (response.ok) {
      // Check for successful response status (200-299)
      const data = await response.json(); // Parse the response as JSON
      console.log("Success:", data);
    } else {
      console.error("Error:", response.status, response.statusText);
    }
  } catch (error) {
    console.error("Fetch error:", error);
  }
};
This all worked great, until I needed to create embeddings. That API endpoint isn’t supported client-side.
So this led me to create a few Tauri commands on the backend (aka the “server”) that handle sending embedding data to the API. These use the reqwest Rust crate to send the POST request to the OpenAI API.
async fn post_ai_api(url: &str, data: &serde_json::Value) -> Result<serde_json::Value, String> {
    use tauri_plugin_http::reqwest;

    let client = reqwest::Client::new();

    let res = client
        .post(url)
        .json(data)
        .send()
        .await
        .expect("Failed to POST");
    println!("{:?}", res.status()); // e.g. 200

    match res.json().await {
        Ok(data) => return Ok(data),
        Err(error) => {
            eprintln!("Error deserializing JSON: {}", error);
            // Return the error to the frontend
            return Err(format!("Error deserializing JSON: {}", error));
        }
    };
}

#[tauri::command(async)]
async fn test_api() -> Result<serde_json::Value, String> {
    let url = format!("{}{}", AI_API_URL, "v1/models");
    get_ai_api(&url).await
}
ℹ️ Needless to say, there’s not a lot of great support for OpenAI in Rust. There’s one crate that’s recommended, but I found it much easier just to leverage the API directly.
Now we can send data to our OpenAI API from our frontend, and backend if necessary. Let’s send our first chat!
Chatting with LLM
When we chat with an LLM what does this mean? You’re probably familiar with using apps like ChatGPT, Claude, Gemini, etc that have “chat threads” where you can “chat” with the LLM.
But what is a “chat thread” and how does the LLM know what you’ve talked about before? One of the common misconceptions about LLMs is that chat’s train them. This is most likely not the case, unless you’re specifically training a model - and that process is specialized in itself.
In order to create a “chat thread”, we just send the LLM every message in the chat, every time we chat. So your first message might ask “Explain multiplication in math”. The LLM might respond with a long winded explanation. Then you ask a follow-up question, “What was my first question?”. When you send the second question, you also send the LLM the first message, as well as it’s response, and finally the new message.
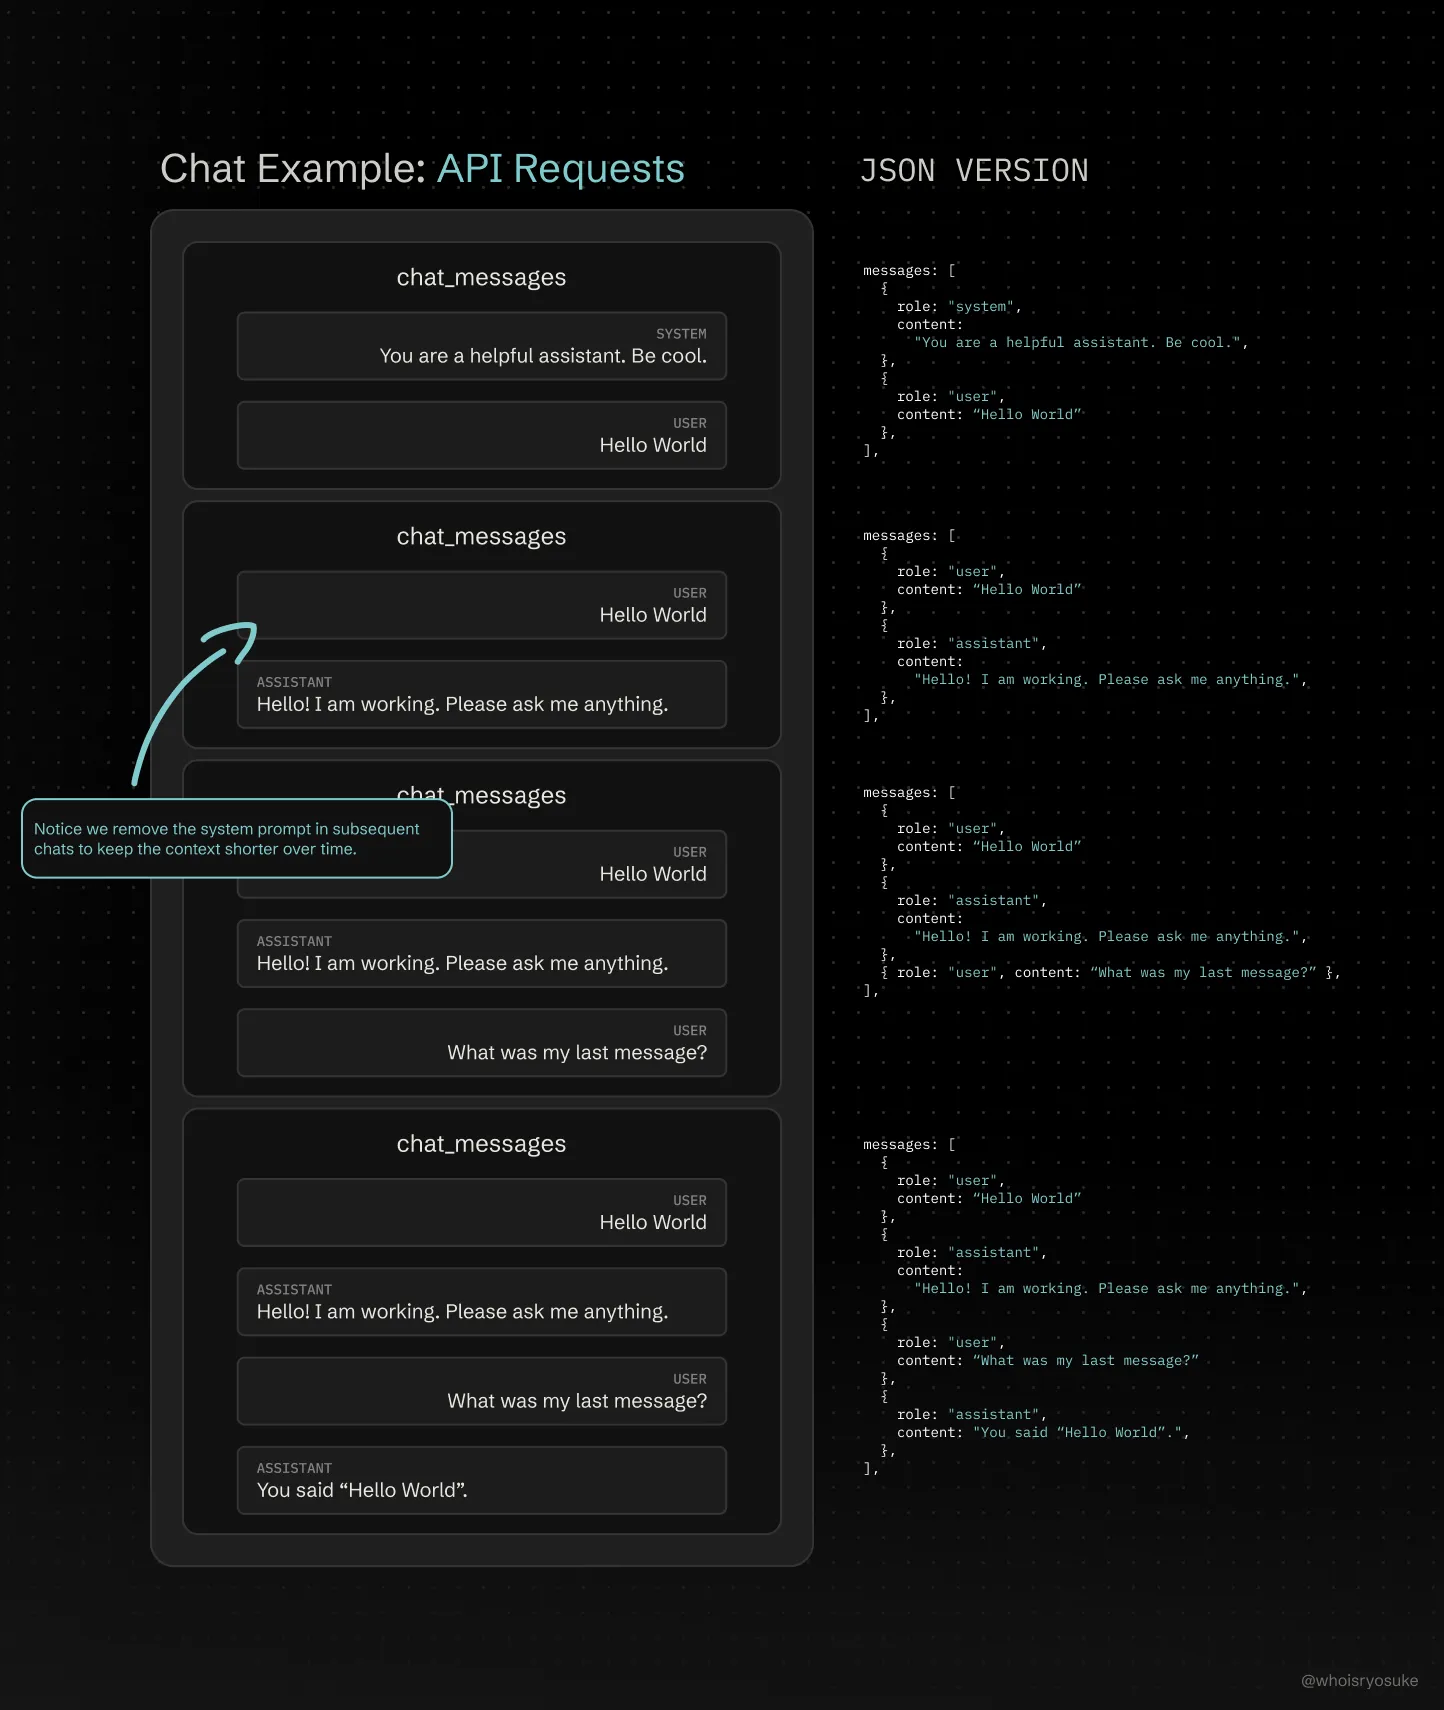
This concept is often referred to as “context”. The LLM is only aware of what’s in it’s current context - which is why we we need to send the entire chat history.
ℹ️ But you might be asking yourself, how do other agentic-style AI’s share relevant data between chats? This is deceptively simple. You basically analyze each user’s conversation, pull key details like general topics (usually by just prompting an LLM for it), then when the user chats again you add the metadata in the form of a “system prompt” (basically prepending chat message with more context instructing AI what to do). Retraining a model is intensive and prohibitive, so it doesn’t happen on a user level. There can be augments in place for some models, but ultimately it’s fed by metadata scraped from your experience with the app.
Now that we have an idea of how chats work, let’s send an example message. Here’s a <Chat> component with a <textbox> that we can type our chat messages into and send data to the API.
Then we use the llmClient we created earlier to send a chat message by creating a new request to the Completion API endpoint.
import { useAtom } from "jotai";
import React, { useRef } from "react";
import { pdfStore } from "../../store/pdf";
import llmClient, { LM_MODEL } from "../../api/lm";
type Props = {};
const Chat = (props: Props) => {
const textareaRef = useRef<HTMLTextAreaElement | null>(null);
const handleSubmit = async () => {
if (!textareaRef.current) return;
// Get chat text
const text = textareaRef.current.value;
console.log("user text", text);
// API request here
const completion = await llmClient.chat.completions.create({
model: LM_MODEL,
messages: [
{
role: "system",
content:
"You are a helpful assistant that answers questions based on the provided document.",
}, // System message - sets the tone and instructions. Crucial!
{ role: "user", content: text },
],
});
console.log(completion.choices[0].message.content);
};
return (
<div>
<textarea ref={textareaRef} />
<button onClick={handleSubmit}>Send</button>
</div>
);
};
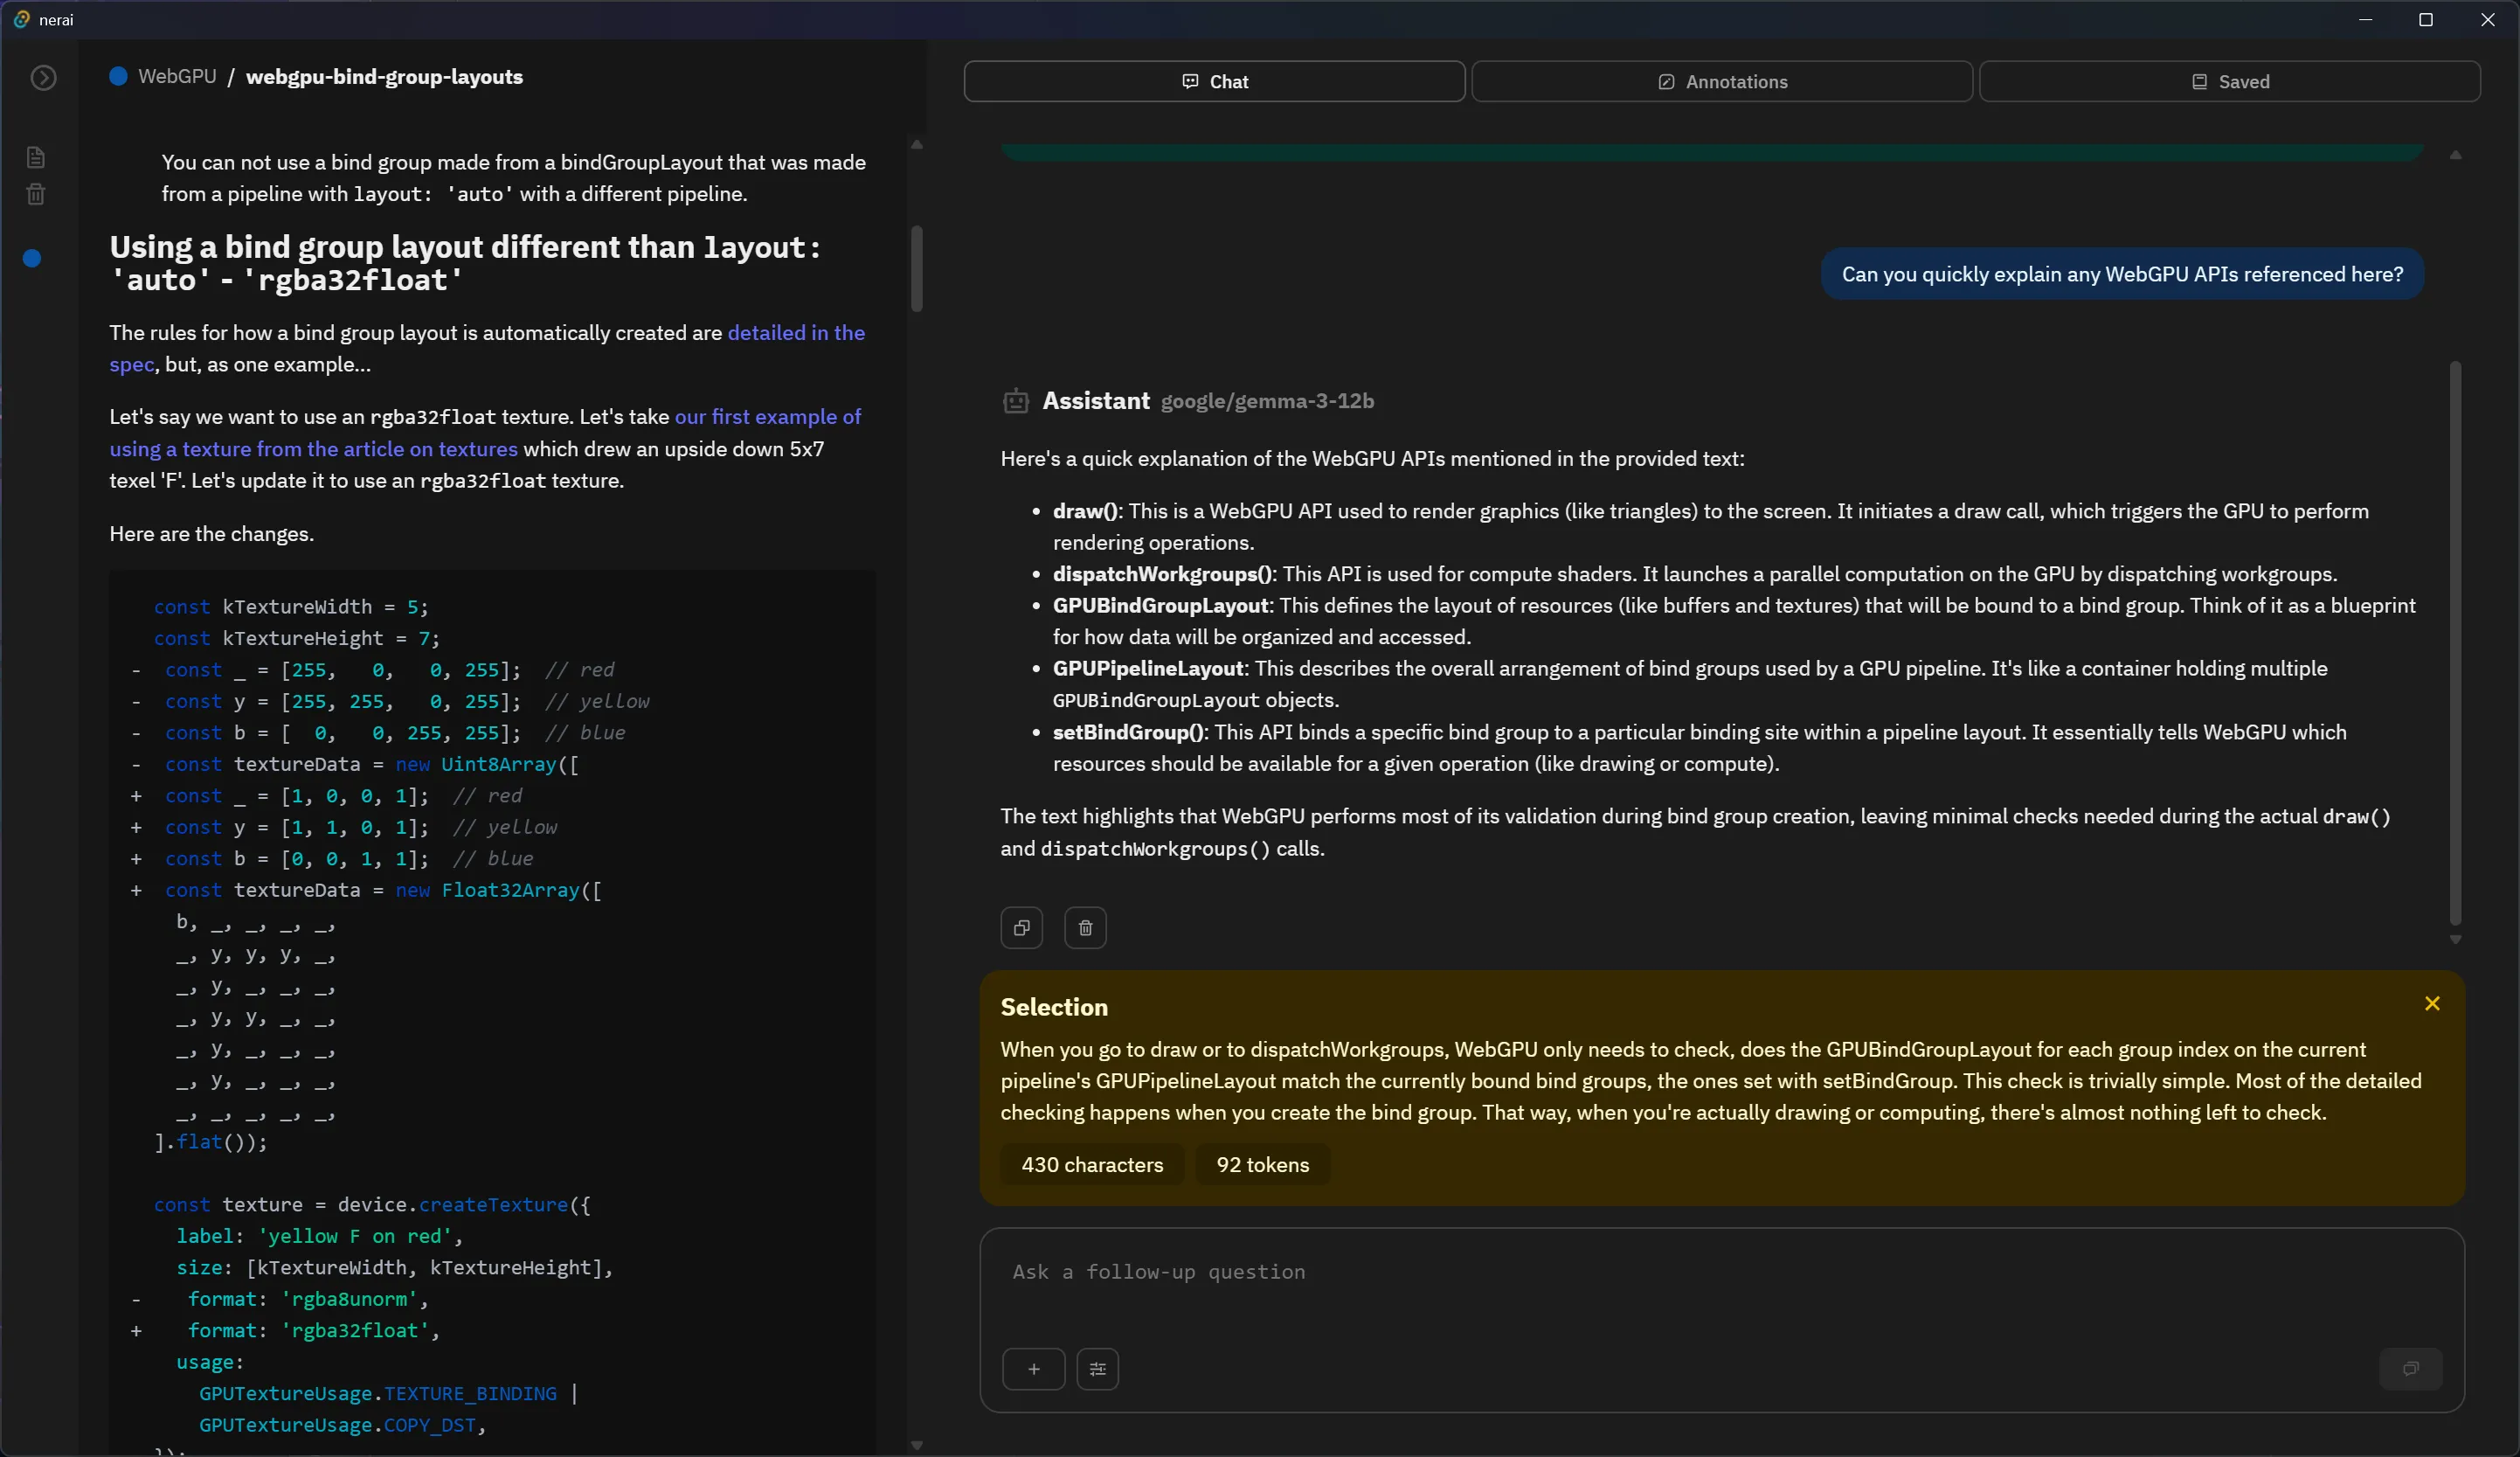
export default Chat;This works great, and you should see a response back from the LLM that looks like this. In my case, I’m using Google’s Gemma model (gemma-3-12b).
2025-09-12 11:51:38  [INFO]
 [google/gemma-3-12b] Generated prediction:  {
  "id": "chatcmpl-ztkpsg0jlyp5cs6r6fh2a",
  "object": "chat.completion",
  "created": 1757703094,
  "model": "google/gemma-3-12b",
  "choices": [
    {
      "index": 0,
      "message": {
        "role": "assistant",
        "content": "This would be some fancy response from the LLM.",
        "tool_calls": []
      },
      "logprobs": null,
      "finish_reason": "stop"
    }
  ],
  "usage": {
    "prompt_tokens": 1109,
    "completion_tokens": 248,
    "total_tokens": 1357
  },
  "stats": {},
  "system_fingerprint": "google/gemma-3-12b"
}
This is pretty cool, but how do we maintain a chat - like a sending a second message?
Like I mentioned before, we need to keep track of the entire chat history and send it each time. To keep it simple, you can just save the user’s and LLM’s messages in the component state (aka useState in React). But in my case, I needed to have multiple chats, so I stored the data in a global data store using Jotai.
import { atomWithStorage } from "jotai/utils";
import { ChatCompletionMessageParam } from "openai/resources";

export type ChatLog = {
  id: string;
  name: string;
  tokenCount: number;
  log: ChatCompletionMessageParam[];
};

type ChatStore = ChatLog[];

export const chatStore = atomWithStorage<ChatStore>("chats", []);
export const selectedChatStore = atomWithStorage<string>("chats-selected", "");
Each chat is represented as a ChatLog with a few key properties like a unique id, a name that describes the chat, tokenCount to keep track of our usage, and finally a log that’s an array of our chat messages. To simplify things, we’ll just grab the types from the openai SDK.
Then to simplify adding chats to the store, I created a addLogToChat function. This is a function that wraps a callback - basically so we can pass it to our Jotai setAtom function directly.
export const addLogToChat =
  (selectedChat: string, messages: ChatLog["log"]) => (prev: ChatStore) => {
    const tempChats = [...prev];
    const tempChat = tempChats.find((chat) => chat.id === selectedChat);
    tempChat?.log.push(...messages);

    return tempChats;
  };

// Using the function in a React component
const [chats, setChats] = useAtom(chatStore);
const [selectedChat, setSelectedChat] = useAtom(selectedChatStore);
setChats(addLogToChat(selectedChat, [newChatMessage]));
Since setChats first parameter is a callback shaped like:
setChat: (previousState: ChatLog[]) => voidWe just have to ensure our addChatToLog function returns a callback like this - then in the same function we can use it (simplifying the process into a single line).
ℹ️ If your Jotai store is available in vanilla JS, you could also just access it directly in your function (instead of using the React hook + callback method). I do a very similar process with Zustand where you just do a
yourStore.get()and it’s really handy for decoupling dependency and logic from the React level (and gives me strange Redux-Saga flashbacks).
But now we can finally send some follow-up chat messages with a few changes to our <Chat> component:
const handleSubmit = async () => {
  if (!currentChat) return;
  // Get chat text
  const text = currentMessage;
  console.log("user text", text);

  // Generate the message sent to LLM
  // We copy the chat log into a new var so we can send it alongside new messages
  const tempChatLog = [...currentChat.log];

  // The new messages we'll send to API
  const messages: ChatCompletionMessageParam[] = [];

  // Attach user's message
  messages.push({ role: "user", content: text });

  setChats(addLogToChat(selectedChat, messages));
  // Add them to our temporary chat log
  tempChatLog.push(...messages);

  console.log("chat messages", messages);
  console.log("chat log", tempChatLog);

  // API request here
  const completion = await llmClient.chat.completions.create({
    model: LM_MODEL,
    messages: tempChatLog,
  });

  // Save the LLM's response to chat log
  console.log(completion.choices[0].message.content);
  setChats(addLogToChat(selectedChat, [completion.choices[0].message]));
};
There’s a few key things to consider here that make the process a little more complex:
- Creating a new “empty” chat in the store. If we don’t do this, we won’t be able to add our messages to a
log. I create the chat initially in theuseEffectif a one doesn’t exist. - Sending the system prompt in the initial message. For my app specifically, I needed to instruct the LLM to respond in a certain way, as well as acknowledge additional data I’d be sending.
- Deleting chat messages. The user should be able to delete chat messages to clear up context if needed.
- Communicating context usage to user. Since we’re storing and sending the entire chat thread, we need to let the user know how much “chat” they have left. The LLM returns a token count for each message, but we can also use libraries on the frontend (like
gpt-tokenizer) to count the tokens to estimate usage before messages are even sent.
Attaching documents
Now that we can chat with the LLM, how would we attach a document for it to look at? Like say, a Markdown file with text — or code in it’s format (like .tsx for React components).
This is also as simple as you’d imagine by now. The LLM needs to know about something? It needs to be in the “context”. How do we add things to the context? We just append it to our chats. Just like before, we insert a message before the user’s chat with a system prompt informing the LLM we’re giving it a document, then just inlining all the document text.
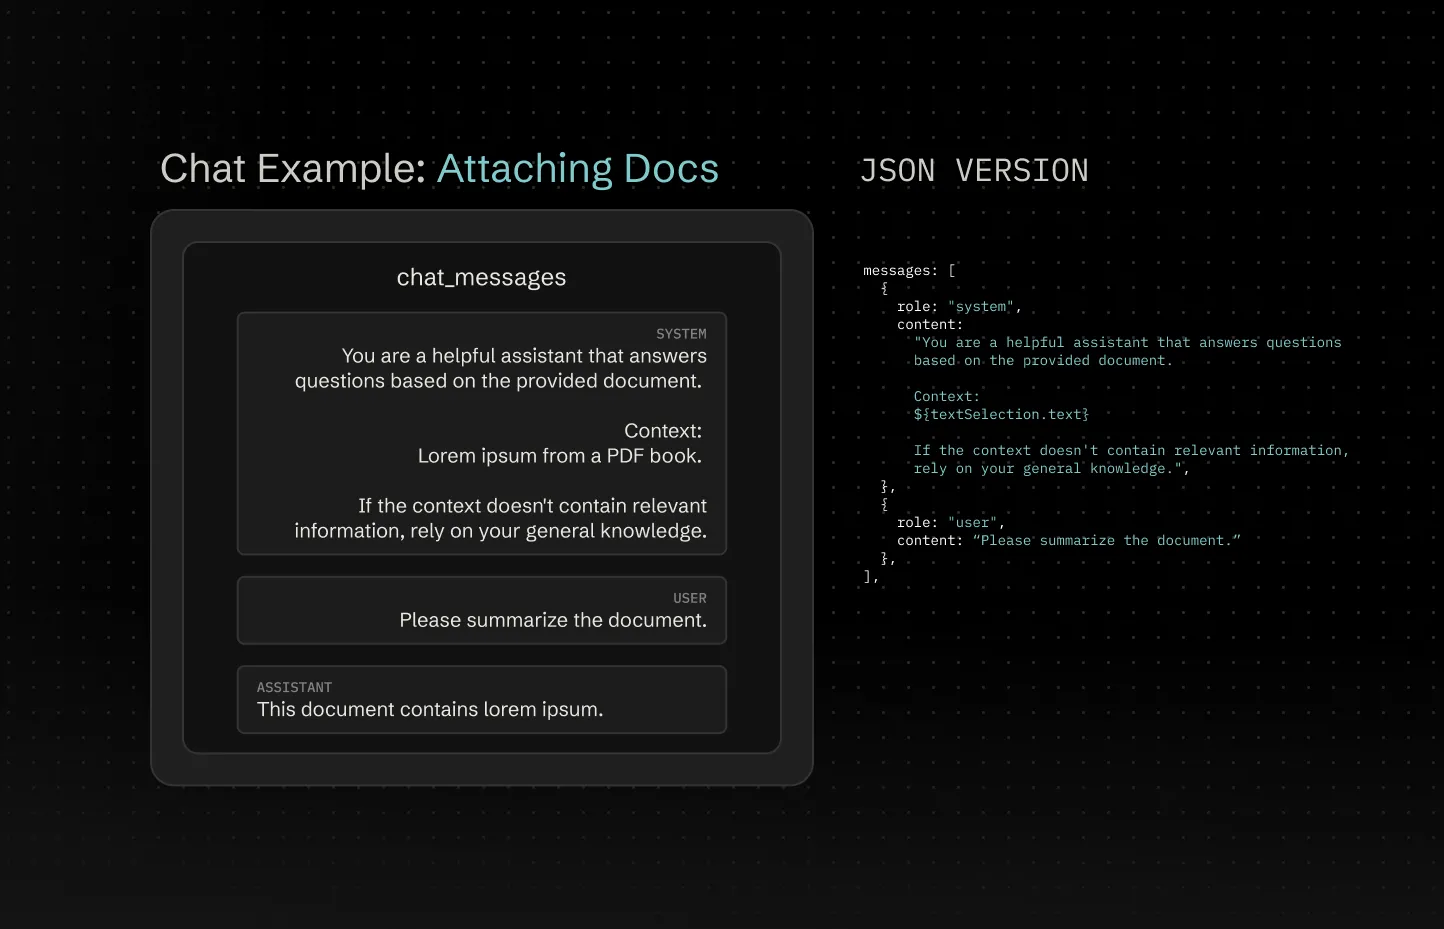
messages.push({
  role: "system",
  content: `You are a helpful assistant that answers questions based on the provided document.

Context:
${textSelection.text}

If the context doesn't contain relevant information, rely on your general knowledge.`,
});
The big thing to note here is that the role is set to system. This makes it a “system prompt”, informing the system of information without including it in the chat log. This is often exposed in a “settings” menu for the chat where the user can adjust their own system prompt to tweak the responses to their liking. But here we’re utilizing it to insert our own data.
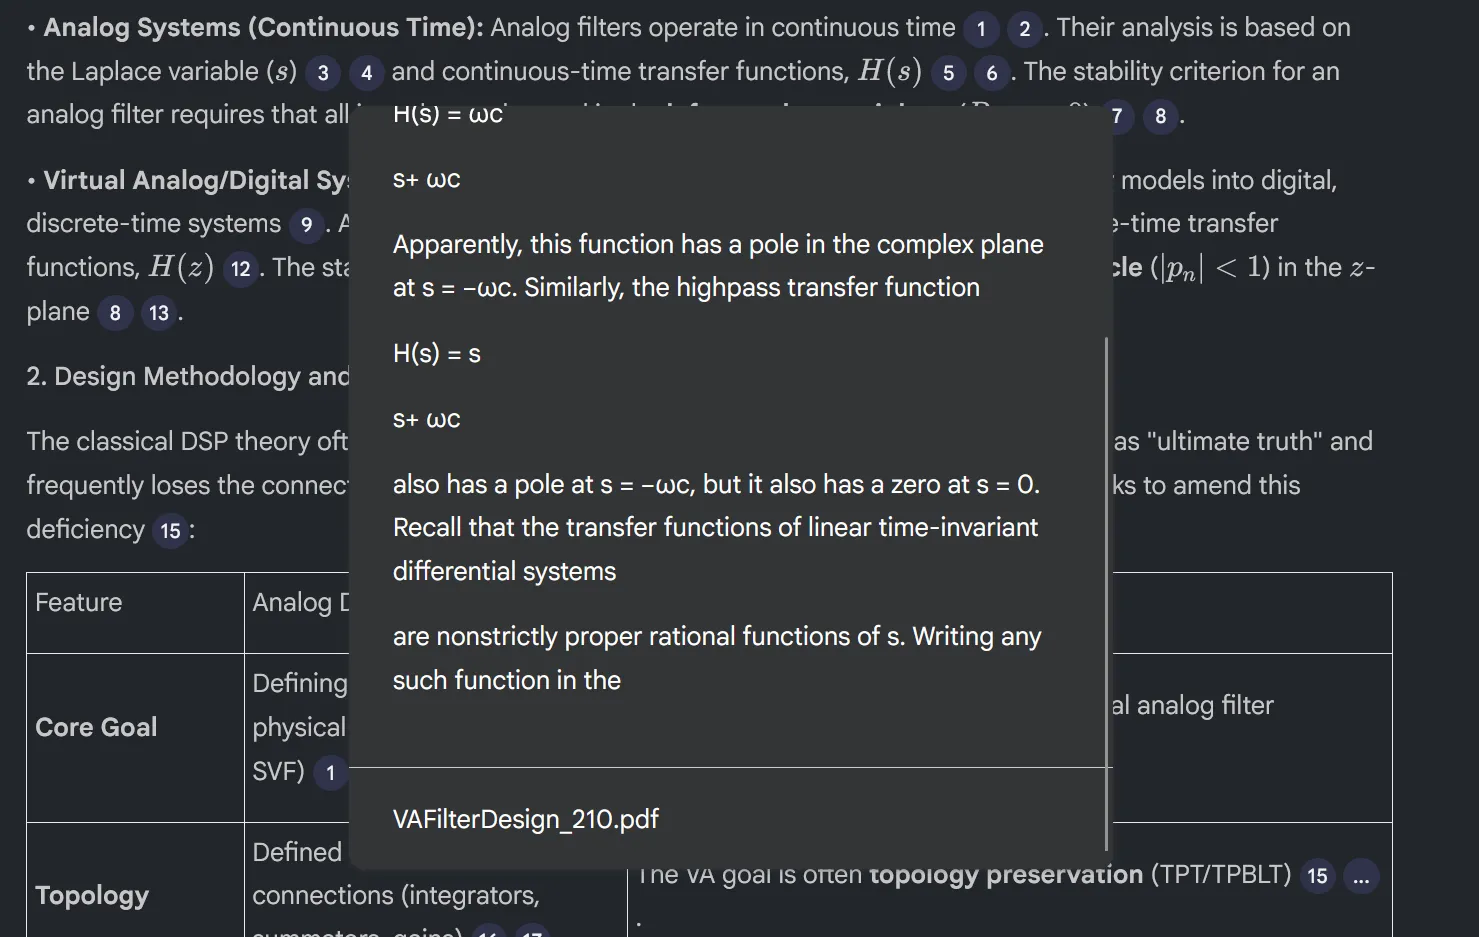
ℹ️ This “text” could come from anywhere, like uploading a Markdown file and getting the contents as text — or parsing a PDF and pulling it’s text out with a 3rd party library. That process isn’t really important, ultimately you just need your document in a plain text format. What about images? We’ll touch on that later…
You might notice a key issue here though. I mentioned before most LLM’s have a limit to their context, usually measured in a token count. If we include more words we increase the token count, possibly exceeding the threshold. And once we do that, the LLM starts making more mistakes - sometimes even “hallucinating” by providing gibberish as responses.
So what do you do if you want to upload an entire book or code repo and have the AI analyze it?
Instead of providing the entire document we break it up into “chunks”. Then when the user asks a question, we find the most relevant chunks and send those — instead of the whole kit and kaboodle. That’s where we get into the concept of “searching”.
ℹ️ If your document is smaller than the context, just send it without chunking. The next step is primarily for scaling the process for more data (like NotebookLM searching between 30 documents for citations).
Searching for documents (aka “RAG”)
I’ll preface this by saying that this whole process is probably the most involved, and depending on how it’s implemented, massively effects how accurate the LLM can respond using reference material.
Rather than sending the entire document and clogging up our context, we’ll break it up into chunks and send the most relevant ones. Breaking text up into chunks is pretty trivial (kinda — we’ll get into that…), but how are we going to find the most “relevant” chunk?
This whole process is referred to as retrieval-augmented generation or RAG. We’ll basically have a database with the chunks of text — as well as “embeddings” of the text as vector data. Then we’ll use search the database using the embeddings to grab text data and send it to the LLM as context. This allows the LLM to have access to information it’s not trained with — but more importantly, lets it access a large amount of data and get specific pieces (to keep the context small so user and agent can respond back with more).
Let’s break down the process a bit, starting with converting our text into “embeddings”.
ℹ️ If you’re interested in another tutorial, NVidia has a series of blogs and tutorials that go over a RAG process using their AI API and embedding models. It’s Python and cloud-based though (and seems to even cost in computing…), so maybe just speed read the blogs past any marketing stuff and focus on the open source code they released.
Embeddings
The process starts with the concept of embeddings. We need to take our text chunk and feed it to an LLM which will return an “embedding” of the text data. The embedding is an array of floats (aka numbers). These numbers represent a tokenization of our text. It’s not exactly a representation of the tokens themselves, but a compressed version of it (like say, 1024 floats in our embedding).
We can create an embedding by using the embeddings endpoint. This accepts an array of text and returns the embeddings for each. In my case, I created a Tauri command that sends a POST request to the endpoint.
/**
 * Creates embeddings using OpenAI. Expects user to send JSON as string.
 */
#[tauri::command(async)]
async fn create_embeddings(data: serde_json::Value) -> Result<serde_json::Value, String> {
    let url = format!("{}{}", AI_API_URL, "v1/embeddings");
    post_ai_api(&url, &data).await
}
ℹ️ For text embeddings, you should use one specifically made for it. Ideally if you’re using a certain model for your LLM chat, you should use their text embedding model. For example, OpenAI uses
text-embedding-ada-002to process it’s text for it’s internal models. If you’re like me and trying to do things offline, you’ll likely need to find another. If you’re using LM Studio you can just search for text embedding models and find a few.
Then on the frontend I can call the command and pass it text chunks:
async function generateEmbeddingsForTextBatch(
  chunks: string[],
  modelName: string = LM_MODEL_TEXT_EMBED,
): Promise<TextEmbedding[]> {
  const embeddings: TextEmbedding[] = [];

  try {
    const response = (await invoke("create_embeddings", {
      data: {
        model: modelName,
        input: chunks,
      },
    })) as CreateEmbeddingResponse;

    console.log("got response from Rust", response);

    if ("error" in response) {
      throw response.error;
    }

    // Process the response data
    response.data.forEach((embeddingData, index) => {
      embeddings.push({
        text: chunks[index],
        embedding: embeddingData.embedding as number[],
      });
    });
  } catch (error: any) {
    console.error("Error generating embeddings:", error);
    // Re-throw to handle upstream
    throw error;
  }

  return embeddings;
}

// Convenience function for handling all our chunks
export async function processChunksToEmbedding(chunks: string[]) {
  const embeddings: TextEmbedding[] = [];
  try {
    const chunkEmbeddings = await generateEmbeddingsForTextBatch(chunks);
    embeddings.push(...chunkEmbeddings); // Spread the results into the main embeddings array
  } catch (error) {
    console.warn(`Error processing batch. Retrying later...`);
    // @TODO: Handle retry edge case
  }
  return embeddings;
}

// Get the embedding data for text chunks
const embeddings = await processChunksToEmbedding(dataset);
But what do we do with an array of numbers? This is is where the magic of vector math comes into play.
What if we could convert the user’s chat message to an embedding as well? This would give us 2 different arrays of numbers to compare. And if we use vector math, like the cosine similarity between the numbers, we could see how “similar” the chunk and chat message are.
/**
 * Utility function to compare 2 vectors.
 * Used for comparing text that's been converted to embeddings (aka vector data).
 */
function cosineSimilarity(a: number[], b: number[]): number {
  console.log("similarity", a, b);
  const dotProduct = a.reduce((sum, val, i) => sum + val * b[i], 0);
  const magnitudeA = Math.sqrt(a.reduce((sum, val) => sum + val * val, 0));
  const magnitudeB = Math.sqrt(b.reduce((sum, val) => sum + val * val, 0));
  return dotProduct / (magnitudeA * magnitudeB);
}

export async function findRelevantDocuments(
  query: string,
  resultCount: number = 3,
): Promise<DocumentEmbedding[]> {
  console.log("finding relevant docs...");
  const documents = store.get(pdfEmbedStore);

  // In order to "search" the documents, we need to convert chat message
  // to an embedding so we have vector data to compare against the document vectors
  const queryEmbedding = await generateEmbeddingsForTextBatch([query]);
  if (queryEmbedding.length == 0) {
    throw Error("Couldn't convert search/chat to embeddings for comparison");
  }

  // Go through all the documents and compare them to chat message
  // and measure the "similarity" of the docs to message
  const similarities = documents
    .filter((doc) => doc.embedding)
    .map((doc) => ({
      document: doc,
      similarity: cosineSimilarity(queryEmbedding[0].embedding, doc.embedding),
    }));

  // Sort docs by similarity and return the top results
  return similarities
    .sort((a, b) => b.similarity - a.similarity)
    .slice(0, resultCount)
    .map((item) => item.document);
}
ℹ️ You might be asking yourself, how does an embedding of a user’s chat message like “Generate a summary of this document” grab relevant documents? The embeddings take text and convert it into vector representations of their meanings. So it’s not saving each word, or even sets of words. It’s associating pieces of text with other concepts it’s trained for like “Summary of core material”. So if we ask it for a “study guide”, it’ll associate that phrase with that concept. When we do a vector comparison we see how similar our document chunks are to these encoded concepts.
As you can imagine, this requires taking each document the user uploads — breaking it up into chunks, generating embeddings, then storing them somewhere we can “search” later. I created a Jotai store for this initially:
export interface DocumentEmbedding {
  text: string;
  embedding: number[]; // Assuming a standard embedding size (e.g., 1536 for text-embedding-ada-002)
}
export const embeddingStore = atom<DocumentEmbedding[]>([]);
As you can imagine, this doesn’t scale very well. Instead, we can leverage a database that supports vector data, store our embeddings inside, then search for embeddings like we normally would — just supercharged by the database.
SELECT
    rowid,
    doc_id,
    content,
    distance
FROM embeddings
WHERE embedding MATCH :embedding_data
AND project_id = :project_id
ORDER BY distance
LIMIT 3
ℹ️ You might be looking at this whole process and thinking, isn’t this how search engines work? And you’d be kind of correct. Search engine frameworks like Elasticsearch have their own custom embedding models that provide better relevance than a simple string similarity lookup. Programmers of LLMs have been able to adapt this kind of architecture to streamline their chat models.
So cool, we now we have a list of relevant documents that are rated by relevance (or distance in the database case). But if you’ve been following closely, you’re probably asking yourself: “Where do the text chunks come into play?”.
When we store the embeddings (either in a store or database), we also need to store our text chunks associated with them. We can do this in a lot of different ways.
Initially with a store, I chose to create separate DocumentChunk and DocumentEmbedding data types that were associated by an chunk_id` on the embedding. This allowed us to have multiple embeddings for each chunk if needed, and it kept embedding data lighter (so when we search for it, the memory footprint’s a bit smaller).
export interface DocumentChunk {
  id: string;
  text: string;
  // Associate with a document
  doc_id: string;
}

export interface DocumentEmbedding {
  // Associate with a document chunk
  chunk_id: string;
  embedding: number[];
}

// Using them
const documentChunk = {
  id: randomHash(),
  text: documentTextChunk,
  doc_id: documentId,
};
const embedding = generateEmbedding(documentTextChunk);
const documentEmbedding = {
  chunk_id: documentChunk.id,
  embedding,
};
I eventually switched to a database, where I tried doing things separately — but because of the unique setup I had with SQLite, it made relating embedding data and document chunks difficult. Instead, I placed the document chunk alongside the embedding. Ideally this is faster, since the database won’t need to load the entire entry into memory (like we do with the JS data store). You can read more about that process in my other blog post dedicated to the database process.
Optimizing text chunks
At first you might think “oh, splitting text into chunks, that’s easy”. It technically is, it’s often one of the basic lessons you learn with each programming language. But in this case, these text chunks provide the LLM with context. So imagine, if we arbitrarily split a string by a certain character length and cut off words, the LLM will have a broken perception of the document.
To remedy this, we need to split our document into chunks that make sense. We could split by sentence or line, but this loses overall context. And we could split by a few paragraphs, but then the context gets larger and loses relevance when embedded.
Depending on the document type, this process is easier or harder. For Markdown, we could just split the text by line breaks to get paragraphs and work from there — or even leverage the structured format and capture content between headings. I’ll cover how I parsed each file type below.
We can improve this by taking it a step further and including metadata with each chunk. This way, the LLM gets more understanding of the overall context with less data. For example, we could append the page number (or a line numbers for code) so the LLM knows what range it’s working with. See “Adding Metadata” section below for more details.
const pdfContent = "long content...";
const headers = `filename: ${filename}. page: ${page}`;
const chunk = `${headers}
${pdfContent}`;
The process
Now that we have a grasp of the LLMs and using the OpenAI API to send chat messages and even create embeddings, let’s create an app around that.
Scaffolding the app
I created a new Tauri app using their CLI. I used the template for React and Typescript. And I installed a few base libraries like Jotai for client-side state management. Nothing too wild here.
There are a few configuration details to care about, like enabling fs permissions when dealing with file uploads. I’d recommend learning about the Tauri process before diving completely in, like working with commands with communicate between client-side JS and Rust backend.
Setting up the database
This topic was actually so large that I dedicated an entire blog post to it. I recommend reading it you’re interested in seeing how I setup the SQLite database, integrated the sqlite-vec extension, and all the bits and bobs that go with that setup (like a migration system — or backend Tauri commands for querying the database). If you ever want to setup an offline-friendly app that uses a database, it’s got quite a few tip and tricks that should save you some time.
Rendering PDFs
One of the primary features of my app is uploading PDFs and being able to read them within the app itself (as well as adding features on top of the PDF, like annotations). To do this, we need to leverage a third party library to “render” the PDF to the webpage to a <canvas> element. Why? Because PDF is a proprietary format that’s difficult to parse manually and equally difficult to display the data (both text and embedded images/diagrams).
ℹ️ I won’t go over rendering Markdown here because it’s a much simpler process than rendering a PDF. It’s essentially just text that you run through a Markdown library to generate HTML that looks right (like wrapping bold text in a
<strong>tag). Working with the data is also much easier, since all the text is available up front (no concept of “pages” here), so creating embedding is much easier too.
I reached for what seems to be the ubiquitous option — pdf.js. It’s an old library, so npm install pdf.js doesn’t work well - not TS types and whatnot. Instead, I used pdfjs-dist — which offers a modern wrapper of the library (+ types).
From there, I checked out their examples and reverse engineered them to piece together my own React component <RenderPDF>:
import {
  PageViewport,
  PDFDocumentProxy,
  RenderTask,
  TextLayer,
} from "pdfjs-dist";
import React, { useEffect, useRef, useState } from "react";
import { pdfStore } from "../../../store/pdf";
import { useAtom, useAtomValue, useSetAtom } from "jotai";
import { selectionStore } from "../../../store/reader";
import { embeddingStore, MAX_TEXT_LENGTH } from "../../../store/embeddings";
import { PDFTextElement } from "../../PDFText";
import { countTokens } from "gpt-tokenizer/model/chatgpt-4o-latest";
import { processChunksToEmbedding } from "../../../services/lm/embeddings";
import { PDFPageSize } from "./types";
import { invoke } from "@tauri-apps/api/core";
import TextHighlightTooltip, {
  TOOLTIP_MARGIN_BOTTOM,
} from "../../documents/TextHighlightTooltip/TextHighlightTooltip";
import { useDocumentView } from "../../../context/DocumentViewContext";
import { useTextSelection } from "../../../hooks/useTextSelection";

export type PDFPageProps = {
  doc: PDFDocumentProxy;
  url: string;
  visible: boolean;
  page: number;
  /**
   * Initial page size, usually first page size in PDF.
   * Since we use infinite scroller to load content, we need to space pages evenly.
   * This gets replaced with real page size (if it differs from first page in PDF).
   */
  initialPageSize: PDFPageSize;
};

const PDFPage = ({
  doc,
  visible,
  url,
  page,
  initialPageSize,
}: PDFPageProps) => {
  const renderRef = useRef<RenderTask | null>(null);

  const canvasRef = useRef<HTMLCanvasElement>(null);
  const textLayerRef = useRef<HTMLDivElement>(null);
  const containerRef = useRef<HTMLDivElement>(null);
  const setPdfStoreData = useSetAtom(pdfStore);
  const setPdfEmbeds = useSetAtom(embeddingStore);
  const { projectId, docId } = useDocumentView();
  const isTextCaptured = useRef("");
  const [pageSize, setPageSize] = useState<PDFPageSize>({
    width: 0,
    height: 0,
  });

  function renderPage(pageNumber: number) {
    if (!doc) return;
    console.log("rendering page...", pageNumber);

    doc.getPage(pageNumber).then(async (page) => {
      console.log("got page", page);
      if (!canvasRef.current || !containerRef.current) return;
      const context = canvasRef.current.getContext("2d");
      if (!context) return;
      const viewport = page.getViewport({ scale: 1 }); // Adjust scaling as needed
      setPageSize({
        width: viewport.width,
        height: viewport.height,
      });

      console.log("viewport size", viewport);

      canvasRef.current.width = viewport.width;
      canvasRef.current.height = viewport.height;
      containerRef.current.style.width = `${viewport.width}px`;
      containerRef.current.style.height = `${viewport.height}px`;

      // Render the PDF content (images)
      renderRef.current = page.render({
        canvas: canvasRef.current,
        canvasContext: context,
        viewport: viewport,
      });

      // Add selectable text layer
      const textContent = await page.getTextContent();
      console.log("text content", textContent);

      // Create text layer
      if (textLayerRef.current) {
        // textLayerRef.current.style.width = canvasRef.current.width + "px";
        // textLayerRef.current.style.height = canvasRef.current.height + "px";
        const textLayer = new TextLayer({
          textContentSource: textContent,
          container: textLayerRef.current as HTMLElement,
          viewport: viewport,
        });

        await textLayer.render();
      }

      // Condense text for LLM
      const combinedText = textContent.items.reduce((merge, text) => {
        // Skip marked content
        // @TODO: Figure out what it is and if it's needed
        if (!("str" in text)) return merge;

        // If we detect blank text, assume it's a line break
        const mergedText =
          text.str == ""
            ? `${merge}
`
            : `${merge} ${text.str}`;

        return mergedText;
      }, "");

      const cleanedText = combinedText.replace(/\s+/g, " ").trim();

      setPdfStoreData((prev) => ({
        ...prev,
        text: cleanedText,
      }));
    });
  }

  useEffect(() => {
    if (!doc || !visible) return;

    console.log("rendering the page", page, visible);
    // Cancel any previous rendering if we refreshed fast
    renderRef.current?.cancel();
    // Render the first page initially
    renderPage(page); // Start with page 1

    getText();

    // Leaving component? Cleanup rendering
    return () => {
      renderRef.current?.cancel();
    };
  }, [doc, visible, page]);

  return (
    <div
      className="pdf-container"
      ref={containerRef}
      style={{
        width: pageSize.width > 0 ? pageSize.width : initialPageSize.width,
        height: pageSize.height > 0 ? pageSize.height : initialPageSize.height,
      }}
    >
      <canvas ref={canvasRef} />
      <div ref={textLayerRef} className="svg-text-layer" />
      <TextHighlightTooltip
        {...textSelection.tooltip}
        visible={isTooltipVisible}
      />
    </div>
  );
};

export default PDFPage;
The rendering happens in the useEffect() - which fires off when the page changes. From there, we render the page using the getPage() method on the PDFDocumentProxy class. This returns a page variable that has a render() method we can use to draw the PDF on a canvas that we specify (just a simply getElementById or use React ref in this case).
But you’ll notice that this assumes we’ve already loaded our PDF. This is because for a PDF, we need to render multiple pages at a time usually (people tend to expect to infinitely scroll books in UI). To enable this, we have a <PDFContent> component that loads the PDF, parses it using pdf.js, then passes that PDFDocumentProxy class to each page that needs to render.
import {
  getDocument,
  GlobalWorkerOptions,
  PageViewport,
  PDFDocumentProxy,
  PDFPageProxy,
  RenderTask,
  TextLayer,
  Util,
} from "pdfjs-dist";
import worker from "pdfjs-dist/build/pdf.worker.mjs?url";
import React, { CSSProperties, useEffect, useRef, useState } from "react";
import "./RenderPDF.css";
import { useAtom, useSetAtom } from "jotai";
import { pdfEmbedStore, pdfStore } from "../../../store/pdf";
import {
  processChunksToEmbedding,
  processDatasetToEmbedding,
} from "../../../services/lm/embeddings";
import { embeddingStore } from "../../../store/embeddings";
import { countTokens } from "gpt-tokenizer/model/chatgpt-4o-latest";
import { selectionStore } from "../../../store/reader";
import PDFPage from "./PDFPage";
import PDFScrollItem from "./PDFScrollItem";
import { PDFPageSize } from "./types";
import { useDocumentView } from "../../../context/DocumentViewContext";

type PDFTextElement = {
  text: string;
  left: CSSProperties["left"];
  top: CSSProperties["top"];
  fontSize: CSSProperties["fontSize"];
  fontFamily: CSSProperties["fontFamily"];
  angle: number;
  width: number;
  transform: string;
};

type Props = {
  url: string;
};

const PDFContent = ({ url }: Props) => {
  const canvasRef = useRef<HTMLCanvasElement>(null);
  const textLayerRef = useRef<HTMLDivElement>(null);
  const containerRef = useRef<HTMLDivElement>(null);
  const [pdfDoc, setPdfDoc] = useState<PDFDocumentProxy | null>(null);
  const [initialPageSize, setInitialPageSize] = useState<PDFPageSize>({
    width: 0,
    height: 0,
  });
  const [pages, setPages] = useState<number[]>([]);

  useEffect(() => {
    if (pdfDoc) return;
    const loadAndRenderPDF = async () => {
      GlobalWorkerOptions.workerSrc = worker;
      const document = getDocument(url);
      let contents;
      try {
        contents = await document.promise;
      } catch (error) {
        console.error("Error loading PDF:", error);
        alert("Failed to load PDF.  Check the console for details.");
      }
      if (!contents) return;

      setPdfDoc(contents);

      // We could memoize this in render, but this works nicely too
      const newPages = new Array(contents.numPages).fill(0);
      setPages(newPages);
      console.log("PDF has " + contents.numPages + " pages");

      // Get document size

      contents.getPage(1).then(async (page) => {
        const newViewport = page.getViewport({ scale: 1 }); // Adjust scaling as needed
        setInitialPageSize({
          width: newViewport.width,
          height: newViewport.height,
        });
      });
    };

    loadAndRenderPDF();
  }, []);

  const pageComponents = pages.map((_, index) => (
    <PDFScrollItem
      doc={pdfDoc}
      url={url}
      visible={false}
      page={index + 1}
      initialPageSize={initialPageSize}
    />
  ));

  return (
    <div
      className="PDFContent"
      style={{
        minWidth: initialPageSize.width,
        height: "100vh",
        overflowY: "scroll",
      }}
    >
      {pageComponents}
      <div className="overlay" />
    </div>
  );
};

export default PDFContent;
Once we load the PDF we get access to the number of pages (via numPages), which can use to render the right number of pages in our React component.
Last thing, you’ll also see the PDF pages are wrapped in a <PDFScrollItem> component. As you can imagine, rendering the PDF is intensive. If we have a PDF that’s 50+ pages, we don’t want to bombard the user with 50+ functions rendering that data — especially if it’s content they’re not looking at. To avoid this, we wrap each PDF page in a component that detects if it’s within the viewport (using the Intersection Observer API), then renders when it’s scrolled to.
import React from "react";
import { useIntersection } from "../../../hooks/useIntersection";
import PDFPage, { PDFPageProps } from "./PDFPage";

type Props = PDFPageProps & {};

const PDFScrollItem = (props: Props) => {
  const { isIntersecting, ref } = useIntersection({
    threshold: 0.5,
  });

  console.log("page scroll", props.page, isIntersecting);

  return (
    <div
      ref={ref}
      // style={{
      //   border: "1px solid",
      //   borderColor: isIntersecting ? "blue" : "gray",
      // }}
    >
      <PDFPage {...props} visible={isIntersecting} />
    </div>
  );
};

export default PDFScrollItem;
Dark mode
One of the small UX conveniences I wanted for my app was enabling light and dark modes. But PDFs are generally rendered as images with baked white backgrounds and black text.
When we detect the user is in dark mode, we basically grab the canvas after it’s done rendering and invert the colors by walking over each pixel in the canvas and subtracting 255 from the RGB values (so if we have a white pixel that’s 255 red blue and green, it’s be 0 for each after this function — making it black).
function invertCanvasColors(
  canvas: HTMLCanvasElement,
  context: CanvasRenderingContext2D,
) {
  const imageData = context.getImageData(0, 0, canvas.width, canvas.height);
  const pixels = imageData.data;

  for (let i = 0; i < pixels.length; i += 4) {
    pixels[i] = 255 - pixels[i]; // Red
    pixels[i + 1] = 255 - pixels[i + 1]; // Green
    pixels[i + 2] = 255 - pixels[i + 2]; // Blue
    // Alpha (pixels[i + 3]) is left as is
  }

  context.putImageData(imageData, 0, 0);
}

// Inside the render function...
// Dark mode? Invert canvas colors
renderRef.current.promise.finally(() => {
  if (!canvasRef.current) return;
  invertCanvasColors(canvasRef.current, context);
});
Text Selection Hook
One of the key features of the app is being able to select text and use it in various ways, whether you want it copied into chat for additional context — or saving it as an annotation. To enable this across all file types, I created a React hook that handles all the logic. It spins up the event listeners for user selection, and handles saving it to a global store where other features can access it (like the chat).
I created a store for the text selection. It had properties for the text that was selected, the amount of tokens the text takes up, and the page number if relevant (like for PDFs). I also created a property called tooltip that contained the position of the selected text, this way I could render a little popup where the user selects.
import { atom } from "jotai";

type TextSelectionData = {
  text: string;
  tokens: number;
  page: number;

  tooltip: {
    left: number;
    top: number;
    width: number;
    height: number;
  };
};
export const selectionStore = atom<TextSelectionData>({
  text: "",
  tokens: 0,
  page: 0,

  tooltip: {
    left: 0,
    top: 0,
    width: 0,
    height: 0,
  },
});
Then I created a hook that accepts an HTML element to check for text selection inside of. This syncs the selected text with the store (as well as measuring the token count for user’s reference). Nothing too fancy here, just leveraging the standard Selection API.
import { Ref, RefObject, useEffect } from "react";
import { countTokens } from "gpt-tokenizer/model/chatgpt-4o-latest";
import { useAtom, useSetAtom } from "jotai/react";
import { selectionStore } from "../store/reader";
import { TOOLTIP_MARGIN_BOTTOM } from "../components/documents/TextHighlightTooltip/TextHighlightTooltip";

export function useTextSelection(
  contentRef: RefObject<HTMLElement | null>,
  containerRef: RefObject<HTMLElement | null>,
  page: number,
) {
  const setTextSelection = useSetAtom(selectionStore);

  const handleTextSelection = () => {
    console.log("handling text selection");
    if (window.getSelection) {
      const selection = window.getSelection();
      if (!selection) return;
      const selectionString = selection.toString();
      const tokens = countTokens(selectionString);

      // Get text position
      if (selection.rangeCount > 0 && containerRef.current) {
        const range = selection.getRangeAt(0);
        // Get visual position (bounding rectangle)
        const textRect = range.getBoundingClientRect();
        console.log("text selection rect", textRect);

        const containerRect = containerRef.current.getBoundingClientRect();

        console.log("container rect", containerRect);

        const tooltip = {
          left: textRect.left - containerRect.left,
          top: textRect.bottom - containerRect.top + TOOLTIP_MARGIN_BOTTOM,
          width: textRect.width,
          height: textRect.height,
        };

        setTextSelection({ text: selectionString, tokens, page, tooltip });

        console.log("text pos", tooltip);
      }
    }
  };

  // Get text selection
  useEffect(() => {
    if (!contentRef.current) return;
    contentRef.current.addEventListener("mouseup", handleTextSelection);

    return () => {
      if (!contentRef.current) return;

      contentRef.current.removeEventListener("mouseup", handleTextSelection);
    };
  }, []);
}
Beyond just saving the text, we also want to popup a tooltip underneath the text with a menu of options (like saving the text to an annotation).
To get the position of the text for the tooltip, we use the getRangeAt() method on the text selection get the whole text starting from the first character. Then we can use a getBoundingClientRect() on the text “range” we generated to get the size and position of the text.
But how do we handle when the user scrolls on the page? Well when we save the position, we also measure the position of the page content (for PDFs, this is 1 page - for Markdown it’d be the whole document) and subtract that against the position of the tooltip. That gives us a position that’s relative to the current page, that way we can set a position: relative on the container and absolute on the tooltip and it’ll display properly (instead of “global” fixed position for the tooltip, which would change if user scrolled).
Then I can use the text selection as needed in the app. The chat window has a space that displays the user’s selection so they can quickly include it alongside their chat message, we just grab the text selection from the store and display it there.
Similarly for the tooltip, we display it using the text position we generated earlier.
const PDFPage = () => {
  return (
    <div
      className="pdf-container"
      ref={containerRef}
      style={{
        width: pageSize.width > 0 ? pageSize.width : initialPageSize.width,
        height: pageSize.height > 0 ? pageSize.height : initialPageSize.height,
      }}
    >
      <canvas ref={canvasRef} />
      <div ref={textLayerRef} className="svg-text-layer" />

      <TextHighlightTooltip
        {...textSelection.tooltip}
        visible={isTooltipVisible}
      />
    </div>
  );
};

export default PDFPage;
Parsing data into embeddings
I got the app setup to where the user can upload Markdown or PDF documents and display them respectively (and nice little features like selecting text). So how do we get the text from these documents and create a RAG system to search for relevant docs and give the LLM access to the data?
Getting text from documents
The first step is understanding how each document stores it’s data.
For Markdown, the process is as easy as it can get. The text is stored as plain text, meaning we can just load the file and start slicing up the text however we need. It gets better, as the document is written in Markdown, which is a “structured” format. Meaning we can run it through a parser (like remark) and get a “tree” of elements inside the documents (like top level elements like # headers or nested elements like a ** bold tag inside a paragraph). This allows us to break the text up into “thoughts” based on headings.
import unified from "unified";
import remarkParse from "remark-parse";

const markdownText = `# Hello world

A paragraph with **bold** text.
`;

const tree = unified().use(remarkParse).parse(markdownInput);

console.log(tree);

// Walk through top-level and sort text into bundles based on prior headings
For PDFs, it gets a bit complex here. I’m using pdf.js which renders each PDF one page at a time. We load each page using getPage() method, then using that page we get access to a getTextContent() method that gives use all the text from that specific page. If you open your PDF in any standard viewer, this means any text that is selectable. If the text is baked into an image or diagram, it won’t be included.
const PDFPage = ({
  doc,
  visible,
  url,
  page,
  initialPageSize,
}: PDFPageProps) => {
	function getText() {
	  if (!doc) return;
	  // Only capture text once
	  if (isTextCaptured.current == url) return;

	  // Loop through each page, get text, and create embeddings
	  doc.getPage(page).then(async (page) => {
	    const textContent = await page.getTextContent();

			// pdf.js returns text and "marked content" we filter that out.
	    const rawTextItems = textContent.items
	      .map((text) => {
	        if (!("str" in text)) return "";
	        return text.str;
	      })
	      .filter((text) => text != "");

	      // Combine each PDF page's text into context-friendly chunks
	      // We limit each chunk by a certain token amount so it can fit within a query
	      // Go too small here and searching docs becomes unreliable. Best to keep at minimum 400 characters.
	      let dataset: string[] = [];
	      let currentItem = "";
	      rawTextItems.map((rawTextItem) => {
	        // Check if item exceeds max
	        const testItem = currentItem + rawTextItem;

	        const tokenCount = countTokens(testItem);
	        // console.log("tokenCount", { tokenCount, length: testItem.length });

	        if (tokenCount > MAX_TEXT_LENGTH) {
	          // Add text to stack
	          dataset.push(currentItem);
	          currentItem = "";
	        }

	        currentItem += rawTextItem;
	      });

	      // Convert the data to "embeddings" for AI context
	      const embeddings = await processChunksToEmbedding(dataset);

	      // Save the embeddings to store/DB
	  }
  }


	useEffect(() => {
	  if (!doc || !visible) return;

	  // Render the first page initially
	  renderPage(page);

		// Scrape text from document and generate embeddings
	  getText();

	}, [doc, visible, page]);

	// Check out `<PDFPage>` for full code...
}
To analyze the entire PDF we’d have to walk through each page. And the text often isn’t formatted the best, so it’s more difficult to break up logically. There’s no way to tell if something is a heading or body text (since there’s no structure like Markdown), or when a sentence starts or ends (since periods could be used for other things, and spacing isn’t uniform). Our best bet is to just measure the content and ensure we break it up into decent reasonable chunk sizes.
Initially I ran this getText() function on every PDF page when it loads, so as the user scrolls through, it adds the embeddings to the database. But ideally, the user should be able to find any content throughout the document without worrying about that. So I had to create a separate component that sat at the top-level above the pages and looped through all pages when the PDF loads initially.
ℹ️ If you were working with code, it’d be a similar process to the Markdown. Depending on the size of each file, you could just include the whole thing - that way you get the best context. But if you need to split things up, you could get the AST of the code (using some sort of language specific parser), then limit the chunks based top level elements (like the Markdown - except you’d be grabbing functions instead of paragraphs).
Keeping it relevant
The most important part of this process is how we break up the text into “chunks”. Like I mentioned earlier, if we make the chunks too small we lose context, but if we make the chunks too large we limit the user’s conversation size.
After a bit of testing, I found that saving 1-2 paragraphs at a time, with about 2-3 sentences each, was the best way to handle creating chunks. This kept the context large enough to make the searching better, as well as improve the responses from the LLM.
You can see Google’s NotebookLM use a similar process with their chunking by looking a their citations. Each citation is limited to 2-3 paragraphs max, with only 5-6 sentences total. And you can see they arbitrarily cut text off, instead of trying to cut off by sentence.
Adding metadata
One of the ways we can improve our relevant document search (aka RAG process) is by adding a little more data to each chunk.
The way our search works is converting document chunks to embeddings, then the chat message gets converted to an embedding and we search the chunk embeddings using that. So say we ask a question about a certain document, how would the search know to include chunks that include that? If we sprinkle in the document name into each chunk, we raise the chances of it being included.
ℹ️ Notice how I say “chances”. The way the search works is using 2 embeddings and comparing them. It’s not actually searching the text of our chat or document chunk. This is why the size of the embedding is important too, the more floats we get to compare, the higher the odds our tokenized words are discoverable.
We could also go farther to include other bits of metadata, like pages for the PDF - in case the user asks about a specific page number.
Personally this felt like I was leaving things too much to chance, and since I had a lot of the metadata stored in the database already - I just associated things together. For example, when I search for embeddings, I can filter the SQL results by a specific document (to limit the scope of searching). However this only covers use cases when the user specifically knows they want to search in a specific document for something.
Normally when people search, they’re looking outside their current context (otherwise it’s pretty easy to CTRL + F and find things in an existing context). So if a user searches for text and asks about a specific document, if we don’t add metadata to our chunks, we’d have to determine the document from their query (likely querying the LLM an additional time) then filter accordingly.
As you can imagine, metadata can be avoided using specialized backend flows, but it has it’s limits.
Other optimizations
- Include a paragraph or sentence from before/after each chunk. This way thoughts might be more cohesive — since we’re not splitting by “thought” and limited to chunk sizes.
- Use a library or API for splitting text so you can ensure you split it correctly. It’s easy to accidentally chop up an emoji or complex character combination.
Relevant document context
Earlier we discussed how to create embeddings and how to search for document chunks using embeddings, so I won’t go into too much detail into the implementation of that. But one of the key things to decide when making an app like this is how to include relevant documents.
In NotebookLM, they grab several documents (10+) every time you chat and send them directly to the LLM alongside your message. They later get used as citations. I’m assuming for subsequent responses they remove the system prompts from the chain to limit bloating the context over time. They do keep a history of chat messages and pass them to the LLM — if you ask it to tell you what you previously asked in the same chat it will quote your message.
The key decision I had to make was how to include the relevant documents in the app. I wanted the user to be able to search a few different ways:
- Search documents like a normal app-level search bar. They should be able to find relevant documents, get a list of them, and navigate to each one.
- Search for documents while in the chat — but choose what to include (either the chunk or more).
- Automatically include relevant document chunks when user asks any question. Maybe they can enable or disable using a toggle, so user can guarantee a more “pure” response when needed. And remove relevant chunks from subsequent responses to alleviate context.
For the first, searching docs globally, we don’t want to do this with embeddings ideally. Normally when someone is searching for text, they often aware of what they want. They may ask for document with a specific keyword. This is easy to handle using the SQL database and a similar LIKE filter of document chunks. But what happens when the user’s keyword needs to be more generic? Or they want to use natural language to search, like they would on Google? Then we could leverage the embeddings.
I handle the global in 3 stages: searching document titles, searching document chunks, and searching using embedding. This gives the user the best results, by giving an immediate response using the document titles and content (since SQL is incredibly fast), and the embeddings can get mixed in depending on their relevance (or “distance” calculated in our cosine comparison).
What’s next?
There’s so much to build with this kind of application. From tuning and optimizing the RAG process, to developing a better UX through UI, to adding a more agentic flow to the chat — there’s lots of potential. It’s been fun to watch Google’s NotebookLM update over time on social media and see them add little features over time like LaTeX support or generating reports based on aggregated documents.
I might cover more interesting features in future blogs. Though I will say, a lot of this work tends to boil down to “throw more stuff at the LLM” - which would be fine, if it weren’t a fickle and inconsistent part of the pipeline. For example, many chat apps have a list of recommended questions to help get the person start with their research. This process ultimately boils down to just combining RAG with an LLM prompt to get information (like the “topic” of the document - or simply generating the questions).
As always, I hope this blog helps get you started with working with LLMs (especially locally) and how to query and use large amounts of data. If you have any questions or want to share what you’re working on, feel free to reach out on socials.
Stay curious, Ryo
comments?
what's up?