Posted on
March 14, 2024
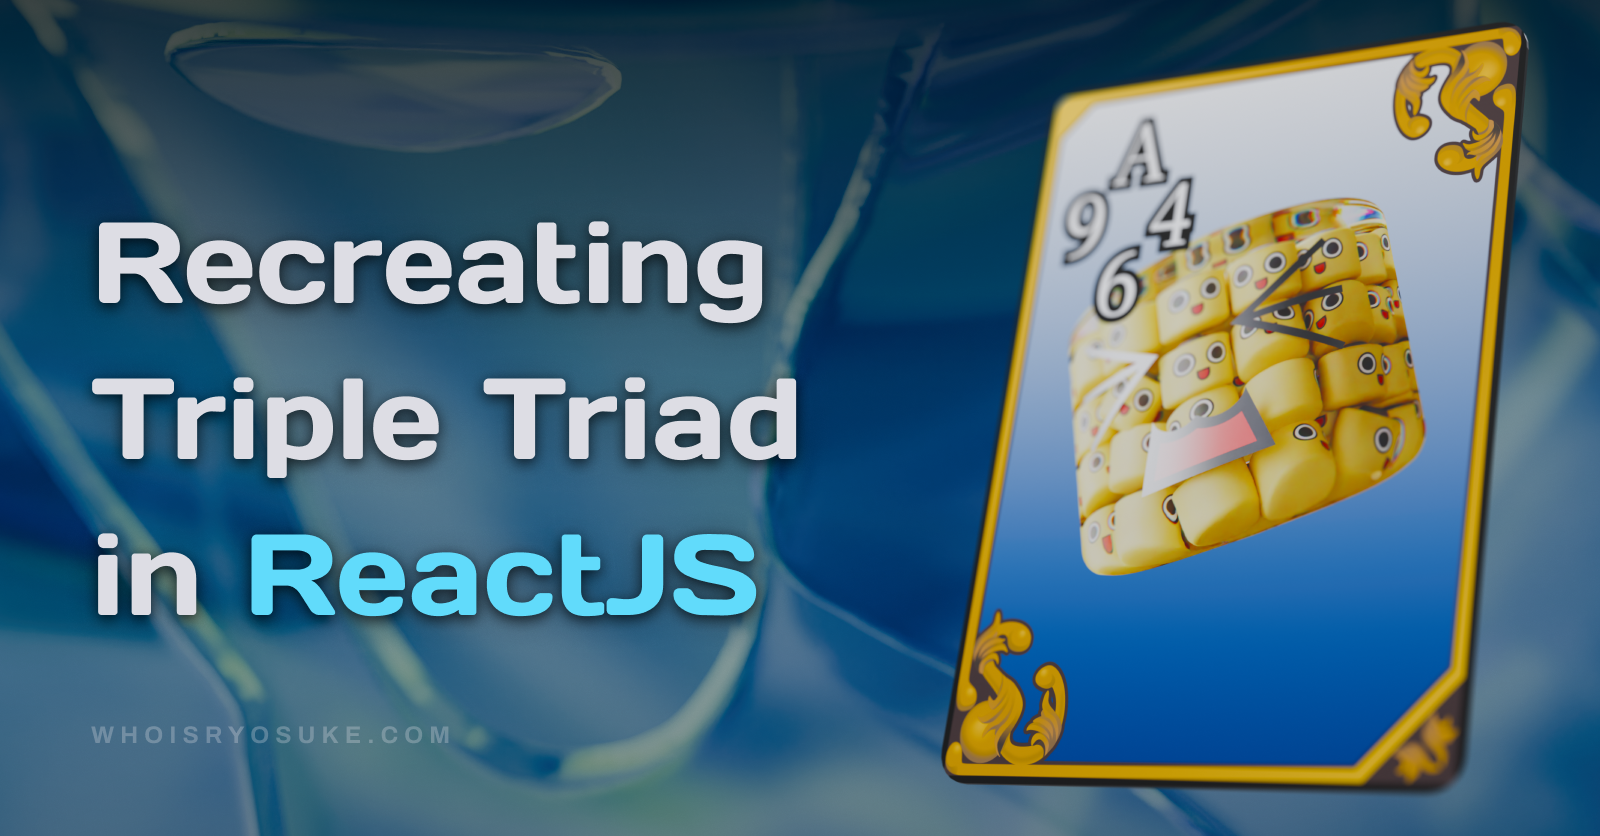
I’m a big fan of Final Fantasy 8 and the Triple Triad card game that’s featured inside it. If you want to play the card game today, you’d either have to spin up a copy of FF8 or FF14, or download the Final Fantasy Portal app where it’s a watered down version of itself. There have been games that are similar conceptually, like the Creatures of Aether game that’s a 4 by 4 grid instead of Triple Triad 3 by 3 grid (hence the triple in the name, get it?).
I got inspired to recreate Triple Triad, and I wanted to remake it as a web app - so it’d be accessible to anyone. I thought I’d break down my process a bit and show how you can develop a game in React.
You can find the complete source code for the game here.
What is Triple Triad?
It’s a card game that was a mini game inside of Final Fantasy 8, and later in Final Fantasy 14. Players collect an assortment of cards based off of monsters or characters in the game. Then they use the cards to battle each other. And after each battle you get to keep one or more of the opponents cards. It made for an addicting loop of trying to “catch ‘em all”, especially when certain cards are locked behind particular regions or challenging foes in the game.
📁 I would highly recommend just watching some gameplay of it from FF8. It’s a fairly simple game to understand fundamentally. It gets more complex when rulesets are integrated.
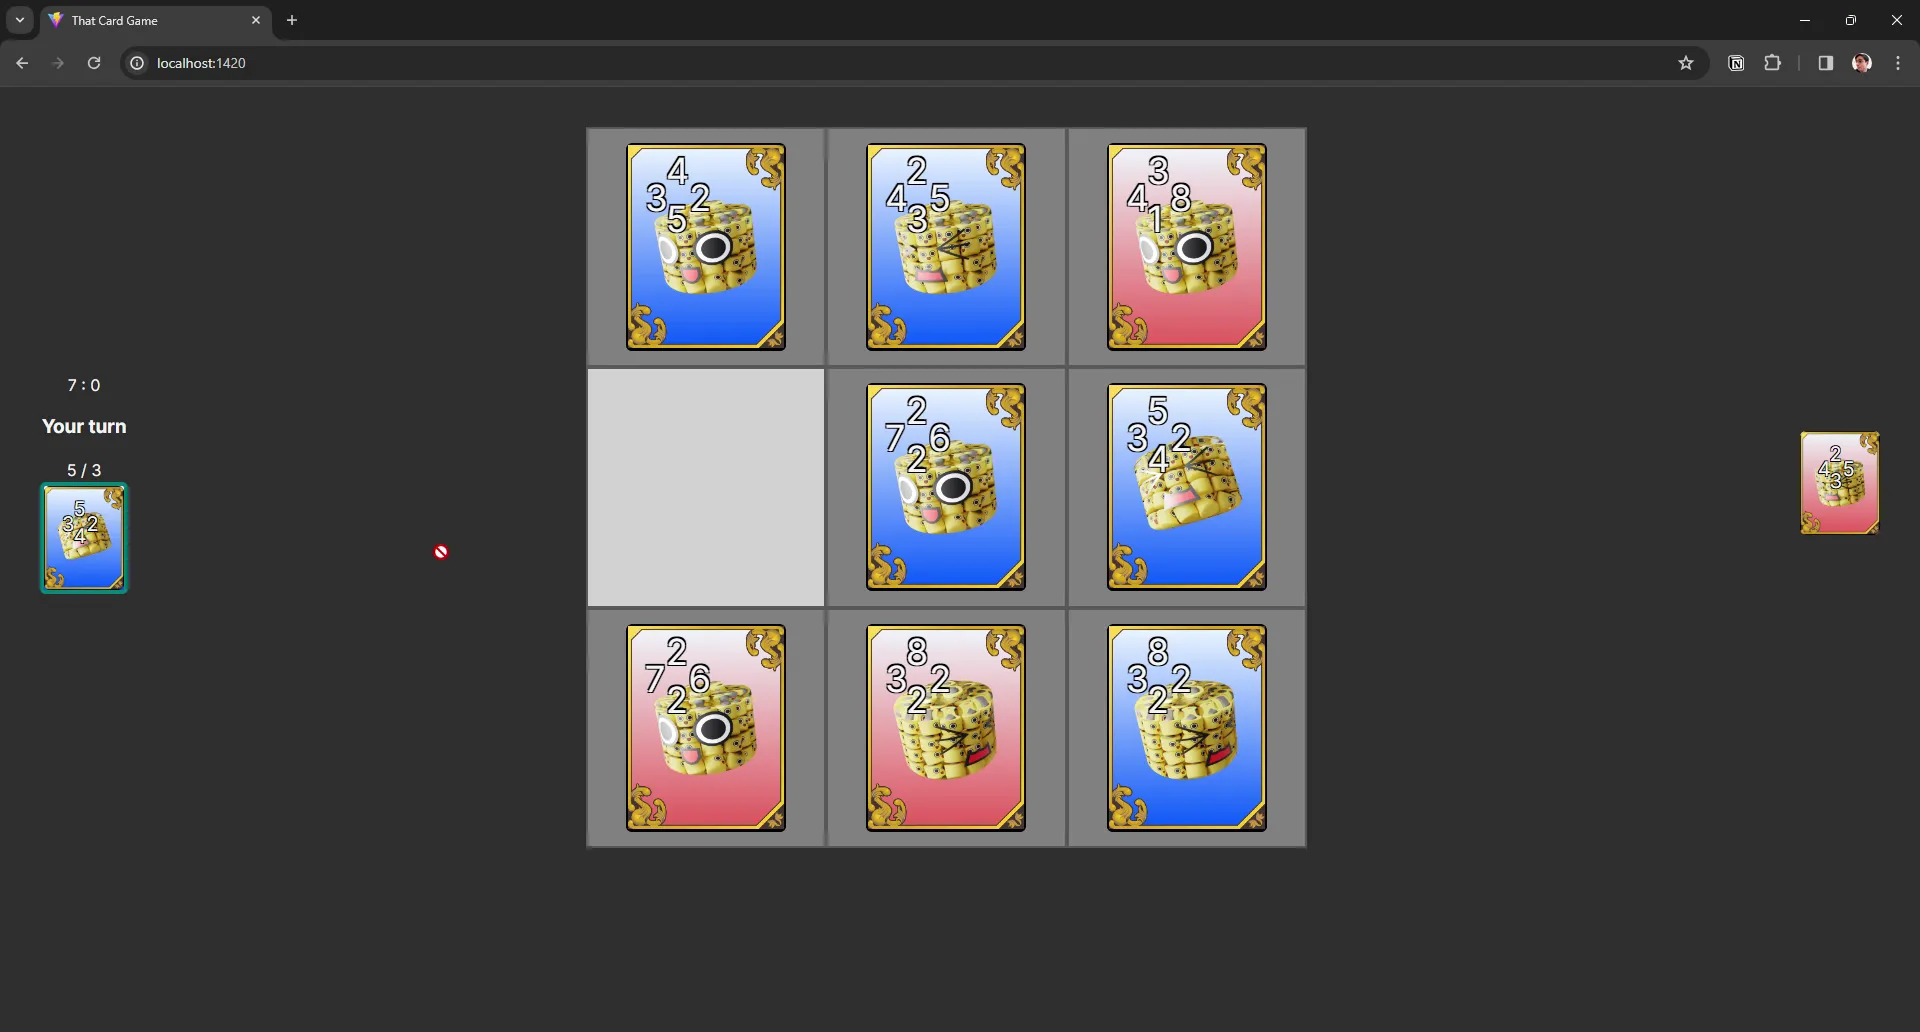
The game itself begins with both players selecting 5 cards from their collection to play. Then the match starts around a game board, made of a 3 by 3 grid where cards can be placed. Each player takes turns placing a card down on the board. If a card is played alongside an opponent’s card from any direction, the cards “battle” to see who wins.

Each card has 4 number values associated with it, placed in cardinal directions (up, down, left, and right). Lets say the player drops a card next to an existing card, and it’s to the right. The player’s card would use it’s right number, and the opposing card would use it’s left number. There are also other values associated with like a “type”, such as fire, ice, etc.
When the cards finish battling, the player who’s card won gains “ownership” of the existing card. The number of cards you “own” on the board represents your score. So at the end, the goal is to have at least 5 cards under your ownership to win (or a higher number than your opponent before the timer runs out - usually like 5 mins).
There’s more complexity to it when you get into “rules”, like certain rules that augment that game board and make certain tiles boost certain card types (so a fire card gets +1 to all stats on a fire tile). But ultimately it’s just a 3 by 3 card game where the bigger number on card wins, and whoever has the most cards owned wins.
Process
Let’s build it! I used Tauri to bundle it into a desktop app, but since it’s just a React app, it can be run on the web too. Starting the project was fairly easy, I ran the Tauri CLI to scaffold a new Typescript and React based project.
State
I sat and knocked out the types for the basic gameplay. What does a card look like? What does the game board look like? How should we represent the player vs opponent? Tried to knock out all these as types first.
// Player 1 = user. Player 2 = opponent.
export type PlayerIndex = 1 | 2;
// The star value on the card. Conveys the "tier"
export type CardRating = 1 | 2 | 3 | 4 | 5;

export type Card = {
  name: string;
  img: string;
  rating: CardRating;
  value: {
    top: number;
    bottom: number;
    left: number;
    right: number;
  };
};

export type CardInPlay = Card & {
  owner: PlayerIndex;
};

export type GameTileIndices = 1 | 2 | 3 | 4 | 5 | 6 | 7 | 8 | 9;

export type GameBoard = Record<GameTileIndices, CardInPlay | null>;

export type GameRules = "all-open" | "three-open";
export type GameRule = {
  name: string;
  description: string;
};
Then created a few sample cards using the new Card type:
import { Card } from "../../types/game";

const servbot: Card = {
  name: "Servbot",
  img: "servbot.png",
  rating: 1,
  value: {
    top: 4,
    bottom: 5,
    left: 3,
    right: 2,
  },
};

const SAMPLE_CARD1: Card = {
  ...servbot,
  value: {
    top: 2,
    bottom: 3,
    left: 4,
    right: 5,
  },
};

// ...and a few more...
And some sample rules using the GameRule type (although we never used these…):
import { GameRule, GameRules } from "../../types/game";

const allOpen: GameRule = {
  name: "All Open",
  description: "All cards visible between players",
};
const threeOpen: GameRule = {
  name: "Three Open",
  description: "First three cards visible between players",
};

const rules: Record<GameRules, GameRule> = {
  "all-open": allOpen,
  "three-open": threeOpen,
};

export default rules;
And I put together a quick Zustand store using a lot of the types we just created, and a few I know we’ll need, like a startTime for our game timer.
import { create } from "zustand";
import { devtools } from "zustand/middleware";
import { Card, GameMode, GameRules, PlayerIndex } from "../types/game";
// import type {} from "@redux-devtools/extension"; // required for devtools typing

interface GameState {
  mode: GameMode;
  setMode: (mode: GameMode) => void;
  score: Record<PlayerIndex, number>;
  setScore: (player: PlayerIndex, score: number) => void;
  startTime: number;
  setStartTime: (startTime: number) => void;
  rules: GameRules[];
  setRules: (rules: GameRules[]) => void;
  cards: Record<PlayerIndex, Card[]>;
  setCards: (player: PlayerIndex, cards: Card[]) => void;
}

export const useGameStore = create<GameState>()(
  devtools((set) => ({
    mode: "CARD-SELECTION",
    setMode: (mode) =>
      set(() => ({
        mode,
      })),

    score: {
      1: 0,
      2: 0,
    },
    setScore: (playerIndex, score) =>
      set((state) => ({
        score: {
          ...state.score,
          [playerIndex]: score,
        },
      })),
    startTime: 0,
    setStartTime: (startTime) =>
      set(() => ({
        startTime,
      })),
    rules: [],
    setRules: (rules) =>
      set(() => ({
        rules,
      })),
    cards: {
      1: [],
      2: [],
    },
    setCards: (playerIndex, cards) =>
      set((state) => ({
        score: {
          ...state.score,
          [playerIndex]: cards,
        },
      })),
  }))
);
Then I set off to start the UI portion.
📁 Here’s this step’s commit and this one for reference.
Routing / Gameplay
To start laying out the UI, I planned out the “screens” that make up the game. The user starts on the card selection screen, then go into the game, then get a game over message. Then from there I broke them down into what kind of content I’d need to display on each page. This helped me envision what kind of components I needed and their overlap.
🗺️ Player’s Path
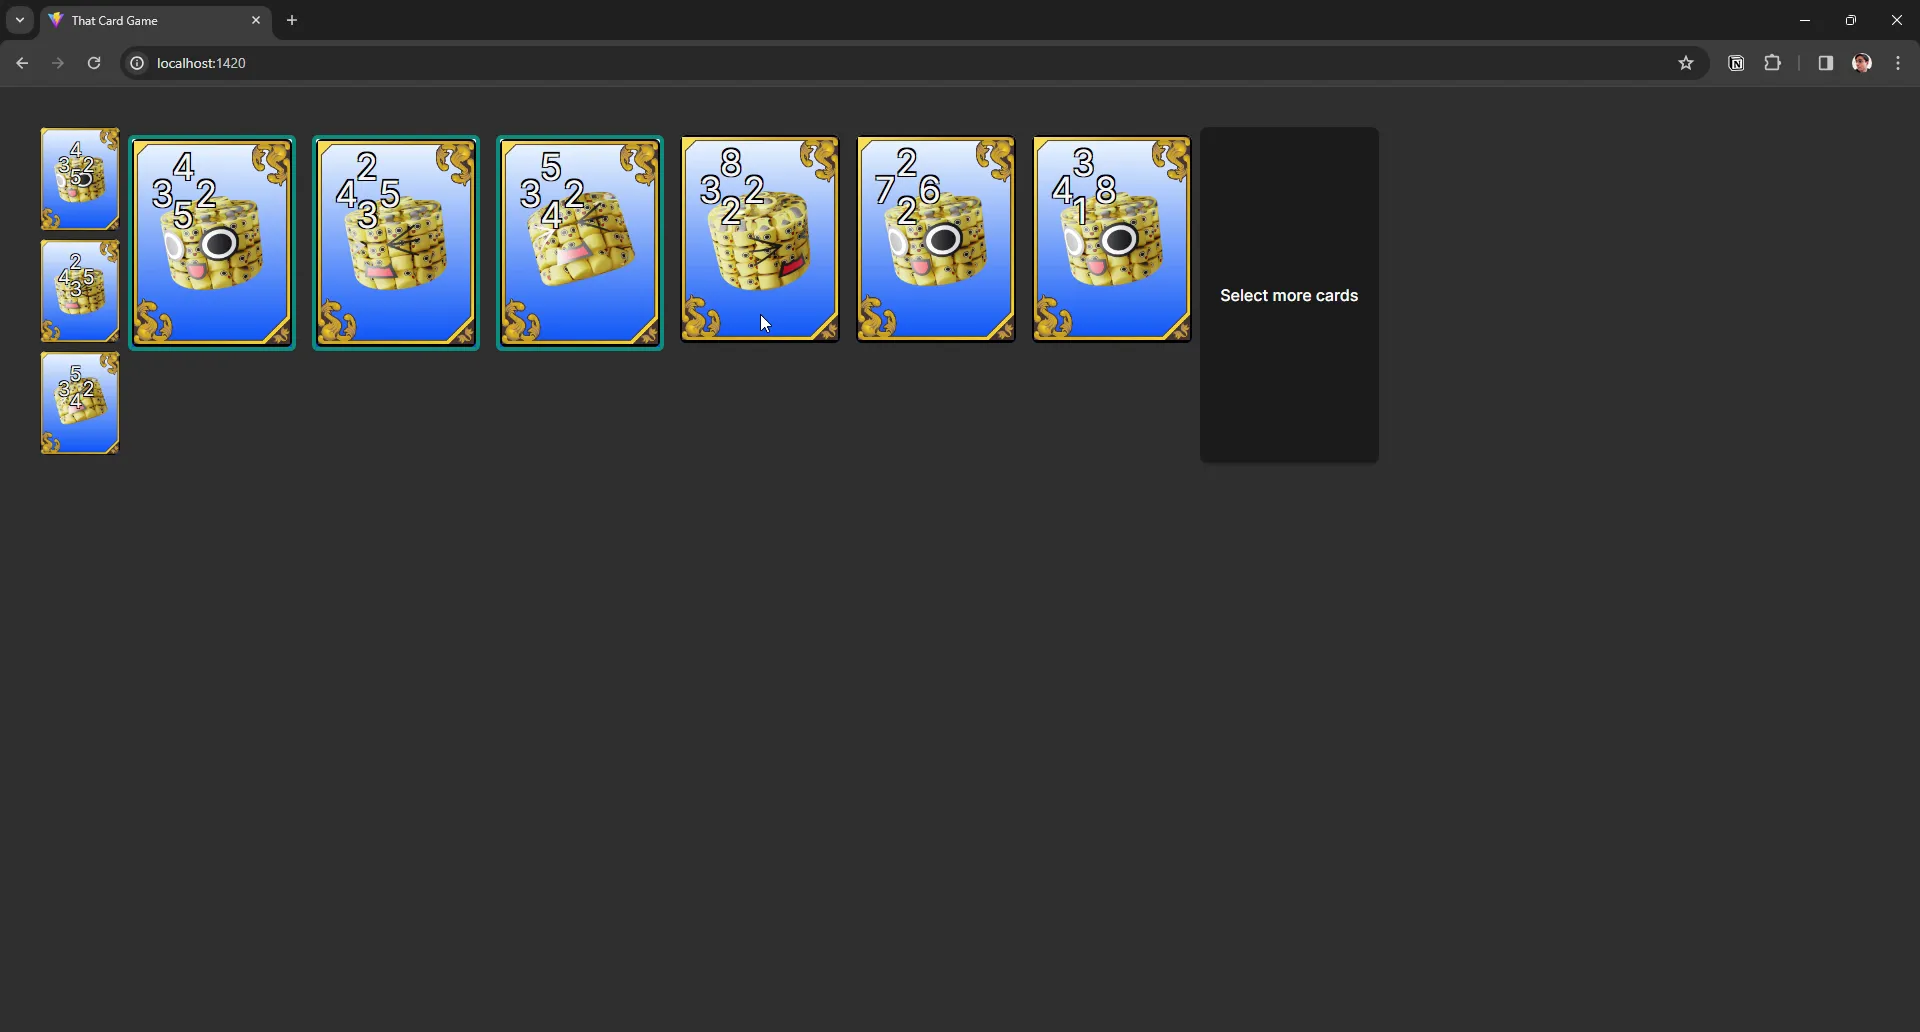
- The game starts with a card selection.
- Catalog of cards
- The user’s selected cards
- Game starts
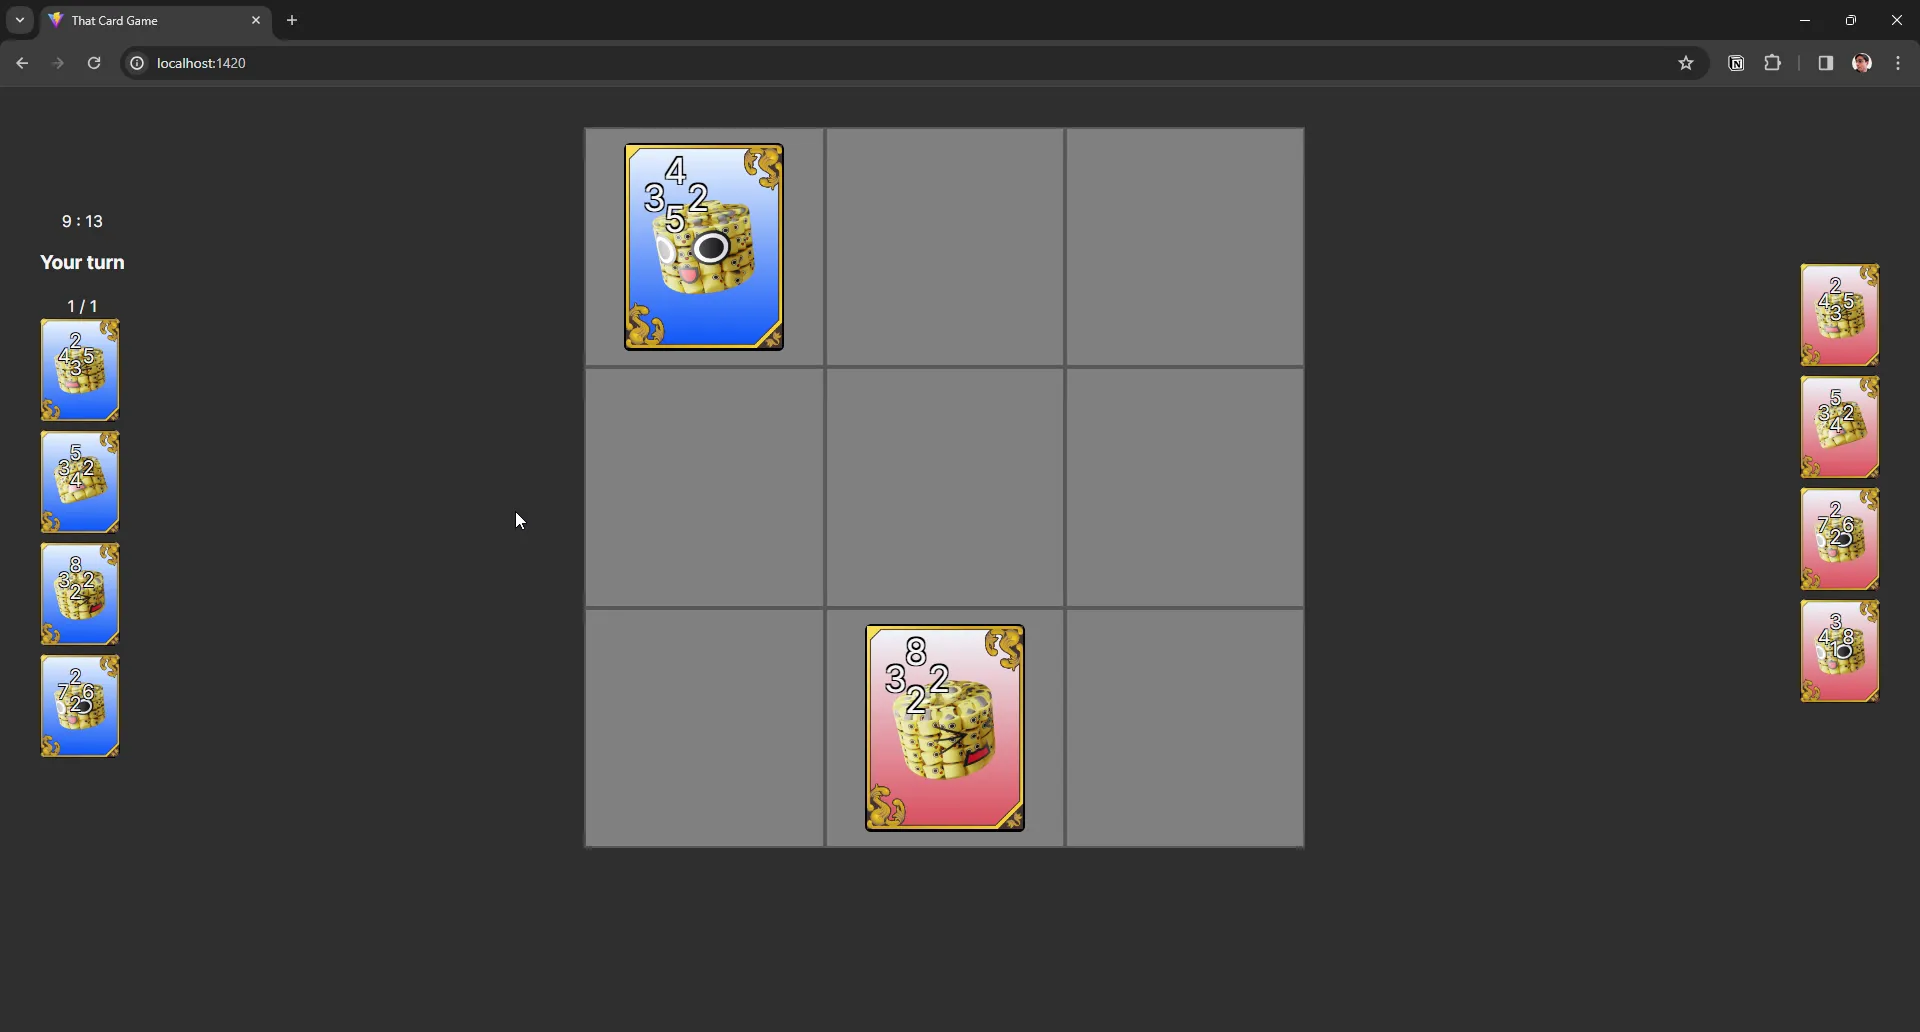
- Player cards on one side
- Enemy cards on other side
- Game board where cards are played
- Game ends
- Modal pops up over game board
- Results of match (win or lose and card count)
- Button to try again
Instead of using a classic router, I just made a component with a switch statement inside to swap to each screen. The current route was saved in a Zustand store so I could access it anywhere to change it.
import React from "react";
import { useGameStore } from "../../store/game";
import CardSelection from "../screens/CardSelection/CardSelection";
import Match from "../screens/Match/Match";
import GameOver from "../screens/GameOver/GameOver";

type Props = {};

const Game = (props: Props) => {
  const { mode } = useGameStore();
  let Route: (props: any) => JSX.Element;
  switch (mode) {
    default:
    case "CARD-SELECTION":
      Route = CardSelection;
      break;
    case "MATCH":
      Route = Match;
      break;
    case "GAME-OVER":
      Route = Match;
      break;
  }
  return <Route />;
};

export default Game;
Card Selection
This screen was pretty simple. It gave me the ability to create one of the core components of the project: the card.
import React, { CSSProperties } from "react";
import { Card } from "../../../../types/game";
import "./CatalogCard.css";
import allCards, { AllCardIds } from "../../../../data/cards";

type Props = {
  id: AllCardIds;
  selected?: boolean;
  small?: boolean;
  scale?: CSSProperties["width"];
  onClick?: (card: AllCardIds) => void;
  style?: CSSProperties;
};

const CatalogCard = ({
  id,
  selected = false,
  onClick,
  scale = 1,
  small,
  style = {},
  ...props
}: Props) => {
  const card = allCards[id];
  const handleClick = () => {
    onClick?.(id);
  };
  return (
    <div
      className={`catalog-card ${selected ? "selected" : ""} ${
        small ? "small" : ""
      }`}
      style={{
        backgroundImage: `url(/assets/cards/${card.img})`,
        transform: `scale(${scale})`,
        ...style,
      }}
      onClick={handleClick}
    >
      <div className="frame" />
      <div className="card-metadata">
        <p className="vertical top">{card.value.top}</p>
        <p className="vertical bottom">{card.value.bottom}</p>
        <p className="horizontal left">{card.value.left}</p>
        <p className="horizontal right">{card.value.right}</p>
      </div>
    </div>
  );
};

export default CatalogCard;
Then I created a <CardCatalog /> component I display all the cards available and allow the user to click them to mark them as selected.
import React from "react";
import allCards, { AllCardIds } from "../../../../data/cards";
import CatalogCard from "./CatalogCard";
import { useGameStore } from "../../../../store/game";
import "./CardCatalog.css";

type Props = {};

const CardCatalog = (props: Props) => {
  const { cards, addCard } = useGameStore();

  const handleAddToCatalog = (card: AllCardIds) => {
    if (cards[1].size < 5) {
      addCard(1, card);
    }
  };

  const displayCards = Object.entries(allCards).map(([id, card]) => (
    <CatalogCard
      id={id as AllCardIds}
      selected={cards[1].has(id as AllCardIds)}
      onClick={handleAddToCatalog}
      style={{ margin: 8 }}
    />
  ));
  return <div className="card-catalog">{displayCards}</div>;
};

export default CardCatalog;
Then I have <SelectedCards />, a spot where I display each card that’s selected, so the user can easily see what their hand will look like.
import React from "react";
import { useGameStore } from "../../../../store/game";
import CatalogCard from "./CatalogCard";
import "./SelectedCards.css";
import { AllCardIds } from "../../../../data/cards";

type Props = {};

const SelectedCards = (props: Props) => {
  const { cards, removeCard } = useGameStore();

  const handleRemoveCard = (card: AllCardIds) => {
    removeCard(1, card);
  };

  const displayCards = [...cards[1]].map((card) => (
    <CatalogCard
      id={card}
      small
      style={{ marginBottom: "8px" }}
      onClick={handleRemoveCard}
    />
  ));
  return <div className="selected-cards">{displayCards}</div>;
};

export default SelectedCards;
We put all these new components together and we have a card selection screen! I also added a button that transitions to the next “route” — aka the game board screen. But the button only enables when the user has selected the appropriate number of cards.
import React from "react";
import { useGameStore } from "../../../store/game";
import CardCatalog from "./components/CardCatalog";
import SelectedCards from "./components/SelectedCards";
import "./CardSelection.css";

type Props = {};

const CardSelection = (props: Props) => {
  const { cards, setMode } = useGameStore();

  const handleStartGame = () => {
    setMode("MATCH");
  };

  const isGameplayEnabled = cards[1].size === 5;

  return (
    <div className="card-selection">
      <SelectedCards />
      <CardCatalog />
      <button onClick={handleStartGame} disabled={!isGameplayEnabled}>
        {isGameplayEnabled ? "Start Game" : "Select more cards"}
      </button>
    </div>
  );
};

export default CardSelection;
Also grabbed a card frame resource from an old forum where a fan redrew it for a triple triad game project to make the card look a bit more realistic.
📁 Here’s this step’s commit for reference.
Countdown Clock
I feel like making a timer in React is a rite of passage. Between that and sliders, I feel like I make them all the time for different purposes. This particular timer is a simple game timer that starts when the game begins, continues for the match length (about 5 minutes), and then stops when the game is over.
A lot of this is powered by useEffect running functions when our state changes (aka Zustand store with our game state). The clock technically starts when we reset the time. This ensures that when we reload the game board (like restarting a game), the timer will start fresh. After we reset the time, we enable a React ref called isPlaying that does exactly what is says — let’s another useEffect know that we need to start playing.
That finally triggers a requestAnimationFrame that is the magic behind our timer. This runs in an infinite loop until we stop it, and lets us update our component’s state with the latest time (or currentTime). The time is stored in seconds, and we want to display it in the minutes and seconds format, so we just do a little math and round it out using Math.floor().
import React, { useEffect, useRef, useState } from "react";
import { useGameStore } from "../../../../store/game";
import { MATCH_LENGTH_TIME } from "../../../../constants/game";

type Props = {};

const CountdownClock = (props: Props) => {
  const { startTime, mode, setMode } = useGameStore();
  const [currentTime, setCurrentTime] = useState(0);
  const prevStartTime = useRef<number>(0);
  const prevTime = useRef<number>(0);
  const isPlaying = useRef(false);
  const requestRef = useRef<
    ReturnType<typeof requestAnimationFrame> | undefined
  >();

  // console.log("[CLOCK] currentTime", currentTime);

  const animate = (time: number) => {
    // No previous time? Assume it's the current time.
    // When we reset game, the RAF time keeps going, so zeroing breaks time
    if (prevTime.current === 0) prevTime.current = time;

    // Get the latest state (since the callback restricts reaching out)
    const { mode } = useGameStore.getState();
    // Repeat
    if (mode === "MATCH" && isPlaying.current)
      requestRef.current = requestAnimationFrame(animate);

    // Set time. We use time value from RAF.
    const deltaTime = time - prevTime.current;
    setCurrentTime((state) => state + deltaTime * 0.01);
    prevTime.current = time;
  };

  // Start the clock (unless it's game over screen)
  useEffect(() => {
    if (mode === "MATCH" && isPlaying.current)
      requestRef.current = requestAnimationFrame(animate);
    return () => {
      if (requestRef.current) cancelAnimationFrame(requestRef.current);
    };
  }, []);

  // Trigger "Game Over" screen when time has run out
  useEffect(() => {
    if (currentTime > MATCH_LENGTH_TIME && isPlaying.current) {
      setMode("GAME-OVER");
      console.log("[CLOCK] Game over - time ran out", currentTime);
      isPlaying.current = false;
    }
  }, [currentTime]);

  // Reset the clock if new game
  useEffect(() => {
    if (startTime !== prevStartTime.current && !isPlaying.current) {
      console.log("[CLOCK] Resetting clock");
      prevStartTime.current = startTime;
      setCurrentTime(0);
      isPlaying.current = true;
    }
  }, [startTime]);

  const timeRemaining = MATCH_LENGTH_TIME - currentTime;
  const minutes = Math.floor(timeRemaining / 60);
  const seconds = Math.floor(timeRemaining - minutes * 60);

  return (
    <div>
      <div>
        {minutes} : {seconds}
      </div>
    </div>
  );
};

export default CountdownClock;
This also can trigger the “game over” screen when the timer runs out. A nice example of an independent system in React (kinda like systems in Bevy).
We plug this timer into the game board later.
Setup the board
The board itself is a fairly small component. It displays 9 board tiles or <GameBoardTile /> components. Each tile is given an index to keep track of it’s position.
import React from "react";
import GameBoardTile from "./GameBoardTile";
import "./GameBoard.css";

type Props = {};

const GameBoard = (props: Props) => {
  return (
    <div className="game-board">
      {new Array(9).fill(0).map((_, index) => (
        <GameBoardTile key={index} id={index + 1} />
      ))}
    </div>
  );
};

export default GameBoard;
And I use a tiny bit of CSS to flex wrap the boxes into a 3 by 3 grid. Each tile will be 25vh, or a third of the board’s width.
.game-board {
  width: 80vh;
  display: flex;
  flex-wrap: wrap;
  margin: auto;
}
Players and Opponent cards
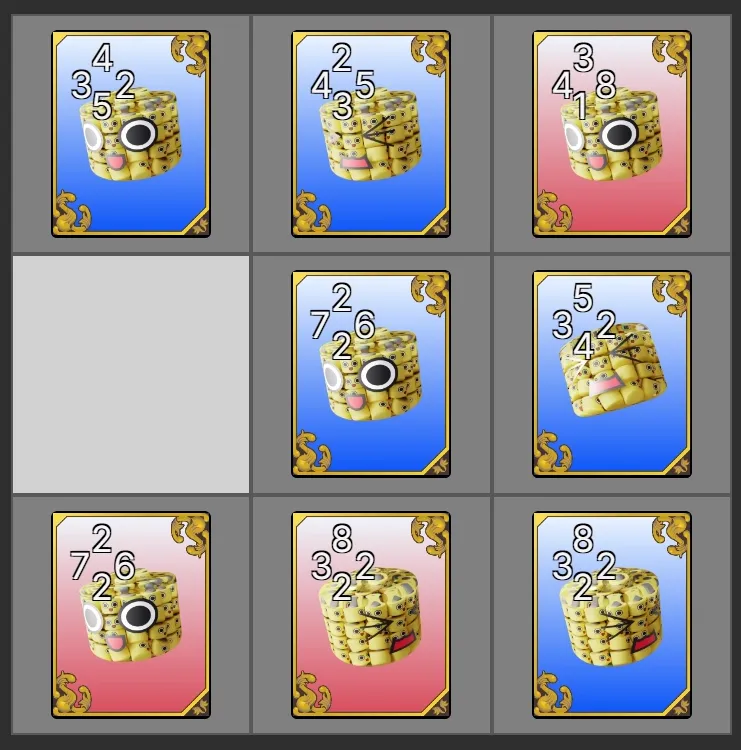
On each side of the game board we display the player and opponent’s cards. This one is also pretty simple, it just grabs each person’s cards and displays them. We also filter to check if the card is currently in play on the board, so the user can’t play the same card twice.
In the case of the player, we have a <GameBoardCard /> that handles the drag and drop logic (which I’ll explain next).
import React from "react";
import { useGameStore } from "../../../../store/game";
import "../../CardSelection/components/SelectedCards.css";
import { AllCardIds } from "../../../../data/cards";
import GameBoardCard from "./GameBoardCard";

type Props = {};

const PlayerCards = (props: Props) => {
  const { cards, removeCard, board } = useGameStore();

  const handleRemoveCard = (card: AllCardIds) => {
    removeCard(1, card);
  };

  const cardsInPlay = Object.values(board);

  const displayCards = [...cards[1]]
    .filter(
      (card) =>
        !cardsInPlay.find(
          (cardInPlay) => cardInPlay?.card === card && cardInPlay.owner === 1
        )
    )
    .map((card) => (
      <GameBoardCard
        key={card}
        id={card}
        small
        owner={1}
        style={{ marginBottom: "8px" }}
        onClick={handleRemoveCard}
      />
    ));
  return <div className="selected-cards">{displayCards}</div>;
};

export default PlayerCards;
Drag and drop
The board tile itself is where half the drag and drop magic happens.
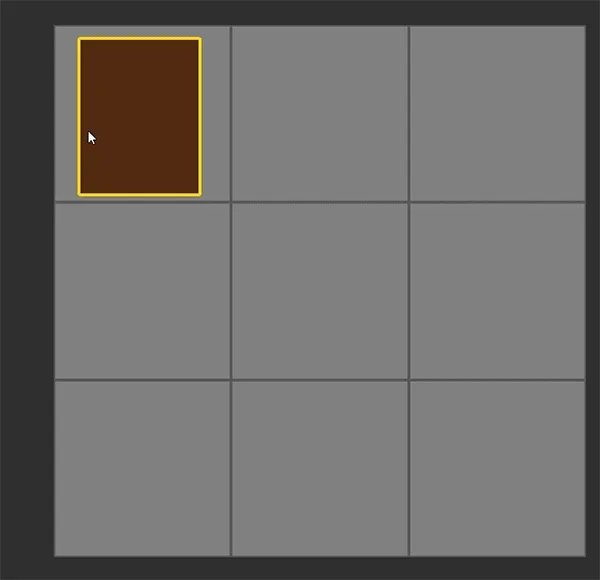
I use the react-dnd library and their useDrop() hook to detect when a card is being dropped onto the specific tile. It also blocks dropping when a card is already occupying the tile by using the canDrop property.
import React, { useEffect, useRef } from "react";
import "./GameBoardTile.css";
import { useDrop } from "react-dnd";
import { DropResult, ITEM_TYPES } from "../../../../constants/dnd";
import CatalogCard from "../../CardSelection/components/CatalogCard";
import { useGameStore } from "../../../../store/game";
import { GameTileIndices, PlayerIndex } from "../../../../types/game";

type Props = {
  id: number;
};

const GameBoardTile = ({ id, ...props }: Props) => {
  const { board } = useGameStore();
  const prevOwner = useRef<PlayerIndex | null>(null);

  const currentTileIndex = id as GameTileIndices;
  const currentTile = board[currentTileIndex];
  const tileCard = currentTile?.card;

  const [{ canDrop, isOver }, drop] = useDrop(() => ({
    accept: ITEM_TYPES.CARD,
    drop: () => ({ id }) as DropResult,
    canDrop: () => {
      const { board } = useGameStore.getState();

      const currentTileIndex = id as GameTileIndices;
      const currentTile = board[currentTileIndex];
      const tileCard = currentTile?.card;
      return !tileCard && !currentTile;
    },
    collect: (monitor) => ({
      isOver: monitor.isOver(),
      canDrop: monitor.canDrop(),
    }),
  }));

  const isActive = canDrop && isOver;
  let state = "";
  if (isActive) {
    state = "hovered";
  } else if (canDrop) {
    state = "notice";
  }

  useEffect(() => {
    // No owner? Hydrate with original owner of card
    if (!prevOwner.current && currentTile?.owner) {
      prevOwner.current = currentTile.owner;
    }

    // Owner exists and is different? Update!
    if (prevOwner.current && prevOwner.current === currentTile?.currentOwner) {
      // Trigger animation here?
      prevOwner.current = currentTile.currentOwner;
    }
  }, [currentTile]);

  return (
    <div ref={drop} className={`game-board-tile ${state}`} {...props}>
      {tileCard && currentTile && (
        <div className="card">
          <CatalogCard id={tileCard} owner={currentTile.currentOwner} />
        </div>
      )}
    </div>
  );
};

export default GameBoardTile;
The other half of the drag and drop happens in the <GameBoardCard /> component. It is a wrapper around the core card component we’ve been using everywhere. It uses the useDrag() hook to allow the user to drag it onto the board (which is setup to detect the drop). When the card is dropped the callback we provided to the end property is called, which plays the card on the board.
The card is played by just updating our Zustand store and the board property to add the new card. But you can see I wrap that logic in a playCard() function — I’ll touch on that later.
import React from "react";
import CatalogCard, {
  CatalogCardProps,
} from "../../CardSelection/components/CatalogCard";
import { DropResult, ITEM_TYPES } from "../../../../constants/dnd";
import { useDrag } from "react-dnd";
import { useGameStore } from "../../../../store/game";
import { playCard } from "../../../../features/card-logic";

type Props = CatalogCardProps;

const GameBoardCard = ({ id, ...props }: Props) => {
  const { evaluating, turn } = useGameStore();

  // Setup drag and drop functionality
  const [{ isDragging }, drag] = useDrag(() => ({
    type: ITEM_TYPES.CARD,
    item: { name: id },
    // Callback when item is dropped
    end: (item, monitor) => {
      const dropResult = monitor.getDropResult<DropResult>();
      if (item && dropResult) {
        // console.log(`You dropped ${item.name} into ${dropResult.id}!`);

        // Play the card!
        playCard(dropResult.id, {
          card: item.name,
          owner: 1,
          currentOwner: 1,
        });
      }
    },
    collect: (monitor) => ({
      isDragging: monitor.isDragging(),
      handlerId: monitor.getHandlerId(),
    }),
    // canDrag: () => turn === 1,
  }));

  const isPlayersTurn = turn === 1;
  const isGameEvaluating = !evaluating;

  return (
    <CatalogCard
      ref={isPlayersTurn && isGameEvaluating ? drag : null}
      id={id}
      {...props}
      selected={isDragging}
    />
  );
};

export default GameBoardCard;
Game logic: The “turn”
When a card is played the game needs to change “turns” from one player to another. So when the player drops a card, the opponent should go next. This is controlled by the turn property in the Zustand store. It keeps track of the current “user”, and we denote the player is 1 and the opponent is 2.
Then when we play a card, either from the player dropping it — or the opponent “automatically” doing it — we can switch over turns.
We can also limit the user input to stop any card dragging when it’s not their turn. And also let the AI play their turn.
To handle this logic, I created a playCard() function that handles adding the card to the board, as well as switching over the turn (and any other logic we need…spoilers for later).
export const playCard = (gameTile: GameTileIndices, card: CardInPlay) => {
  console.log("[CARD LOGIC] Starting...");
  const {
    placeCardOnBoard,
    setTurn,
    evaluating,
    setEvaluating,
    board,
    queueFlip,
  } = useGameStore.getState();

  const cardData = cards[card.card];
  const owner = card.currentOwner;

  setEvaluating(true);

  // Play the card on the board
  placeCardOnBoard(gameTile, card);

  // Change the turns over
  setTurn(changeOwner(card.owner));
  setEvaluating(false);
};
This worked great. The player can drop cards and now it was the opponents turn. So let’s give them something to do!
Opponent AI
The goal of the opponent is to play a card on the board. It can do that in a way that makes the game difficult for the player, aka a “strategic” AI. In my case, I wanted to keep things simple. The AI would operate randomly, and drop a random available card on a random empty tile. Simple.
All this logic could be contained in a hook I called useOpponentAI().
We grab the latest state from the Zustand store and in a useEffect we check if it’s the opponent’s turn. If so, to simulate a small wait time, we fire off a setTimeout() function that runs the enemyMove() function. The enemy movement function does exactly what I mentioned earlier. It checks the opponents hand for a card, then checks the game board for an empty tile, then places a card there.
import { useEffect, useRef } from "react";
import { useGameStore } from "../../../../store/game";
import { AllCardIds } from "../../../../data/cards";
import { GameTileIndices } from "../../../../types/game";
import { playCard } from "../../../../features/card-logic";

export const useOpponentAI = () => {
  const { turn, board, cards } = useGameStore();
  // Keep track if opponent's turn is active
  // This prevents multiple re-renders triggering extra "moves"
  const isPlaying = useRef(false);
  const timeoutRef = useRef<ReturnType<typeof setTimeout> | null>(null);

  // Get empty grid tiles
  const emptySlots = Object.entries(board).filter(
    ([tileId, card]) => card === null
  );
  // Keep an array of all cards on the board for reference
  const cardsInPlay = Object.values(board);

  const enemyMove = () => {
    console.log("[ENEMY TURN] Starting");
    // For now just pick a random empty spot and fill it
    // Find empty slot
    const randomEmptySlotIndex = Math.floor(Math.random() * emptySlots.length);
    const randomEmptySlot = emptySlots[randomEmptySlotIndex][0];
    // Find a random card that isn't being played
    const displayCards = [...cards[2]].filter(
      (card) =>
        !cardsInPlay.find(
          (cardInPlay) => cardInPlay?.card === card && cardInPlay.owner === 2
        )
    );
    const randomCardIndex = Math.floor(Math.random() * displayCards.length);
    const randomCard = displayCards[randomCardIndex];
    if (!randomCard) return;

    // Play it
    console.log(
      "[ENEMY TURN] Playing card",
      emptySlots,
      randomEmptySlot,
      randomCard,
      displayCards
    );
    playCard(parseInt(randomEmptySlot) as GameTileIndices, {
      card: randomCard,
      owner: 2,
      currentOwner: 2,
    });
  };

  // If it's the opponent's turn, handle their move
  useEffect(() => {
    // Is it opponent's turn? And is there an empty slot?
    if (turn === 2 && emptySlots.length > 0 && !isPlaying.current) {
      isPlaying.current = true;

      const min = 600;
      const max = 1500;
      const randomWaitTime = Math.floor(Math.random() * (max - min + 1) + min);

      timeoutRef.current = setTimeout(enemyMove, randomWaitTime);
    }
    // We reset the flag when we detect the turn officially switch
    if (turn === 1) {
      isPlaying.current = false;
    }

    return () => {
      if (timeoutRef.current) {
        isPlaying.current = false;
        clearTimeout(timeoutRef.current);
      }
    };
  }, [turn]);
};
Game logic: Card flipping
This is where things got interesting. How do you handle the logic of card flipping in Triple Triad? Essentially when a card is dropped, all adjacent tiles need to be checked. If the played card is more powerful, it flips the card. All this happens between turns.
So the game originally would just switch turns directly. To accommodate the “flipping” period of time, I added a new flag to the game state called evaluating. This helps the game keep track of when it’s “crunching numbers”. I use it to prevent the player and opponent from playing. And I could use it in a new hook called useFlipCards() — which handles the card flipping logic.
But before I get into that, let’s talk about flips. I mentioned they should happen when the card is played. So that’s what I put the logic - inside the playCard() function. So after the card is played, we check each adjacent card and if the played card beats it - we “queue” a flip in the system. I determine what tile is adjacent by using a hardcoded map (basically each tile has an associated property and it returns an array of tile indices).
const ADJACENT_TILES = {
  1: [2, 4],
  2: [1, 3, 5],
  3: [2, 6],
  4: [1, 5, 7],
  5: [2, 4, 6, 8],
  6: [3, 5, 9],
  7: [4, 8],
  8: [7, 5, 9],
  9: [6, 8],
};

// Check against nearby cards
// Figure out adjacent tiles
const adjacentTiles = ADJACENT_TILES[gameTile];
// Go through each tile and check ownership of card
let noFlips = true;
adjacentTiles.forEach((tileIndex) => {
  console.log("[CARD LOGIC] Checking all adjacent tiles");
  // Only check opponents cards
  const currentIndex = tileIndex as GameTileIndices;
  const currentTile = board[currentIndex];
  if (currentTile && currentTile?.currentOwner !== owner) {
    const checkCardData = cards[currentTile.card];

    // What direction is this card relative to newly dropped card?
    // Is vertical
    const isBelow = gameTile + 3 === tileIndex;
    const isAbove = gameTile - 3 === tileIndex;
    // This card is below the card just dropped
    if (isBelow) {
      console.log("[CARD LOGIC] Is below");
      // Compare top/bottom card numbers
      if (cardData.value.bottom > checkCardData.value.top) {
        // Flip card!
        queueFlip(currentIndex);
        noFlips = false;
      }
    }
    if (isAbove) {
      console.log("[CARD LOGIC] Is above");
      // Compare top/bottom card numbers
      if (cardData.value.top > checkCardData.value.bottom) {
        // Flip card!
        queueFlip(currentIndex);
        noFlips = false;
      }
    }
    // Is horizontal
    const isRight = gameTile + 1 === tileIndex;
    const isLeft = gameTile - 1 === tileIndex;
    // This card is below the card just dropped
    if (isRight) {
      console.log("[CARD LOGIC] Is right");
      // Compare left/right card numbers
      if (cardData.value.right > checkCardData.value.left) {
        // Flip card!
        queueFlip(currentIndex);
        noFlips = false;
      }
    }
    if (isLeft) {
      console.log("[CARD LOGIC] Is left");
      // Compare left/right card numbers
      if (cardData.value.left > checkCardData.value.right) {
        // Flip card!
        queueFlip(currentIndex);
        noFlips = false;
      }
    }
  }
});
The hook then checks if the game is “evaluating” and if there are any queued flips, and loops over them. The “flip” is essentially updating the currentOwner of the card in the Zustand store - then clearing the flip from the queue. We do one flip at a time and use a setTimeout to simulate a little extra time between cards (and to give things time to animate).
import { useEffect, useRef } from "react";
import { useGameStore } from "../../../../store/game";
import { changeOwner } from "../../../../features/card-logic";

export const useFlipCards = () => {
  const {
    flips,
    removeFlip,
    placeCardOnBoard,
    board,
    evaluating,
    setEvaluating,
    setTurn,
    turn,
  } = useGameStore();
  const timeoutRef = useRef<ReturnType<typeof setTimeout> | null>(null);
  const isFlipping = useRef<boolean>(false);

  useEffect(() => {
    if (evaluating && flips.length > 0) {
      // Remember that we've started flipping
      isFlipping.current = true;
      timeoutRef.current = setTimeout(() => {
        const flipTile = flips[0];
        const currentCard = board[flipTile];
        if (currentCard) {
          // Update the card with new owner
          const updatedCard = {
            ...currentCard,
            currentOwner: changeOwner(currentCard.currentOwner),
          };
          placeCardOnBoard(flipTile, updatedCard);

          // Remove from the flip queue
          removeFlip(flipTile);
        }
      }, 300);
    }
    console.log("flips", flips);
    if (evaluating && flips.length === 0 && isFlipping.current) {
      console.log("[FLIP] Changing turns");
      setEvaluating(false);
      setTurn(changeOwner(turn));
      isFlipping.current = false;
    }

    return () => {
      if (timeoutRef.current) clearTimeout(timeoutRef.current);
    };
  }, [evaluating, flips]);
};
But how do we visually “flip” the card when there’s a battle between two cards and one wins? It comes back to the card component.
Inside the Card component we accept a prop called owner that represents which player currently owns the card. It’s primarily used to just color the background red or blue — but when we change it — we can have the CSS transition between both colors. But CSS can’t transition between gradients, so I essentially place 2 <div>’s on top of each other and use their opacity to fade between.
The component looks like this:
<div
  ref={ref}
  className={`catalog-card ${selected ? "selected" : ""} ${
    small ? "small" : ""
  } ${owner === 1 ? "player" : "opponent"}`}
  style={{
    transform: `scale(${scale})`,
    ...style,
  }}
  onClick={handleClick}
>
  <div className="opponent" style={{ opacity: owner === 2 ? 1 : 0 }} />
  <div className="player" style={{ opacity: owner === 1 ? 1 : 0 }} />
</div>
And the CSS looks like this:
.catalog-card .player {
  position: absolute;
  width: 100%;
  height: 100%;
  background: linear-gradient(
    to bottom,
    rgba(240, 249, 255, 1) 0%,
    rgba(0, 85, 255, 1) 100%
  );
  opacity: 0;
  transition: opacity 400ms ease-in;
}
.catalog-card .opponent {
  position: absolute;
  width: 100%;
  height: 100%;
  background: linear-gradient(
    to bottom,
    rgba(240, 249, 255, 1) 0%,
    rgba(229, 89, 89, 1) 100%
  );
  opacity: 0;
  transition: opacity 400ms ease-in;
}
But what about flipping? When the card is played, I created a CSS animation that flips the card. But it only plays initially when the card is played. So to replay it, you’d need to access the ref of the card to alter the DOM and modify a specific property to get CSS animations to reset. Shoutout to this StackOverflow post that covers the hacky solution.
function reset_animation() {
  var el = ref.current;
  el.style.animation = "none";
  el.offsetHeight; /* trigger reflow */
  el.style.animation = null;
}
Game Over screen
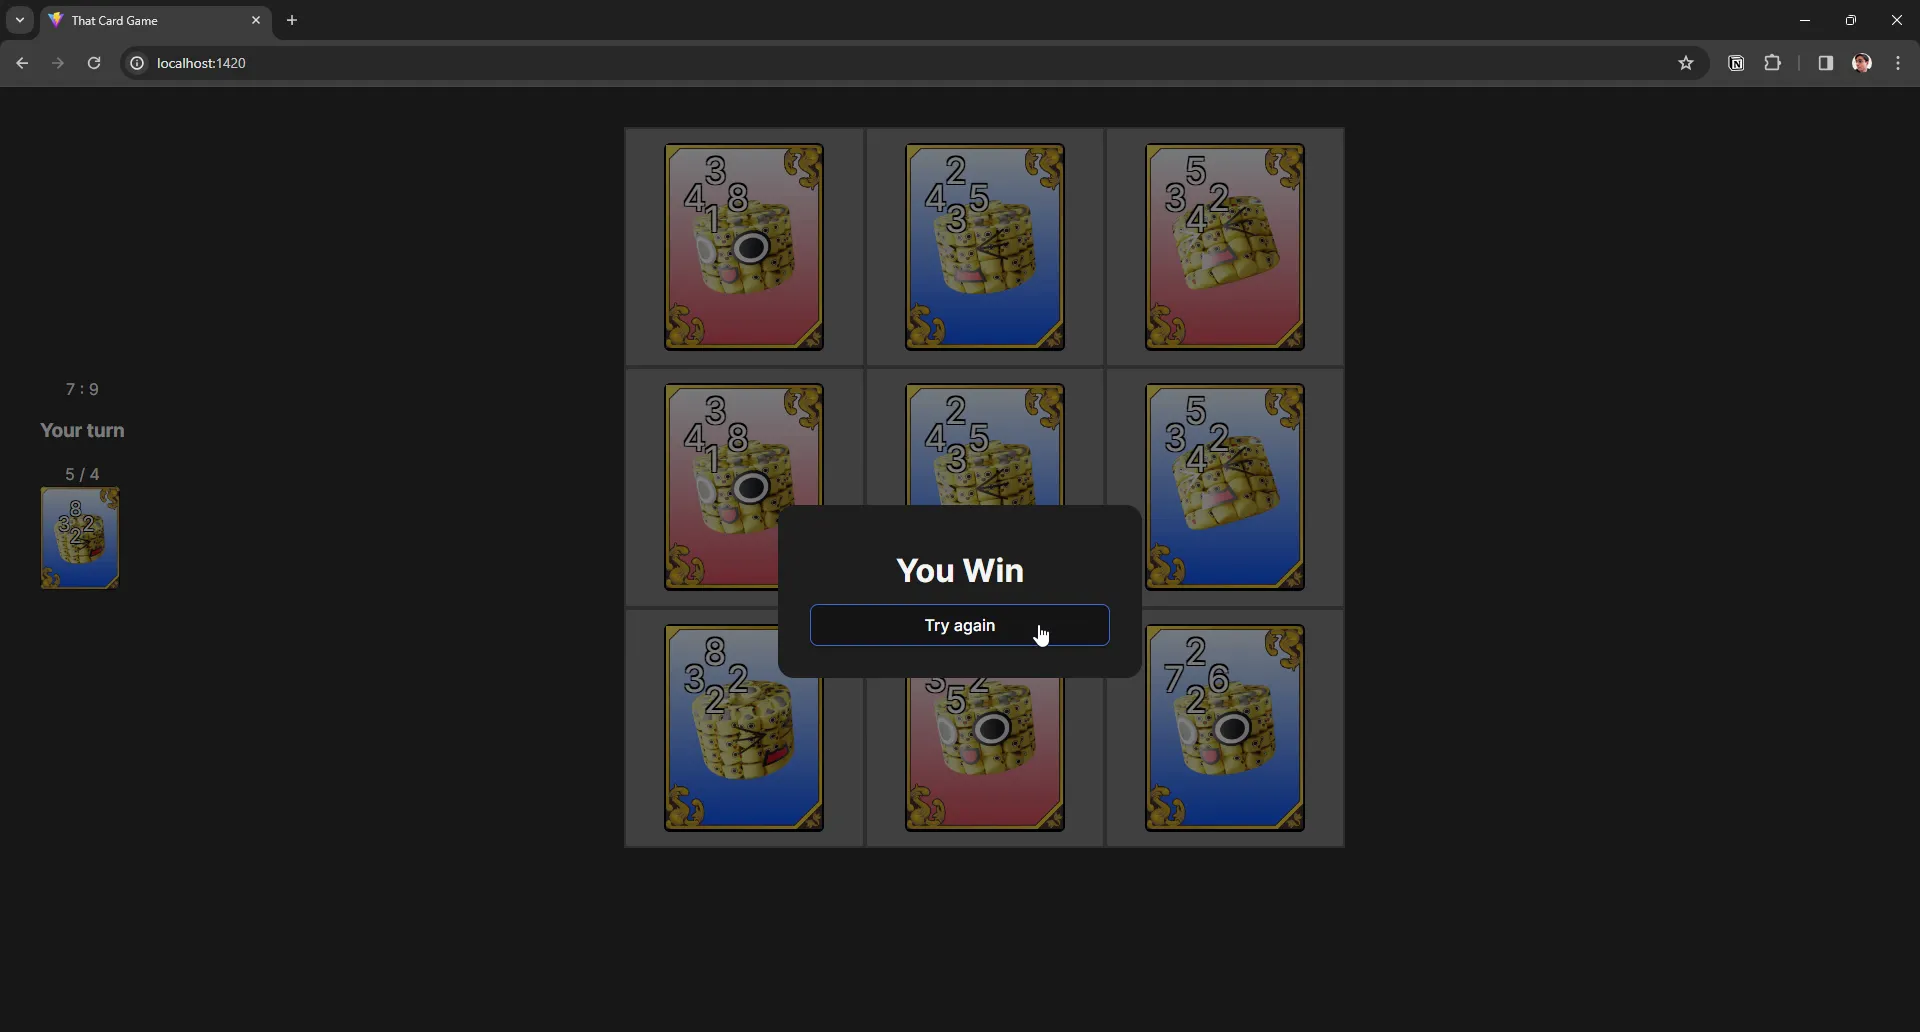
This one isn’t a screen as much as an alternate state for the game board screen. When the game is in the “game over” mode, the router stays on the game board — but the screen knows to also display a modal with the game’s results. Nothing too fancy here, just an inaccessible hand-spun modal that could probably be better replaced in a jiffy with a react-aria component or something.
Making it look good
Now that most of the core game logic is there, I focused on making things look a bit better. There was a bit of responsive design done in the CSS world, but I won’t waste your time with that because honestly, it still has a bit of work to go anyway. But I will cover one feature - card backgrounds.
In Triple Triad, each card is made up of a monster or hero that’s cutout on a transparent background. Then that monster or hero is placed on top of a gradient colored background, to signify the current “ownership” of the card. Blue represents the player, red represents the opponent. I replicated this in my game as well by exporting a few different variations of my 3D Servbot art transparent backgrounds, then added the colored gradient in the CSS.

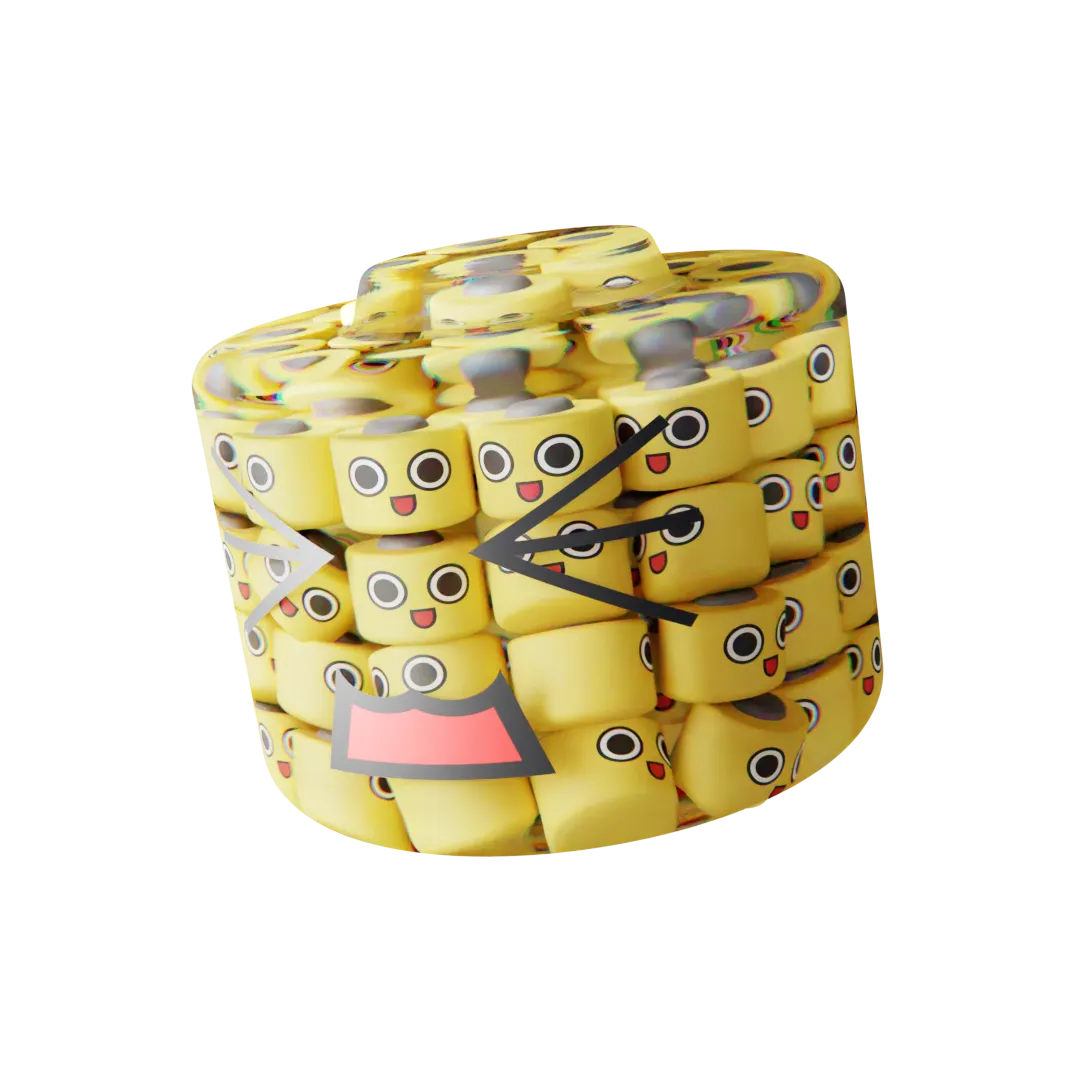

Combined with the fanart frame I borrowed, it looked great:
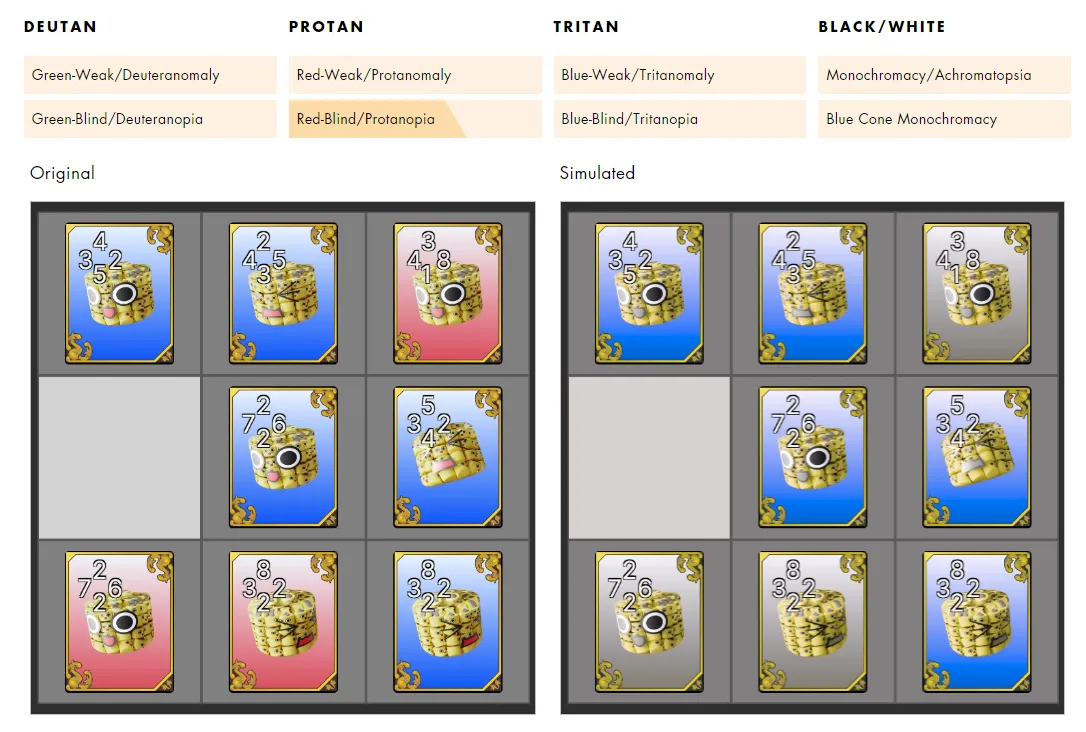
The only issue I found here, and I wonder if the designers at Square Enix and Final Fantasy have considered, I’m not sure if this is accessible for people who are colorblind. In UI it’s often not the best idea to convey meaning solely with color, you often need a secondary visual cue - often in the form of an icon (better) or tooltip when interacting (not as good, moreso a fallback).
You can see here if I simulate monochromacy / achromatopsia (a type of black and white vision) using a tool, the color cue becomes indistinguishable.
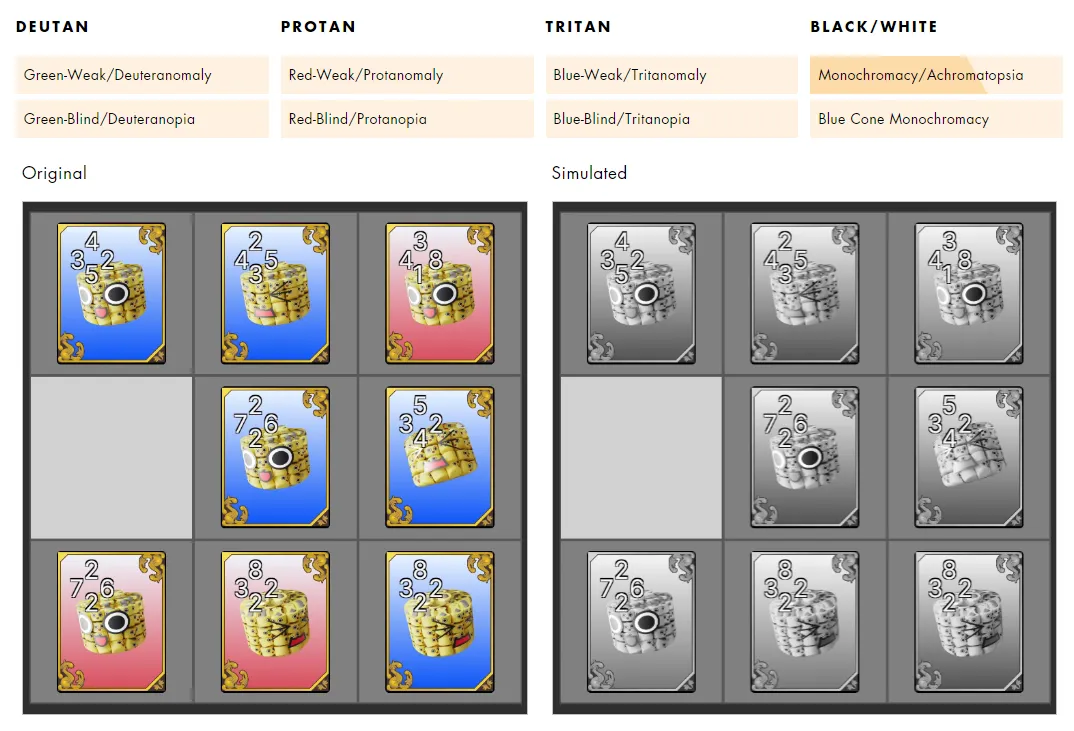
I will say though, red and blue works surprisingly well for color difference. Since most colorblindness is often blue or red, the other color is often still distinguishable enough.
What’s next?
The game is roughed out with core functionality, but it’s still missing a few things to make it a fully fleshed out game.
The rule system is something that I scaffolded in with the types and store, but I never actually implemented. This one would be pretty interesting, since the rules effect multiple areas of the game, from the cards visible to the board itself.
Adding cool looking cards would be a big requirement. Why play a card game if all the cards are placeholders? And once we had cool cards, you’d probably want to collect them when you win a match.
Want to play a game of cards?
Hope this inspires you to explore game development with React. It’s a great framework for creating apps, and even games on the web. And it can be pretty easy to jump into with how modular everything can be kept. It can be a little hard to adapt some game design concepts to it since it doesn’t run in an infinite loop like most engines, but I hope I showed some nice examples of integrating those game dev concepts.
You could even fork it and add the real images from FF8 if you owned a copy of the game and wanted a homebrew solution. Just like…remove my name from it or something lol, I’m still trying to get hired at Square Enix.
What kind of game would you like to see me make next? 👀 Got any questions or suggestions? Tag me on Threads, Mastodon, or Twitter.
Stay curious, Ryo