Posted on
February 8, 2024
Recently I upgraded my PC that was over 6 years old with a fairly top of the line setup. I went from a GTX 1080 to a RTX 4080 - a huge leap that took my render times down from 2 minutes to 20 seconds.
But before that upgrade I was still learning Blender and struggling to render my artwork and animations. I picked up a few tips and tricks on optimizing rendering to get it to work on a low end device, and I thought I’d share them.
I’d also like to stress I wouldn’t call myself a Blender expert, and there are probably even more advanced tips out there. But these basics should help you build a good foundation, and acts as a solid “checklist” when thinking about rendering performance.
CPU vs GPU for Cycles
One of the first things I noticed that was ruining my rendering performance was Blender using the CPU instead of the GPU. This slowed rendering down a lot and made even scarier sounds with how hard the CPU had to work.
This happened because I had both the CPU and GPU checked in the Blender Preferences under Cycles Render Devices. By unchecking the CPU, it improved my performance 10 times easily.
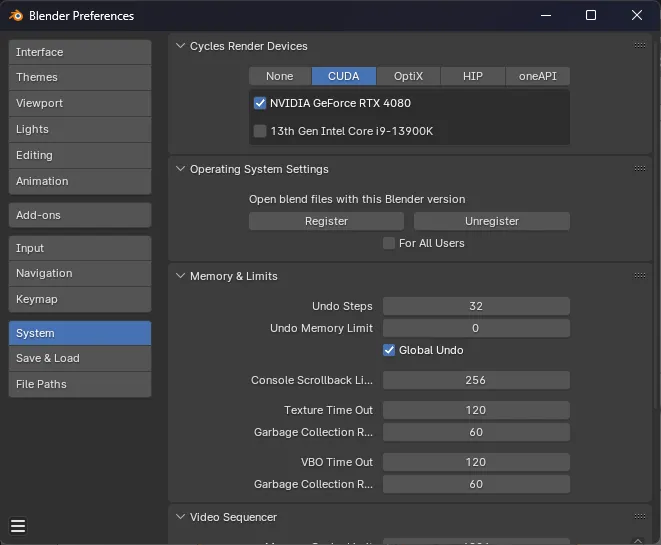
The Blender preferences window on the System tab. Under Cycles Render Devices the CUDA tab is selected and the GPU is checked but not the CPU.
Of course, this is dependent on you having a good graphics card (or any at all). But if you did have a decent GPU and you were wondering where the bottleneck was — it’s this setting.
Rendering tips
Simplify your scene
The more objects you have in your scene, the higher the total polygon count, the the more things with large texture on them, things that are see through — there are lots of ways you can bloat a scene and increase the rendering time. Reducing the complexity of your scene is a great way to improve rendering time.
I wouldn’t focus too heavily in this section, since these optimizations won’t make a huge difference unless you’re working at scale (big scenes, lots of objects).
Decimate
If you have meshes that are too high poly count, you could apply a Decimate modifier to decrease the number of polygons (quads/tris).
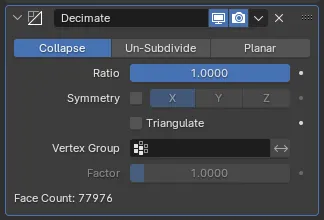
The decimate modifier expanded in the Modifier panel.
Optimize textures
If you’re using 4K textures and you’re rendering a 1080p scene, it might be a bit overkill. Larger textures are great for getting higher quality renders - especially closeups - but if you’re object is far away from the camera it’s not as necessary.
This does more for the CPU and memory than the GPU, since Blender preloads texture data before each frame.
Limit glass/transparent objects
The more glass objects (Glass BSDFs or low transmission Principled BSDFs) you have in a scene, the harder time the GPU will have rendering everything.
Use Eevee
The Eevee rendering backend is lightning fast compared to Cycles. Just switching over to that will improve rendering times immensely.
You’ll find that the Eevee renderer doesn’t have the same features as Cycles so renders will look and feel different. Though it does have quite a few - from bloom to ambient occlusion to depth of field. It’s possible to create some fairly impressive scenes with the right setup.
Cycles settings
When you need to use Cycles, there are a lot of settings you can change to speed up your render at minimal cost to quality.
Sampling settings
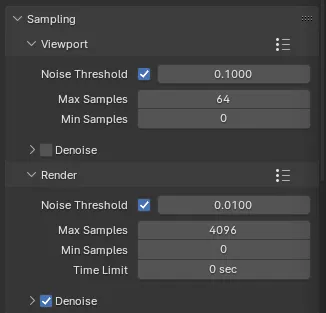
The Sampling settings in Cycles’ Render settings panel
Noise threshold is the one of the easiest ways to quickly improve rendering time. Going from 0.01 to 0.1 (basically same a viewport) cuts down times immensely. And it doesn’t effect the quality of the render too much usually.
You can reduce the number of samples as well. I usually divide by 4 until I find a number I’m happy with (you can literally type /4 behind a number in the Blender input and it’ll do the math for you). I found I was hovering around 64-128 at my lowest, and things didn’t look terrible.
You can uncheck Denoise to save some time after each frame, but this will make the render way more noisy. Though if you ask me, it’s kinda aesthetic? So it might help the render if you’re going for that slightly textured look.
Light Paths
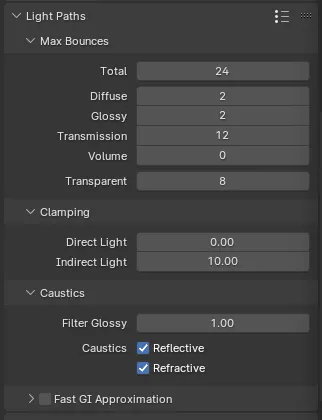
The Light Paths settings in Cycles’ Render settings panel
You can decrease the Total Max Bounces, which will save a little time rendering. And of course, if you don’t have any glass or see through stuff, lower the bounces used on Transmission.
And if your scene doesn’t include any transparent objects, you can uncheck Reflective and Refractive caustics.
Performance
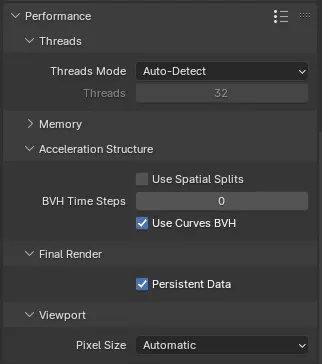
The Performance settings in Cycles’ Render settings panel
You can check Persistent Data under the Performance accordion to keep render data around between frames. This is good for animations where things in scene don’t change much. I wouldn’t enable this if you don’t have a lot of memory/RAM - but test it first - it’s not as intensive as you might think.
Output properties
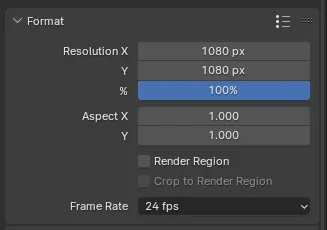
The Format settings in the Output settings panel
The format is the quickest way to improve your render time - but at the cost of smaller renders. I usually lower the percent to 50% or lower when rendering quick tests — then back to 100% when doing final tests and renders.
Animations
The one tip I can give with animations is to render each frame as a PNG as compile them as a video sequence later in an app like Adobe Premiere or DaVinci Resolve.
I also recommend using Flamenco (see below) to render your animations. This allows you to create custom scripts to let your PC takes breaks between frames so you don’t have to manually do it.
Other optimizations
Rendering in Unreal Engine
You can always use a game engine to render your work. From Unreal Engine to Unity to even the web, you can always export your work from Blender and import it somewhere else. Here’s a video I found on YouTube that covers the process for Unreal Engine.
The one thing to keep in mind with this process is exporting files properly. Make sure you “bake” things in on the Blender side like applying modifiers and transformations (since other apps won’t be able to replicate things like Geometry Nodes — or even a Subdivision modifier). And during the export, select a file format that supports everything you need (like GLTF or FBX if you need multiple models, animations, skeletons).
Flamenco
If you really want to step things up and treat your PC like a render farm, you could use Blender’s open source render farm software — Flamenco.
Now I know what you’re thinking - “my PC is bad, why would I want to industry standard software with it?”. Because you can, nothing’s stopping you. And it’s automated workflow basically giving you a simple version of Adobe Media Encoder to queue up all your renders to.
What is Flamenco?
Flamenco is an app made by Blender that lets you queue renders (single images and even animations) and render them across multiple computers. Blender uses it for it’s internal studio to render the films they create. It’s open source, you can see the source code on the Blender repo.
It’s a “manager” app you run on your computer than spins up a local Vue web app, and a CLI backend to manage the render farm. Then you open another app that’s a “worker”, and that’ll actually run the rendering. In a studio this would be setup on some main remote server, then multiple computers would spin up the “worker” app and point to that website. But since we’re just 1 person, we just run both on the same computer and it works fine.
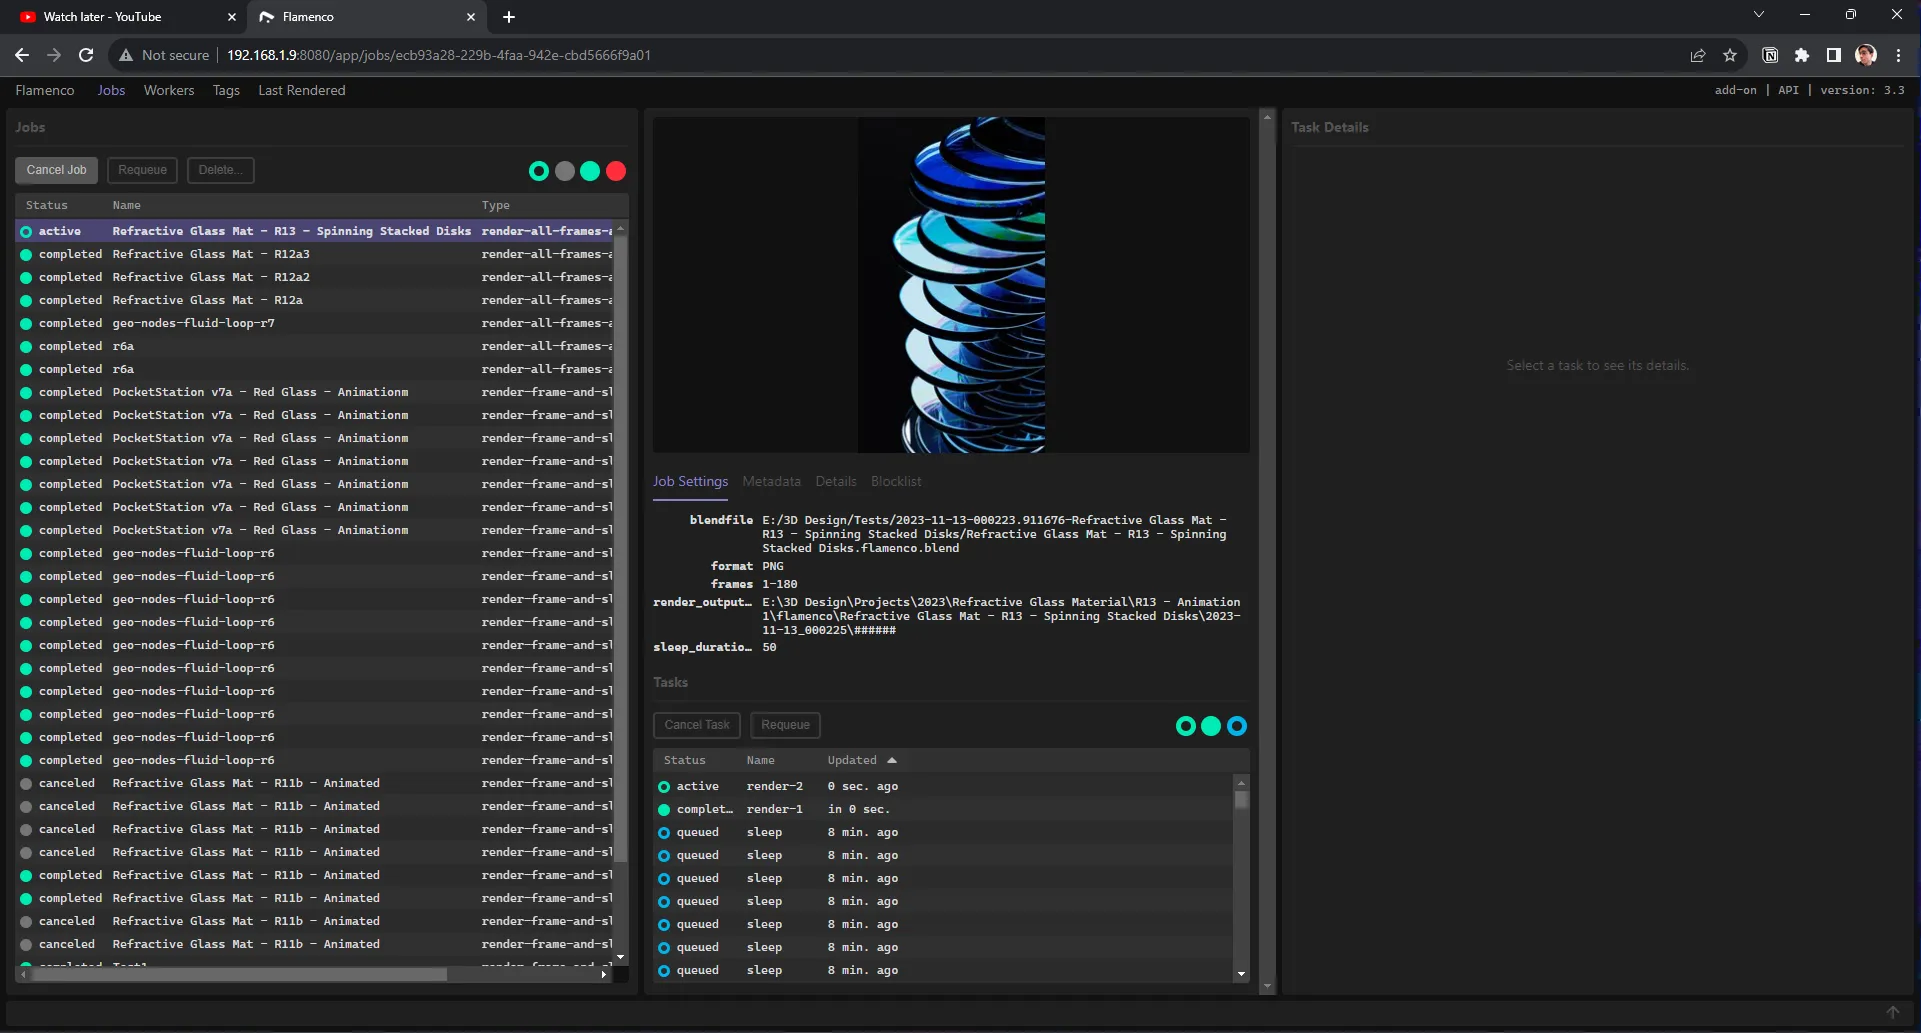
A screenshot of the Flamenco app running locally in my Chrome browser. A left column has a list of jobs and their status. The center column shows the selected job, including a picture of a render, file details, and a list of all the frames being rendered.
You also have to install a Blender plugin to add some UI to the rendering tab that enables us to queue jobs - as well as change settings. You can see an example below.
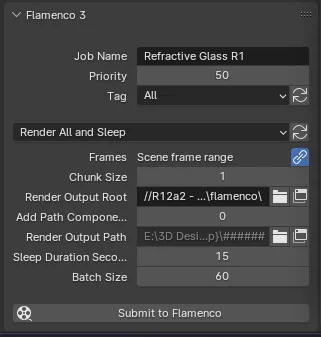
The Flamenco settings in the Output settings panel
One of the benefits of Flamenco is being able to write custom scripts to run jobs. You can see above I have a job type called “Render All and Sleep”. This renders all the frames provided, but has the computer sleep between chunks. So you can render 180 frames in 60 frame chunks and sleep for 15 seconds after each chunk.
This is a custom script I created in JavaScript that use an API Flamenco exposes. I use it to loop over each frame and render or sleep accordingly. It’s based off of one the examples in the Flamenco repo.
const JOB_TYPE = {
  label: "Render All and Sleep",
  settings: [
    // Settings for artists to determine:
    {
      key: "frames",
      type: "string",
      required: true,
      eval: "f'{C.scene.frame_start}-{C.scene.frame_end}'",
      evalInfo: {
        showLinkButton: true,
        description: "Scene frame range",
      },
      description:
        "Frame range to render. Examples: '47', '1-30', '3, 5-10, 47-327'",
    },
    {
      key: "chunk_size",
      type: "int32",
      default: 1,
      description: "Number of frames to render in one Blender render task",
      visible: "submission",
    },

    // render_output_root + add_path_components determine the value of render_output_path.
    {
      key: "render_output_root",
      type: "string",
      subtype: "dir_path",
      required: true,
      visible: "submission",
      description:
        "Base directory of where render output is stored. Will have some job-specific parts appended to it",
    },
    {
      key: "add_path_components",
      type: "int32",
      required: true,
      default: 0,
      propargs: { min: 0, max: 32 },
      visible: "submission",
      description:
        "Number of path components of the current blend file to use in the render output path",
    },
    {
      key: "render_output_path",
      type: "string",
      subtype: "file_path",
      editable: false,
      eval: "str(Path(abspath(settings.render_output_root), last_n_dir_parts(settings.add_path_components), jobname, '{timestamp}', '######'))",
      description: "Final file path of where render output will be saved",
    },

    // Sleep settings
    {
      key: "sleep_duration_seconds",
      type: "int32",
      default: 30,
      description: "Number of seconds to sleep between frame batches",
    },
    {
      key: "batch_size",
      type: "int32",
      default: 25,
      description: "Number of frames to render before going to sleep",
      visible: "submission",
    },

    // Automatically evaluated settings:
    {
      key: "blendfile",
      type: "string",
      required: true,
      description: "Path of the Blend file to render",
      visible: "web",
    },
    {
      key: "fps",
      type: "float",
      eval: "C.scene.render.fps / C.scene.render.fps_base",
      visible: "hidden",
    },
    {
      key: "format",
      type: "string",
      required: true,
      eval: "C.scene.render.image_settings.file_format",
      visible: "web",
    },
    {
      key: "image_file_extension",
      type: "string",
      required: true,
      eval: "C.scene.render.file_extension",
      visible: "hidden",
      description: "File extension used when rendering images",
    },
    {
      key: "has_previews",
      type: "bool",
      required: false,
      eval: "C.scene.render.image_settings.use_preview",
      visible: "hidden",
      description: "Whether Blender will render preview images.",
    },
  ],
};

// Set of scene.render.image_settings.file_format values that produce
// files which FFmpeg is known not to handle as input.
const ffmpegIncompatibleImageFormats = new Set([
  "EXR",
  "MULTILAYER", // Old CLI-style format indicators
  "OPEN_EXR",
  "OPEN_EXR_MULTILAYER", // DNA values for these formats.
]);

// File formats that would cause rendering to video.
// This is not supported by this job type.
const videoFormats = ["FFMPEG", "AVI_RAW", "AVI_JPEG"];

function compileJob(job) {
  print("Blender Render job submitted");
  print("job: ", job);

  const settings = job.settings;
  if (videoFormats.indexOf(settings.format) >= 0) {
    throw `This job type only renders images, and not "${settings.format}"`;
  }

  const renderOutput = renderOutputPath(job);

  // Make sure that when the job is investigated later, it shows the
  // actually-used render output:
  settings.render_output_path = renderOutput;

  const renderDir = path.dirname(renderOutput);
  const renderTasks = authorRenderTasks(settings, renderDir, renderOutput);

  function newSleepTask() {
    const sleepTask = author.Task("sleep", "misc");
    sleepTask.addCommand(
      author.Command("sleep", {
        duration_in_seconds: settings.sleep_duration_seconds,
      })
    );
    return sleepTask;
  }

  let sleepTask = newSleepTask();

  let loopCount = 0;
  for (const rt of renderTasks) {
    job.addTask(rt);

    // We add a sleep task in between a certain number of render tasks (aka rendering 1 frame usually)
    if (sleepTask) {
      // If there is a video task, all other tasks have to be done first.
      sleepTask.addDependency(rt);
      loopCount = loopCount + 1;

      if (loopCount == settings.batch_size) {
        loopCount = 0;
        job.addTask(sleepTask);

        sleepTask = newSleepTask();
      }
    }
  }
}

// Do field replacement on the render output path.
function renderOutputPath(job) {
  let path = job.settings.render_output_path;
  if (!path) {
    throw "no render_output_path setting!";
  }
  return path.replace(/{([^}]+)}/g, (match, group0) => {
    switch (group0) {
      case "timestamp":
        return formatTimestampLocal(job.created);
      default:
        return match;
    }
  });
}

function authorRenderTasks(settings, renderDir, renderOutput) {
  print("authorRenderTasks(", renderDir, renderOutput, ")");
  print("frames", settings.frames);
  let renderTasks = [];
  let chunks = frameChunker(settings.frames, settings.chunk_size);
  for (let chunk of chunks) {
    const task = author.Task(`render-${chunk}`, "blender");
    const command = author.Command("blender-render", {
      exe: "{blender}",
      exeArgs: "{blenderArgs}",
      argsBefore: [],
      blendfile: settings.blendfile,
      args: [
        "--render-output",
        path.join(renderDir, path.basename(renderOutput)),
        "--render-format",
        settings.format,
        "--render-frame",
        chunk.replaceAll("-", ".."), // Convert to Blender frame range notation.
      ],
    });
    task.addCommand(command);
    renderTasks.push(task);
  }
  return renderTasks;
}
This is useful if you want to insert some sort of logging or analytics, or do some transformations before or after the render (like compiling all the frames to a video).
Limitations of Flamenco
As I’ve used Flamenco for a few months now, I’ve encountered a few Blender features it has problems handling. It’s also easy to forget things and set a render to essentially fail overnight.
- Physics simulations. These technically work, but if you don’t bake your simulation, nothing will animate.
- Simulation zones inside Geometry Nodes. They don’t seem to animate at all. Even if you bake the animation before sending it off. Probably because the cache resets every time the file is reopened, so saving it with a bake wouldn’t work.
- CPU intensive animations. Not sure why, but some animations would straight up fail in Flamenco, but render fine in Blender. The only thing I could think of was that they were a bit CPU intensive with a lot of subdivisions.
- Dynamic painting. This is another case where I tried baking the data into the file and I still couldn’t get it to render with Flamenco.
- Certain geometry/shader nodes. Not sure why this is an issue, but occasionally I can’t queue projects with node trees. I’ll get an error about the Voronoi texture or particular nodes not exporting properly in the error log.
Basically Flamenco works by saving a copy of your Blender file inside a temporary folder to access later. This is how you’re able to queue something, change the file, then queue something else without messing up the first render.
So keep that in mind, if you need things like simulation data baked into your .blend file, make sure it’s done before sending something off to queue. And for longer renders, do a small segment in a part that’s clearly animating as a test cause you never know!
I was able to fix some issues by updating Flamenco, so I’m sure as time goes on some of these issues will be resolved as well.
Get rendering!
Hope this helps you wrap your head around the Blender UI and rendering systems enough to crank out some cool renders. As always, you can always reach out to me on my socials and share your work or ask any questions.
Stay regular, Ryo