
Posted on
March 18, 2024
I’ve recently been getting into P5.js, a graphics library for the web that lets you easily draw to the canvas. As I’ve been using it, I’ve been preferring it over using ThreeJS, especially for 2D visualizations. It’s a lot less overhead and is much simpler to setup. So I thought, why not use it on my blog? It’d be a great way to illustrate some posts and provide animated or interactive examples.
A few years ago, I switched my blog over from Markdown to MDX based content. This allowed me to support React components inside of my Markdown files, which allows for some cool stuff, like embedding interactive examples into posts (without “embedding” a separate website via iframe).
I thought I’d go over the process of getting P5.js working with my NextJS MDX-based blog, and intricacies behind the process that tripped me up. I’ve got plenty of tips for working with P5 and React, so bring the popcorn 🍿
TLDR? You can find the source code branch here on GitHub.
What is MDX?
MDX is a superset of the Markdown syntax that allows you to import and use JavaScript inline with your Markdown. This is the example MDX provides in their docs:
export function Thing() {
return <>World</>
}

# Hello <Thing />
You can see how powerful this could be, being able to define custom components inside your Markdown files.
What is P5.js?
P5 is an open source JavaScript library for drawing to the web’s HTML canvas element. It also provides utilities for other web functionality, like mouse interactions or microphone input. With these two combined, you can create some cool interactive experiences.
It simplifies the drawing experience to allow for “creative coding”, where someone can focus on creating art with their curated toolset of primitives (like drawing a circle with ellipse()).
In this example from the P5 docs, we create a 400px square canvas, fill it with a gray background, and draw a 80px circle at the coordinates 50, 50 on the canvas.
function setup() {
  createCanvas(400, 400);
}

function draw() {
  background(220);
  ellipse(50, 50, 80, 80);
}
You can see how quickly it is to get started, and how accessible feature APIs are.
Adding P5 to my blog
How MDX works with NextJS
Before I jump into how I add P5, I want to give an overview of how my blog currently works. Last year when I migrated my website from AstroJS to NextJS, I had to create a very specific setup.
NextJS supports MDX “out of the box” (kinda) using their next/mdx library, which extends their build system to support MDX files. You can learn more about this process in Vercel’s guide to adding MDX to your NextJS blog.
The problem with this process? There’s a few:
- Every MDX page needs to be a
.mdxfile. There was no easy way to leverage the functionality of the MDX rendering on a dynamic level. For example, you couldn’t have a catch-all[...slug].tsxpage to display all blog posts. - Frontmatter isn’t supported the best. You install a remark plugin to remove it from the output, but then there’s no easy to access the frontmatter to display it.
- Layout is sloppy, basically requiring you to importing the layout component into your MDX file and exporting it as a
Layoutcomponent. You can see an example here. It’d basically require me to take my entire blog archive and append a layout component to each MDX file. You could also just use the_page.tsxcomponent to add a wrapper (which I ended up doing) - but that has it’s own compromises. Normally you’d be able to define a layout in the frontmatter and change the layout based on that.
next-mdx-remote
This led me to next-mdx-remote. It has solutions for each of the problems I had: external MDX file loading, frontmatter support, and a solution for defining different layouts for blogs.
But after using next-mdx-remote, I started to hit some limitations (that are luckily clearly documented - s/o to the contributors).
It basically doesn’t support dynamic imports for React components inside MDX. If you want to use a React component inside MDX, it needs to be predefined in the “MDX Components” list you pass the renderer. They do support conditionals here in a way, but it felt weird coupling my content to my component list. I wanted to make one-off examples and not feel like it’s weighing the whole site down (or have to wonder what component is related to what content…).
And if you want to export any data from MDX, you’re out of luck (or have to basically use the frontmatter — which is parsed differently using the gray-matter library).
The solution: Why not both?
My blog content is located inside /content/blog/ as MDX files. These get loaded using next-mdx-remote like they normally would, nothing really changes.
But since I want to leverage dynamic imports, I setup NextJS to use MDX. Thanks for the NextJS router, I was able to use a dynamic catch-all route for the next-mdx-remote content (/pages/blog/[…slug]), then mix in .mdx files as static routes in the /pages/blog directory. The MDX setup included installing their library, setting up the config file, and figuring out a few wrinkles (like removing frontmatter using a remark plugin). Overall nothing too wild, you can see most of this in the NextJS docs.
What was more interesting was getting different features of my blog working. For example, I have Metadata and Table of Contents. The Metadata component adds the right meta tags to the <head>. And the Table of Contents component does exactly what it sounds like.
Both are powered by a Zustand store (useBlogStore) where we keep data about the current blog post the user is reading. When the blog page is loaded, we grab the necessary metadata from the MDX file’s frontmatter (like the page title, or the blog post’s cover image). Then we save this in the Zustand store to use across the app.
To support this with NextJS, for every MDX page I had to create a variable called frontmatter and pass it to an exported layout component called <MDXBlogWrapper />. This was a stand-in for the functionality I get from using the dynamic [...slug] route and manually parsing the frontmatter. I add this chunk of code to each MDX file on the top, underneath the real frontmatter.
import dynamic from "next/dynamic";
export const BlogMDXWrapper = dynamic(
  () => import("@components/dom/BlogMDXWrapper/BlogMDXWrapper"),
  { ssr: false }
);
export default function Layout({ children }) {
  const frontmatter = {
    title: "Intro to Visualizing Audio Programming",
    date: "2024-03-12",
    section: "blog",
    tags: ["blender", "ui", "tips"],
    cover_image: "./how-i-made-the-render-buddy-blender-plugin.png",
  };
  return (
    <BlogMDXWrapper frontMatter={frontmatter} slug="test-mdx">
      {children}
    </BlogMDXWrapper>
  );
}
The layout component was the same code from the [...slug] page, I just had to pull it out and make it modular:
import Head from "next/head";
import BlogTransition from "../BlogTransition/BlogTransition";
import { useEffect } from "react";
import { useBlogStore } from "@store/blog";
import useBlogPostRead from "features/achievements/hooks/useBlogPostRead";
import { MetaTagsProps } from "../MetaTags/MetaTags";

export default function BlogMDXWrapper({ frontMatter, slug, children }) {
  const { setTitle, setSlug, resetTableOfContents } = useBlogStore();

  useEffect(() => {
    setTitle(frontMatter.title);
    setSlug(slug);
    return () => {
      resetTableOfContents();
    };
  }, [frontMatter.title]);

  useBlogPostRead();

  const meta: MetaTagsProps = {
    title: frontMatter.title,
    // Markdown uses relative image URLs, we convert here
    image: frontMatter?.cover_image?.replace(
      "./",
      `https://whoisryosuke.com/${slug}/`
    ),
    url: slug,
    blogArticle: true,
  };
  return (
    <BlogTransition>
      <Head title={frontMatter.title} meta={meta} />
      {children}
    </BlogTransition>
  );
}

BlogMDXWrapper.defaultProps = {
  frontMatter: {
    title: "",
  },
};
Now I know what you’re thinking. If the frontmatter is a variable now, we can get rid of the YAML-style frontmatter too right? Right Anakin?
Sadly this isn’t the case because of the way my blog archive works. The blog archive manually goes through the /content/blog folder, finds MDX files, parses the YAML frontmatter, and lists them out. It needs the YAML frontmatter because it uses gray-matter to parse it, not the MDX library (which would support the exported frontmatter variable).
📁 And I know what you’re thinking. If you have a variable
frontmatter, can you use those variables in the YAML frontmatter? Nah.gray-matterdoesn’t run any MDX-like logic like that, so you’ll just get the templated variables in your output (e.g.{frontmatter.title}).
I had to modify the archive to also check the /pages/blog directory. Doing this — and leaving the YAML frontmatter — made everything work as intended without too much modification. The blog archive loads the content based on an array of file paths I provide through a getPosts() function. I added a new line for checking for the pages and was good to go:
const getPosts = async () => {
  const rawFiles = await getFiles(POSTS_PATH);
  const pageFiles = await getFiles(FILES_PATH);
  return [...rawFiles, ...pageFiles];
};

// POSTS_PATH is useful when you want to get the path to a specific file
export const POSTS_PATH = path.join(process.cwd(), "content");
export const FILES_PATH = path.join(process.cwd(), "pages");
And with that I was able to show MDX files as pages — and include dynamic React components.
You can see the whole commit on GitHub here.
Integrating P5.js with React
This one was interesting. When you look at all the P5.js examples, they’re all written in Vanilla JavaScript. But what if we want to run P5.js inside React? What if we want to access data from React - or our Zustand store? And how do make the visualizations responsive (since blog posts change width based on user’s device)?
P5.js + React.js
When using P5.js you essentially need to initialize the library with your “sketch” function (new p5(sketch)) and provide a <div> where the <canvas> will render inside.
In React-land it’s nothing too inventive, it’s what you’d expect: you create a ref that stores the p5 instance, and run it inside a useEffect() (so it only runs initially on render — or when defined props change). Shoutout this post on Dev that outlined this process.
import React, {
  CSSProperties,
  RefObject,
  forwardRef,
  useEffect,
  useRef,
  useState,
} from "react";
import p5 from "p5";
import P5Container from "./P5Container";
import { isServer } from "@utils/next";

type Props = {
  title: string;
  width?: CSSProperties["width"];
  height: CSSProperties["height"];
  sketch: (p: p5) => void;
};

const P5Viz = (
  { title, width = "100%", height, sketch, ...props }: Props,
  ref: RefObject<HTMLDivElement>
) => {
  const p5ref = useRef<p5 | null>(null);
  const divRef = useRef<HTMLDivElement | null>(null);

  useEffect(() => {
    if (divRef.current && p5ref.current == null)
      p5ref.current = new p5(sketch, divRef.current);
  }, [sketch]);

  return (
    <P5Container
      ref={ref}
      className="p5-viz"
      title={title}
      width={width}
      height={height}
      {...props}
    >
      <div ref={divRef}></div>
    </P5Container>
  );
};

export default forwardRef(P5Viz);
You can see I also wrap the <div> in a “container” component. This lets me “frame” the visualization, like adding a border radius or drop shadow — or even a title.
The main “action” comes from the sketch prop, this powers the visualization. Here’s an example of the component in action:
import P5VizWrapper from "@components/dom/P5Viz/P5VizWrapper";
import { P5SetupCallback, P5SketchCallback } from "@utils/p5";

function TestViz() {
  const setup: P5SetupCallback = (p) => {
    console.log("setup canvas inside MDX");
  };
  const draw: P5SketchCallback = (p) => {
    p.background(colors.gray[9]); // Set the background to black
  };

  const sketch = (p) => {
	  p.setup: () => setup(p),
	  p.draw: () => draw(p),
  }

  return <P5Viz title="Test Viz" sketch={sketch} />;
}

export default TestViz;
Creating consistency + responsiveness
Now we have an easy way to display visualizations, and we’ve already created some consistency with the <P5Container /> component. But there’s one more problem: when you initialize P5 you often “setup” the scene. This behavior should be the same across all visualizations (like creating the canvas, or setting sensible defaults). So how do we let user’s provide their own draw commands?
We create one extra level of misdirection - the <P5VizWrapper />. This wraps the <P5Viz /> component and handles the “pre-setup” we need with a createSketch() function.
import React, { useEffect, useRef } from "react";
import P5Viz from "./P5Viz";
import { createSketch } from "@utils/p5";
import { useAppStore } from "@store/app";
import useResizeObserver from "@react-hook/resize-observer";

type Props = {
  setup: any;
  draw: any;
  title: string;
};

const P5VizWrapper = ({ setup, draw, title }: Props) => {
  const ref = useRef(null);
  const sketch = createSketch(setup, draw);

  return <P5Viz ref={ref} title={title} sketch={sketch} height={480} />;
};

export default P5VizWrapper;
Then in the createSketch() function we create the sketch object that P5 expects with setup and draw properties, do what we need to do first, then call the setup and draw functions/callbacks provided by the user.
import { CanvasSize, useAppStore } from "@store/app";
import { GraphicsColors, colors } from "@theme/graphics";
import p5 from "p5";

// Scene data we pass to the `draw` method
interface P5SceneInfo {
  canvasSize: CanvasSize;
}

// The callbacks the user uses (usually in MDX)
export type P5SetupCallback = (p: p5, colors: GraphicsColors) => void;
export type P5SketchCallback = (
  p: p5,
  colors: GraphicsColors,
  scene: P5SceneInfo
) => void;

/**
 * Wrapper for the `sketch` prop passed to P5 to create blog viz.
 * Handles sensible defaults like setting canvas size.
 * @param setup
 * @param draw
 * @returns
 */
export const createSketch = (
  setup: P5SetupCallback,
  draw: P5SketchCallback
) => {
  let canvasSize = {
    width: 480,
    height: 400, // Change fixed height here
  };
  return (p) => {
    p.setup = () => {
      // Create the canvas
      // We scale it to 100% width and a fixed height (above)
      // We grab the store instead of querying DOM
      // because store is more accurate thanks to ResizeObserver
      const { canvasSize: canvasSizeStore } = useAppStore.getState();
      canvasSize.width = canvasSizeStore.width;
      //   canvasSize.height = canvasSizeStore.height;
      p.createCanvas(canvasSizeStore.width, canvasSizeStore.height);

      p.frameRate(30);

      // Sensible defaults for the scene
      p.background(colors.background); // Set the background to black

      // Run user's setup function
      setup(p, colors);
    };
    p.draw = () => {
      // Bail if we aren't client-side
      if (typeof window === "undefined") return;

      const scene = {
        canvasSize,
      };

      // Run user's draw function
      draw(p, colors, scene);
    };

    p.windowResized = () => {
      const container = document.querySelector(".p5-viz");
      const containerSize = container.getBoundingClientRect();

      canvasSize.width = containerSize.width;
      //   canvasSize.height = containerSize.height;

      p.resizeCanvas(containerSize.width, containerSize.height);
    };
  };
};
There’s a lot going on in the function so let’s break down each section:
Theming
I figured that every visualization should share the same colors for consistency. And rather than have the user import the colors per visualization, I added it as a parameter to the sketch() callback. That way the user can just use the colors variable to grab colors like colors.gray[9].
In the future if I ever want to restyle my blog, I’ll be able to control the colors of all visualizations through one file. Which would be possible without this method — but it makes the dependency chain more clear.
Responsiveness
And you can see inside the function how we handle resizing the canvas as the browser changes. When we initially create the canvas we use a canvasSize provided by a Zustand store. This is a measurement we take using a ResizeObserver on the canvas container.
// Inside `<P5VizWrapper />`
const { canvasSize, setCanvasSize } = useAppStore();

useResizeObserver(ref.current, (entry) => {
  console.log("resize observer", entry.contentRect.width);
  setCanvasSize({
    width: entry.contentRect.width,
    height: entry.contentRect.height,
  });
});
Then when the user resizes their window, P5 has a lifecycle called windowResized that runs when the window is resized. Inside this function we grab the first P5 visualization on the page (since they’re all same size) and store that width.
Now the canvas stretches
📁 You’ll notice I create a
canvasSizeon top of the function. This is a great way to mutate state inside the infinitedrawloop (like apositionvariable for an object, or an array to contain instances of particles/objects).
Scene properties
Since I’d be storing properties in the function, I wanted to expose them to the canvas if any example ever wanted access. I pass down the canvas size here, but it’s not really necessary since P5 gives you the latest canvas size using the p.width and p.height properties — but it’s a nice example of storing some global state to share between all examples.
Using Zustand inside P5.js
As you saw above, it’s totally possible to use Zustand inside your P5.js draw calls. Since Zustand is built to work inside React, and outside — you can access the data anywhere.
But let’s take a step back. Lets say you had a React component with a P5 viz and Zustand hook, what happens when you use that Zustand variable inside the draw() callback?
import P5VizWrapper from "@components/dom/P5Viz/P5VizWrapper";
import { P5SetupCallback, P5SketchCallback } from "@utils/p5";

function TestViz() {
  // 👇 Get data from Zustand store
  const { canvasSize, setCanvasSize } = useAppStore();

  const setup: P5SetupCallback = (p, colors) => {
    console.log("setup canvas inside MDX");
  };
  const draw: P5SketchCallback = (p, colors, scene) => {
    // 👇 If we change this variable in the store, this will always be the same.
    console.log(canvasSize);
  };

  return <P5VizWrapper title="Test Viz" setup={setup} draw={draw} />;
}

export default TestViz;
If you guessed that the value never changes, you’d be correct. When we create the draw() function, any variables we provide inside get “baked” in when we created the function. Unlike Rust or C, we don’t have a “reference” to the data.
To resolve this, you have to access the Zustand store directly in the draw() function. That way when it’s called over and over, it grabs the latest data each time.
const draw: P5SketchCallback = (p, colors, scene) => {
  // Grab the most up to date store data
  const { canvasSize, setCanvasSize } = useAppStore.getState();
  // 👇 This gives us the current value
  console.log(canvasSize);
};
This works great for everything, from storing data to even handling interactions (like mouse or gamepad input). I have an example of this in my MIDI Synthesizer app.
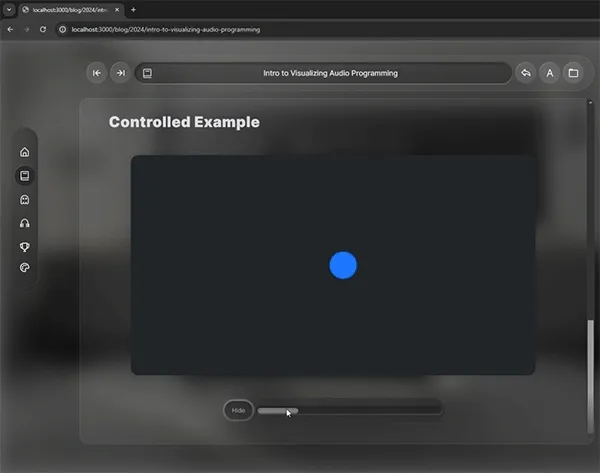
Using React state inside P5.js
One of the things I wanted to support was interactive examples, like being able to toggle things on and off in a P5 visualization. But how do you access data inside the draw() callback? I showed above you can’t just pass a variable inside and expect it to work.
Or can you? I mentioned we were passing a “baked” value and not a “reference” like C or Rust. But what if we could pass a reference - using React’s ref system?
Sure enough this works great. You can create a ref with the useRef() hook, pass it into the draw() function, change the value of it, and the P5 canvas will update.
import Button from "@components/dom/Button/Button";
import Glass from "@components/dom/Glass/Glass";
import P5VizWrapper from "@components/dom/P5Viz/P5VizWrapper";
import Slider from "@components/dom/Slider/Slider";
import Stack from "@components/dom/Stack/Stack";
import { P5SetupCallback, P5SketchCallback } from "@utils/p5";
import { useRef, useState } from "react";

function ControlledExample() {
  // 👇 Create a ref
  const visible = useRef(false);

  const setup: P5SetupCallback = (p, colors) => {};
  const draw: P5SketchCallback = (p, colors, scene) => {
    p.background(colors.gray[9]); // Set the background to black

    p.fill(colors.primary.default);
    p.strokeWeight(2);
    p.stroke(colors.primary.pressed);

    const halfwayAcrossScreen = p.width / 2;
    const halfwayDownScreen = p.height / 2;
    // 👇 Here we use the ref to conditionally draw
    if (visible.current) p.circle(halfwayAcrossScreen, halfwayDownScreen, 60);
  };

  const toggleVisibility = () => {
    visible.current = !visible.current;
  };
  const handleWeightChange = (e: React.FormEvent<HTMLInputElement>) => {
    offsetX.current = Number(e.currentTarget.value);
    setOffsetX(Number(e.currentTarget.value));
  };

  return (
    <div>
      <P5VizWrapper title="Controlled Example" setup={setup} draw={draw} />
      <Glass width="50%" p={3} margin="auto" borderRadius="round">
        <Stack responsive={false} alignItems="center">
          <Button solid onClick={toggleVisibility}>
            {visible ? "Hide" : "Show"}
          </Button>
        </Stack>
      </Glass>
    </div>
  );
}

export default ControlledExample;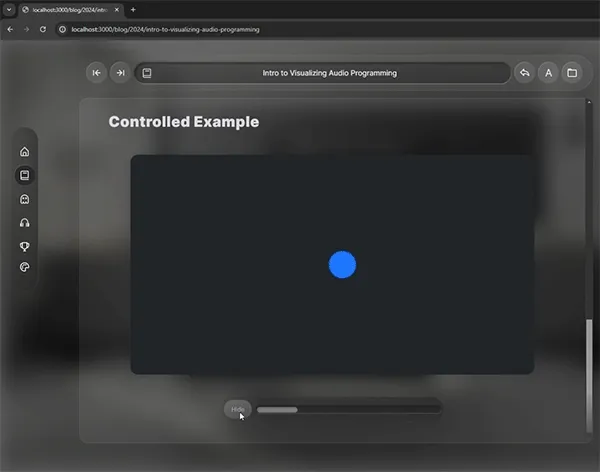
But when we run this, we’ll notice that the button inside doesn’t update (it always says “Hide” - should change to “Visible”). This is because we used a ref to store state, which should be in a useState() hook. But like we saw, we can’t use React state in our drawing. So like before — we just have to do both:
import Button from "@components/dom/Button/Button";
import Glass from "@components/dom/Glass/Glass";
import P5VizWrapper from "@components/dom/P5Viz/P5VizWrapper";
import Slider from "@components/dom/Slider/Slider";
import Stack from "@components/dom/Stack/Stack";
import { P5SetupCallback, P5SketchCallback } from "@utils/p5";
import { useRef, useState } from "react";

function ControlledExample() {
  // 👇 Create a ref for canvas
  const visibleRef = useRef(false);
  // 👇 Create state for UI in React
  const [visible, setVisible] = useState(false);

  const setup: P5SetupCallback = (p, colors) => {};
  const draw: P5SketchCallback = (p, colors, scene) => {
    p.background(colors.gray[9]); // Set the background to black

    p.fill(colors.primary.default);
    p.strokeWeight(2);
    p.stroke(colors.primary.pressed);

    const halfwayAcrossScreen = p.width / 2;
    const halfwayDownScreen = p.height / 2;
    // 👇 Here we use the ref to conditionally draw
    if (visibleRef.current)
      p.circle(halfwayAcrossScreen, halfwayDownScreen, 60);
  };

  const toggleVisibility = () => {
    visibleRef.current = !visibleRef.current;
    setVisible(visibleRef.current);
  };
  const handleWeightChange = (e: React.FormEvent<HTMLInputElement>) => {
    offsetX.current = Number(e.currentTarget.value);
    setOffsetX(Number(e.currentTarget.value));
  };

  return (
    <div>
      <P5VizWrapper title="Controlled Example" setup={setup} draw={draw} />
      <Glass width="50%" p={3} margin="auto" borderRadius="round">
        <Stack responsive={false} alignItems="center">
          <Button solid onClick={toggleVisibility}>
            {visible ? "Hide" : "Show"}
          </Button>
        </Stack>
      </Glass>
    </div>
  );
}

export default ControlledExample;
And now we have our canvas and DOM synced up properly!
The future is viz
I’m excited to enhance my blog content with new illustrative and interactive experiences. And I hope this helps demystify the process a bit for you. I’ll have another blog where I talk about creative coding more generally if you’re interested in that, keep your eyes peeled.
And as always, if you have any questions or comments feel free to hit me up on Threads, Mastodon, or Twitter.
Stay curious, Ryo