Posted on
February 9, 2023
I took some time recently building a Galaga clone to wrap my head around Bevy, a game engine for Rust. I documented my process of going from a blank screen to a whole game. It only took a half a day (mostly co-writing this article) and was pretty fun. I thought I’d share it as a blog post since it’s a pretty new library and new users could always use an extra hand.
I used the Breakout clone from the Bevy examples as a basis for a lot of this logic, and then branched off where needed for Galaga-like features. In this tutorial I’ll show you how to work with 2D sprites and meshes, setup custom shaders to make an animated space background, and how to add sound to your game.
You can find the complete game code on Github here.
What’s Bevy?
Bevy is a game engine framework used with Rust. It’s runs on wgpu, which is a Rust implementation of WebGPU, which basically means Bevy apps run not only natively — but on the web! It’s a standard low-level game engine, expect to work with an ECS system to compose your 2D or 3D scene. Bevy also has a few systems in place for things like primitive shapes, handling images/audio, and other nice utilities.
In this tutorial we’ll explore quite a few Bevy features, but you can also read the Bevy “book” or browse through the official Bevy examples to get a bigger and better picture. I also recommend reading the Bevy Cheatbook for more insight into specific features.
How does Bevy work?
Bevy is a low level game engine that uses an ECS architecture to structure it’s scenes. There are a few concepts you’ll hear me say and use frequently — like entities, systems, resources, etc. It’ll become more clear how all these pieces work individually and together as you work with them.

You’ll find yourself creating a lot of “systems” that get added to your Bevy app. Systems are Rust functions that run each frame, usually responsible for logic like moving your character or spawning enemies.
You can use “resources” to manage assets and state in your game. From media like textures and sounds - to data like game state (e.g. “is game paused?”) — you’ll use a lot of resources in Bevy. Bevy exposes a bit of it’s logic through resources, like keyboard and gamepad input (which get added by “plugins”…).
You can organize multiple systems and resources together into a “plugin”. It basically just groups together logic into a single module. It might make sense to make a GameAudio plugin that handles all the audio logic in a game. It also makes it easier to enable/disable game features. Bevy provides a few plugins out of the box, like a Window plugin for managing a native window, or an Input plugin for adding a resource to your game with synced user input.
We’ll also end up using “events” which are exactly what they sound like. It’s a way for systems to communicate with other systems using specific events, like a NewGameEvent event could play intro music and spawn enemies.
“Magic” Function Parameters
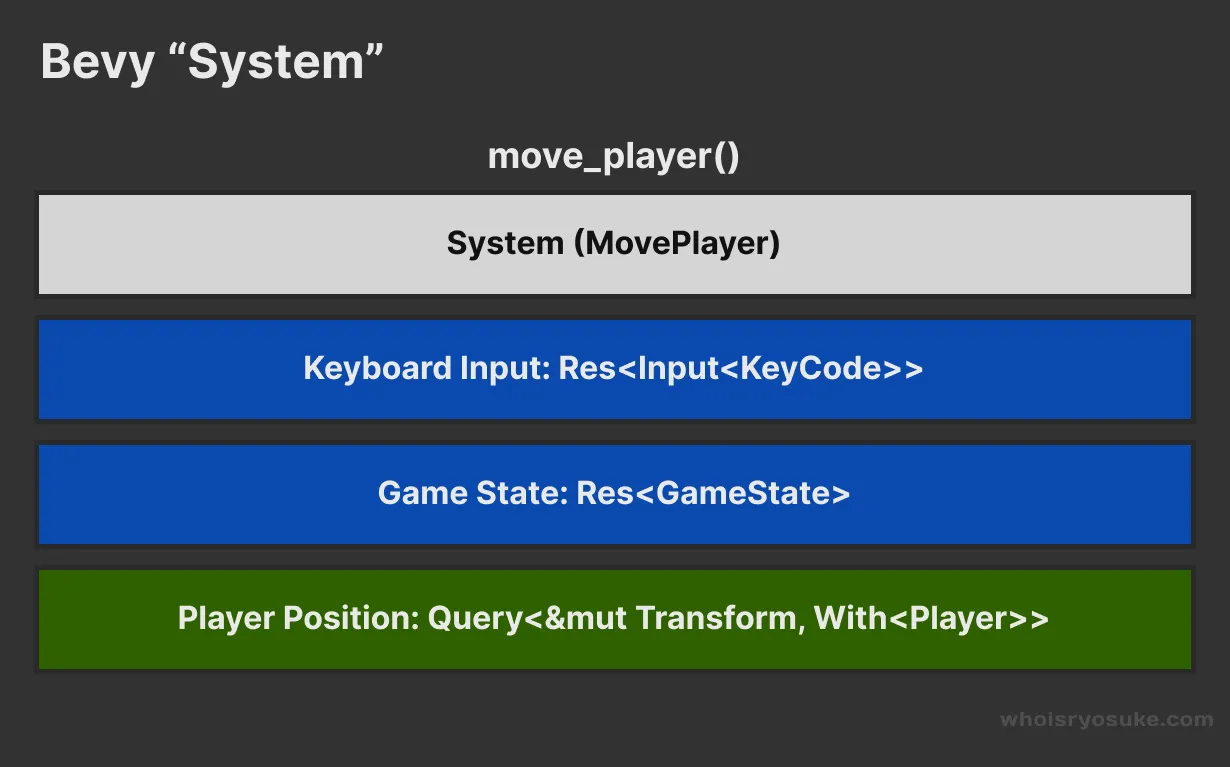
The magic of Bevy systems is that you can create function parameters for anything you need, and Bevy will automatically provide the system the necessary data.
For example, if you want to access a “resource”, you’d create a system that has a function parameter with the type Res<YourResourceHere>. In this code snippet, we ask for the Input and GameState resources separately.
fn move_player(
    keyboard_input: Res<Input<KeyCode>>,
    game_state: Res<GameState>,
) { }
You can learn more about this in the Bevy book.
Here’s an example of a system and the different parameters it can use.
Galaga time
Now that we have a rough understanding of Bevy, let’s make a game!
Project Setup
Made a new project using cargo new.
Installed bevy cargo add bevy.
Tried running the build — failed requiring Rust Compiler v1.6.4 or higher. I had 1.6.3. Went to Rust site, downloaded binary, installed — build ran successfully.
Added default Bevy plugins that create the window, adds keyboard input, and other core Bevy goodies. You can find a list of the default plugins here.
fn main() {
    App::new()
        .add_plugins(DefaultPlugins)
Now we have a blank window! Let’s keep going!
Roughing it out
First we need to create a system to “setup” our game. It’ll initialize any data, load any assets, and spawn any necessary stuff (like the player or enemies). I added the Commands to the parameter list to allow us to commands.spawn() our player and other “entities” in our ECS system.
fn main() {
App::new()
.add_plugins(DefaultPlugins)
.add_startup_system(setup_game)
.run();
}
// ...
fn setup_game(
mut commands: Commands
) {
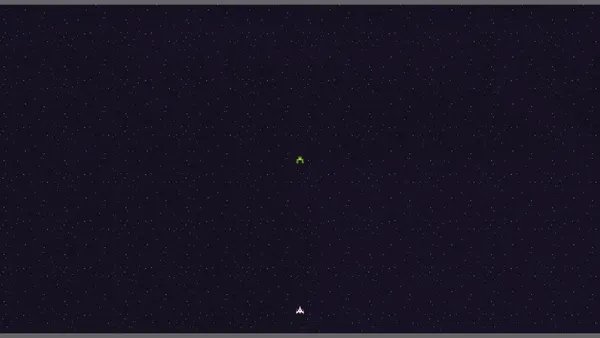
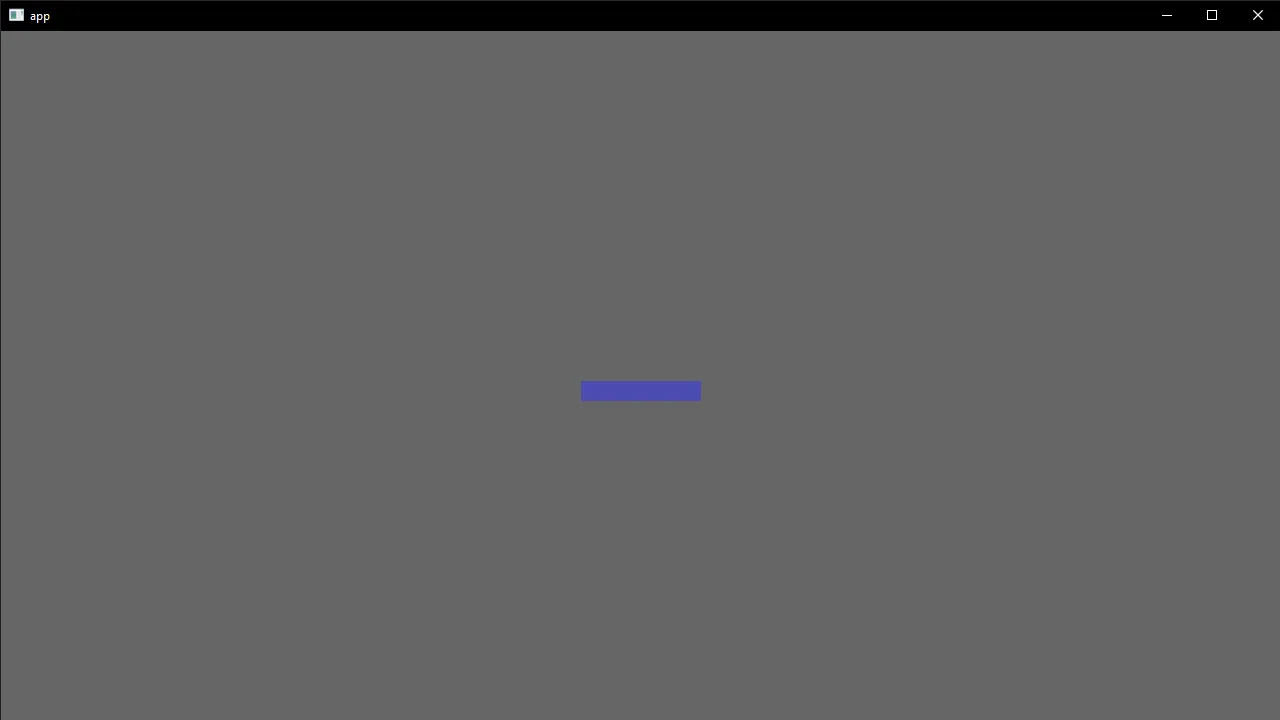
}Spawned a 2D camera entity into the scene to start using 2D elements. This turned the blank window into a gray screen (likely from the renderer’s “clear color”).
// Camera
commands.spawn(Camera2dBundle::default());
Creating a “player” sprite
Time to create our player! We use Commands to spawn a player “sprite” (basically 2D object). This also required making a simple struct for the “components” for our Player and Collider. This allows us to “query” the ECS for each later, like finding the current player position, or checking for collisions between objects. If we didn’t add these components, we’d have to query for all the entities in a scene and create some logic to discern which is which (much messier/buggy).
// The Player object
#[derive(Component)]
struct Player;
// Signifies an object is collidable
#[derive(Component)]
struct Collider;

const PADDLE_SIZE: Vec3 = Vec3::new(120.0, 20.0, 0.0);
const PADDLE_COLOR: Color = Color::rgb(0.3, 0.3, 0.7);

fn setup_game(
    mut commands: Commands
) {
	// Spawn Player in initial position
	commands.spawn((
	    SpriteBundle {
	        transform: Transform {
	            translation: Vec3::new(0.0, 0.0, 0.0),
	            scale: PADDLE_SIZE,
	            ..default()
	        },
	        sprite: Sprite {
	            color: PADDLE_COLOR,
	            ..default()
	        },
	        ..default()
	    },
	    Player,
	    Collider,
	));
}
Added a “set” of systems. This will allow us to run a sequence of systems (like our player input, or enemy spawning) - but also have it respect a certain order of operations using the .before() method. Later we’ll add a collision system, and we’ll want all of our systems to wait for this once to finish processing each frame before they run (so the player doesn’t run through a wall - the app checks for the collision and limits player movement if necessary).
fn main() {
App::new()
.add_plugins(DefaultPlugins)
.add_startup_system(setup_game)
.add_system_set(
SystemSet::new()
// .with_system(check_for_collisions)
// .with_system(move_player.before(check_for_collisions))
.with_system(move_player),
)
.run();
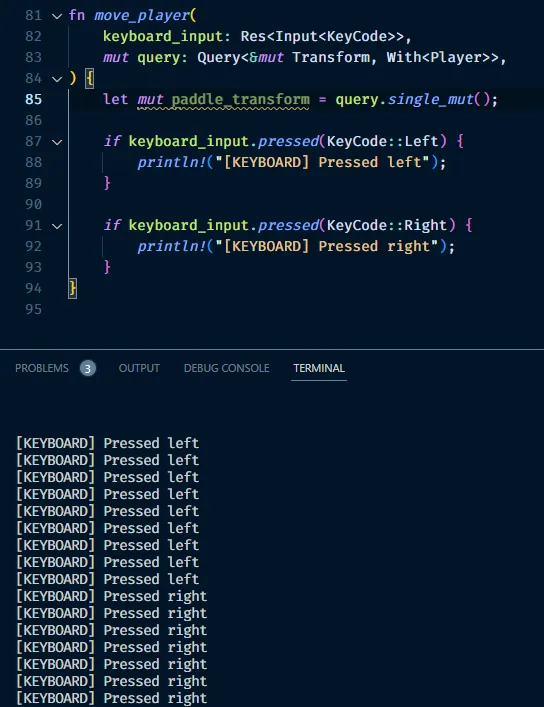
}The first system to add is a player input (aka “move the player using keyboard presses”). We can create a new system called move_player and grab the Input ”resource”, and specifically the KeyCode struct for keyboards. Then we can use the .pressed() command on the resource to check for specific keys (using the KeyCode struct).
fn move_player(
    keyboard_input: Res<Input<KeyCode>>
) {
    if keyboard_input.pressed(KeyCode::Left) {
        println!("[KEYBOARD] Pressed left");
    }

    if keyboard_input.pressed(KeyCode::Right) {
        println!("[KEYBOARD] Pressed right");
    }
}
Now lets actually move the player based on the input. In Bevy’s systems you can Query<> for a mutable Transform (aka position) of the Player. Using that query, we can mutate the value to our new position.
Movement is a simple and clever calculation. We think of movement on a 2D graph using X/Y coordinates, which means moving left would make numbers negative — or right positive. Using this as the basis (left is negative, right is positive), we set a direction variable with a number that -1 or 1, then multiply that by how fast our player should move (PLAYER_SPEED). We’ll also multiply by the frame rate of the app (TIME_STEP) since the update method runs 60 times a second. Not sure if this is super necessary, cause you can just adjust the other values (like player speed) - but we’ll use this frame rate later to power a timer to keep things more consistent.
// Defines the amount of time that should elapse between each physics step
// in this case, 60fps
const TIME_STEP: f32 = 1.0 / 60.0;
const PLAYER_SPEED: f32 = 100.0;

fn move_player(
    keyboard_input: Res<Input<KeyCode>>,
    mut query: Query<&mut Transform, With<Player>>,
) {
    let mut paddle_transform = query.single_mut();
    let mut direction = 0.0;

    if keyboard_input.pressed(KeyCode::Left) {
        println!("[KEYBOARD] Pressed left");
        direction -= 1.0;
    }

    if keyboard_input.pressed(KeyCode::Right) {
        println!("[KEYBOARD] Pressed right");
        direction += 1.0;
    }

    // Calculate the new horizontal paddle position based on player input
    let new_paddle_position = paddle_transform.translation.x + direction * PLAYER_SPEED * TIME_STEP;

    paddle_transform.translation.x = new_paddle_position;
}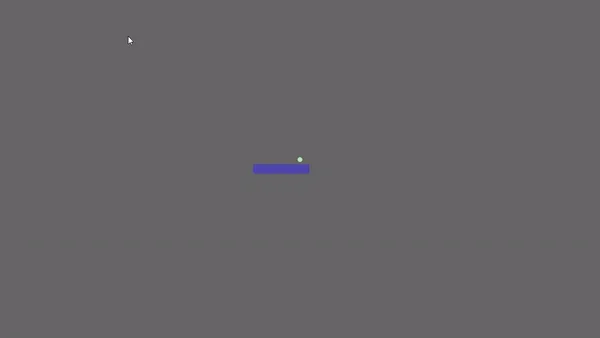
Now let’s make the player shoot projectiles. First we’ll make a system to handle detecting the shoot button (spacebar in this case), and spawn a projectile at the player’s current position. It’s a lot of copy/paste/modify from earlier parts - like detecting input or spawning a mesh.
// Above (truncated)
.with_system(shoot_projectile)

// Below
fn shoot_projectile(
    mut commands: Commands,
    mut meshes: ResMut<Assets<Mesh>>,
    mut materials: ResMut<Assets<ColorMaterial>>,
    keyboard_input: Res<Input<KeyCode>>,
    mut query: Query<&Transform, With<Player>>,
) {
    let player_transform = query.single_mut();

    if keyboard_input.pressed(KeyCode::Space) {
        // Spawn projectile
        commands.spawn((
            MaterialMesh2dBundle {
                mesh: meshes.add(shape::Circle::default().into()).into(),
                material: materials.add(ColorMaterial::from(PROJECTILE_COLOR)),
                transform: Transform::from_translation(player_transform.translation)
                    .with_scale(PROJECTILE_SIZE),
                ..default()
            },
            Projectile,
            Velocity(INITIAL_PROJECTILE_DIRECTION.normalize() * PROJECTILE_SPEED),
        ));
    }
}
Then we can make the projectiles move! Any projectile on the screen should be flying. Similar to above, we’ll use previous code and modify it a bit to get what we need.
// Above (truncated)
.with_system(move_projectiles)

// Below
fn move_projectiles(mut query: Query<&mut Transform, With<Projectile>>) {
    for mut collider_transform in &mut query {
        // Calculate the new horizontal player position based on player input
        let new_projectile_position = collider_transform.translation.y + 250.0 * TIME_STEP;
        // TODO: make sure player doesn't exceed bounds of game area

        collider_transform.translation.y = new_projectile_position;
    }
}
Couple things we need to handle. Projectiles should despawn once they’re off screen. The top of the screen is around 350, so we check if the collider’s translation (aka position) is greater than that. If it is, we “despawn” the “entity” (aka the projectile and all it’s components like the Collider) to remove the projectile from the game.
fn destroy_projectiles(
    mut commands: Commands,
    query: Query<(Entity, &Transform), With<Projectile>>,
) {
    for (collider_entity, collider_transform) in &query {
        if collider_transform.translation.y > 350.0 {
            commands.entity(collider_entity).despawn();
        }
    }
}
This all works - but if you noticed, we fire like…60 bullets per second 😅 To prevent this, let’s create a timer to keep track of the “reload” time of the weapon. This way, the user can only fire again once the timer has completed. It’ll be a short interval (0.3 seconds).
First let’s create that timer globally. We create a struct to represent our timer “resource”, and it’ll contain the actual timer as it’s first tuple property. Then we can insert the resource into our app, and initialize the timer immediately. We have control over the duration of the timer (0.3 seconds in this case) and if the timer repeats or not. Since we want the user to control the timing of their shot, we’ll do it Once — so we can reset each time another shot is fired.
// Timer used to limit player shooting every frame per second
#[derive(Resource)]
struct ProjectileTimer(Timer);

fn main() {
    App::new()
        .add_plugins(DefaultPlugins)
        .insert_resource(ProjectileTimer(Timer::from_seconds(0.3, TimerMode::Once)))
Let’s update the shoot_projectiles function to include a time and projectile_time parameter. Bevy gives you access to a Time resource (I’m assuming from CorePlugin), which is a constantly running timer - so we can keep track of total time elapsed in our game.
Then we have to increment the ProjectileTimer timer using the time.delta() (or time that passed between last “render”). If we don’t, the timer will never run, and logging out projectile_timer.elapsed() will be 0.
Finally, we can check if the projectile timer is finished using the finished() method. If it is, we can spawn our projectile. But before we do, we also reset the timer, to prevent the user from shooting again immediately.
fn shoot_projectile(
    time: Res<Time>,
    mut projectile_timer: ResMut<ProjectileTimer>,
    mut commands: Commands,
    mut meshes: ResMut<Assets<Mesh>>,
    mut materials: ResMut<Assets<ColorMaterial>>,
    keyboard_input: Res<Input<KeyCode>>,
    mut query: Query<&Transform, With<Player>>,
) {
    let player_transform = query.single_mut();

    if keyboard_input.pressed(KeyCode::Space) {
        // Check if player is allowed to shoot based on internal timer
        // We have to "tick" the timer to update it with the latest time
        if projectile_timer.0.tick(time.delta()).finished() {
            // Reset the timer
            projectile_timer.0.reset();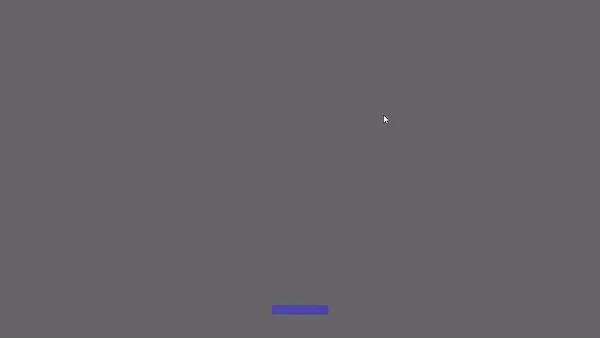
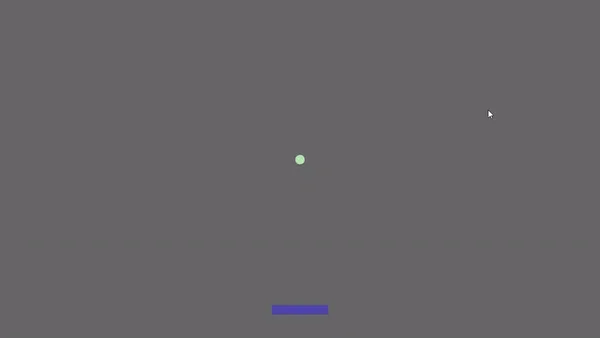
Now we can start setting up some “enemies” we can shoot at them with our projectiles. We’ll need to create a new struct to represent our enemies (Enemy), and we’ll change the startup code to spawn an entity with a Enemy and Collider components attached.
// The Enemy object
#[derive(Component)]
struct Enemy;

fn setup_game(
    mut commands: Commands,
    mut meshes: ResMut<Assets<Mesh>>,
    mut materials: ResMut<Assets<ColorMaterial>>,
    asset_server: Res<AssetServer>,
) {
	// Other stuff

	// Spawn enemies
    commands.spawn((
        MaterialMesh2dBundle {
            mesh: meshes.add(shape::Circle::default().into()).into(),
            material: materials.add(ColorMaterial::from(PROJECTILE_COLOR)),
            transform: Transform::from_translation(PROJECTILE_STARTING_POSITION)
                .with_scale(PROJECTILE_SIZE * Vec3::new(2.0, 2.0, 2.0)),
            ..default()
        },
        Enemy,
        Collider,
    ));
}
So we have enemies, we have our player shooting projectiles — let’s check if any of the projectiles hit (or “collide) any enemies!
We create a new system called check_for_collisions that loops through all the projectiles in a scene, then for each bullet it checks each object in the scene if they’ve collided (using a nice collide() method from Bevy’s 2D system).
Now this trick is nice - since Bevy can query entities for their components, we can also check for components attached to the entity using the Option<> enum. In this case, we check if the entity with the Collider is also an enemy (Option<Enemy>), and if it is, we destroy the enemy by de-spawning it’s associated entity.
fn main() {
    App::new()
        .add_plugins(DefaultPlugins)
        .insert_resource(ProjectileTimer(Timer::from_seconds(
            PROJECTILE_TIME_LIMIT,
            TimerMode::Once,
        )))
        .add_startup_system(setup_game)
        .add_system_set(
            SystemSet::new()
                .with_run_criteria(FixedTimestep::step(TIME_STEP as f64))
                .with_system(check_for_collisions)
                .with_system(move_player.before(check_for_collisions))
                .with_system(move_projectiles.before(check_for_collisions))
                .with_system(destroy_projectiles.before(check_for_collisions))
                .with_system(shoot_projectile.before(check_for_collisions)),
        )
        .add_system(bevy::window::close_on_esc)
        .run();
}

fn check_for_collisions(
    mut commands: Commands,
    projectiles_query: Query<(Entity, &Transform), With<Projectile>>,
    collider_query: Query<(Entity, &Transform, Option<&Enemy>), With<Collider>>,
) {
    // Loop through all the projectiles on screen
    for (projectile_entity, projectile_transform) in &projectiles_query {
        // Loop through all collidable elements on the screen
        // TODO: Figure out how to flatten this - 2 for loops no bueno
        for (collider_entity, collider_transform, enemy_check) in &collider_query {
            let collision = collide(
                projectile_transform.translation,
                projectile_transform.scale.truncate(),
                collider_transform.translation,
                collider_transform.scale.truncate(),
            );

            if let Some(collision) = collision {
                // If it's an enemy, destroy!
                if enemy_check.is_some() {
                    println!("Collided!");

                    // Enemy is destroyed
                    commands.entity(collider_entity).despawn();

                    // Projectile disappears too? Prevents "cutting through" a line of enemies all at once
                    commands.entity(projectile_entity).despawn();
                }
            }
        }
    }
}
📘 You’ll also notice I also added a
FixedTimestepto our system set. This ensures it runs 60fps using theTIME_STEPconstant we created earlier. This is an optional step.
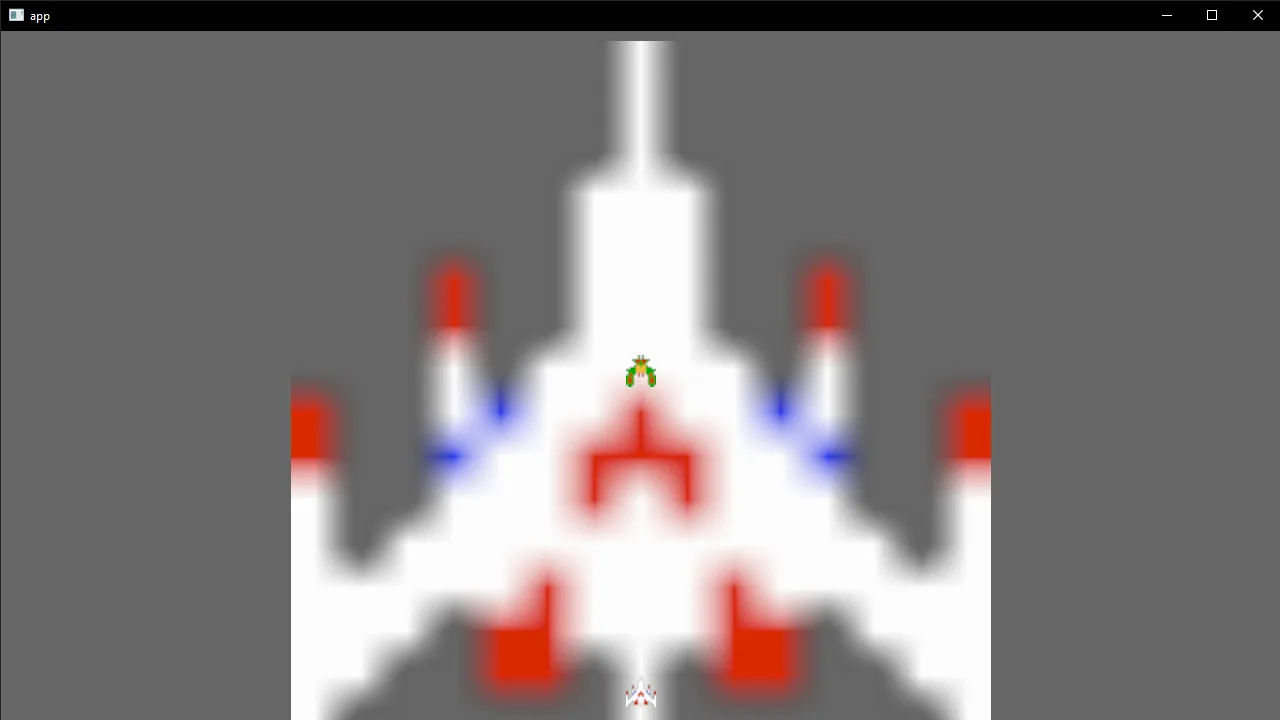
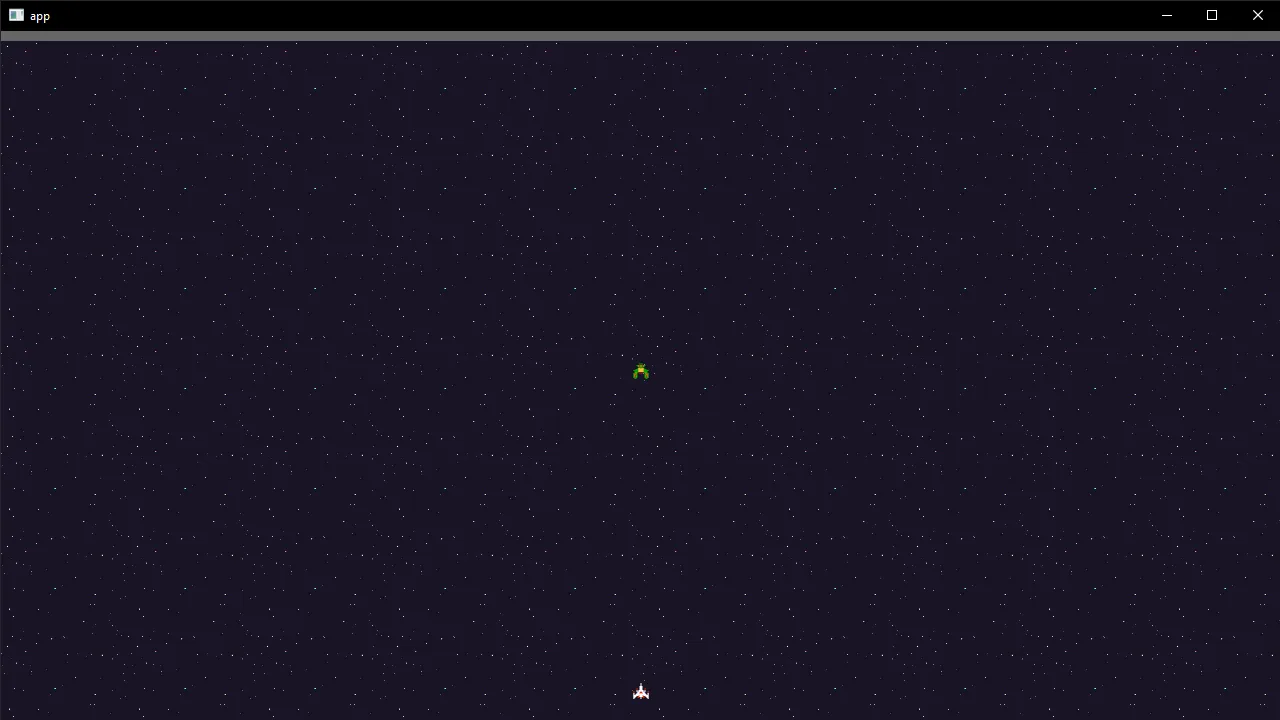
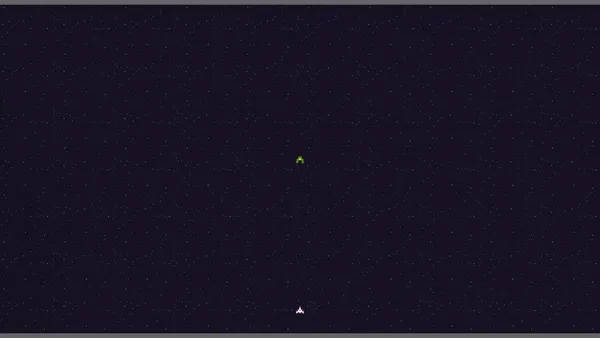
Now let’s style things a bit so it looks less like Breakout and more like Galaga. I downloaded some Galaga sprites from here, took them into Figma and cut out the player ship, a projectile, and an enemy. Each were 15x16 pixels. Or you could download them here on Github.
Now that we have PNGs, we can apply them to our existing Sprite entities. First, let’s create an assets folder in the project root. Bevy will start from that folder when we load things later. Then we can add our PNGs to the folder - I created a folder called sprites to keep things organized.
We’ll use the AssetServer to load the PNG and use it as the sprite’s texture property. You can see a simple example here on the Bevy site. We’ll also remove the weird scaling we did to make it a rectangle. And since our sprite is so small, we’ll scale it to 200% it’s original size by using a Vec3(2.0, 2.0, 0.0).
const PLAYER_SIZE: Vec3 = Vec3::new(2.0, 2.0, 0.0);

fn setup_game(
    mut commands: Commands,
    mut meshes: ResMut<Assets<Mesh>>,
    mut materials: ResMut<Assets<ColorMaterial>>,
    asset_server: Res<AssetServer>,
) {
    // Camera
    commands.spawn(Camera2dBundle::default());

    // Spawn Player in initial position
    commands.spawn((
        SpriteBundle {
						// 👇 Add your texture here
            texture: asset_server.load("sprites/player_default.png"),
            transform: Transform {
                translation: PLAYER_STARTING_POSITION,
                scale: PLAYER_SIZE,
                ..default()
            },
            sprite: Sprite {
                // color: PLAYER_COLOR,
                ..default()
            },
            ..default()
        },
        Player,
        Collider,
    ));
Now we can replace the placeholder MaterialMesh2dBundle for the enemy and projectile with PNG textures.
Backgrounds
The background is looking a bit plain. In Galaga, it’s a tiled space texture that scrolls to simulate the sense of flying through space.
There’s a few ways we can do it. If we tried to imitate what we did for the enemies or player ships by creating “sprites”, we’d have to spawn enough sprites to cover the entire screen — then also mutate each position each frame using a system.
To do this more efficiently, we’ll implement this logic inside a fragment shader. A fragment shader is part of the graphic rendering pipeline and is responsible for “painting” the pixels down on the screen based on instruction from the previous shaders (like vertex). Since shaders run on the GPU, they’re better suited for simple (and complex) math operations — like iterating over a screen and calculating the color of each pixel.
In Bevy, we can add a “shader” in a few ways. We could apply a shader to the entire pipeline, and change the way the entire scene is rendered. This would be good for post processing, like rendering 100 objects - then blurring all of them at the same time.
Or you could apply a “custom material” to a “mesh” in your scene. This allows us to apply a shader to a specific object, like a cube or 2D shape.
Let’s create a custom material. You’ll notice we use Material2d instead of Material because we’re rendering a 2D scene (not 3D). We also have to give each material a UUID using a macro. And inside the material struct, we add a uniform property for Color and a texture (aka optional Image Handle). Bevy seems to handle generating the sampler for us under the hood, so we only need to pass the image data.
impl Material2d for CustomMaterial {
    fn fragment_shader() -> ShaderRef {
        "shaders/custom_material.wgsl".into()
    }
}

// Background shader material
#[derive(AsBindGroup, TypeUuid, Debug, Clone)]
#[uuid = "f690fdae-d598-45ab-8225-97e2a3f056e0"]
pub struct CustomMaterial {
    #[uniform(0)]
    color: Color,
    #[texture(1)]
    #[sampler(2)]
    color_texture: Option<Handle<Image>>,
}
Create a new file at /assets/shaders/custom_material.wgsl. We define our custom material at the top, and grab our uniforms we defined (in this case - only color). Our texture is available through bind groups, and Bevy’s 2D pipeline puts the texture in the first slot (@binding(1)), and sampler in second slot (@binding(2)).
📘 If you try to change these bind group indexes you’ll get an error about bind groups not matching up — this is because of how render pipelines work. Bevy defines a specific pipeline configuration for 2D elements, and it assumes the texture will always be bound to slots
1and2. If you want to add additional bind groups, you’ll need to customize the render pipeline (example here).
struct CustomMaterial {
    color: vec4<f32>,
};

@group(1) @binding(0)
var<uniform> material: CustomMaterial;
@group(1) @binding(1)
var base_color_texture: texture_2d<f32>;
@group(1) @binding(2)
var base_color_sampler: sampler;

@fragment
fn fragment(
    #import bevy_pbr::mesh_vertex_output
) -> @location(0) vec4<f32> {
    return textureSample(base_color_texture, base_color_sampler, uv);
}
In the setup, let’s add a new mesh and apply a custom texture to it. The mesh is a created from a Quad (aka a rectangle) that we scale to the screen size using the transform property. The Vec3::splat() method just sets the X and Y values at the same time. We’ll use an existing texture (the player ship) for now as a test.
// Background
commands.spawn(MaterialMesh2dBundle {
    // mesh: meshes.add(shape::Plane { size: 3.0 }.into()).into(),
    mesh: meshes.add(Mesh::from(shape::Quad::default())).into(),
    transform: Transform::default().with_scale(Vec3::splat(SCREEN_EDGE_VERTICAL * 2.0)),
    // material: materials.add(ColorMaterial::from(Color::TURQUOISE)),
    material: materials.add(CustomMaterial {
        color: Color::BLUE,
        color_texture: Some(asset_server.load("sprites/player_default.png")),
    }),
    ..default()
});
📘 I left a commented out
Planemesh that also works, if you were trying to use different kinds of shapes. The syntax was really weird (.into()then anotherinto()) — had to find this in another Bevy example somewhere. I also left aColorMaterialthere if you wanted to debug the mesh without the custom material.
Change the function signature of our setup_game() to use our CustomMaterial instead of ColorMaterial. If we don’t do this, the project won’t compile and it’ll complain about inserting a different material type into the materials stack.
fn setup_game(
    mut commands: Commands,
    mut meshes: ResMut<Assets<Mesh>>,
    mut materials: ResMut<Assets<CustomMaterial>>,
    asset_server: Res<AssetServer>,
) {
Go to where we define our app and let’s add a new plugin that initializes our shader (likely loading and initializing the shader and any textures).
fn main() {
    App::new()
        .add_plugins(DefaultPlugins)
        .add_plugin(Material2dPlugin::<CustomMaterial>::default())
📘 If you don’t add this, your app will fail with an obscure error about the Asset Server not finding the
CustomMaterial. It might seem like the image or shader isn’t found on disk, but you can remove them and the error should still show.
Cool! Now we should be seeing our texture centered on the screen.
Now that we have the texture displaying, let’s tile it using the shader. Right now the image is being stretched across the entire screen because the mesh is that large — which also means the “UVs” of the mesh are scaled that size. So how do we tile the image?
The first thought is to divide or multiply the UVs. But this doesn’t work. Our image only shows once, gets scaled down, and the last pixels get stretched to the size of our mesh.
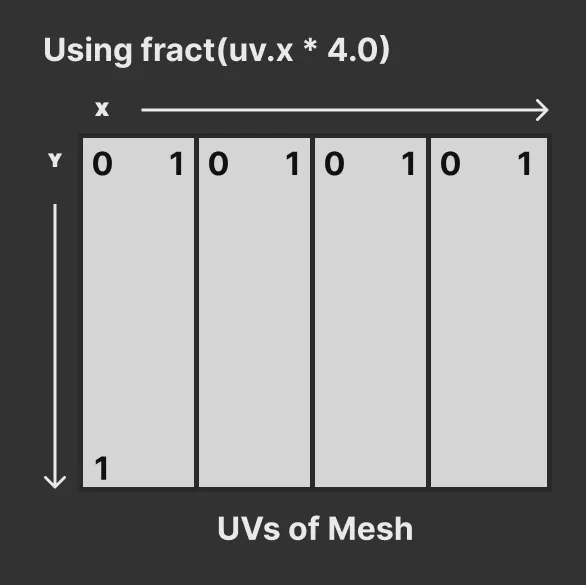
Explaining UV Math
What’s the problem here? Well let’s break down how UVs work for a second. UVs are usually 2D vectors (aka X and Y values) that go from 0 to 1. The top left of an image is (0,0) and the bottom right is (1,1). Our texture data is mapped assuming this, When we multiply the UV by say 4.0, we’re telling it to go from (0,4) now.
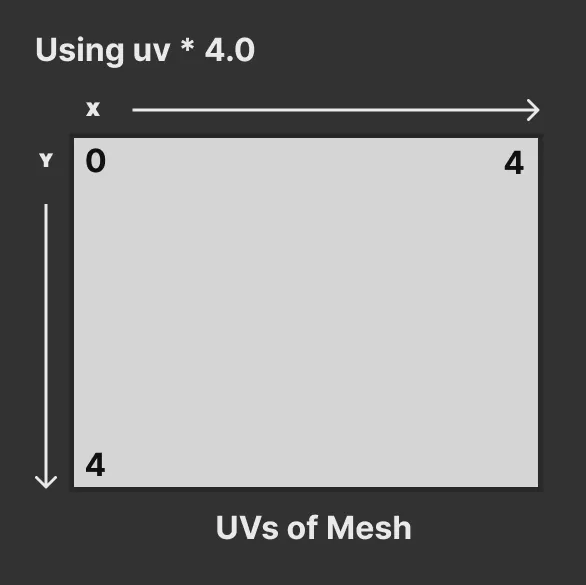
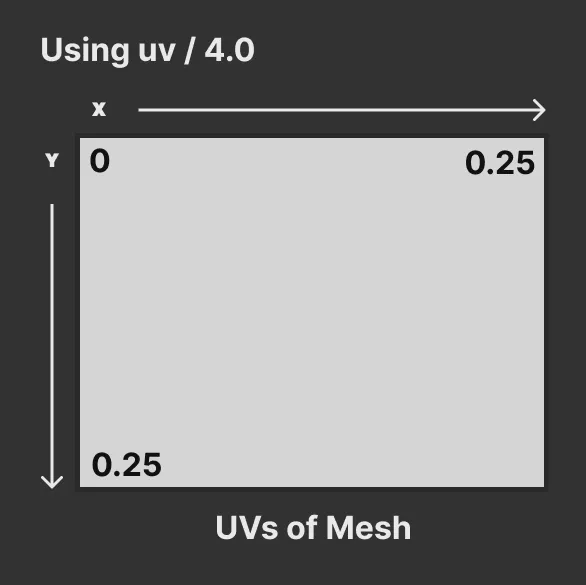
Similarly when we divide, we change the range from (0,1) to (0,0.25) . That’s what causes the image to look stretched, we’re only seeing the top left quarter corner of it.
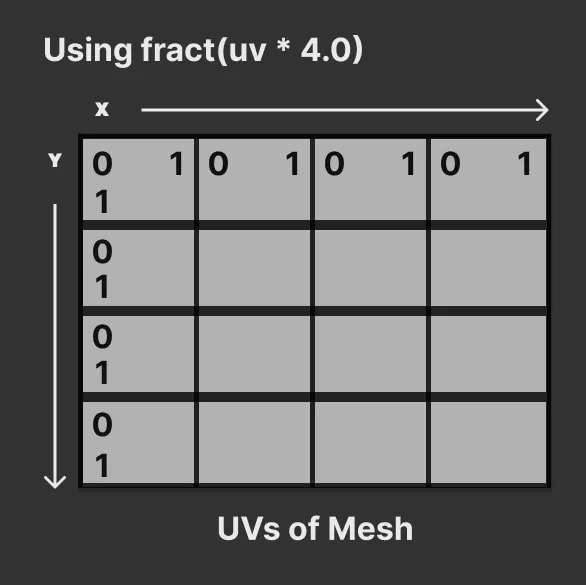
So how do we get our shader to “repeat” the UV data? The fract() function. You can see an basic interactive example here. By using the fract() function, we force the number when it exceeds 1.0 to reset back to 0 and increment up again.
@fragment
fn fragment(
    #import bevy_pbr::mesh_vertex_output
) -> @location(0) vec4<f32> {
    var tiled_uv: vec2<f32>;
    tiled_uv = fract(uv * 10.0);
    return textureSample(base_color_texture, base_color_sampler, tiled_uv);
}
Now it should tile the image 10 times horizontally and vertically.
Let’s quickly update the size of the mesh to fit the width of the screen too.
// Background
commands.spawn(MaterialMesh2dBundle {
    // mesh: meshes.add(shape::Plane { size: 3.0 }.into()).into(),
    mesh: meshes.add(Mesh::from(shape::Quad::default())).into(),
    transform: Transform::default().with_scale(Vec3::new(
        1300.0,
        SCREEN_EDGE_VERTICAL * 2.0,
        0.0,
    )),
    // material: materials.add(ColorMaterial::from(Color::TURQUOISE)),
    material: materials.add(CustomMaterial {
        color: Color::BLUE,
        color_texture: Some(asset_server.load("sprites/player_default.png")),
    }),
    ..default()
});
📘 Ideally we should use the window size from the
Windowresource, but we’ll hardcode stuff for now for simplicity.
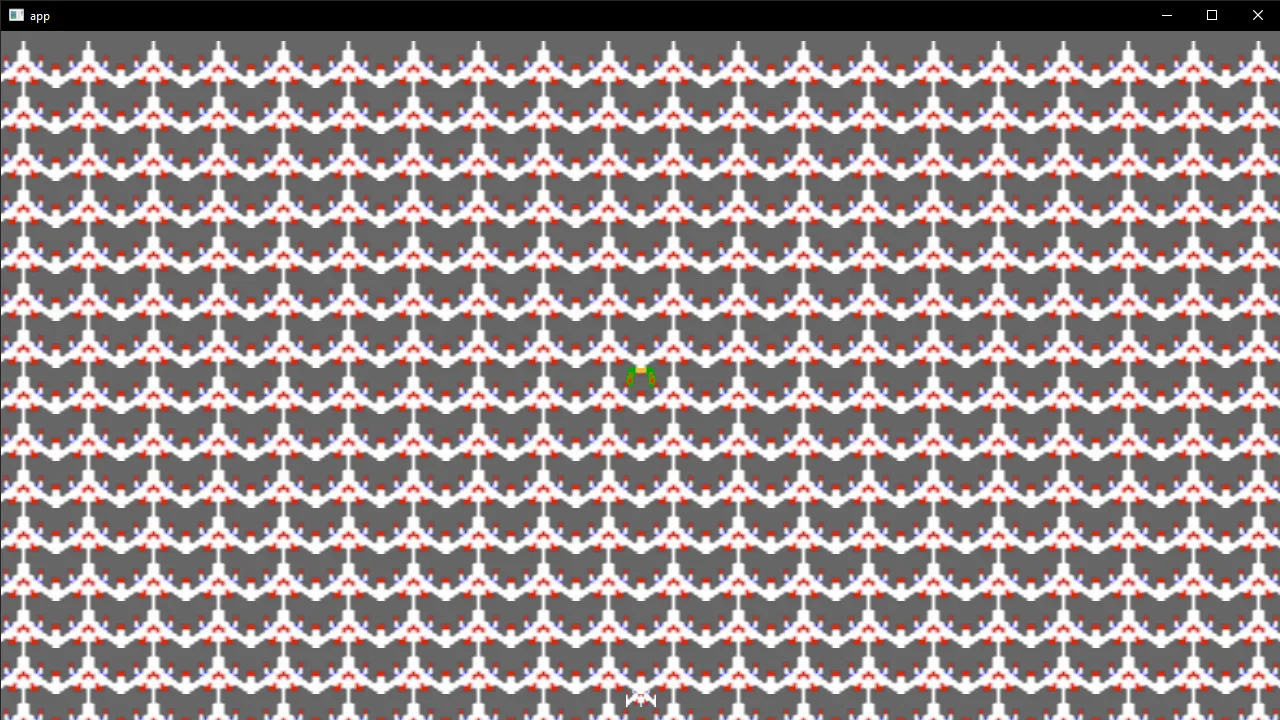
And one last thing about the tiling — it’s stretching the images.
If we separate the UV’s X and Y properties, we can scale them independently, then re-combine them. We’ll make sure to stretch the X more than Y to match the screen ratio. There’s definitely better math for this, we’re just doing this hardcoded for now.
@fragment
fn fragment(
    #import bevy_pbr::mesh_vertex_output
) -> @location(0) vec4<f32> {
    var tiled_uv: vec2<f32>;
    var tiled_uv_x: f32;
    var tiled_uv_y: f32;
    tiled_uv_x = fract(uv.x * 20.0);
    tiled_uv_y = fract(uv.y * 15.0);
    tiled_uv = vec2(tiled_uv_x,tiled_uv_y);
    return textureSample(base_color_texture, base_color_sampler, tiled_uv);
}
Now things look better.
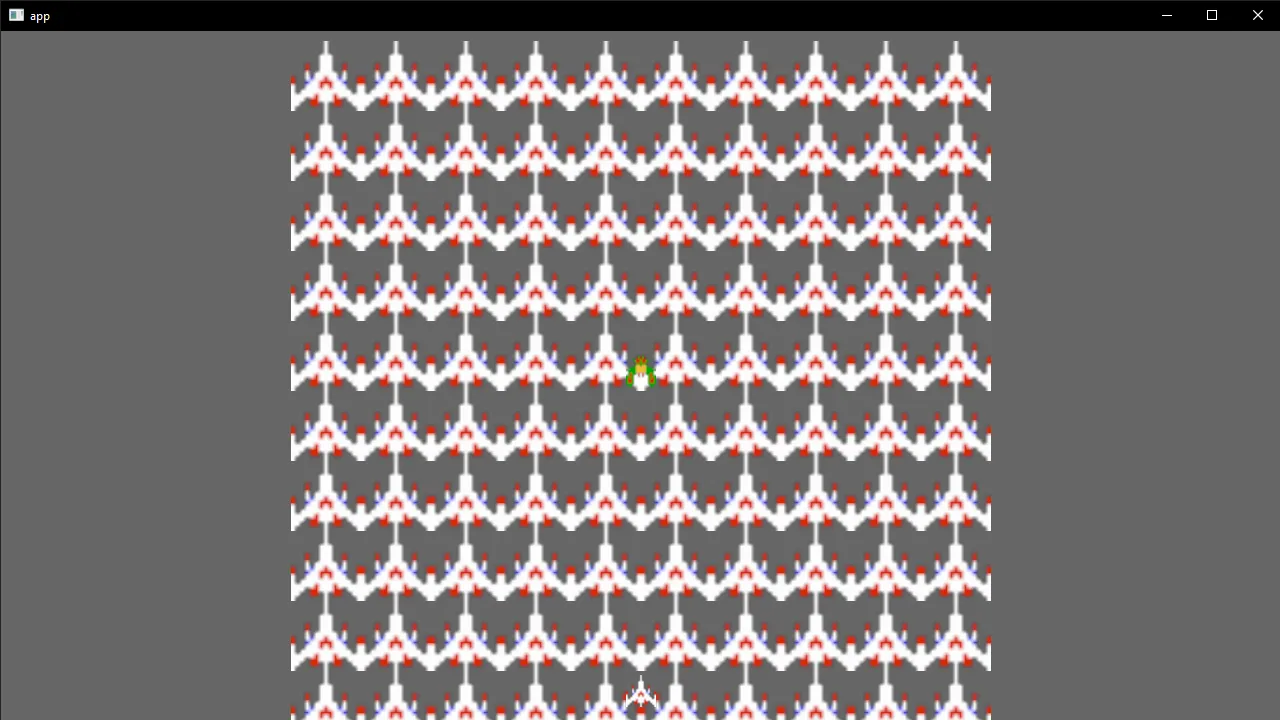
Let’s swap the BG texture with a real space texture. I went over to OpenGameArt and found a seamless space background texture. I copied it to the assets folder, then swapped the reference in the custom material.
color_texture: Some(asset_server.load("textures/space/space.png")),Now we have a space texture that covers the entire screen!
But you’ll notice another problem — the player, enemy, and projectiles no longer show! I think this is because we’re a mesh for the background, and sprites for everything else. You can try changing the “render order” of different functions in the Bevy systems, but it’ll render with the mesh on top.
If we change the Sprites to Meshes - they start to appear more consistently.
// Spawn Player in initial position
commands.spawn((
    MaterialMesh2dBundle {
        // mesh: meshes.add(shape::Plane { size: 3.0 }.into()).into(),
        mesh: meshes.add(Mesh::from(shape::Quad::default())).into(),
        transform: Transform {
            translation: PLAYER_STARTING_POSITION,
            scale: PLAYER_SIZE,
            ..default()
        },
        material: materials.add(CustomMaterial {
            color: Color::BLUE,
            color_texture: Some(asset_server.load("sprites/player_default.png")),
            tile: 0.0,
        }),
        ..default()
    },
    Player,
    Collider,
));

// Spawn enemies
commands.spawn((
    MaterialMesh2dBundle {
        // mesh: meshes.add(shape::Plane { size: 3.0 }.into()).into(),
        mesh: meshes.add(Mesh::from(shape::Quad::default())).into(),
        transform: Transform {
            translation: PROJECTILE_STARTING_POSITION,
            scale: PLAYER_SIZE,
            ..default()
        },
        material: materials.add(CustomMaterial {
            color: Color::BLUE,
            color_texture: Some(asset_server.load("sprites/enemy_green_bug.png")),
            tile: 0.0,
        }),
        ..default()
    },
    Enemy,
    Collider,
));
But now we have a new problem - our asset server only supports 1 material type. And our material is using our shader that tiles images. So by applying it to our Player - we’ll see our player 20x15 times instead of once at the right size.
Instead of adding a new material (which I couldn’t quickly find out how to do for the life of me — I assumed enum but nope) — we’ll modify the existing shader to enable or disable the tiling based on a shader uniform we pass.
To add a new uniform, go back to our custom material and add a new property under our color. We need to use the uniform() macro to define the bind group, in this case, we want the same one as our color. We also need to define a data type - in this case f32. I originally tried to use a bool - but the shader pipeline refused it, so we use a float instead and assume 0 = false and 1 = true.
// Background shader material
#[derive(AsBindGroup, TypeUuid, Debug, Clone)]
#[uuid = "f690fdae-d598-45ab-8225-97e2a3f056e0"]
pub struct CustomMaterial {
    #[uniform(0)]
    color: Color,
    #[uniform(0)]
    tile: f32,
    #[texture(1)]
    #[sampler(2)]
    color_texture: Option<Handle<Image>>,
}
In our shader file we need to update a couple of things. The CustomMaterial type at the type needs to have our new tile property added to it. Then to access that property, we use the material variable (which grabs the data from the bind group we assigned earlier — at index 0). Then we can do a quick conditional check if the tiling is enabled or not.
struct CustomMaterial {
color: vec4<f32>,
tile: f32,
};
@group(1) @binding(0)
var<uniform> material: CustomMaterial;
@group(1) @binding(1)
var base_color_texture: texture_2d<f32>;
@group(1) @binding(2)
var base_color_sampler: sampler;
@fragment
fn fragment(
#import bevy_pbr::mesh_vertex_output
) -> @location(0) vec4<f32> {
var tiled_uv: vec2<f32>;
// Default to the mesh UV
tiled_uv = uv;
// If tiling is enabled, redefine the UVs
if(material.tile > 0.0) {
var tiled_uv_x: f32;
var tiled_uv_y: f32;
tiled_uv_x = fract(uv.x * 10.0);
tiled_uv_y = fract(uv.y * 7.0);
tiled_uv = vec2(tiled_uv_x,tiled_uv_y);
}
return textureSample(base_color_texture, base_color_sampler, tiled_uv);
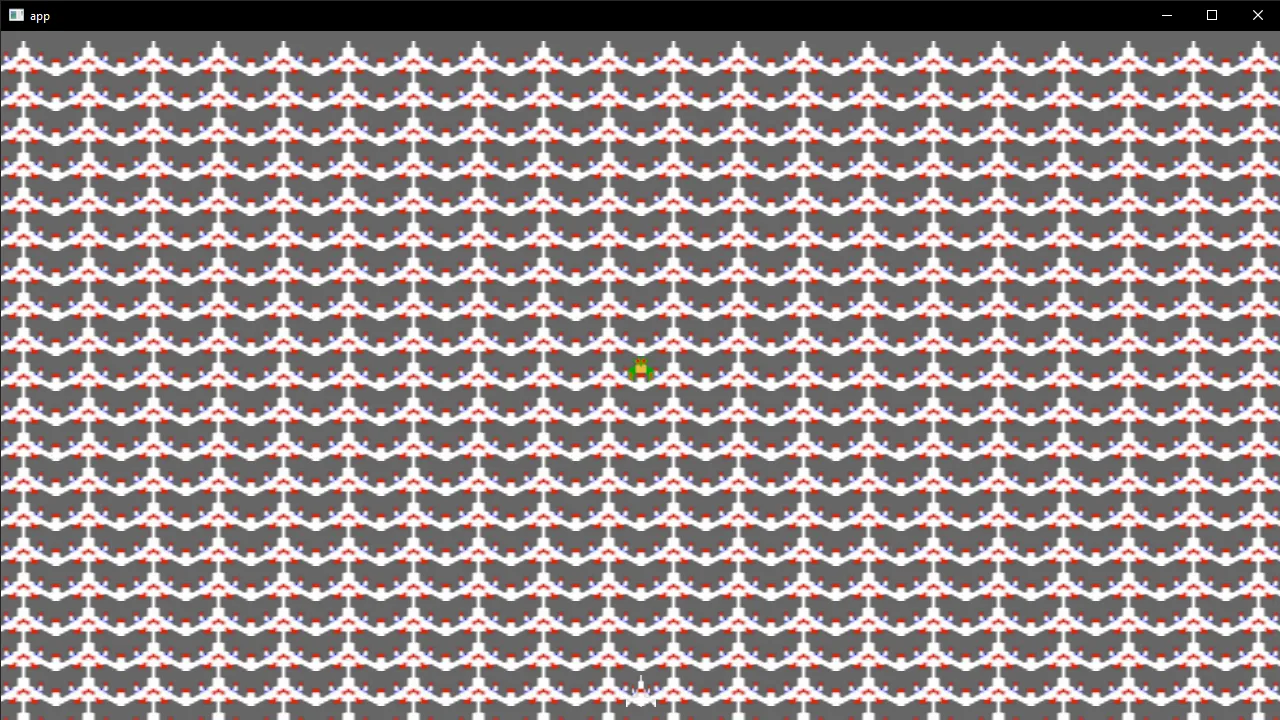
}Now everything should look a little better now.
But we still have one issue - our objects are flickering now.
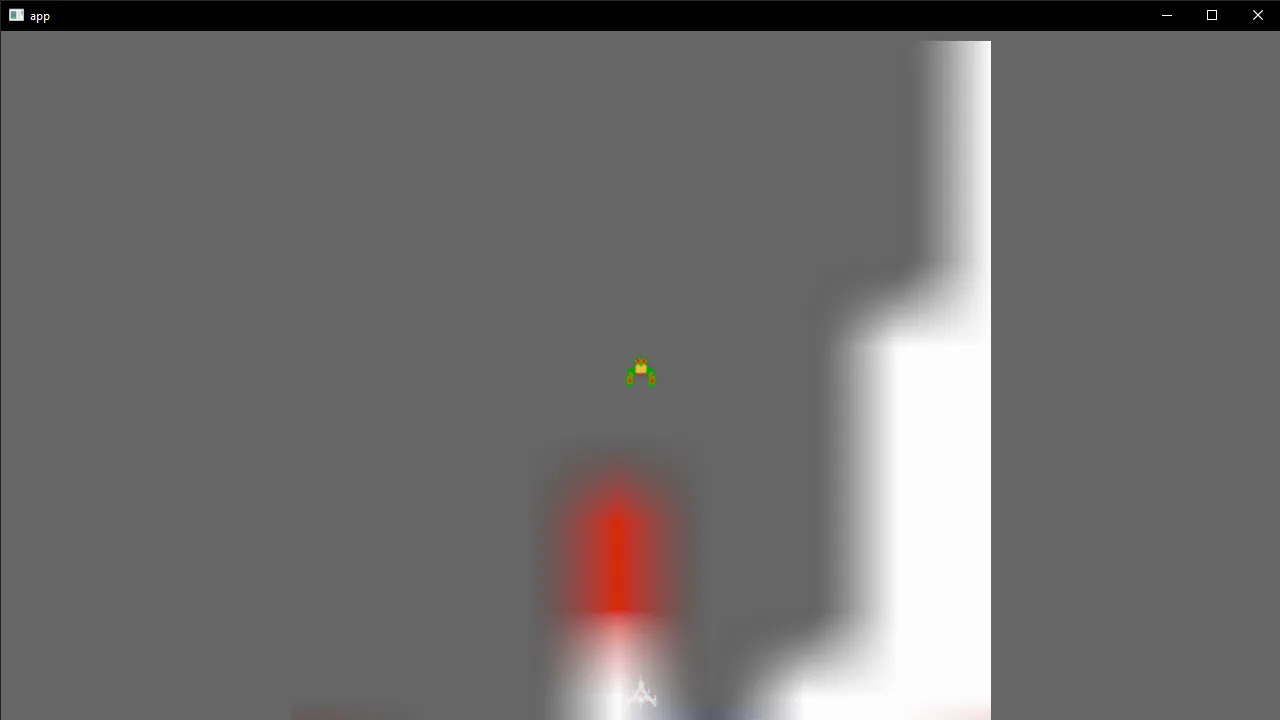
This looked a little like z-fighting, I’m assuming between the background and elements on top. I tried changing the translation of the background mesh and making the Z negative — but that didn’t render in some cases (only the clear color) or just didn’t do anything different.
I popped onto the Bevy Discord and asked the community and they quickly confirmed it was a z-fighting issue, but I had to increment to positive Z values instead. I made the Z value for the character and enemy 1.0. This stopped the flickering! 🙌
const PLAYER_STARTING_POSITION: Vec3 = Vec3::new(0.0, -300.0, 1.0);
const PROJECTILE_STARTING_POSITION: Vec3 = Vec3::new(0.0, 20.0, 1.0);
📘 Normally in game engines, you define “layers” for rendering, like a layer for your scene and another layer for UI. In this case, we could do a rudimentary version of it by defining constants at the top for different layer presets and use them as the Z value when needed. For example
LAYER_UIcould be3.0so it sits on top of everything. I don’t think Bevy has a layer system implemented yet, but you can see some progress on that feature in this Github issue.
Animated scrolling background
The background is missing one thing that’ll really sell it - it needs to scroll down like Galaga or most vertical “shmups” (or shoot-em-ups).
To animate anything with shaders, your shaders need to have a sense of time. We’ll create a new uniform for our material called time, which will be a f32 representing time in seconds (e.g 0.0 to infinity). This will let us animated things using math. As the time number changes and gets bigger, we can use it in our shader algorithms to drive movement.
// Background shader material
#[derive(AsBindGroup, TypeUuid, Debug, Clone)]
#[uuid = "f690fdae-d598-45ab-8225-97e2a3f056e0"]
pub struct CustomMaterial {
    #[uniform(0)]
    color: Color,
    // Should we tile this material? 1 = true
    #[uniform(0)]
    tile: f32,
    // ⭐ New uniform for time
    #[uniform(0)]
    time: f32,
    #[texture(1)]
    #[sampler(2)]
    color_texture: Option<Handle<Image>>,
}
Let’s add a new system to our game that goes through all the materials in our scene and updates the time variable on them. When we loop over the materials, they’re arrays, with the first index being the material ID and the second index as the actual material data. I left a dbg!() macro in the function that you can enable to see the time change as a sanity check.
fn main() {
    App::new()
        .add_system(update_material_time)
}

fn update_material_time(time: Res<Time>, mut materials: ResMut<Assets<CustomMaterial>>) {
    materials.iter_mut().for_each(|material| {
        // dbg!(material.1.time);
        material.1.time = time.elapsed_seconds();
    });
}
Now that we have time pumped into our shader, let’s use it to scroll the background.
Since we want to scroll the screen vertically, we need to focus on the Y coordinate of the UVs. We already take the Y coordinate of the UVs and multiply it, then use fract() to make it repeat between 0-1. We want to stay between the 0-1 coordinates, which means we should put the time inside the fract(), so it keeps the “repeating grid” consistent. If we subtract the time, lets say the UV starts at 0, if we subtract time, the UV will be negative — which gets converted back to a positive 0-1 by the fract().
struct CustomMaterial {
    color: vec4<f32>,
    tile: f32,
    // ⭐ Time increments
    time: f32,
};

@group(1) @binding(0)
var<uniform> material: CustomMaterial;
@group(1) @binding(1)
var base_color_texture: texture_2d<f32>;
@group(1) @binding(2)
var base_color_sampler: sampler;

@fragment
fn fragment(
    #import bevy_pbr::mesh_vertex_output
) -> @location(0) vec4<f32> {
    var tiled_uv: vec2<f32>;
    tiled_uv = uv;
    if(material.tile > 0.0) {
        var tiled_uv_x: f32;
        var tiled_uv_y: f32;
        tiled_uv_x = fract(uv.x * 10.0);
        // ⭐ We "scroll" the background by subtracting time here
        tiled_uv_y = fract(uv.y * 7.0 - material.time);
        tiled_uv = vec2(tiled_uv_x,tiled_uv_y);
    }
    return textureSample(base_color_texture, base_color_sampler, tiled_uv);
}
Adding sounds
Bevy has a great system setup in place for handling and playing audio assets. Let’s add some quick sound effects to the game to make it more immersive.
We could play sounds directly in the same functions where we currently fire the projectile - but that function has a lot going on already. Instead lets use Bevy’s “event system” to fire off an EnemyDeathEvent when we fire the weapon, then we can check for that event inside other systems, like say a play_enemy_death_sound() function. We could also create another system/function later that checks for the same event and increases the score.
Let’s create some structs to represent these “events”.
// Projectile has been fired
#[derive(Default)]
struct ProjectileEvent;
Then we can add them to our Bevy app.
fn main() {
    App::new()
        .add_plugins(DefaultPlugins)
        .add_plugin(Material2dPlugin::<CustomMaterial>::default())
        .insert_resource(ProjectileTimer(Timer::from_seconds(
            PROJECTILE_TIME_LIMIT,
            TimerMode::Once,
        )))
        .add_startup_system(setup_game)
        .add_system(update_material_time)
        // ⭐ Add events here
        .add_event::<ProjectileEvent>()
Now we can update the shoot_projectile() method to add an EventWriter property for our ProjectileEvent. This lets us send events using the .send_default() method on the event writer variable. We use that method specifically so we don’t have to define any event details (see the send() method for more info) and it creates a “default” event.
fn shoot_projectile(
    time: Res<Time>,
    mut projectile_timer: ResMut<ProjectileTimer>,
    mut commands: Commands,
    mut meshes: ResMut<Assets<Mesh>>,
    mut materials: ResMut<Assets<CustomMaterial>>,
    keyboard_input: Res<Input<KeyCode>>,
    mut query: Query<&Transform, With<Player>>,
    asset_server: Res<AssetServer>,
    mut projectile_events: EventWriter<ProjectileEvent>,
) {
    let player_transform = query.single_mut();

    if keyboard_input.pressed(KeyCode::Space) {
        // Check if player is allowed to shoot based on internal timer
        // We have to "tick" the timer to update it with the latest time
        if projectile_timer.0.tick(time.delta()).finished() {
            // Reset the timer
            projectile_timer.0.reset();

            // ⭐ Fire off a ProjectileEvent to notify other systems
            projectile_events.send_default();
We’ve got the event firing off, but we still need to have a system listening for that event and actually playing the sound. So let’s do just that.
We’ll create a new function play_projectile_sound that has an EventReader property to read our ProjectileEvent events. We also grab a audio property that gives us access to Bevy’s audio system (which we’ll use to play the sound). And we’ll grab the specific sound we want.
We can use the is_empty() method on the events to check if the list is empty, and if it’s not, we first clear the events (so the sound plays only once per frame). Then we can play the sound using the Audio system and our sound (which we have to clone because Rust reasons 🦀).
fn play_projectile_sound(
    projectile_events: EventReader<ProjectileEvent>,
    audio: Res<Audio>,
    sound: Res<ProjectileSound>,
) {
    // Check for events
    if !projectile_events.is_empty() {
        // Clear all events this frame
        projectile_events.clear();
        println!("[AUDIO] Playing projectile sound!");

        audio.play(sound.0.clone());
    }
}
But we actually need some sound to play right? I searched for a Galaga projectile sound effect and found one (but any MP3 or OGG will do — this is prime territory for silliness).
Once you have a sound in place, we can create the struct we used earlier ProjectileSound that’ll store the Resource reference to our sound asset.
// Sounds
#[derive(Resource)]
struct ProjectileSound(Handle<AudioSource>);
We need to load the sound, and since this sound will be used all the time, we can load it during the startup system. We use the insert_resource() method on the Commands property to add our sound file to Bevy’s list of active resources. This let’s us query it like we did using the Res<ProjectileSound> earlier.
fn setup_game(
    mut commands: Commands,
    mut meshes: ResMut<Assets<Mesh>>,
    mut materials: ResMut<Assets<CustomMaterial>>,
    asset_server: Res<AssetServer>,
) {
    // Camera
    commands.spawn(Camera2dBundle::default());

    // ⭐ Load sound effects
    let projectile_sound = asset_server.load("sounds/projectile.mp3");
    commands.insert_resource(ProjectileSound(projectile_sound));
You’ll notice one problem though when you run the game. No sound! If you look at the Bevy logs when the game starts you’ll see an error about the asset server missing a mp3 module. This means we need to enable the mp3 feature for Bevy in the cargo.toml file. You can see a list of all Bevy features you can optionally enable on Github.
Open up the cargo.toml and you can add the feature like so, or run cargo install bevy --features mp3:
[dependencies]
bevy = { version = "0.9.1", features = ["mp3"]}
Now you should be able to re-compile the app using cargo run and hear sound.
What’s next?
There’s a lot you could add, that’s the beauty of a game! From a start screen, to a score, to random enemies, animations for enemies entering — the list goes on and on (as most game devs will know).
In the next blog I’ll show you how to add UI, a start screen, an intro sequence, and enemy spawning to the game.
I hope this inspires you to make some games with Bevy and shows how simple Bevy makes the process.
As always, if you have any questions or want to share your own game dev work, feel free to share with me on Mastodon or Twitter.
Stay curious, Ryo