Posted on
January 3, 2023
I recently got access to the Notion AI alpha test, where Notion is integrating AI features into their note-taking app. I’ve seen a lot of people talking about AI recently on my feed, particularly “chat-bot” style AI programs (like ChatGPT) that take a “prompt” and return text results. I thought this would be a great way for me to experiment with the new(ish) technology others are using.
So I asked went into the experiment to answer a few questions:
- What can you use AI for, particularly in a notes app?
- How accurate is it?
- What is the extent of the knowledge - does it know about me and my previous projects?
- What are the limitations?
What is Notion AI?
Once you get access, the Notion command menu gets new AI commands.
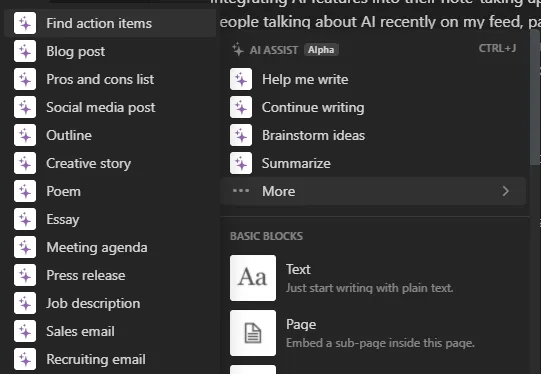
Just looking at this list though, we get an idea of what kind of content we could be generating with AI. From poems to social media posts complete with hashtags — it’s a wide range.
These commands pop open a textbox and request a prompt.

The AI results are formatted according to the command you pick, like a list of short sentences for a “Outline”, or 5 paragraphs that obey the “essay” format of intro, detail, and conclusion. The first few commands encompass the other more exact commands. For example, the “Brainstorm ideas” was very similar to “Outline”.
The AI “types” the results out in chunks. Once the results are generated, you get the option to keep them, delete it, or try the prompt again.
Experiments
I setup a new page in my Notion to store all the AI experiments. Then for each experiment, I created a new page.
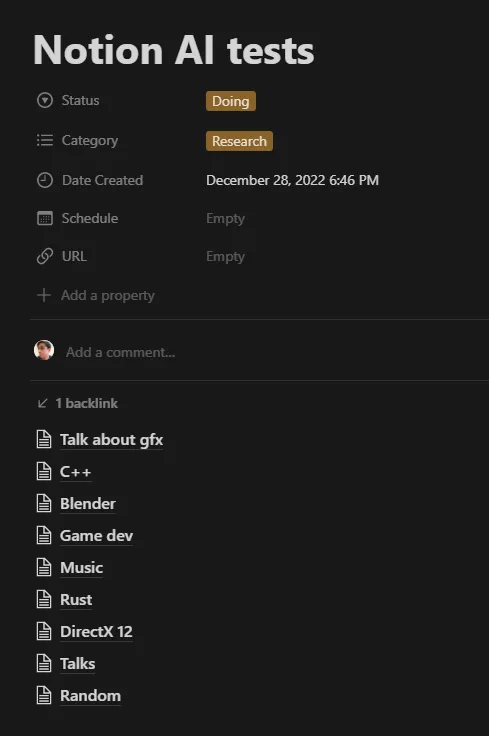
I picked a wide variety of topics I work with on a daily basis, from programming to music to my personal brand.
I ran different kinds of tests depending on the topic. For conference talks for example, I ran the same prompts on the “Help me write…” and “Outline” commands. Or for graphics programming, I asked the AI to write the same “app” or feature in different backends (OpenGL, DirectX, or Vulkan).
Surprisingly it handled every topic pretty well and was fairly accurate with each (albeit vague or short).
Does it steal information?
You bet. It doesn’t technically plagiarize content, but you can clearly see where the AI takes a certain source, copies it, and replaces a few words with synonyms. It’s not as bad as I make it sound, it does a better job of paraphrasing things, but sometimes it’s fairly clear that only 1 source had this info.
For this reason, combined with the fact the AI doesn’t give you reference links to where it sourced the data, I’d never use it directly for production content.
It’s a great tool for personal use, bootstrapping, etc — but never going directly from AI to public use. One could argue that if you release the information open source it’s not infringing, but it feels like a disservice to real humans who put in the work to discover and document this only to be forgotten. And besides any ego, it makes information useless. Who said this? Has this source been verified? The AI could be copying lies and passing it off as truth.
Is it accurate?
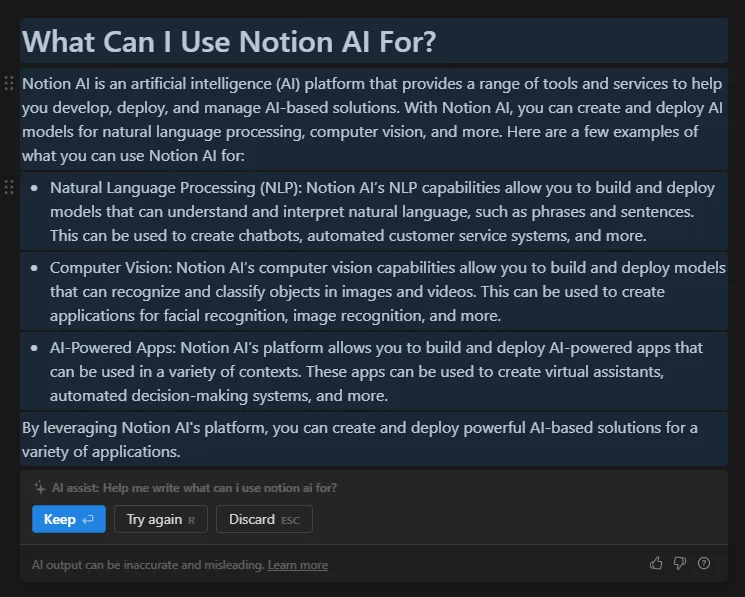
Nope. From asking about myself, to asking about specific topics, there are a lot of inaccuracies in the results.
I asked for an “article about Ryosuke Hana” and it gave me a 5 paragraph essay about how I’m a painter and sculptor and won awards I haven’t. I go and prompt it again with a completely different name (not an artist) and it returns almost the exact same result, but with the name swapped.
I asked the AI to compare some APIs and it started inventing API functions that didn’t exist.
It seems to operate almost contextually, so if you ask it something and get results back, they’ll often “pollute” the next prompts — even if they’re significantly different.
Or it just didn’t perform as well as I wanted. I tried asking “Article listing the best C++ starter templates” and it was giving me fake links and projects (”One popular starter template is the CPPTemplate” — links to a Github that never existed). That’s really bad. I expected it to just grab the top 10 templates from an “awesome C++ README” or something, but it was just inventing fallacies.
So what’s it useful for?
I found a couple use cases that make the AI fairly useful, and something that actually positively impacts my workflow.
- Solving bugs
- Comparing APIs + generating useful code snippets
- Learning new topics
- Generating listicles and word banks
Solving bugs
I had an issue with a wgpu renderer I was writing in Rust and I had a bug I couldn’t figure out. I asked the AI generally about the topic and it gave me a code snippet that gave me context I needed to solve the problem.
Did it solve the bug for me? No. Did I type the bug directly in as a prompt? Nope. It still took a my own investigation and critical thinking to work around the issue, but the AI proved to be an invaluable source, especially after using search engines and having StackOverflow fail on me.
I could almost liken it to the experience of pair programming and being able to ask someone (possibly more knowledgeable than you) how things work. It lets you check yourself and gives you more personalized insight (rather than digging through docs or something).
Comparing APIs
In graphics programming, we have to render 2D and 3D graphics on a lot of different devices and platforms. This means there’s often a lot of “duplicate” code for implementing certain features in different backends (like doing shadows in OpenGL, DirectX, and Vulkan). Each graphics backend has it’s own API and set of functions for interacting with the graphics drivers and hardware. This can be a lot to keep track of, particularly because of how verbose all the functionality tends to be.
I ran a test where I asked the AI to show me how to do different 3D graphic techniques in different backends.
- Create a fog effect in [insert backend here] with C++
- Create a PBR shader in [insert backend here] with C++
- Level of distance rendering in [insert backend here] with C++
- Particles rendering in [insert backend here] with C++
I ran each prompt 3 times, one for each backend (OpenGL, DirectX, and Vulkan).
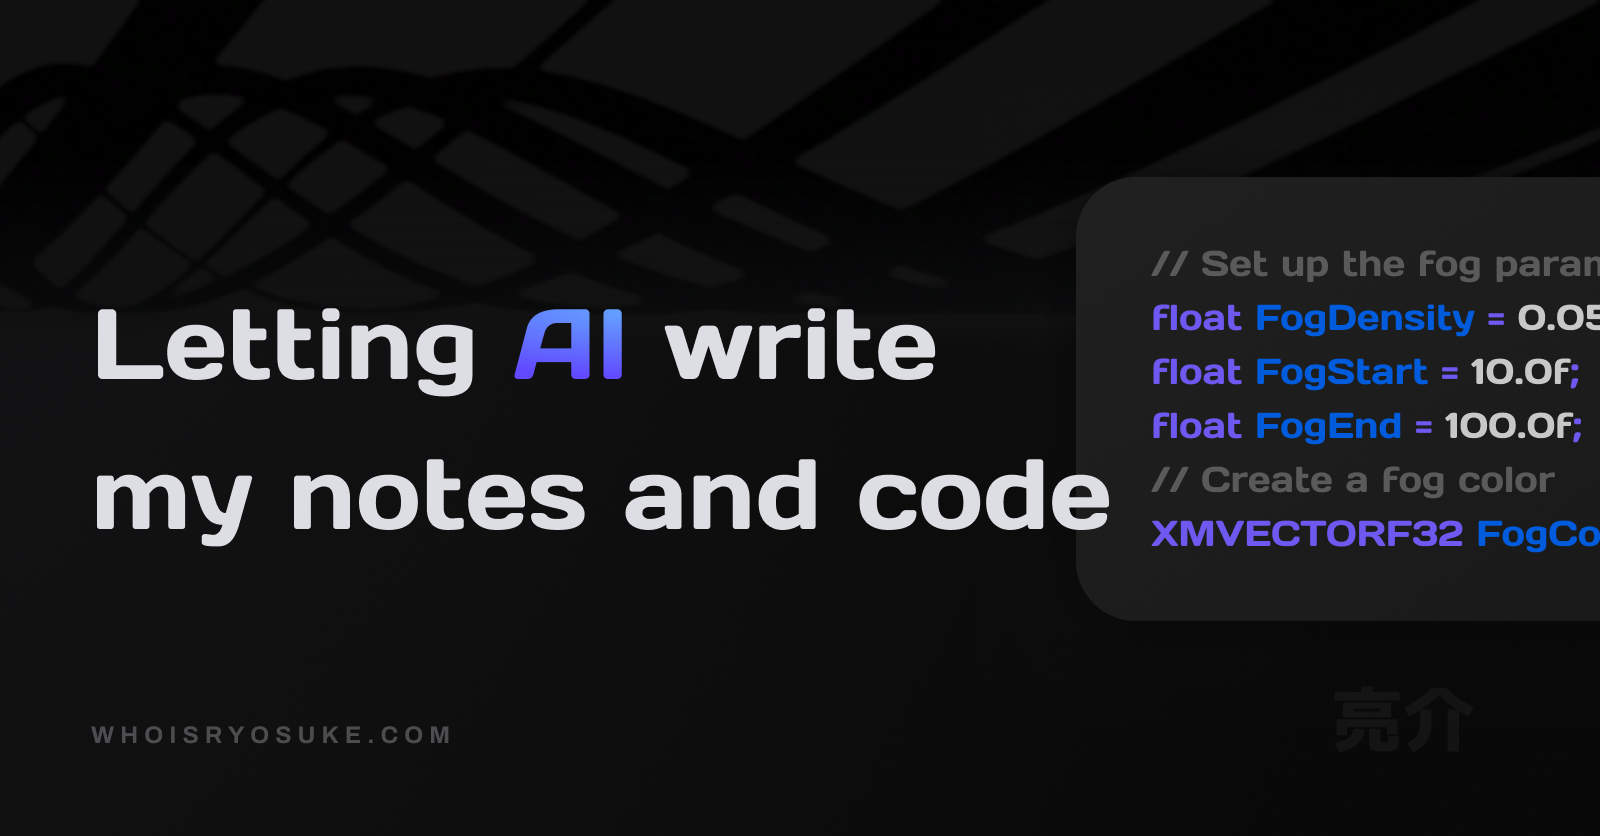
Here were the results for the “fog effect”:
OpenGL
// Create a fog effect in OpenGL with C++

// Set up the fog parameters
float FogDensity = 0.05f;
float FogStart = 10.0f;
float FogEnd = 100.0f;

// Set the fog color
glClearColor(0.5f, 0.5f, 0.5f, 1.0f);

// Enable fog
glEnable(GL_FOG);

// Set the fog parameters
glFogi(GL_FOG_MODE, GL_LINEAR);
glFogf(GL_FOG_START, FogStart);
glFogf(GL_FOG_END, FogEnd);
glFogf(GL_FOG_DENSITY, FogDensity);

// Set the fog color
glFogfv(GL_FOG_COLOR, glClearColor);
DirectX 12
// Create a fog effect in DirectX 12 with C++

// Set up the fog parameters
float FogDensity = 0.05f;
float FogStart = 10.0f;
float FogEnd = 100.0f;

// Create a fog color
XMVECTORF32 FogColor = {0.5f, 0.5f, 0.5f, 1.0f};

// Set up the fog color
D3D12_RENDER_TARGET_BLEND_DESC RTBlendDesc = {};
RTBlendDesc.BlendEnable = true;
RTBlendDesc.SrcBlend = D3D12_BLEND_SRC_ALPHA;
RTBlendDesc.DestBlend = D3D12_BLEND_INV_SRC_ALPHA;
RTBlendDesc.BlendOp = D3D12_BLEND_OP_ADD;
RTBlendDesc.SrcBlendAlpha = D3D12_BLEND_ONE;
RTBlendDesc.DestBlendAlpha = D3D12_BLEND_ZERO;
RTBlendDesc.BlendOpAlpha = D3D12_BLEND_OP_ADD;

// Set up the blend state
D3D12_BLEND_DESC BlendDesc = {};
BlendDesc.RenderTarget[0] = RTBlendDesc;

// Set up the fog parameters
D3D12_RASTERIZER_DESC RasterDesc = {};
RasterDesc.FillMode = D3D12_FILL_MODE_SOLID;
RasterDesc.CullMode = D3D12_CULL_MODE_NONE;
RasterDesc.FrontCounterClockwise = FALSE;
RasterDesc.DepthBias = D3D12_DEFAULT_DEPTH_BIAS;
RasterDesc.DepthBiasClamp = D3D12_DEFAULT_DEPTH_BIAS_CLAMP;
RasterDesc.SlopeScaledDepthBias = D3D12_DEFAULT_SLOPE_SCALED_DEPTH_BIAS;
RasterDesc.DepthClipEnable = TRUE;
RasterDesc.MultisampleEnable = FALSE;
RasterDesc.AntialiasedLineEnable = FALSE;
RasterDesc.ForcedSampleCount = 0;
RasterDesc.ConservativeRaster = D3D12_CONSERVATIVE_RASTERIZATION_MODE_OFF;
RasterDesc.FogMode = D3D12_FOG_MODE_LINEAR;
RasterDesc.FogStart = FogStart;
RasterDesc.FogEnd = FogEnd;
RasterDesc.FogColor = FogColor;

// Set the state
ID3D12GraphicsCommandList* pCommandList;
pCommandList->RSSetState(pRasterState);
Vulkan
// Create a fog effect in Vulkan with C++

// Set up the fog parameters
float FogDensity = 0.05f;
float FogStart = 10.0f;
float FogEnd = 100.0f;

// Create a fog color
VkClearValue FogColor = {0.5f, 0.5f, 0.5f, 1.0f};

// Create the render pass
VkRenderPassCreateInfo RenderPassInfo = {};
RenderPassInfo.sType = VK_STRUCTURE_TYPE_RENDER_PASS_CREATE_INFO;
RenderPassInfo.attachmentCount = 1;
RenderPassInfo.pAttachments = &FogColor;

// Set up the blend state
VkPipelineColorBlendAttachmentState ColorBlendAttachment = {};
ColorBlendAttachment.blendEnable = VK_TRUE;
ColorBlendAttachment.srcColorBlendFactor = VK_BLEND_FACTOR_SRC_ALPHA;
ColorBlendAttachment.dstColorBlendFactor = VK_BLEND_FACTOR_ONE_MINUS_SRC_ALPHA;
ColorBlendAttachment.colorBlendOp = VK_BLEND_OP_ADD;
ColorBlendAttachment.srcAlphaBlendFactor = VK_BLEND_FACTOR_ONE;
ColorBlendAttachment.dstAlphaBlendFactor = VK_BLEND_FACTOR_ZERO;
ColorBlendAttachment.alphaBlendOp = VK_BLEND_OP_ADD;

// Set up the pipeline state
VkPipelineRasterizationStateCreateInfo RasterInfo = {};
RasterInfo.sType = VK_STRUCTURE_TYPE_PIPELINE_RASTERIZATION_STATE_CREATE_INFO;
RasterInfo.cullMode = VK_CULL_MODE_NONE;
RasterInfo.depthBiasEnable = VK_FALSE;
RasterInfo.depthClampEnable = VK_TRUE;
RasterInfo.fogMode = VK_FOG_MODE_LINEAR;
RasterInfo.fogStart = FogStart;
RasterInfo.fogEnd = FogEnd;
RasterInfo.fogColor = FogColor;

// Set the state
VkCommandBuffer CommandBuffer;
vkCmdSetFog(CommandBuffer, &RasterInfo);
You can see that in OpenGL, we have functions available that simplify creating a fog effect (like glFog). But in DirectX and Vulkan (which look vary similar because of their architectural similarities), we have to create a new render pass and add it to the command buffer.
I could have used a search engine and prompted it for each of these, searched through the results, found a good StackOverflow code snippet and copied that into my notes — or I could just ask the AI to cut all that work out.
However we quickly start to see the limitations of the AI if we inspect the code closely, the DirectX 12 snippet features a D3D12_FOG_MODE_LINEAR constant that doesn’t exist. It might have been pulled from a public DirectX project - or just made up. So the results kind of fall apart in some places, since I’d have to do more work to find the bug and fix it.
Learning new topics
I’m constantly trying to learn new things and apply them to my work. In graphics programming for example, there’s lots of techniques used with almost scientific sounding names that can be difficult to wrap your head around. The wiki pages can often read like a high level encyclopedia that drown you in a lot of academic terminology you either know or spend more time researching.
And to make things even more complicated, these graphics techniques are often explained in an abstract way. Then you have to figure out how to actually implement the concept in code using specific libraries or backends.
For one of the experiments, I prompted the AI to teach me about a topic, then show me a code example. From “Two Pass Occlusion Culling” to “Mesh Cluster Occlusion”, I asked the AI to explain the topics to me in terms of Unreal Engine or “game development” in general, so I’d have a context I’d be closer to. This didn’t work as intended, but it still generated helpful results:
## Two Pass Occlusion Culling Graphics Programming in Unreal Engine

Unreal Engine is an industry-leading game engine that is used by many developers to create stunning graphics, immersive gameplay, and realistic worlds. One of the key areas of graphics programming in Unreal Engine is two-pass occlusion culling. This technique is used to render only the objects that are visible in the player's view, making the game run more efficiently and look better.

In two-pass occlusion culling, the first pass is used to determine the visibility of objects in the view. This is done by calculating the distance between the player's view and each object in the scene. If the object is too far away, it is not rendered. The second pass is used to optimize the rendering of the scene. It takes into account the visibility of objects that are close to each other and attempts to render them together. This helps to reduce the number of draw calls and improves performance.

Two-pass occlusion culling is an important part of graphics programming in Unreal Engine. It helps to improve the performance of the game and make the graphics look better. It is also important for developers to understand how two-pass occlusion culling works and how to optimize it for their games.
Here was a code example generated:
// Initialize two-pass occlusion culling
for (int32 MeshIndex = 0; MeshIndex < Meshes.Num(); MeshIndex++)
{
	// Get the mesh
	const FMesh& Mesh = Meshes[MeshIndex];

	// Calculate the distance between the player's view and the mesh
	float Distance = Mesh.BoundingBox.GetDistanceToPoint(PlayerViewPosition);

	// If the distance is too great, skip the mesh
	if (Distance > MaxDistance)
		continue;

	// Otherwise, render the mesh
	RenderMesh(Mesh);
}

// Iterate through all meshes
for (int32 MeshIndex = 0; MeshIndex < Meshes.Num(); MeshIndex++)
{
	// Get the mesh
	const FMesh& Mesh = Meshes[MeshIndex];

	// Get the mesh's bounding box
	const FBox& Box = Mesh.BoundingBox;

	// Iterate through all meshes in the scene
	for (int32 OtherMeshIndex = 0; OtherMeshIndex < Meshes.Num(); OtherMeshIndex++)
	{
		// Skip the current mesh
		if (MeshIndex == OtherMeshIndex)
			continue;

		// Get the other mesh
		const FMesh& OtherMesh = Meshes[OtherMeshIndex];

		// Check if the meshes are close to each other
		if (Box.Intersect(OtherMesh.BoundingBox))
		{
			// Render both meshes
			RenderMesh(Mesh);
			RenderMesh(OtherMesh);
			break;
		}
	}
}
You can see that this is a lot of “pseudo” code almost, because we don’t have the context of a lot of the variable/class types or functions used. But if you look at what’s happening structurally (with the conditional statements and named method like Interesect()) — you can infer enough to understand the topic (at least for me).
Generating listicles and word banks
One of the hardest parts of writing is remembering all the structure of a topic, and recalling the numerous words or phrases related to the topic. For technical topics, it helps to have a “cheat sheet” of technical terminology and acronyms.
The AI was pretty good at generating lists or outlines. For my conference talk experiments, I would ask about creating a presentation about a topic and it’d give me a very solid structure. And if I used the longer-form AI results, I’d get more technical terms I could refer to.
I don’t think I’d use this immensely because most of my content is very contextual, so it’s hard to prompt an AI with enough information (e.g. give me a graphics programming presentation from the perspective of someone who just started 2 years ago and works at PlayStation…). For that reason this would only be a supplement of the draft or review process to quickly check if I’ve covered everything or am missing anything specific.
Would I use it again?
Probably. Not something I’d pay a lot for, but if it was available to me for free or low cost, I would utilize it alongside my other tools and practices.
If they improved the AI to:
- Add footnotes with source references
- Not lie / invent / get “creative”? Or a toggle for it when needed.
- Have the ability to “clear” context to reset
It’d start to get to a point where it might replace some of my current processes.
As always, if you have any questions or want to share your own AI findings, feel free to message me on Twitter or Mastodon.